Authenticating from Active Directory using RADIUS/NPS
https://docs.netgate.com/pfsense/en/latest/recipes/radius-windows.html
Windows Servers can be configured as a RADIUS server using the Microsoft Network Policy Server (NPS). This allows a Windows Server to handle authentication for OpenVPN, Captive Portal, the PPPoE server, or even the firewall GUI itself. NPS can authenticate based on Windows Server local user accounts or Active Directory.
Note
While support for NPS has been present since Windows Server 2008, this document focuses on current versions of Windows Server software.
The options may vary slightly depending on the version of Windows Server software.
Choosing a server for NPS
NPS requires a minimal amount of resources and is suitable for addition to an existing Windows Server in most environments. Microsoft recommends installing it on an Active Directory domain controller to improve performance in environments where NPS is authenticating against Active Directory.
Tip
NPS can also be installed on a member server, which may be desirable in some environments to reduce the attack footprint of domain controllers. Each network-accessible service provides another potential avenue for compromising a server. NPS has a solid security record, especially compared to other services that must be running on domain controllers for Active Directory to function, so this isn’t much of a concern in most network environments.
Most environments install NPS on one of their domain controllers. Microsoft recommends running it on each domain controller in the forest and using NPS proxies to share the load for a busy environment.
Installing NPS
-
Open the Server Manager Dashboard
-
Click Add Roles and Features
This may be on the main screen or under the Manage menu.
-
Click Next until the wizard displays the server selection screen
-
Select this server from the list
-
Click Next again
-
Check Network Policy and Access Services on the list of roles
-
Click Add Features if it appears
-
Click Next on each screen until the end of the wizard
-
Click Finish or Install, depending on the windows server version
-
Click Close once the installation completes
Configuring NPS
To configure NPS, bring up the Server Manager and select the new role. The name varies on different versions of Windows Server but may be NPAS (2022), NAP (2012), Network Policy and Access Services, or a similar name.
First configure a RADIUS client for the firewall, then setup remote access policies.
Adding a RADIUS Client
-
Open the Server Manager dashboard
-
Click NPAS or its equivalent name (NAP, etc)
-
Right click on this server in the server list
-
Click Network Policy Server
-
Expand RADIUS Clients and Server
-
Click RADIUS Clients
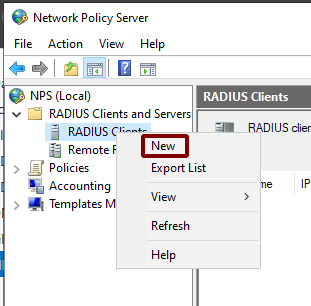
Add New RADIUS Client
Add the new RADIUS client:
-
Right click on RADIUS Clients
-
Click New, as shown in Figure Add New RADIUS Client
-
Enter a Friendly name for the firewall, as shown in Figure Add New RADIUS Client Address.
This can be the hostname or an FQDN.
-
Enter the Address (IP or DNS) for the firewall.
This must be the IP address from which the firewall will initiate RADIUS requests or an FQDN which resolves to that IP address.
Note
This is the IP address of the firewall interface closest to the RADIUS server. If the RADIUS server is reachable via the firewall LAN interface, this will be the LAN IP address of the firewall. In deployments where the firewall is not the perimeter firewall, and the WAN interface resides on the internal network where the RADIUS server resides, the WAN IP address would be the correct address.

Add New RADIUS Client Address
-
Enter a Shared secret, as shown in Figure Add New RADIUS Client Shared Secret.
This shared secret is used by the firewall to authenticate itself when making RADIUS access requests.
Windows can automatically create a shared secret using the Generate option.
-
Click OK.
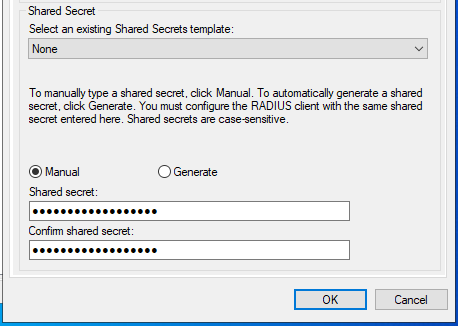
Add New RADIUS Client Shared Secret
The NPS configuration for the RADIUS client is now complete. The RADIUS Client is visible as in Figure Listing of the RADIUS Client.

Listing of the RADIUS Client
Refer to other sections in this documentation describing the service to be used with RADIUS for more guidance on how to utilize the service. The User Manager can use NPS as an authentication server which also enables RADIUS for IPsec, OpenVPN, and Captive Portal. Other services such as the PPPoE server can use it directly as well.
Configuring Users and Network Policies
Network Policies control whether or not a user can authenticate via RADIUS. Using Network Policies, an administrator can place a user in a specific Active Directory group to allow VPN access and also offer more advanced capabilities such as time of day restrictions.
More information on remote access policies can be found in Microsoft’s documentation at http://technet.microsoft.com/en-us/library/cc785236%28WS.10%29.aspx.
Adding a Network Policy
-
Open the Server Manager dashboard
-
Click NPAS or its equivalent name (NAP, etc)
-
Right click on this server in the server list
-
Click Network Policy Server
-
Expand NPS (Local), Policies, then Network Policies
-
Right click on Network Policies
-
Click New
-
Enter
Allow from Firewallin the Policy name -
Leave the Type of network access server set to Unspecified
-
Click Next
-
Click Add in the Specify Conditions window
-
Select Windows Groups
-
Click Add
-
Enter or select the name of the user group which contains VPN users, e.g.
VPNUsers -
Click OK
-
Click Next
-
Choose Access granted
-
Click Next
-
Add EAP Types / Authentication Methods as needed:
-
Leave existing authentication methods selected
-
Add or Select Microsoft: Secured Password (EAP-MSCHAP v2) if the firewall will use this policy for IPsec IKEv2 EAP-RADIUS authentication
-
Select Encrypted Authentication (CHAP)
-
Select Unencrypted Authentication (PAP, SPAP)
-
-
Click Next
-
Click No or Decline if the wizard prompts to view a help topic about security
-
Configure any additional access constraints, if necessary
-
Click Next on the remaining screens until the final screen is reached
-
Click Finish
Editing an Existing Network Policy
Existing policies can be altered to change their constraints or other properties. For example, to edit an older policy to enable it for use by IPsec for IKEv2 EAP-RADIUS:
-
Open the Server Manager dashboard
-
Click NPAS or its equivalent name (NAP, etc)
-
Right click on this server in the server list
-
Click Network Policy Server
-
Expand NPS (Local), Policies, then Network Policies
-
Edit the policy currently in use (e.g. right click, click Properties)
-
Click the Constraints tab
-
Click Authentication Methods
-
Click Add
-
Select Microsoft: Secured Password (EAP-MSCHAP v2)
-
Click OK
-
Click Apply to restart NPS
-
Click OK
Check Users and Groups
These steps are only necessary if the use case for this setup requires group authentication on the firewall.
Before proceeding, ensure any users who must authenticate using NPS are members of the correct groups (e.g. VPNUsers).
Create a matching group with a remote scope on the firewall (Manage Local Groups).
Edit the NPS policy on the Windows server so it returns the group name:
-
Open the Server Manager dashboard
-
Click NPAS or its equivalent name (NAP, etc)
-
Right click on this server in the server list
-
Click Network Policy Server
-
Expand NPS (Local), Policies, then Network Policies
-
Edit the policy currently in use (e.g. right click, click Properties)
-
Click the Settings tab
-
Click Standard under RADIUS Attributes
-
Select Class from the list
-
Click Add
-
Select String for the attribute value type
-
Enter a group name which matches a group on the firewall (e.g.
VPNUsers) -
Click OK
-
Click Close
-
Click Apply to restart NPS
-
Click OK
Add Authentication Server
Now that NPS is ready to accept authentication requests, the next step is to add an authentication server entry on the firewall.
See also
-
Open the firewall GUI
-
Navigate to System > User Manager, Authentication Servers tab
-
Click
 Add to create a new entry
 -
Enter the following settings:
- Descriptive name
-
Active Directory NPS - Type
-
RADIUS
- Hostname or IP address
-
198.51.100.30– Replace this with the IP address of the Windows server - Shared Secret
-
The password added to the NAS entry in NPS
- Services offered
-
Authentication
- Authentication port
-
1812
-
Click Save
Test Authentication
On the firewall GUI, test the authentication:
If that test succeeded, then configure other services such as IPsec or OpenVPN to use the new RADIUS server and attempt authentication there.
Troubleshooting NPS
This section describes the most common problems users encounter with NPS.
Verify port
First ensure NPS is using the default port 1812. If the NPS server was already installed, it may have be using a non-standard port.
-
Open the Server Manager dashboard
-
Click NPAS or its equivalent name (NAP, etc)
-
Right click on this server in the server list
-
Click Network Policy Server
-
Right click on NPS (Local) at the top left of the console
-
Click Properties
-
Click the Ports tab
-
Verify that the Authentication port set includes port
1812NPS can use multiple ports separated with commas, as shown in figure NPS Ports.
-
Verify the Accounting port set includes port
1813(optional)This is only necessary if the use case requires RADIUS accounting.
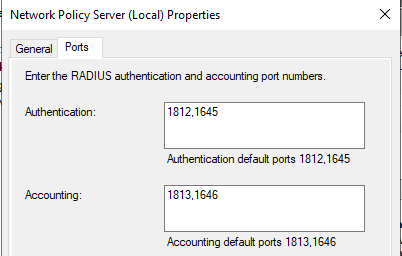
NPS Ports
Check Event Viewer
When NPS handles a RADIUS authentication request it creates a log entry in the Security log in Event Viewer with the result of the authentication request. If it denies access, it logs the reason in the event log.
These log entries can be viewed in one of two ways:
View the Security log. This method is easier to identify success vs failure but on a busy server it may be difficult to isolate entries specific to NPS.
-
Open Event Viewer on the Windows Server
-
Expand Windows Logs
-
Click Security
-
Look for entries in the log which reference NPS
Use the custom view which only displays NPS log entries:
-
Open Event Viewer on the Windows Server
-
Expand Custom Views
-
Expand Server Roles
-
Click Network Policy and Access Services
Similar messages are available in both locations thought their format may vary slightly.
The contents of the log message contain a Reason: line which explains why authentication failed. The common two failures are:
-
“Authentication failed due to a user credentials mismatch”
This indicates that the user supplied an invalid username or password.
-
“The Network Access Permission setting in the dial-in properties of the user account in Active Directory is set to Deny access to the user.”
Indicates that the user account is set to deny access or the network policies in NPS do not allow access for that user. For example, they may not be a member of the correct group.
If NPS is logging that authentication was successful, but the client is receiving a bad username or password message, ensure that the RADIUS secret configured in NPS and on the firewall match.
No Comments