TrueNAS
- Disk smartctl data
- Disks & ZFS
- CLEAR CHECKSUM ERROR IN FREENAS/TRUENAS
- Hard Drive Burn in Testing
- Replacing a Drive Prior to Failure
- Replacing Failed Disks
- Resolving Problems With ZFS
- ZFS commands and status
- ZFS metadata corruption
- TrueNAS Server
Disk smartctl data
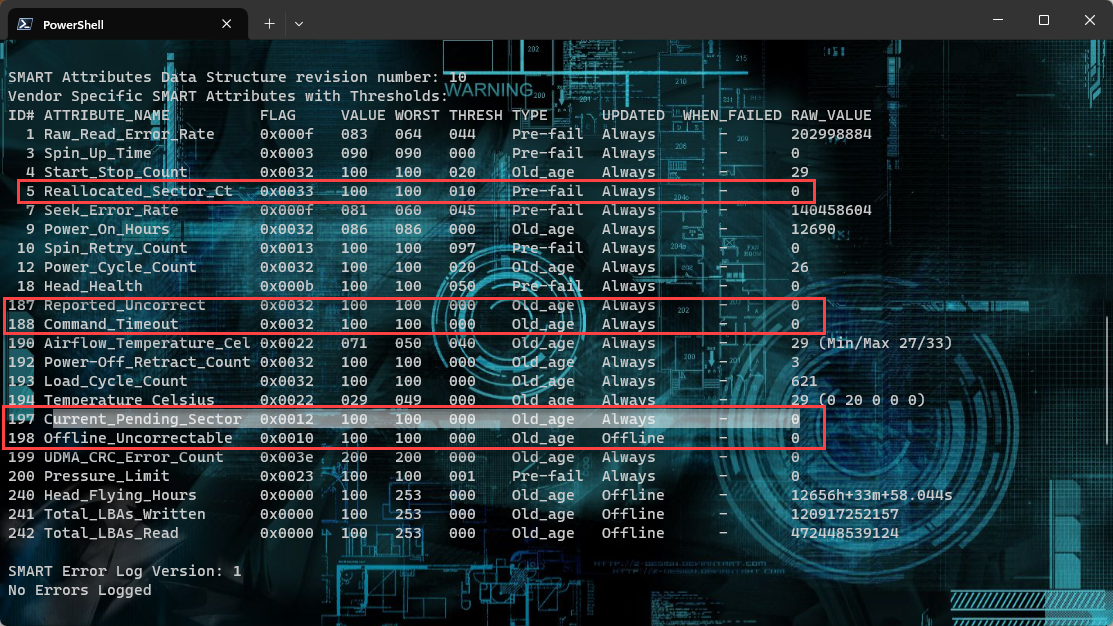
The five most important factor to look for in a drive health are
- option 5 Reallocated_Sector_CT
- option 187 Reported_Uncorrect
- option 188 Command_Timeout
- option 197 Current_Pending_Sector
- option 198 Offline_Uncorrectable
Disks & ZFS
This is information related to the usage of Disks and ZFS
CLEAR CHECKSUM ERROR IN FREENAS/TRUENAS
https://blog.bianxi.com/2021/10/02/clear-checksum-error-in-freenas-truenas/
Identify error
Errors can be found in TrueNAS Storage section in web page, or use shell in web page, run zpool status -x command.
Sample error can be fond in following screen. There are two pools got error. The pool0 got two hard disks, first one got 154 checksum errors, second one got one data error.
  pool: pool0
 state: ONLINE
status: One or more devices has experienced an unrecoverable error.  An
    attempt was made to correct the error.  Applications are unaffected.
action: Determine if the device needs to be replaced, and clear the errors
    using 'zpool clear' or replace the device with 'zpool replace'.
   see: https://openzfs.github.io/openzfs-docs/msg/ZFS-8000-9P
  scan: scrub repaired 0B in 00:00:02 with 0 errors on Sat Oct  2 17:39:46 2021
config:

    NAME                                            STATE     READ WRITE CKSUM
    pool0                                           ONLINE       0     0     0
      mirror-0                                      ONLINE       0     0     0
        gptid/bf410fcf-2209-11ec-b8aa-001132dbfc9c  ONLINE       0     0   154
        gptid/bfcc498a-2209-11ec-b8aa-001132dbfc9c  ONLINE       0     0     0

errors: No known data errors

  pool: pool01
 state: ONLINE
status: One or more devices has experienced an error resulting in data
    corruption.  Applications may be affected.
action: Restore the file in question if possible.  Otherwise restore the
    entire pool from backup.
   see: https://openzfs.github.io/openzfs-docs/msg/ZFS-8000-8A
config:

    NAME                                          STATE     READ WRITE CKSUM
    pool01                                        ONLINE       0     0     0
      gptid/75827da1-207a-11ec-afcf-005056a390b2  ONLINE       0     0     1
errors: List of errors unavailable: permission denied

errors: 1 data errors, use '-v' for a list
For second error, impacted file can be found using zpool status -v command
root@truenas[~]# zpool status -v pool01
  pool: pool01
 state: ONLINE
status: One or more devices has experienced an error resulting in data
        corruption.  Applications may be affected.
action: Restore the file in question if possible.  Otherwise restore the
        entire pool from backup.
   see: https://openzfs.github.io/openzfs-docs/msg/ZFS-8000-8A
  scan: scrub repaired 0B in 00:23:22 with 1 errors on Sat Oct  2 21:53:02 2021
config:

        NAME                                          STATE     READ WRITE CKSUM
        pool01                                        ONLINE       0     0     0
          gptid/75827da1-207a-11ec-afcf-005056a390b2  ONLINE       0     0     1

errors: Permanent errors have been detected in the following files:

        /mnt/pool01/download/file.1
root@truenas[~]#
Clear error
Run following command to clear the error
zpool clear <pool_name>For the pool has data error, which has any file impacted. Delete or overwrite the file.
Then scrub the pool
zpool scrub <pool_name>Replace disk
To replace disk, run following command, c0t0d2 is a new disk to replace c0t0d0
zpool replace c0t0d0 c0t0d2If the disk replaced at same location, then run following command
zpool replace c0t0d0Hard Drive Burn in Testing
https://www.truenas.com/community/resources/hard-drive-burn-in-testing.92/
TESTING FOR HIGH CAPACITY DRIVES WILL TAKE A LONG TIME. EXPECT 12 HOURS OR SO PER TB OF CAPACITY
First of all, the S.M.A.R.T. tests. The first thing that someone unfamiliar with S.M.A.R.T. tests might find strange is the fact that no results are shown when you run the test. The way these tests work is that you initiate the test, it goes off and does its thing, then it records the results for you to check later. So, if this is an initial burn-in test for your entire system, you can initiate tests on all of the drives simultaneously by simply issuing the test command for each drive one after another.
The first test to run is a short self-test:
smartctl -t short /dev/adaX
It should indicate that the test will take about 5 minutes. You can immediately begin the same test on the next drive, but you can only run one test on each drive at a time. Once it has completed, run a conveyance test:
smartctl -t conveyance /dev/adaX
Again, wait for the test to complete (about 2 minutes this time). Finally, a long test:
smartctl -t long /dev/adaX
------
Note added by @wblock 2018-01-10: this section recommended enabling the kern.geom.debugflags sysctl. Many people still think it has something to do with allowing raw writes. It does not. Instead, it disables a safety system that is intended to prevent writes to disks that are in use (say, by having a mounted filesystem). From man 4 geom:
To summarize, this option should generally not be needed. It only makes it possible to harm data. Any disk you are going to overwrite with data should not be mounted or have anything you wish to keep. In fact, best practice is to not be erasing or stress-testing drives on a system that has actual data on it. Since those disks will not have mounted filesystems, this sysctl will not affect being able to write to them. In fact, it will only make it possible to blow away things that are in use.
------
This carries some inherent risk, and should probably not be done on a production system. This does not survive through a reboot, so when you're done, just reboot the machine to disable it:
sysctl kern.geom.debugflags=0x10
Now that we can execute raw I/O, run a badblocks r/w test.
tmux
You should now see a green stripe at the bottom of the screen. Now, we can run badblocks. THIS TEST WILL DESTROY ANY DATA ON THE DISK SO ONLY RUN THIS ON A NEW DISK WITHOUT DATA ON IT OR BACK UP ANY DATA FIRST:
badblocks -ws /dev/adaX
badblocks also offers a non-destructive read-write test that (in theory) shouldn't damage any existing data, but if you do choose to run it on a production drive and suffer data loss, on your own head be it:
badblocks -ns /dev/adaX
It has been brought to my attention that badblocks has some limitations with larger drives >2TB. The easy workaround is to manually specify a larger block size for the test.
badblocks -b 4096 -ws /dev/adaX
or
badblocks -b 4096 -ns /dev/adaX
Once you've started the first test, press Ctrl+B, then " (the double-quote key, not the single quote twice). You should now see a half-white, half-green line through the screen (in PuTTY, it's q's instead of a line, but same thing) with the test continuing in the top half of the screen and a new shell prompt in the bottom. Run the badblocks command again on the next disk, then press Ctrl+B, " again to create another shell. Continue until you've started a test on each disk. If you are connecting over SSH and your session gets disconnected, all of the tests will continue running. When you reconnect, to resume the session and view the test status, simply type:
tmux attach
As with the S.M.A.R.T. tests, you can only run one test at a time per drive, but you can test all of your drives simultaneously. In my experience, the tests run just as fast with all drives testing as with a single drive, so for your initial burn-in, there's really no reason not to test all of the drives at once. Also, be prepared for this test to take a very long time, as it is basically the "meat and potatoes" of your burn-in process. For reference, the default 4-pass r/w test took a little over 24 hours on my WD Red 2TB drives, YMMV.
Because S.M.A.R.T. tests only passively detect errors after you've actually attempted to read or write a bad sector, you should run the S.M.A.R.T. long test again after badblocks completes:
smartctl -t long /dev/adaX
At this point, you have fully tested all of your drives, and now it's time to view the results of the various S.M.A.R.T. tests:
smartctl -A /dev/adaX
This should produce something like this (sorry for the formatting fail):
[root@freenas] ~# smartctl -A /dev/ada0
smartctl 6.2 2013-07-26 r3841 [FreeBSD 9.2-RELEASE-p4 amd64] (local build)
Copyright (C) 2002-13, Bruce Allen, Christian Franke, www.smartmontools.org

=== START OF READ SMART DATA SECTION ===
SMART Attributes Data Structure revision number: 16
Vendor Specific SMART Attributes with Thresholds:
ID# ATTRIBUTE_NAME		  FLAG	VALUE WORST THRESH TYPE	  UPDATED  WHEN_FAILED RAW_VALUE
  1 Raw_Read_Error_Rate	0x002f  200  200  051	Pre-fail  Always	  -	  0
  3 Spin_Up_Time			0x0027  175  174  021	Pre-fail  Always	  -	  4208
  4 Start_Stop_Count		0x0032  100  100  000	Old_age  Always	  -	  9
  5 Reallocated_Sector_Ct  0x0033  200  200  140	Pre-fail  Always	  -	  0
  7 Seek_Error_Rate		0x002e  200  200  000	Old_age  Always	  -	  0
  9 Power_On_Hours		  0x0032  100  100  000	Old_age  Always	  -	  357
10 Spin_Retry_Count		0x0032  100  253  000	Old_age  Always	  -	  0
11 Calibration_Retry_Count 0x0032  100  253  000	Old_age  Always	  -	  0
12 Power_Cycle_Count	  0x0032  100  100  000	Old_age  Always	  -	  9
192 Power-Off_Retract_Count 0x0032  200  200  000	Old_age  Always	  -	  4
193 Load_Cycle_Count		0x0032  200  200  000	Old_age  Always	  -	  9
194 Temperature_Celsius	0x0022  119  113  000	Old_age  Always	  -	  28
196 Reallocated_Event_Count 0x0032  200  200  000	Old_age  Always	  -	  0
197 Current_Pending_Sector  0x0032  200  200  000	Old_age  Always	  -	  0
198 Offline_Uncorrectable  0x0030  100  253  000	Old_age  Offline	  -	  0
199 UDMA_CRC_Error_Count	0x0032  200  200  000	Old_age  Always	  -	  0
200 Multi_Zone_Error_Rate  0x0008  200  200  000	Old_age  Offline	  -	  0
Some of the more important fields right now include the Reallocated_Sector_Ct, Current_Pending_Sector, and Offline_Uncorrectable lines. All of these should have a RAW_VALUE of 0. I'm not sure why the VALUE field is listed as 200, but as long as the RAW_VALUE for each of these fields is 0, that means there are currently no bad sectors. Any result greater than 0 on a new drive should be cause for an immediate RMA.
Once all of your tests have completed, you should reboot your system to disable the kernel geometry debug flags.
Replacing a Drive Prior to Failure
If you want to replace a drive prior to failure, follow this guide. To replace a drive post failure see here Replacing Failed Disks
This guide is for TrueNAS Cobia
- Attach the new drive to the system
- Navigate to Storage > Pool > Manage Devices > Click on the VDEV containing the disk you want to replace > Select the disk > Select the Replace option > Select the new disk
- Wait for the resilver process to complete
- Run a full scrub of the pool
- Shut down the system
- Remove the old disk
- Start the system again
Replacing Failed Disks
This process is for a failed disk. For replacing a disk that has not failed see here Replacing a Drive Prior to Failure
Replacing a Disk
Another disk of the same or greater capacity is required to replace a failed disk. This disk must be installed in the TrueNAS system, not part of an existing storage pool, and available to use as a replacement. The replacement process wipes any data on the replacement disk.
The TrueNAS Pool widget on the main Dashboard shows when a disk failure degrades a pool.

Click the settings on the pool card to go to the Storage > Pools > Pool Status screen to locate the failed disk.
To replace a disk:
- Take the disk offline.
- Remove, or replace the disk.
- Refresh the screen.
- Bring the disk online.
Taking a Failed Disk Offline
Clicking more_vert for the failed disk to show the disk options.

We recommend you take the disk offline before starting the replacement. This removes the device from the pool and can prevent swap issues. To offline a disk:
Go to Storage > Pools screen, click on the settings settings icon, and then select Status to Open the Pool Status screen and display the disks in the pools.
Click the more_vert icon for the disk you plan to remove, and then click Offline.
Select Confirm, then click OFFLINE. The disk should now be offline.
When the disk status shows as Offline, physically remove the disk from the system.

Replacing a Disk
If the replacement disk is not already physically added to the system, add it now.
If replacing a failed disk with an available disk in the system, click Replace, select an available disk from the dropdown list, then click Replace.
To update the Pool Status screen and show the new disk, click Refresh.
In the Pool Status, open the options for the offline disk and click Replace

Select a new member disk and click Replace Disk. The new disk must have the same or greater capacity as the disk you are replacing. The replacement fails when the chosen disk has partitions or data present. To destroy any data on the replacement disk and allow the replacement to continue, set the Force option.
When the disk wipe completes and TrueNAS starts replacing the failed disk, the Pool Status changes to show the in-progress replacement.

TrueNAS resilvers the pool during the replacement process. For pools with large amounts of data, resilvering can take a long time.
Bringing a New Disk Online
When the resilver completes, the pool status screen updates to show the new disk, and the pool status returns to Online.

During the failed disk replacement process, take these actions after removing and replacing the physical disk to make that replacement disk available:
- Go to Disks and locate the offline disk
- Click the more_vert icon for the offline disk
- Click Online.
Resolving Problems With ZFS
https://docs.oracle.com/cd/E19253-01/819-5461/gbbuw/index.html
The following sections describe how to identify and resolve problems with your ZFS file systems or storage pools:
You can use the following features to identify problems with your ZFS configuration:
-
Detailed ZFS storage pool information can be displayed by using the zpool status command.
-
Pool and device failures are reported through ZFS/FMA diagnostic messages.
-
Previous ZFS commands that modified pool state information can be displayed by using the zpool history command.
Most ZFS troubleshooting involves the zpool status command. This command analyzes the various failures in a system and identifies the most severe problem, presenting you with a suggested action and a link to a knowledge article for more information. Note that the command only identifies a single problem with a pool, though multiple problems can exist. For example, data corruption errors generally imply that one of the devices has failed, but replacing the failed device might not resolve all of the data corruption problems.
In addition, a ZFS diagnostic engine diagnoses and reports pool failures and device failures. Checksum, I/O, device, and pool errors associated with these failures are also reported. ZFS failures as reported by fmd are displayed on the console as well as the system messages file. In most cases, the fmd message directs you to the zpool status command for further recovery instructions.
The basic recovery process is as follows:
-
If appropriate, use the zpool history command to identify the ZFS commands that preceded the error scenario. For example:
# zpool history tank
History for 'tank':
2010-07-15.12:06:50 zpool create tank mirror c0t1d0 c0t2d0 c0t3d0
2010-07-15.12:06:58 zfs create tank/erick
2010-07-15.12:07:01 zfs set checksum=off tank/erick
In this output, note that checksums are disabled for the tank/erick file system. This configuration is not recommended.
-
Identify the errors through the fmd messages that are displayed on the system console or in the /var/adm/messages file.
-
Find further repair instructions by using the zpool status -x command.
-
Repair the failures, which involves the following steps:
-
Replacing the faulted or missing device and bring it online.
-
Restoring the faulted configuration or corrupted data from a backup.
-
Verifying the recovery by using the zpool status -x command.
-
Backing up your restored configuration, if applicable.
-
This section describes how to interpret zpool status output in order to diagnose the type of failures that can occur. Although most of the work is performed automatically by the command, it is important to understand exactly what problems are being identified in order to diagnose the failure. Subsequent sections describe how to repair the various problems that you might encounter.
Determining If Problems Exist in a ZFS Storage Pool
The easiest way to determine if any known problems exist on a system is to use the zpool status -x command. This command describes only pools that are exhibiting problems. If no unhealthy pools exist on the system, then the command displays the following:
# zpool status -x all pools are healthy |
Without the -x flag, the command displays the complete status for all pools (or the requested pool, if specified on the command line), even if the pools are otherwise healthy.
For more information about command-line options to the zpool status command, see Querying ZFS Storage Pool Status.
Reviewing zpool status Output
The complete zpool status output looks similar to the following:
# zpool status tank
# zpool status tank
  pool: tank
 state: DEGRADED
status: One or more devices could not be opened.  Sufficient replicas exist for
        the pool to continue functioning in a degraded state.
action: Attach the missing device and online it using 'zpool online'.
   see: http://www.sun.com/msg/ZFS-8000-2Q
 scrub: none requested
config:

        NAME        STATE     READ WRITE CKSUM
        tank        DEGRADED     0     0     0
          mirror-0  DEGRADED     0     0     0
            c1t0d0  ONLINE       0     0     0
            c1t1d0  UNAVAIL      0     0     0  cannot open

errors: No known data errors
|
This output is described next:
Overall Pool Status Information
This section in the zpool status output contains the following fields, some of which are only displayed for pools exhibiting problems:
- pool
-
Identifies the name of the pool.
- state
-
Indicates the current health of the pool. This information refers only to the ability of the pool to provide the necessary replication level.
- status
-
Describes what is wrong with the pool. This field is omitted if no errors are found.
- action
-
A recommended action for repairing the errors. This field is omitted if no errors are found.
- see
-
Refers to a knowledge article containing detailed repair information. Online articles are updated more often than this guide can be updated. So, always reference them for the most up-to-date repair procedures. This field is omitted if no errors are found.
- scrub
-
Identifies the current status of a scrub operation, which might include the date and time that the last scrub was completed, a scrub is in progress, or if no scrub was requested.
- errors
-
Identifies known data errors or the absence of known data errors.
Pool Configuration Information
The config field in the zpool status output describes the configuration of the devices in the pool, as well as their state and any errors generated from the devices. The state can be one of the following: ONLINE, FAULTED, DEGRADED, UNAVAIL, or OFFLINE. If the state is anything but ONLINE, the fault tolerance of the pool has been compromised.
The second section of the configuration output displays error statistics. These errors are divided into three categories:
-
READ – I/O errors that occurred while issuing a read request
-
WRITE – I/O errors that occurred while issuing a write request
-
CKSUM – Checksum errors, meaning that the device returned corrupted data as the result of a read request
These errors can be used to determine if the damage is permanent. A small number of I/O errors might indicate a temporary outage, while a large number might indicate a permanent problem with the device. These errors do not necessarily correspond to data corruption as interpreted by applications. If the device is in a redundant configuration, the devices might show uncorrectable errors, while no errors appear at the mirror or RAID-Z device level. In such cases, ZFS successfully retrieved the good data and attempted to heal the damaged data from existing replicas.
For more information about interpreting these errors, see Determining the Type of Device Failure.
Finally, additional auxiliary information is displayed in the last column of the zpool status output. This information expands on the state field, aiding in the diagnosis of failures. If a device is FAULTED, this field indicates whether the device is inaccessible or whether the data on the device is corrupted. If the device is undergoing resilvering, this field displays the current progress.
For information about monitoring resilvering progress, see Viewing Resilvering Status.
Scrubbing Status
The scrub section of the zpool status output describes the current status of any explicit scrubbing operations. This information is distinct from whether any errors are detected on the system, though this information can be used to determine the accuracy of the data corruption error reporting. If the last scrub ended recently, most likely, any known data corruption has been discovered.
Scrub completion messages persist across system reboots.
For more information about the data scrubbing and how to interpret this information, see Checking ZFS File System Integrity.
Data Corruption Errors
The zpool status command also shows whether any known errors are associated with the pool. These errors might have been found during data scrubbing or during normal operation. ZFS maintains a persistent log of all data errors associated with a pool. This log is rotated whenever a complete scrub of the system finishes.
Data corruption errors are always fatal. Their presence indicates that at least one application experienced an I/O error due to corrupt data within the pool. Device errors within a redundant pool do not result in data corruption and are not recorded as part of this log. By default, only the number of errors found is displayed. A complete list of errors and their specifics can be found by using the zpool status -v option. For example:
# zpool status -v
  pool: tank
 state: UNAVAIL
status: One or more devices are faulted in response to IO failures.
action: Make sure the affected devices are connected, then run 'zpool clear'.
   see: http://www.sun.com/msg/ZFS-8000-HC
 scrub: scrub completed after 0h0m with 0 errors on Tue Feb  2 13:08:42 2010
config:

        NAME        STATE     READ WRITE CKSUM
        tank        UNAVAIL      0     0     0  insufficient replicas
          c1t0d0    ONLINE       0     0     0
          c1t1d0    UNAVAIL      4     1     0  cannot open

errors: Permanent errors have been detected in the following files:

/tank/data/aaa
/tank/data/bbb
/tank/data/ccc
|
A similar message is also displayed by fmd on the system console and the /var/adm/messages file. These messages can also be tracked by using the fmdump command.
For more information about interpreting data corruption errors, see Identifying the Type of Data Corruption.
System Reporting of ZFS Error Messages
In addition to persistently tracking errors within the pool, ZFS also displays syslog messages when events of interest occur. The following scenarios generate events to notify the administrator:
-
Device state transition – If a device becomes FAULTED, ZFS logs a message indicating that the fault tolerance of the pool might be compromised. A similar message is sent if the device is later brought online, restoring the pool to health.
-
Data corruption – If any data corruption is detected, ZFS logs a message describing when and where the corruption was detected. This message is only logged the first time it is detected. Subsequent accesses do not generate a message.
-
Pool failures and device failures – If a pool failure or a device failure occurs, the fault manager daemon reports these errors through syslog messages as well as the fmdump command.
If ZFS detects a device error and automatically recovers from it, no notification occurs. Such errors do not constitute a failure in the pool redundancy or in data integrity. Moreover, such errors are typically the result of a driver problem accompanied by its own set of error messages.
ZFS commands and status
| Command | What it does |
|
zpool status -v <poolname> zpool status -vLP <poolname> |
status of the pool, identifies drives as GUID, shows any data errors
adding the -LP output the name of the drive in /dev/sdX format |
|
zpool iostat -v <poolname> zpool status -vLP <poolname> |
output the I/O statistics of the pool. Excluding a pool name will show all data for all pools
adding the -LP flag will do that same as above |
|
zpool list -v <poolname> zpool list -vLP <poolname> |
output status of the pool in question. omitting pool name will show all pools. -LP flag does the same as always. |
|
zpool scrub <poolname> |
will scrub the pool detecting data errors. will repair errors if sufficient redundancy exists. |
Pool or Device Failure and Recovery
ZFS supports a rich set of mechanisms for handling device failure and data corruption. All metadata and data is checksummed, and ZFS automatically repairs bad data from a good copy when corruption is detected.
In order to take advantage of these features, a pool must make use of some form of redundancy, using either mirrored or raidz groups. While ZFS supports running in a non-redundant configuration, where each root vdev is simply a disk or file, this is strongly discouraged. A single case of bit corruption can render some or all of your data unavailable.
A pool's health status is described by one of four states:
- DEGRADED
-
A pool with one or more failed devices, but the data is still available due to a redundant configuration.
- ONLINE
-
A pool that has all devices operating normally.
- SUSPENDED
-
A pool that is waiting for device connectivity to be restored. A suspended pool remains in the wait state until the device issue is resolved.
- UNAVAIL
-
A pool with corrupted metadata, or one or more unavailable devices and insufficient replicas to continue functioning.
The health of the top-level vdev, such as mirror or raidz device, is potentially impacted by the state of its associated vdevs, or component devices. A top-level vdev or component device is in one of the following states:
- DEGRADED
-
One or more top-level vdevs is in the degraded state because one or more component devices are offline. Sufficient replicas exist to continue functioning.
One or more component devices is in the degraded or faulted state, but sufficient replicas exist to continue functioning. The underlying conditions are as follows:
-
The number of checksum errors exceeds acceptable levels and the device is degraded as an indication that something may be wrong. ZFS continues to use the device as necessary.
-
The number of I/O errors exceeds acceptable levels. The device could not be marked as faulted because there are insufficient replicas to continue functioning.
-
- OFFLINE
-
The device was explicitly taken offline by the zpool offline command.
- ONLINE
-
The device is online and functioning.
- REMOVED
-
The device was physically removed while the system was running. Device removal detection is hardware-dependent and may not be supported on all platforms.
- UNAVAIL
-
The device could not be opened. If a pool is imported when a device was unavailable, then the device will be identified by a unique identifier instead of its path since the path was never correct in the first place.
ZFS metadata corruption
ZFS performs scrub tasks on a regular basis in which in reads each and every file, and compares that file to the checksum. If the checksum is different from the data on the disk, it will attempt to repair that data using the redundency that has been setup with RAID. If it cannot do this, it will log a corruption error which can be seen using the zpool status -v <poolname> command. This error will remain until the file is removed and another scrub task is preformed.
If the file is gone, but snapshots still reference that file, then an identifier will be used such as <0x00xxx>:<0xXX00> The zpool will also report as being unhealthy.
If the actual ZFS pool metadata is corrupted, that is another story. If crucial metadata is corrupted then the pool will report as being corrupted, and may even fail to import upon boot. A pool with corrupted metadata should be backed up immediately, destroyed and restored from backup.
ZFS metadata corruption can repot as being <metadata:0xXXxx>
Further reading zfs pool metadata corrupt
TrueNAS Server
This is information related to the usage of the TrueNAS OS
Active Directory
check Keytab file for information on joining domain without configuring a username and password
------------------------------------------------------------------------------------------------------------------------------------------------
Setting Up Active Directory
The Active Directory (AD) service shares resources in a Windows network. AD provides authentication and authorization services for the users in a network. This eliminates the need to recreate the user accounts on TrueNAS.
Domain users and groups in local ACLs are accessible after joining AD. Setting up shares acts as a file server.
Joining an AD domain configures the Privileged Access Manager (PAM). This allows domain users to log on via SSH or authenticate to local services.
It is possible to configure AD services on Windows. Or on Unix-like operating systems running Samba version 4.
To configure a connection, you need to know the following items:
- Determine the Active Directory domain controller domain.
- Make sure you have the account credentials for that system.
Preparation
Preparing the following before configuring Active Directory helps ensure the connection process.
Verify Name Resolution
Confirm that name resolution is functioning. Connect to shell and use ping to check the connection to the AD domain controller.
truenas# ping ad01.lab. ixsystems.com
PING ad01. lab. ixsystems.com (10.215.5.200) : 56 data bytes
64 bytes from 10.215.5.200: icmp_seq=0 ttl=126 time=0.800 ms
64 bytes from 10.215.5.200: icmp_seq=1 ttl=126 time=0.933 ms
64 bytes from 10.215.5.200: icmp_seq=2 ttl=126 time=0.810 ms
64 bytes from 10.215.5.200: icmp_seq=3 ttl=126 time=0.876 ms
^C
ad01. lab. ixsystems.com ping statistics
4 packets transmitted, 4 packets received, 0.0% packet loss
round-trip min/avg/max/stddev = 0.800/0.855/0.933/0.054 ms
The ability to send and receive packets without loss verifies the connection. Press Ctrl + C to cancel the ping.
Another option is to use the command host -t srv _ldap._tcp.domainname.com. This checks the network SRV records and verifies DNS resolution.
If the ping fails, go to Network > Global Configuration. Update the DNS Servers and Default Gateway settings. Enter more than one value in Nameserver for the AD domain controllers.
This helps DNS queries for the required SRV records succeed. Domain controllers are not always available. Using more than one name server helps maintain the AD connection in these instances.
Time Synchronization
Active Directory relies on Kerberos, a time-sensitive protocol. During the domain join process, the AD domain controller with the PDC Emulator FSMO Role is added as the preferred NTP server.
You can change NTP server settings in System > NTP Servers if necessary.
In a default AD environment, the local system time must be in sync with the AD domain controller time. Their times cannot differ from each other by more than 5 minutes. Use an external time source when configuring a virtualized domain controller. TrueNAS creates an Alert if the system time gets out of sync with the AD domain controller time.
The following options apply to time synchronization in TrueNAS:
- Go to System > General and make sure the value in Timezone matches the AD Domain Controller.

- Select either local time or universal time in the system BIOS.
Connect to the Active Directory Domain
To connect to Active Directory, go to Directory Services > Active Directory. Enter the AD Domain Name and account credentials. Select Enable to attempt to join the AD domain immediately after saving the configuration.

The preconfigured defaults are generally suitable. Advanced options are available for fine-tuning the AD configuration. Click ADVANCED OPTIONS to access extra options.
Click REBUILD DIRECTORY SERVICE CACHE to resync the cache if it becomes out of sync. Or if fewer users than expected are available in the permissions editors.
When the import completes, AD users and groups become available. These have basic dataset permissions or an Access Control List (ACL). Enabled is the default status for the TrueNAS cache.
Joining AD adds default Kerberos realms and generates a default AD_MACHINE_ACCOUNT keytab. TrueNAS automatically begins using this default keytab. TrueNAS removes any administrator credentials stored in the TrueNAS configuration file.
Related Services: FTP Access
The recommendation is to use SFTP over FTP. But joined systems do allow FTP access. Keep these caveats in mind:
- Authentication uses DOMAIN\username as the user name by default.
- A user home directory needs to exist before joining.
- You cannot add an AD user to the FTP group. Enable local user auth for FTP instead.
- An existing samba homes share created in the GUI is set as the template homedir for AD users. This means that AD user home directories are set inside that path. Proper permissions are vital.
- There are no guarantees about how
proftpdhandles ACLs. - AD users can have populated homedir information in their LDAP schema. The admin (or
pam_mkhomedir) must ensure that these paths exist. - When the admin is pulling home directories from their LDAP schema, take an extra step of caution. Ensure that users aren’t writing files to the boot device.
Troubleshooting
Resync the cache if it becomes out of sync. Or if fewer users than expected are available in the permissions editors. Go to Directory Services > Active Directory > REBUILD DIRECTORY SERVICE CACHE.
If you are using Windows Server with 2008 R2 or older, try the following options:
Create a Computer entry on the Windows server Organizational Unit (OU). When creating this entry, enter the TrueNAS host name in the name field. Make sure it is the same name as the one set in the Hostname field in Network > Global Configuration. Must match the NetBIOS alias from Directory Services > Active Directory > Advanced Options.
You can enter various shell commands to get more details about the AD connection and users:
- AD current state:
midclt call activedirectory.get_state. - Details about the currently connected Lightweight Directory Access Protocol (LDAP) server:
midclt call activedirectory.domain_info | jq. Example:truenas# midclt call activedirectory.domain_info | jq { "LDAP server": "192.168.1.125", "LDAP server name": "DC01.HOMEDOM.FUN", "Realm": "HOMEDOM.FUN", "Bind Path": "dc=HOMEDOM,dc=FUN", "LDAP port": 389, "Server time": 1593026080, "KDC server": "192.168.1.125", "Server time offset": 5, "Last machine account password change": 1592423446 } - View AD users:
wbinfo -u. To see more details about a user, entergetent passwd DOMAIN\\<user>. Replace<user>with the desired user name. With the TrueNAS cache enabledwbinfo -ucan show more users than appear to be available when configuring permissions. Go to Directory Services > Active Directory and increase the AD Timeout value. - View AD groups:
wbinfo -g. To see more details, entergetent group DOMAIN\\domain\ users. - View domains:
wbinfo -m. - Test AD connection:
wbinfo -t. A successful test shows a message similar tochecking the trust secret for domain YOURDOMAIN via RPC calls succeeded. - User connection test to an SMB share:
smbclient '//127.0.0.1/smbshare -U AD01.LAB.IXSYSTEMS.COM\ixuser, replacing127.0.0.1with your server address,smbsharewith the SMB share name,AD01.LAB.IXSYSTEMS.COMwith your trusted domain, andixuserwith the user account name for authentication testing.
Related Content
CORE Tutorials
CORE UI Reference
Have more Questions?
For further discussion or assistance, see these resources:
Found content that needs an update? You can suggest content changes directly! To request changes to this content, click the Feedback button located on the middle-right side of the page (might require disabling ad blocking plugins).
Check status of VMs from Shell
midclt call vm.query | jq Get information of VM including the VM ID
midclt call vm.start <ID>
Disable 2FA
midclt call auth.twofactor.update '{"enabled": false}'
Dragonfish Swap issue
Latest version of Scale called Dragonfish-24.04.0 has an issue with using more system memory for ZFS cache and causes sluggish performance and outright unresponsiveness.
The fix is below
- Log into the shell
- run the following commands
-
sysctl vm.swappiness=0
- This tells the kernel to avoid swap
-
swapoff -a &
- turns swap off entirely
-
top
- System monitor for active process. Monitor for SWAP usage. Should see SWAP usage drop to 0
-
Enable SMB Multi Channel
Put these options in the SMB Advanced options
server multi channel support = yes
aio read size = 1
aio write size = 1
Force SMB3 encryption
server smb encrypt = required ## This is a Auxillary parameter to be set individually on every share
client smb encrypt = required ## this is a global configuration to be set in Services -> SMB
## Run these two commands to verify SMB signing is required
"nmap --script smb2-security-mode.nse -p445 <ip address>"
"nmap -p 139 --script smb2-security-mode <ip address>"
Capture packets in WireShark to confirm the data is actually encrypted
There are two places the you should configure SMB encryption. In the Global SMB or Samba configuration, and on each SMB share. Both are done within the TrueNAS settings. First, you want to configure your SMB or Samba service with the folowing two auxiliary parameters:
server signing = required
client smb encrypt = required
This will do two things. First, it enables server signing of each SMB packet sent. The server will sign each data packet with a hash of that packet, thus alerting the client computer if the data packet is changed in transit. Second, it will enable smb encryption globally, but will not turn it on, each share still needs to be told to use encryption. You can also set
client smb encrypt = desired
if you do not want to prevent clients that do not support encryption from accessing the share.
Clients that do not support SMB encryption will not be able to connect to the share. By default, clients should be attempting to negotiate encryption when connecting, but I prefer to force it for all clients. Almost all modern devices capable of connecting to an SMB share will support SMB encryption. These are the global parameters. Next the local parameters.
On the configuration page of each share you can set:
smb server encrypt = required
This allows you to force encryption of each share individually. Again, clients that do not support SMB encryption will not be able to connect. You can also set:
smb server encrypt = desired
This will set clients to use encryption if possible, but will not lock out clients that do not support encryption. In all cases, you must set encryption globally and on each share. smb server encrypt can be used as a global parameter in some samba iterations, but TrueNAS requires it be set on a share by share basis.
You can use
server smb encryption algorithims = *
This allows you to specify which algorithims are used, or not used. for example
server smb3 encryption algorithms = -AES-128-GCM -AES-128-CCM
Should remove the algorithims from use. I have chosed to remove the 128 bit algorithims that are in use by default. You can see the - symbol prefix.
Go into the shell as root and run smbstatus
This should tell you all open SMB sessions, and if those are encrypted.
You can confirm this by using a Wireshark, or other packet sniffer, on and SMB share before and after enabling these.
This webpage https://www.samba.org/samba/docs/current/man-html/smb.conf.5.html shows detailed explinations of all possible SMB configuration options. I highley recommend forcing the use of SMB encryption on your TrueNAS ASAP. Encryption of data in flight is a good thing. This guide will apply to both Scale and Core.
Midnight Commander
TrueNAS has a file explorer built in. Use the command "mc" in a command prompt to open. Supports clicking with the mouse.
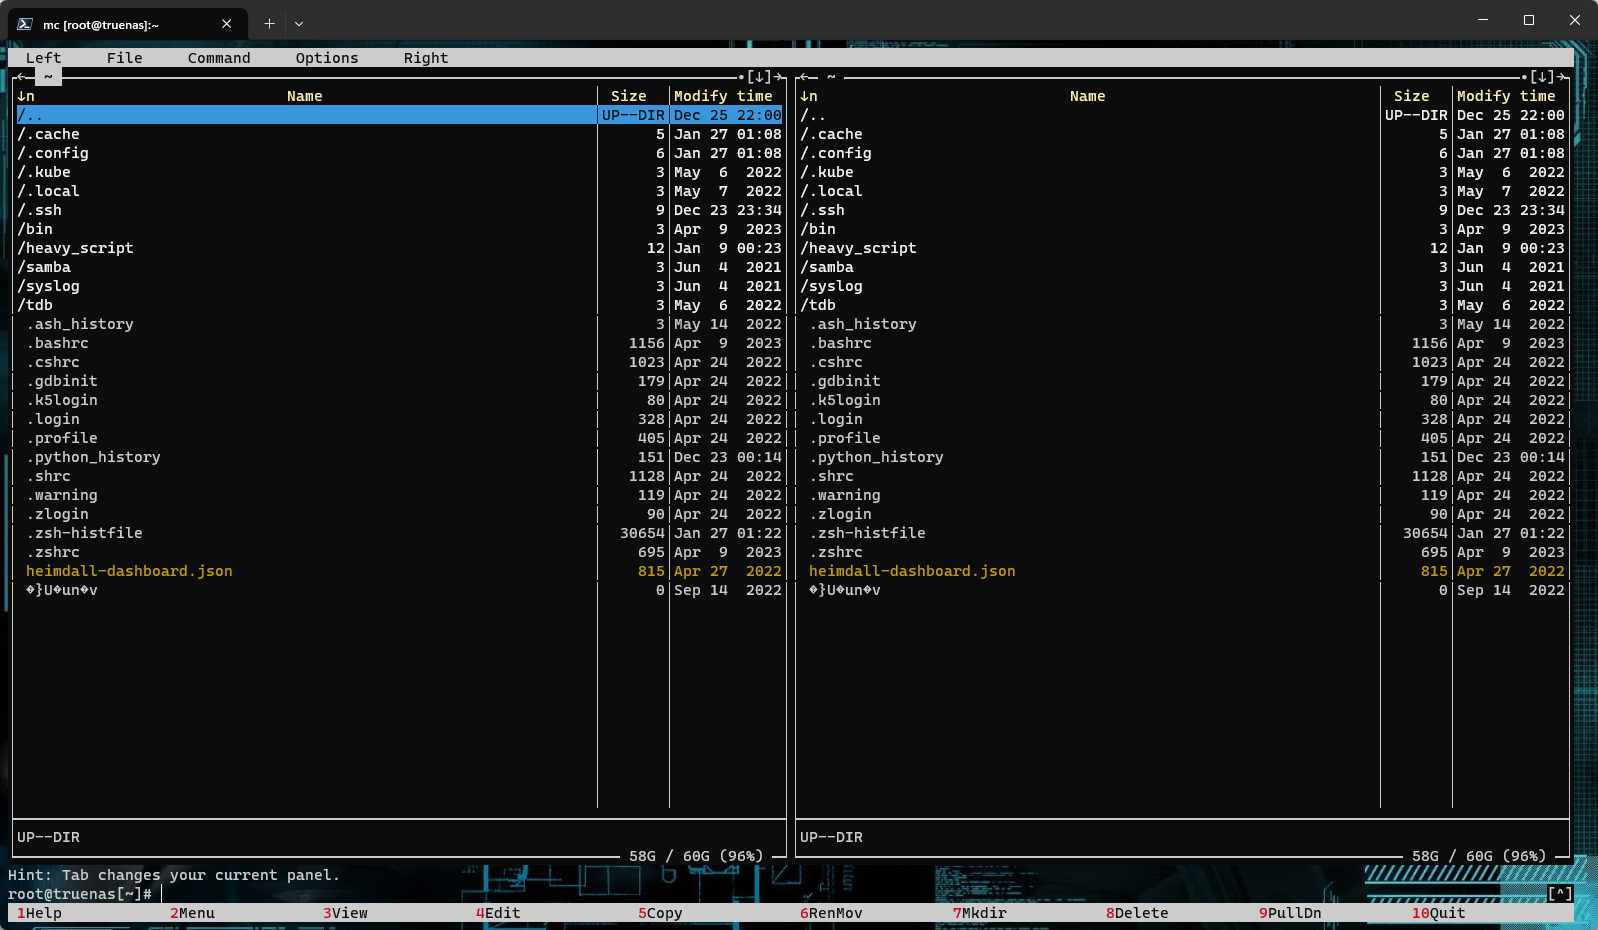
File Explorer - GUI
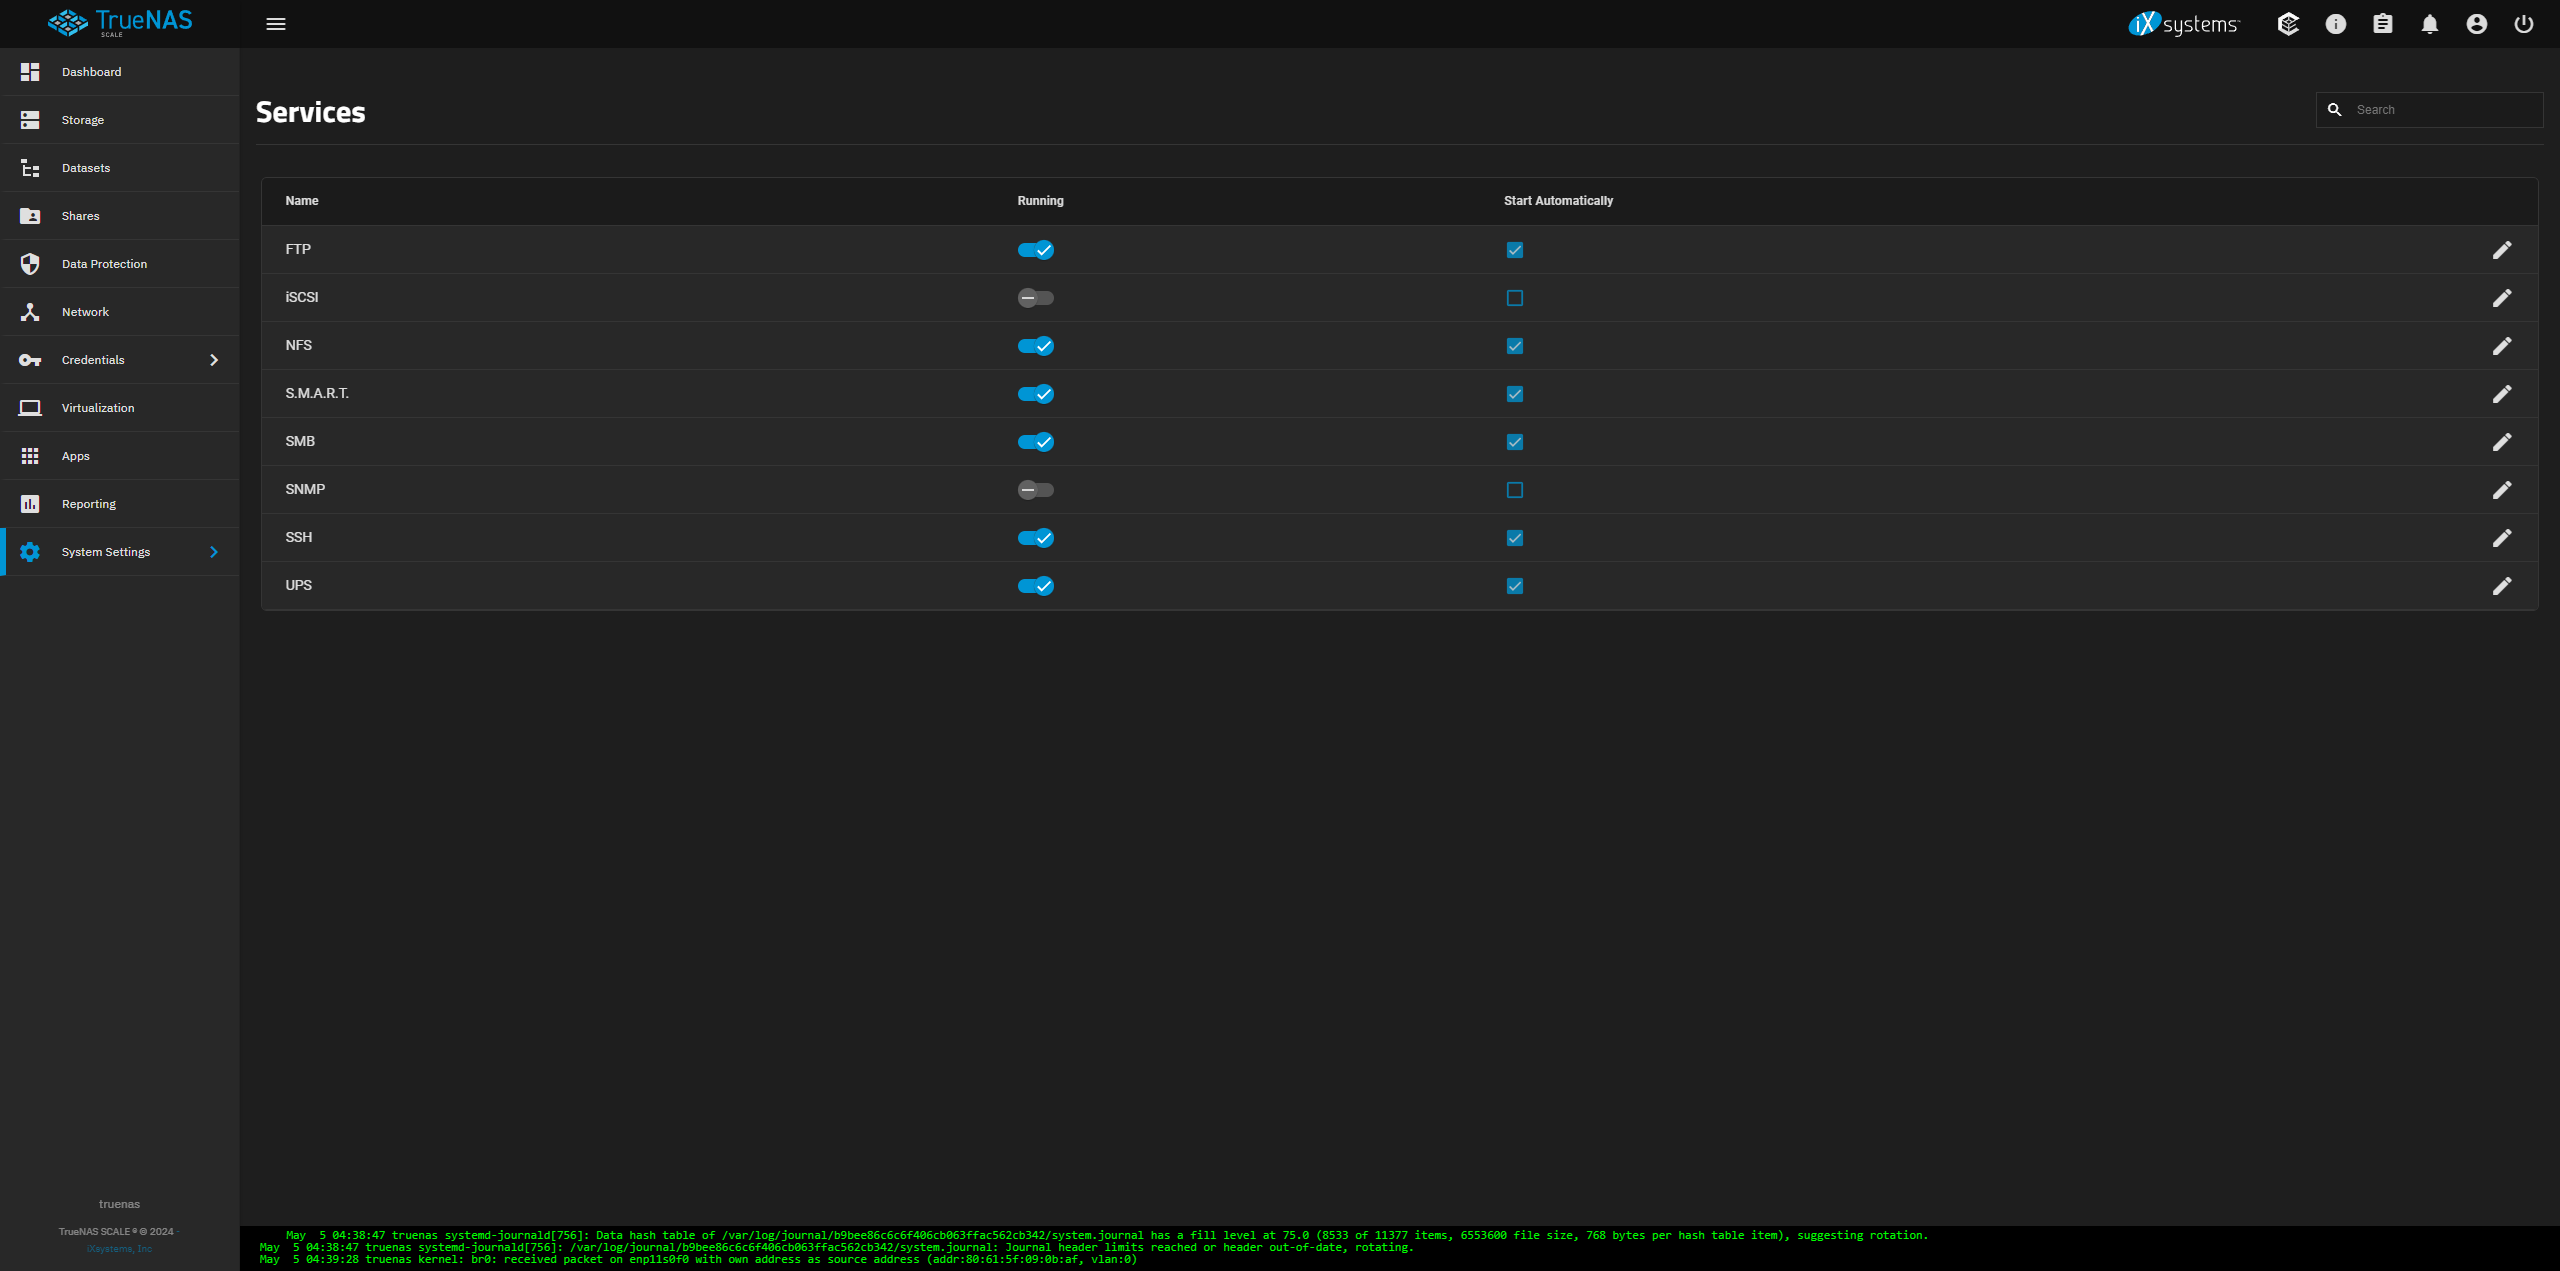
Setup UPS on TrueNAS
You can test the service by running upsc <servicename> with <servicename> being the identifier used to setup the service
- Enable the UPS service
-
- Configure the UPS service

Edit Additional SMB Parameters
midclt call sharing.smb.query | jq
you should get a list of your SMB shares
midclt call sharing.smb.update <id> '{"auxsmbconf": "<stuff>"}'
SMB
https://www.truenas.com/docs/scale/scaletutorials/systemsettings/services/smbservicescale/
The Services > SMB screen displays after going to the Shares screen, finding the Windows (SMB) Shares section, and clicking + Config Service. Alternatively, you can go to System > Services and click the edit icon for the SMB service.
Configuring SMB Service
The SMB Services screen displays setting options to configure TrueNAS SMB settings to fit your use case. In most cases, you can set the required fields and accept the rest of the setting defaults. If you have specific needs for your use case, click Advanced Options to display more settings.

Enter the name of the TrueNAS host system if not the default displayed in NetBIOS Name. This name is limited to 15 characters and cannot be the Workgroup name.
Enter any alias name or names that do not exceed 15 characters in the NetBIOS Alias field. Separate each alias name with a space between them.
Enter a name that matches the Windows workgroup name in Workgroup. TrueNAS detects and sets the correct workgroup from these services when unconfigured with enabled Active Directory or LDAP active.
If using SMB1 clients, select Enable SMB1 support to allow legacy SMB1 clients to connect to the server. Note: SMB1 is deprecated. We advise upgrading clients to operating system versions that support modern SMB protocols.
If you plan to use the insecure and vulnerable NTLMv1 encryption, select NTLMv1 Auth to allow smbd attempts to authenticate users. This setting enables backward compatibility with older versions of Windows, but we do not recommend it. Do not use on untrusted networks.
Enter any notes about the service configuration in Description.
For more advanced settings, see SMB Services Screen.
Click Save.
Start the SMB service.
Configuring Transport Encryption
TrueNAS and Samba default behavior for SMB transport encryption allows SMB clients to negotiate different encryption levels for shares. This default setting enables negotiating encryption but does not turn on data encryption globally per share. SMB1 and SMB2 provide different settings to change the level of global or per-share SMB encryption applied to connections. See Samba Server SMB Encrypt(s) for more information.
You can change the SMB service to apply different SMB transport encryption levels to suit your use case. Go to the SMB service, found on the System > Services screen, and click Edit for the SMB service to open the SMB Service screen, then click on Advanced Settings.
Click in the Transport Encryption Behavior field to select the option and behavior you want applied:
- Default - follow upstream/TrueNAS default
- Negotiate - only encrypt transport if explicitly requested by the SMB client
- Desired - encrypt transport if supported by client during session negotiation
- Required - always encrypt transport (rejecting access if client does not support encryption - incompatible with SMB1 server
enable_smb1)
Select the Default option to use the TrueNAS current behavior. If set to default, there is not a technical limitation preventing an SMB client from negotiating an encrypted session if it is required.
If concerned about having Windows SMB clients always using signing in your environment, make a GPO change on the client side to always sign SMB2+ traffic. This defaults to the Windows settings digitally sign communications (always) and to off.
For more information on Windows SMB-client side transport encryption see Windows SMB Signing Policies.
Auditing SMB Events
To monitor SMB service event logs, such as when a client attempts to authenticate to the share, use the TrueNAS auditing screen. Go to System > Audit to review event logs including SMB connect, disconnect, create, read or write events, and others.
Enter SMB in the search bar to view only SMB service logs or use the advanced search to further limit results.