How to store BitLocker keys in Active Directory
https://coady.tech/store-bitlocker-keys-in-ad/

BitLocker is a fantastic way to protect the data stored on computers and thwart some offline tampering attacks. However, if you’re using BitLocker within a business environment, keeping track of the recovery keys can be quite burdensome. Thankfully Microsoft has developed a way to automatically save BitLocker recovery keys to active directory.
In this post I’m going to be going through the process, step-by-step, to enable BitLocker recovery key saving to active directory. Plus we’ll take a look at how computers that are already encrypted can retrospectively have their recovery keys backed up to active directory.
1.0 Requirements
- Windows 7 or newer client (Must be either Pro or Enterprise)
- Windows Server 2012 or newer domain controller
- Domain schema level of at least ‘Windows Server 2012’
- Latest group policy ADMX files
This guide will show the steps specifically for Windows 10 1909 and Windows Server 2019.
2.0 Setup Steps
2.1 Installing BitLocker
So that we can access the Bitlocker recovery keys, we’ll need to install the BitLocker feature on a domain controller (DC). This feature will add an additional tab within Active Directory Users and Computers to access the recovery keys. It doesn’t mean the domain controller will be encrypted, just that the necessary GUI administration tools will be installed.
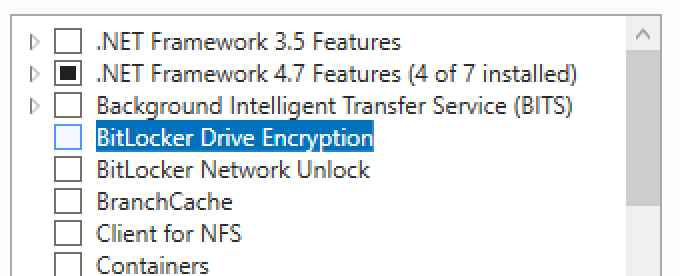
On a domain controller open Server Manager and then launch the Add Roles and Features Wizard. Tick the ‘BitLocker Drive Encryption’ option under Features.
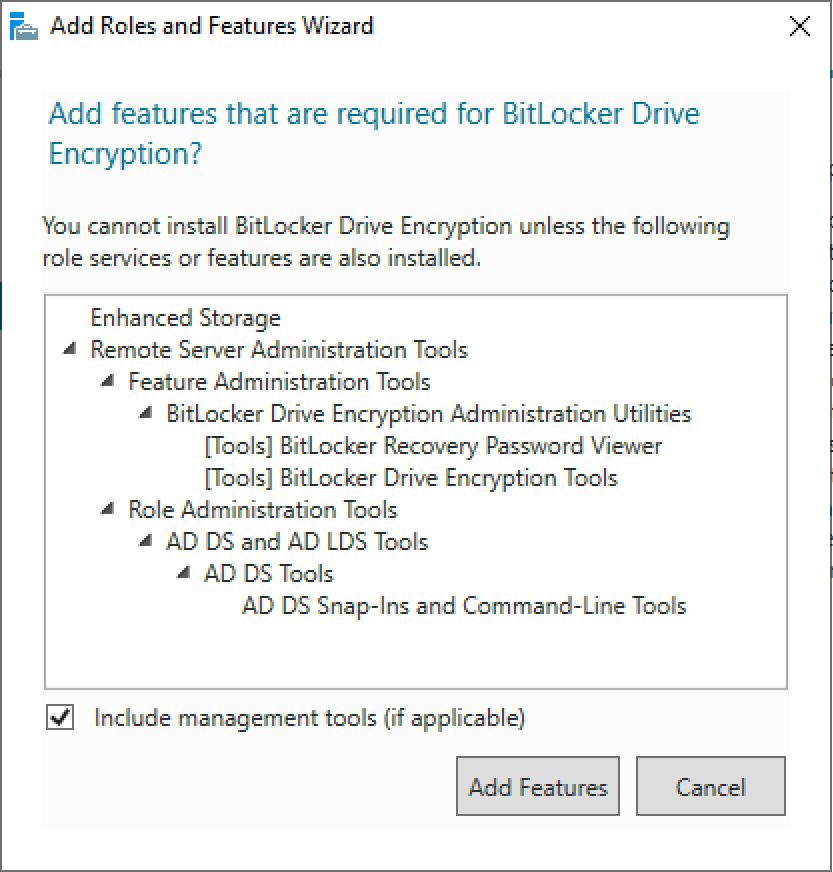
You will be prompted to install additional tools. Select ‘Add Features’.
Leave the feature install to complete. The BitLocker administrator tools will now be installed. Later in the guide we’ll use those tools to view the stored BitLocker recovery keys.
2.2 Update group policy
Client computers will need to forward their recovery keys to active directory. In order to do this we’ll use group policy. In my experience the correct group policy options aren’t always shown out-of-the-box, so I’m going to use the latest template file. Plus it’s always good practice to use the latest group policy templates.
Download the latest ADMX files for your build of Windows here.
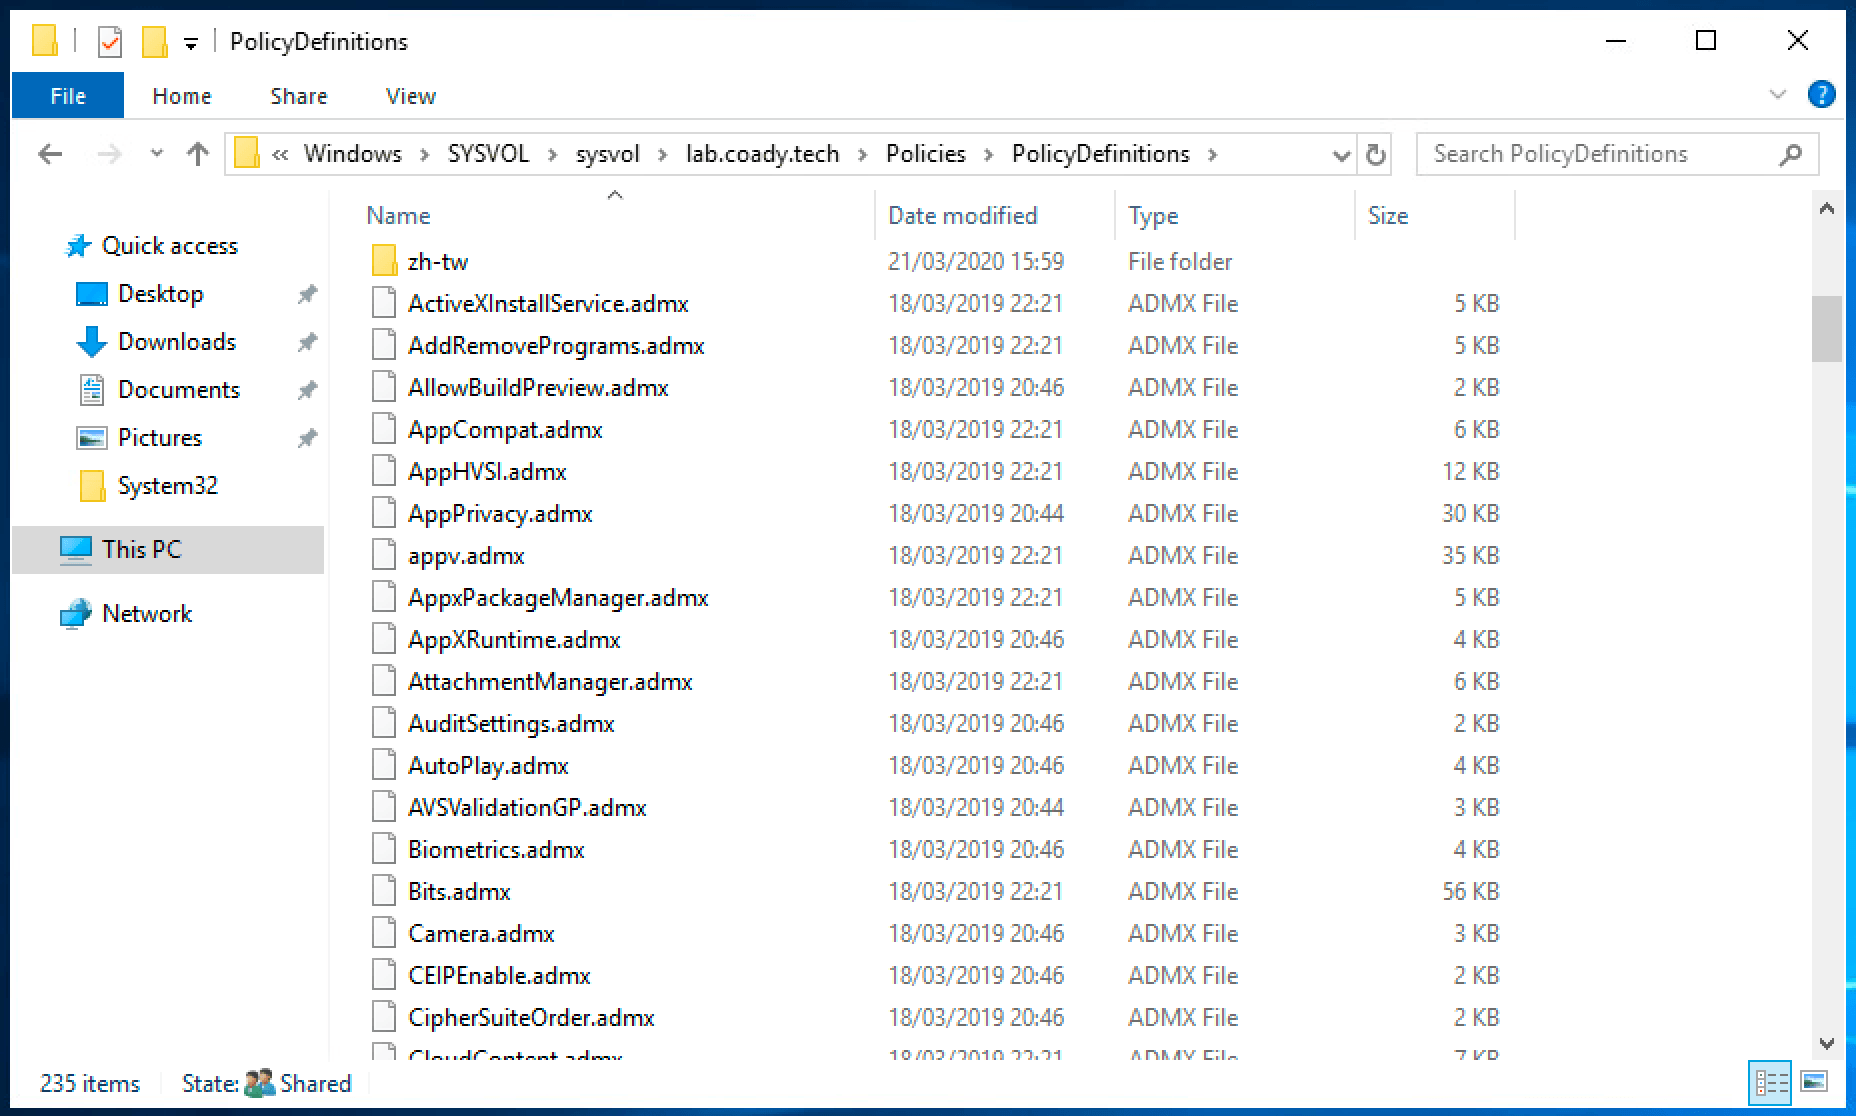
Inside of the ZIP archive will be many group policy ADMX files along with folders for each language. Extract these files to the ‘PolicyDefinitions’ folder within the SYSVOL share on a domain controller. E.g.
C:\Windows\SYSVOL\mydomain.local\Policies\PolicyDefinitions
Once finished you should have a setup similar to mine, as shown below:
2.3 Configuring BitLocker
Create a new group policy object targeted at your computers.
Open the policy for editing and then browse to:
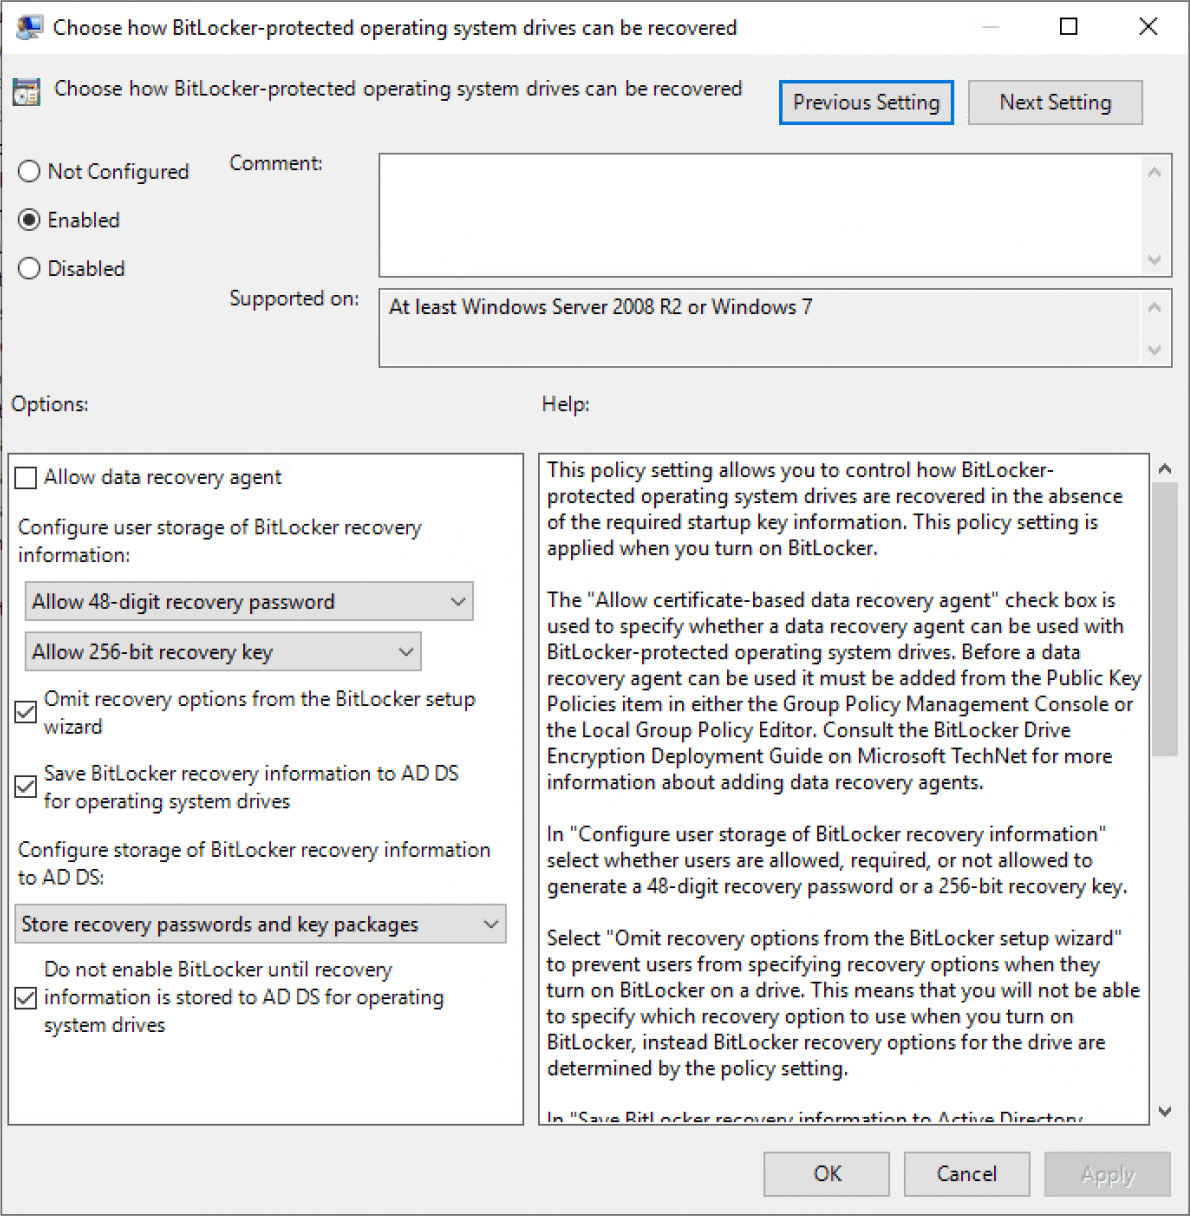
Computer Configuration > Policies > Administrative Templates > Windows Components > Bitlocker Drive Encryption > Operating System Drives.
Configure the policy “Choose how BitLocker-protected operating system drives can be recovered” and set it as shown below:
Save the changes and then exit the group policy editor.
We’re done! Now it’s time to test our changes.
3.0 Encrypting computers
If you’ve completed the previous steps, BitLocker should be automatically saving recovery keys to active directory when the OS volume is encrypted.
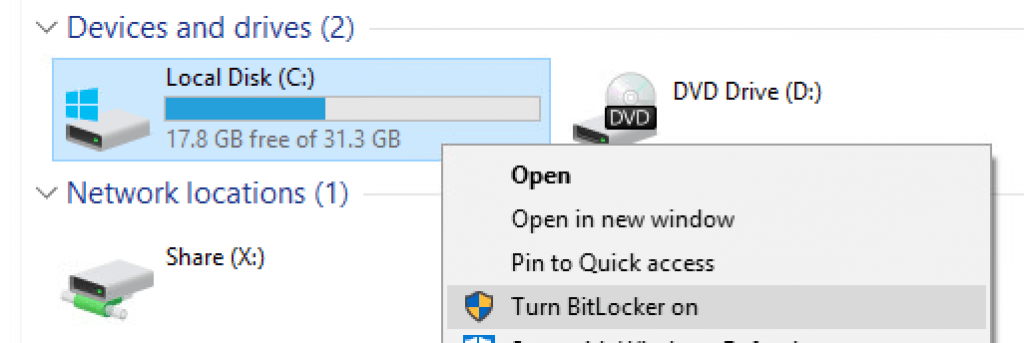
For the purpose of this guide I’m going to encrypt my test client machine the simple way – by right-click’ing on the C volume and following the ‘Turn BitLocker on’ wizard.
4.0 Recovering the BitLocker key
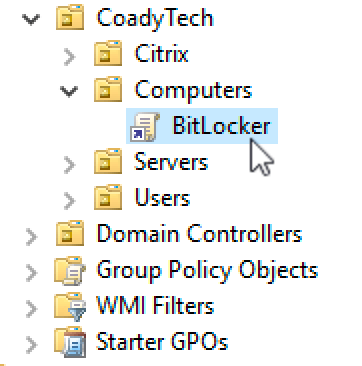
Following our work in Step 1, a new ‘BitLocker Recovery’ tab will be present within active directory computer objects. On a domain controller open Active Directory Users and Computers and then locate the relevant computer account. Double click on the computer account to open the properties dialogue.
Select the ‘BitLocker Recovery’ tab. This will list all of the recovery keys for the computer in question. If there are multiple entries select the top one. Multiple entries will show up if the computer has been encrypted/decrypted multiple times.
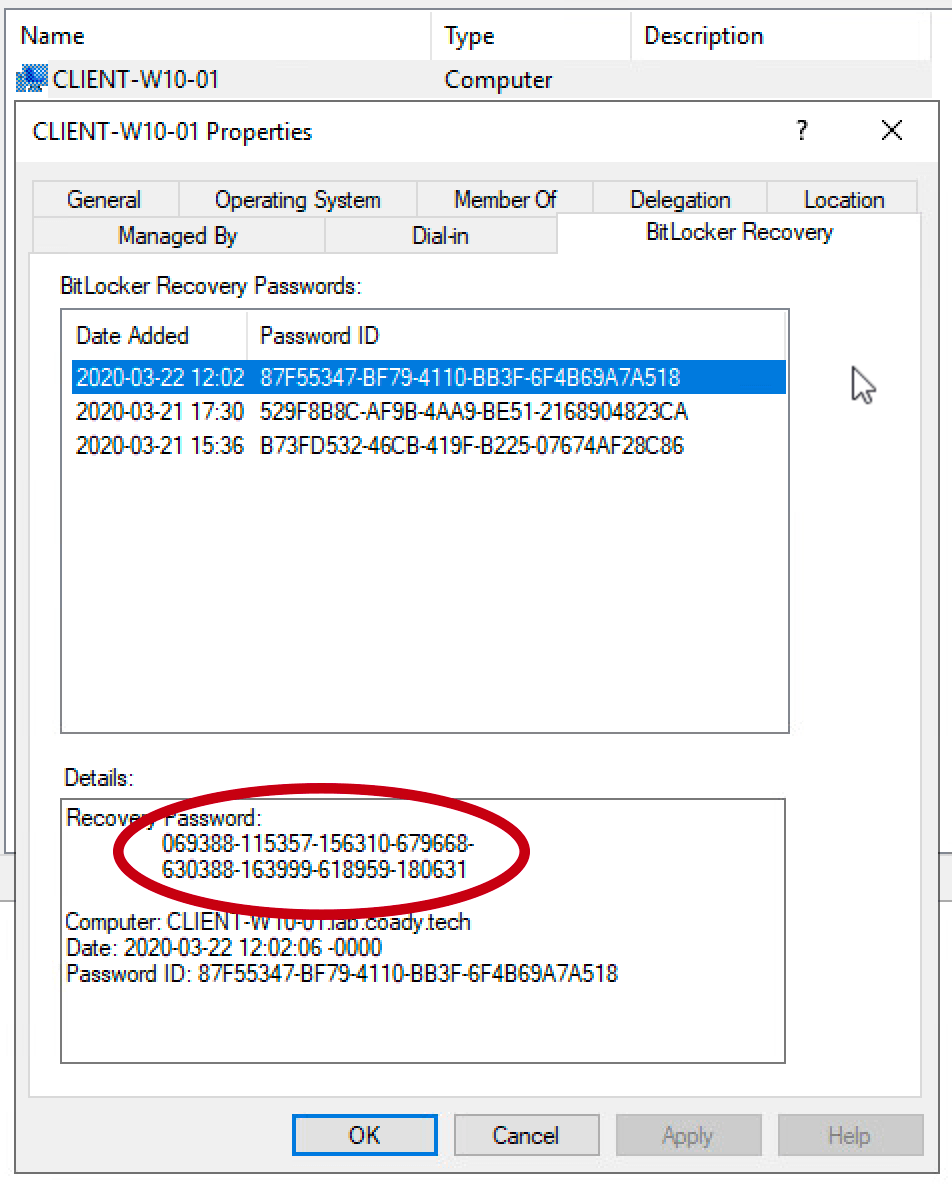
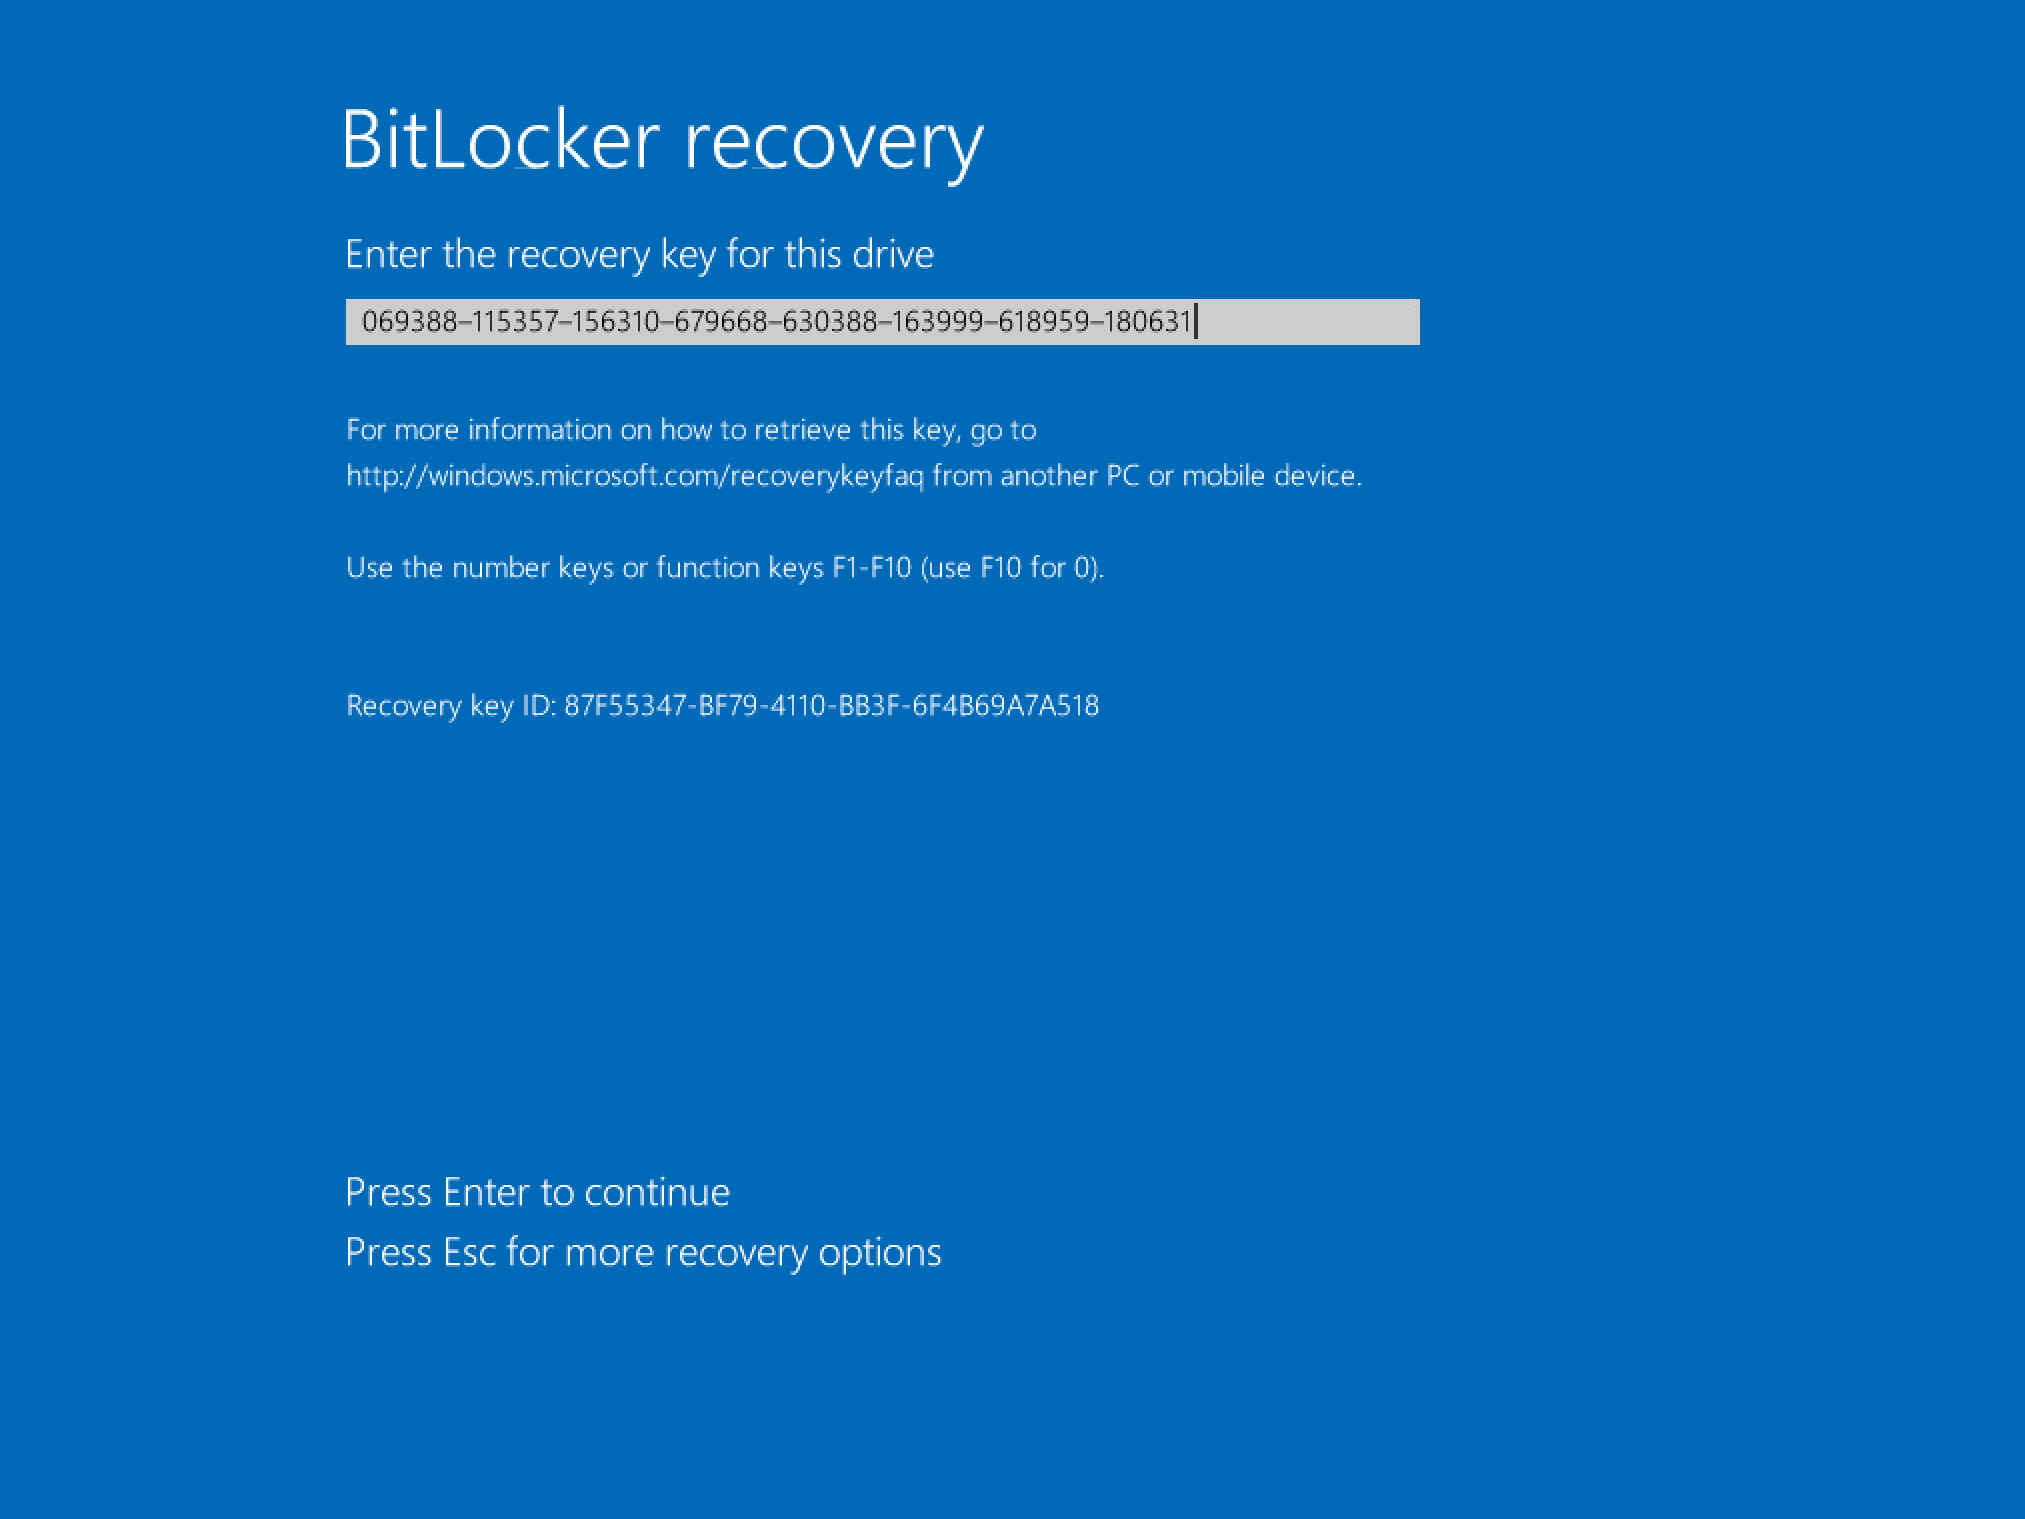
The recovery password (circled in red) can be entered into the BitLocker recovery screen on a client device like so:
5.0 Backup existing BitLocker keys to AD
Backing up the recovery keys to active directory on already encrypted devices is possible too. Open PowerShell as an administrator on an encrypted computer and run the command:
|
|
This will return an output similar to the following:
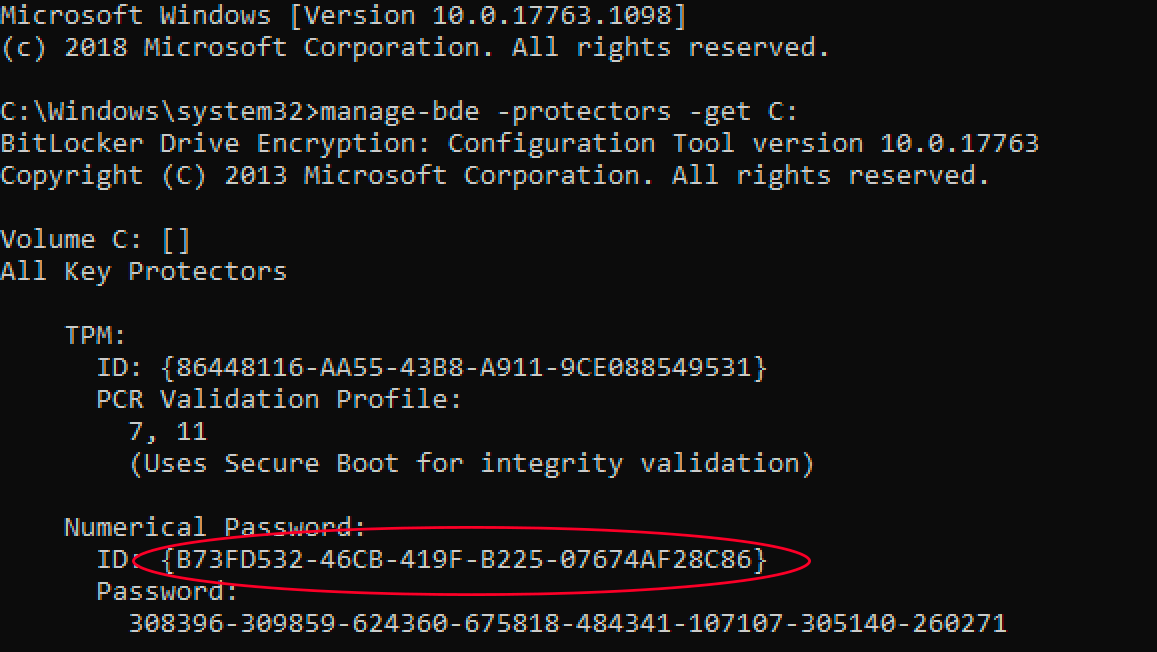
Note the ID number for the numerical password above (circled in red). Use that in the following command:
|
|

That’s it! If you now check the computer object in active directory it will have the client’s key stored.
6.0 Summary
In this post I’ve gone over the steps needed to automatically store BitLocker recovery keys in active directory for new BitLocker installations, and covered one method to add recovery information for existing PC’s too.
Data security and protecting sensitive information is a top priority for organizations of all sizes. One crucial aspect of data security is ensuring that data stored on devices like laptops and desktops is encrypted and can be recovered in case of emergencies or user lockouts.
BitLocker, a disk encryption program with Windows operating systems, provides a robust solution. BitLocker offers a feature that allows administrators to store BitLocker recovery keys using Active Directory, ensuring that these critical keys are securely managed and easily accessible when needed.
In this blog post, we will explore the process of enabling BitLocker recovery key backup via Group Policy Objects (GPO) and several ways to retrieve BitLocker recovery keys.
Table of Contents
Requirements
Active Directory Schema
BitLocker recovery data storage feature is based on the extension of the Active Directory schema. And it brings you extra Active Directory custom attributes. You must verify if your AD schema version has attributes required to store BitLocker recovery keys in Active Directory and check if you need to update the AD schema.
To do this, run the following command from the PowerShell Active Directory module:
Import-module ActiveDirectory
Get-ADObject -SearchBase ((GET-ADRootDSE).SchemaNamingContext) -Filter {Name -like 'ms-FVE-*'}
There should be five following attributes:
- ms-FVE-KeyPackage
- ms-FVE-RecoveryGuid
- ms-FVE-RecoveryInformation
- ms-FVE-RecoveryPassword
- ms-FVE-VolumeGuid

These attributes are available by default starting from Active Directory version on Windows Server 2012.
This article uses Windows Server 2022.
Windows Client
BitLocker works with Windows 10 and 11 Pro, Education, and Enterprise. This article will be using Windows 11 22H2.
Enabling BitLocker Recovery Key Backup via GPO
Users make changes to their computers, and that’s inevitable. Then they reboot their computers, and BAM! Windows is asking for the BitLocker recovery key (password).
In this situation, users will contact the helpdesk or system administrators to help recover their BitLocker recovery keys.
Administrators must enable their backup to Active Directory to ensure the BitLocker keys are recoverable.
- Log in to the domain controller or computer with RSAT installed.
- Open the Group Policy Management Console (GPMC) by running gpmc.msc.
- Within the GPMC, create a new Group Policy Object (GPO) or edit an existing one that you want to use for BitLocker recovery key backup. Ensure that the GPO is linked to the organizational unit (OU) containing the computer objects to which you wish to apply BitLocker.
In this example, I’m creating a new GPO named “BitLocker-WS-Policy” in the “Workstations” OU.
- Open the GPO for editing and navigate to Computer Configuration → Policies → Administrative Templates → Windows Components → BitLocker Drive Encryption.

- Double-click on “Store BitLocker Recovery information in Active Directory Domain Services.”

- Set the policy to Enabled, leave the default selection, as shown below, and click OK. This step enables backing up the BitLocker recovery information in Active Directory.

- Next, select one of the following folders, depending on which drive types you want BitLocker recovery keys to become retrievable.
- Operating System Drives
- Fixed Data Drives
- Removable Data Drives
In this example, I’ll choose “Operating System Drives” and open the “Choose how BitLocker-protected system drives can be recovered” policy.
- Select Enabled and tick the box, “Do not enable BitLocker until recovery information is stored in AD DS for .” These settings enable the recoverability of BitLocker keys, and BitLocker will not be enabled until recovery information is stored in AD DS.

- The policy will be updated on the target computers in the next cycle. But if you want to force it, run gpupdate /force on the affected computers.

- Then, check if the policy is applied:
gpresult /r

Turn On BitLocker Protection on Drives
Now that the policy is deployed to back up BitLocker recovery keys in AD, let’s test it by turning on BitLocker protection.
Open the File Explorer, navigate to “This PC,” right-click on the drive, and click “Turn on BitLocker.”

And go through the steps to finish enabling BitLocker encryption. Refer to Turn on device encryption for the complete steps the user can follow.
Retrieving BitLocker Recovery Keys
You can find available recovery keys for each computer on the new tab “BitLocker Recovery”. It is located in the computer account properties in the Active Directory Users and Computers snap-in.
But first, the BitLocker Management Tools must be installed on the domain controller. To do so, run the following command to install the BitLocker Management Tools.
Install-WindowsFeature RSAT-Feature-Tools-BitLocker-BdeAducExt

Using the BitLocker Recovery Tab in the Computer Properties
After the installation, re-open ADUC, open the computer’s properties, and navigate to the “BitLocker Recovery” tab. You’ll see the recovery password that you can provide to the user so they can unlock their BitLocker-protected drive.

Using the “Find BitLocker recovery password” Tool
If the user can provide the first eight characters of the BitLocker password ID, you can also use the Find BitLocker recovery password tool in ADUC.
Open ADUC, click Action → Find BitLocker recovery password. Enter the first eight characters of the password ID and click Search. If the partial password ID is valid, you will see the corresponding BitLocker recovery password, as shown below.

Using PowerShell Script
Using a PowerShell script to retrieve the BitLocker recovery keys can be quick, convenient, and handy. It only requires the ActiveDirectory PowerShell module; all necessary commands are already included.
Copy the script below and save it to your computer as Get-BitLockerRecoveryPassword.ps1. This script accepts two parameters: ComputerName and KeyId. You can only use one parameter at a time.
# Get-BitLockerRecoveryPassword.ps1
[CmdletBinding(DefaultParameterSetName = ‘byComputerName’)]
param (
[Parameter(Mandatory, ParameterSetName = ‘byComputerName’)]
[string]
$ComputerName,
[Parameter(Mandatory, ParameterSetName = ‘byKeyId’)]
[string]
$KeyID
)
if ($PSCmdlet.ParameterSetName -eq ‘byComputerName’) {
try {
$computerObj = Get-ADComputer $ComputerName -ErrorAction Stop
$blObj = Get-ADObject -Filter { objectclass -eq ‘msFVE-RecoveryInformation’ } -SearchBase $computerObj.DistinguishedName -Properties * -ErrorAction Stop
}
catch [Microsoft.ActiveDirectory.Management.ADIdentityNotFoundException] {
“The AD computer [$($ComputerName)] is not found.” | Out-Default
}
catch {
}
}
if ($PSCmdlet.ParameterSetName -eq ‘byKeyId’) {
if ($KeyID.Length -eq 8) {
$keyId = “*{$keyID*”
$blObj = Get-ADObject -Filter { objectclass -eq ‘msFVE-RecoveryInformation’ -and CN -like $KeyID } -Properties *
}
else {
“The KeyId must be exactly the first 8 characters of the Password ID.” | Out-Default
}
}
if ($blObj) {
[PSCustomObject]$([ordered]@{
‘Computer Name’ = $(($blObj.DistinguishedName -split ‘,’)[1].Replace(‘CN=’, ”))
‘Password ID’ = $(([regex]::Match($blObj.DistinguishedName, ‘\{(.*?)\}’)).Groups[1].Value)
‘Recovery Password’ = $($blObj.’msFVE-RecoveryPassword’)
})
}
You can also download this script from this Gist → Get BitLocker Recovery Password from AD.
After saving the script, open PowerShell and change the working directory to the script location.
cd <path to script>
Run the command below to get the BitLocker recovery key by computer name.
.\Get-BitLockerRecoveryPassword.ps1 -ComputerName <COMPUTER NAME>
You’ll see the following result if the computer exists and has a BitLocker recovery password.

If the computer does not exist, you’ll get this error:

There will be no output if the computer exists but has no BitLocker recovery keys.
![]()
Run the command below to get the BitLocker recovery key by looking up the first eight characters of the Password ID.
.\get-BitLockerRecoveryPassword.ps1 -KeyID 12345678
If the password ID matches, you’ll get the following result.

You’ll get the following error if the Key ID you provided is not eight characters.

If the password ID is not found, there will be no result.

Delegating Permissions to View BitLocker Recover Keys in AD
Administrators have better things to do than retrieving BitLocker recovery passwords. This is why the task can be delegated to a group whose primary role is to support end users, such as the Help Desk.
You can delegate the permissions to view information about BitLocker recovery keys in AD, and here’s how.
- Create a group (or select an existing group) that will be delegated to view BitLocker recovery keys. In this example, I created a security group called “BitLocker Password Viewers.”

- Add members to this group as needed.

- Right-click on the Active Directory OU that contains the computer objects with BitLocker recovery keys and click Delegate Control.

- Add the delegate group to the list and click Next.

- Select the “Create a custom task to delegate” option and click Next.

- Select the “Only the following objects in the folder” option, tick the “msFVE-RecoveryInformation objects” box, and click Next.

- Select the “Read” permissions, as shown below, and click Next.

- Review the delegation summary and click Finish.

- All users added to the “BitLocker Password Viewers” group can view the Recovery tab with BitLocker recovery information.

Conclusion
Safeguarding sensitive data is a paramount concern. Integrated with Windows, BitLocker offers a robust solution for encrypting and protecting data on devices like laptops and desktops. It securely manages and readily provides BitLocker recovery keys via Active Directory.
This blog post covers enabling BitLocker recovery key backup via Group Policy Objects (GPO) and retrieving keys. Prerequisites include an updated Active Directory schema and compatible Windows clients. Follow the steps for GPO configuration to ensure recoverability and secure storage in Active Directory.
We also explore three key retrieval methods: the BitLocker Recovery tab in Active Directory Users and Computers, the “Find BitLocker recovery password” tool, and a PowerShell script. These options offer flexibility for different scenarios.
Lastly, we discuss delegating permissions to specific groups, like a Help Desk team, to view BitLocker recovery keys in Active Directory efficiently. BitLocker simplifies data security and management, enhancing organizations’ data protection strategies.