Setting up the UniFi Network Controller using Docker
https://pimylifeup.com/unifi-docker/
Once you have Docker installed, our next step is to prepare your system to run the UniFi Network Controller container.
The main thing we need to do here is create a directory to store the UniFi containers Compose file and all of its data.
You can create this directory by running the following command within the terminal.
sudo mkdir -p /opt/stacks/unifiCopyBy utilizing the “-p” option, this command will create any missing directories in the given path.
5. After creating a directory to store our Compose file, we can change to the directory by using the cd command.
cd /opt/stacks/unifiCopyWriting a Compose file for the UniFi Docker Container
6. Our next step is writing the Compose file for the UniFi docker container. This Compose file will instruct Docker what image to download and the environment variables to pass through to it.
You can begin writing this file by typing in the following command.
sudo nano compose.yamlCopy7. Within this file, you will want to type in the following lines.
You must replace “<TIMEZONE>” with a valid TZ Identifier. You can find a list of time zone identifiers from Wikipedia.
For example, we would use “Australia/Hobart” for our time zone.
services:
  unifi:
    user: unifi
    image: ghcr.io/jacobalberty/unifi-docker
    container_name: unifi-controller
    restart: unless-stopped
    ports:
      - "8080:8080"
      - "8443:8443"
      - "3478:3478/udp"
      - "10001:10001/udp"
    environment:
      TZ: "<TIMEZONE>"
    volumes:
      - ./data:/unifiCopy
8. Once you have written the lines above, save and quit by pressing CTRL + X, followed by Y, and then the ENTER key.
Starting the UniFi Docker Container
9. With the Compose file written, all you need to do to bring the UniFi network controller Docker container online is to use the following command.
We use the “-d” option to detach from the current terminal session once the container has started.
docker compose up -dCopyAccessing the UniFi Network Controller Web Interface
10. Now that you have the Docker container for the UniFi network controller running, you will want to access its web interface. You will also need to know the IP address later in this guide.
If you don’t know the local IP address of your machine, you can get it by running the following command.
hostname -ICopyEnsure you set up your device with a static IP address before proceeding further. You do not want your UniFi controller to be assigned a dynamic IP address.
11. Once you know the IP address of your device, go to the following address in your favourite web browser.
Ensure that you replace “<IPADDRESS>” with your IP.
https://<IPADDRESS>:8443Initial Set Up of the UniFi Network Controller
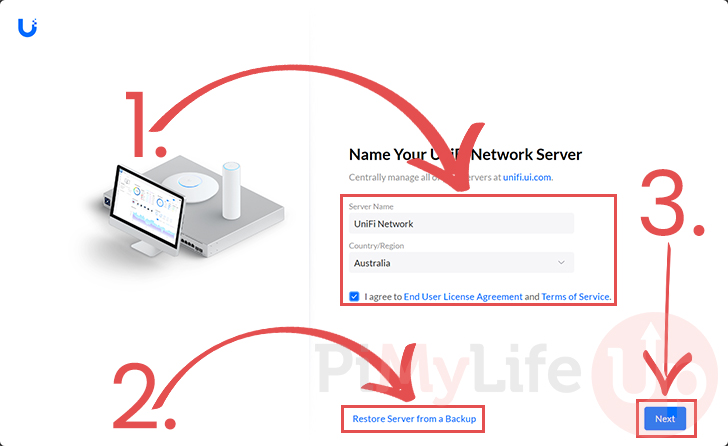
12. When you first access your new Docker-based UniFi Network controller, you must complete some initial set up steps.
If you are setting up this controller as a brand new one, give it a server name, select your country, and accept the terms and conditions (1.).
After filling out your servers details, click the “Next” button (3.) to continue.
However, if you are restoring this from an older UniFi backup, click the “Restore Server from a Backup” link (2.)
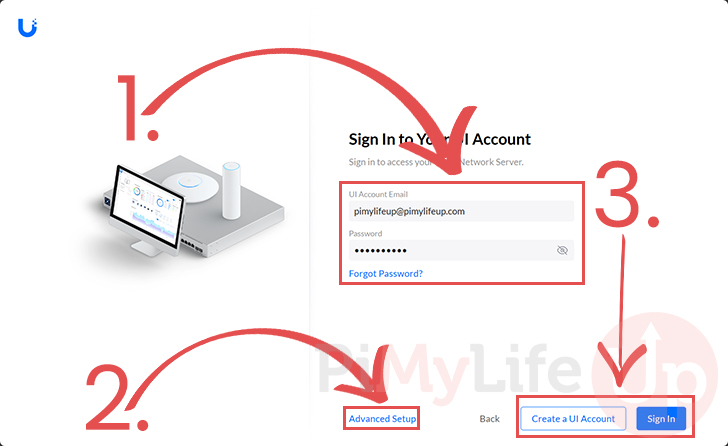
13. If you are setting this controller up from scratch, you will now be asked to sign in to your Ubiquiti account (1.).
After filling out an email and password you can click the “Create a UI Account” button to create a new account, or you can click the “Sign In” button (3.) if you already have an account.
If you prefer not to use a Ubiquiti account on your controller, click the “Advanced Setup” link and follow the prompts (2.).
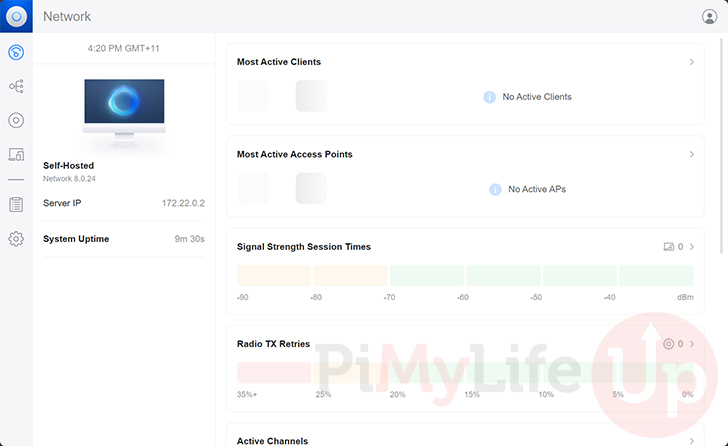
14. At this point, you should now have access to the UniFi network controller web interface.
However, before you can start adopting your Ubiquiti network devices, there is an option you must enable.
Enabling the Inform Host Option
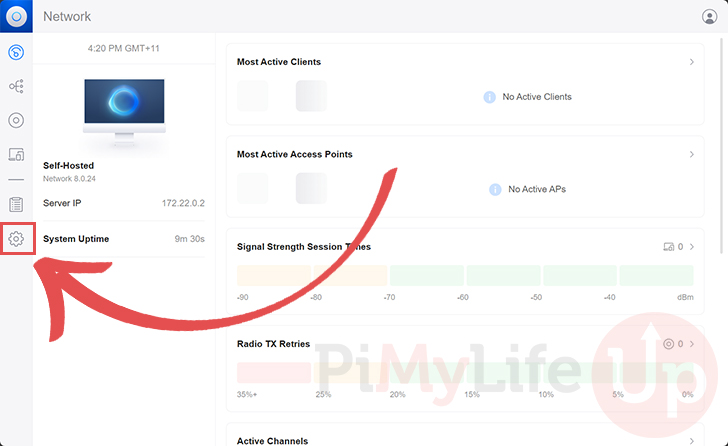
15. For your Ubiquiti devices to detect your Docker-based UniFi network controller, we must enable the “Inform Host” option.
This option lets us tell the IP address the controller should broadcast to available devices. Currently, it will be using the Dockers internal IP rather than the host IP.
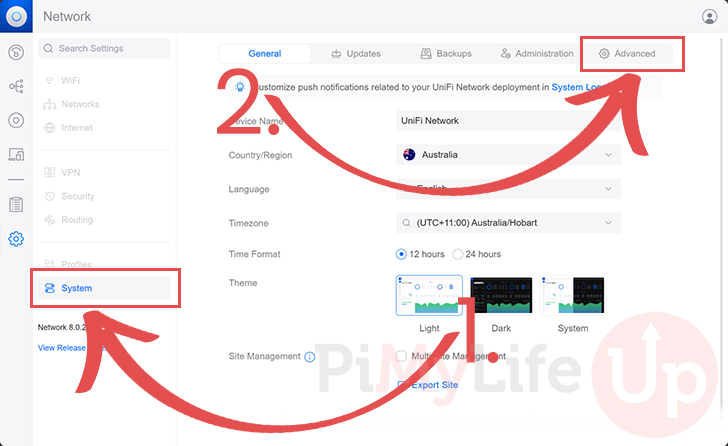
To set this option, you must first switch to the settings page by clicking the cog in the sidebar.
16. Once you are on the settings screen, change to the “System” menu (1.).
After changing to the system settings page, swap to the “Advanced” tab (2.).
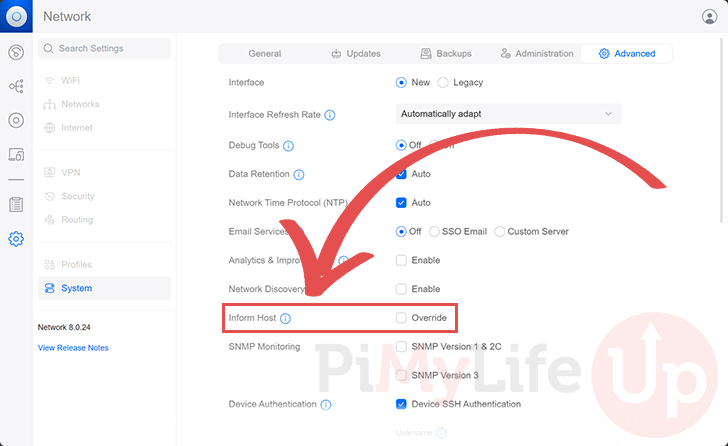
17. On this page, you should find an option labeled “Inform Host“.
Click the checkbox to allow us to begin overriding the host IP.
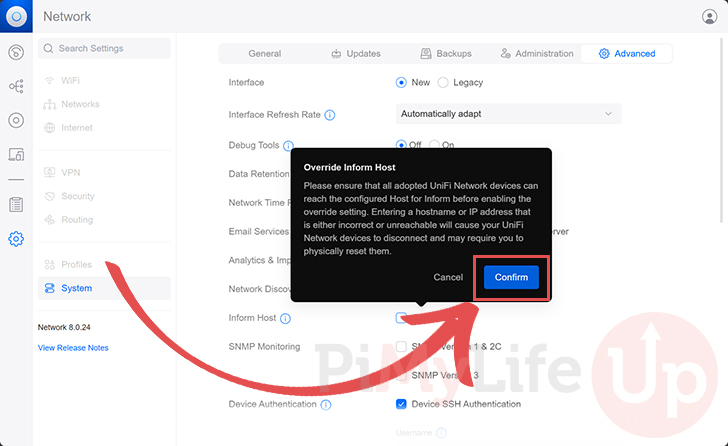
18. Before you can override the inform host value, you will get a warning that misconfiguring this option can cause you to lose access to your devices. You may have to physically reset your Ubiquiti devices if something goes wrong.
You need to ensure that the IP address of your host is correct and reachable. If you are happy to proceed, click the “Confirm” button.
19. A text box will now appear below the “Inform Host” option. Type in the local IP address (1.) of the machine on which you are running the UniFi network controller using Docker.
Once you are happy that you have typed in the correct IP address, click the “Apply Changes” button (2.).

20. Once you have applied your settings, you must restart the UniFi Docker container.
Back in the terminal, you can bring the UniFi container down by using the following command
docker compose downCopy21. Start UniFi back up on your device by running the following command within the terminal.
docker compose up -dCopyUpdating your UniFi Docker Container
One massive advantage of using the UniFi network controller through a Docker container is that updating it is straightforward.
The following steps will walk you through the effortless way of updating to the latest version. You can see what versions are available by visiting the GitHub page for this project.
1. To update the UniFI container, we must change to the directory we created earlier in this guide.
We need to use the Compose file we wrote to pull the latest version of the image.
cd /opt/stacks/unifiCopy2. After swapping to the directory where we wrote the Compose file, you can use the command below to download the latest version of the UniFi container.
docker compose pullCopy3. Finally, if a new version is found, you can get Docker to move over to it using the command below in the terminal.
Docker will detect the new image and restart the container using it.
docker compose up -d
No Comments