# How to install and configure Microsoft LAPS
[https://4sysops.com/archives/how-to-install-and-configure-microsoft-laps/](https://4sysops.com/archives/how-to-install-and-configure-microsoft-laps/)
## Download LAPS
LAPS comprises three components.
1. The interface—A PowerShell module and a fat client GUI
2. An AD schema extension and a group policy extension
3. The client-side component, which performs the password reset and updates Active Directory
Begin by [downloading](https://www.microsoft.com/en-us/download/details.aspx?id=46899) the installation file directly from Microsoft. Note: Be sure to pay attention to the "bitness" of the installer. This walkthrough will assume a 64-bit environment.
The LAPS interface does not need to be installed on a specific server. It can be installed on a purpose-built server or a shared server. You should select a server that your intended audience can already log on to and which is joined to the domain you intend to manage.
## Install LAPS
Log on to your target server with local admin rights.
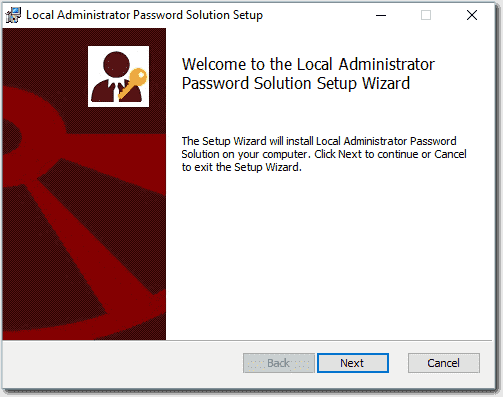
Click **Next** on the Welcome screen.
[](https://docs.coltscomputer.services/uploads/images/gallery/2024-01/H4X94aVotKIGZI5K-welcome-screen.png)
Welcome screen
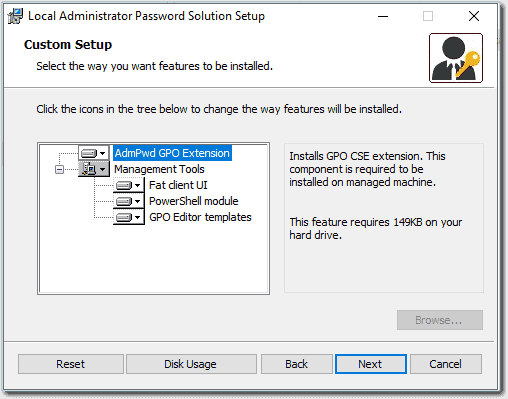
Select all available components and click **Next**.
[](https://docs.coltscomputer.services/uploads/images/gallery/2024-01/3UWQ6gMKxsxYr08z-selecting-the-components.png)
Selecting the components
## Extend the AD Schema
For this step, the logged-on user account will need to be a member of the Schema Admins group in Active Directory. Extend the AD schema by running the following commands from the LAPS PowerShell module you just installed:
Import-module AdmPwd.PS
Update-AdmPwdADSchema
[](https://docs.coltscomputer.services/uploads/images/gallery/2024-01/gd3vjsAiX4pGvUOd-extending-the-schema-600x217.png)
Extending the schema
## Check and set the necessary admin permissions
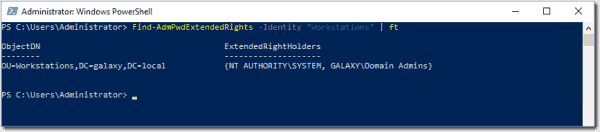
Check and set the permissions on each OU that you will manage with LAPS by using these PowerShell commands:
Find-AdmPwdExtendedRights -Identity “Workstations” | ft
[](https://docs.coltscomputer.services/uploads/images/gallery/2024-01/BBat06YI8XRuzAiF-check-existing-permissions-600x132.png)
Check existing permissions
By default, only the local system account and the domain admins group will have access to the passwords stored in AD. If your domain admins are not the same people that will manage the target machines, you can remove them from this group and add your own custom group. Be sure you don't skip these steps. Not setting the permissions correctly could expose administrator passwords to inappropriate users.
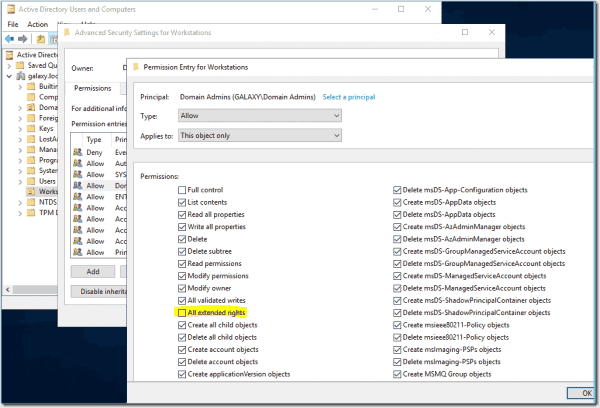
To remove access from an existing user or group, open the security properties for each LAPS-managed OU in Active Directory Users and Computers.
Open the **Advanced Security Settings** and select the security principal to be modified.
Remove the **All Extended Rights** permission, and click **OK** on the permissions window and each parent window.
[](https://docs.coltscomputer.services/uploads/images/gallery/2024-01/oT1f0QAKamAiS4x4-remove-permissions-600x408.png)
Remove permissions
Verify that the security group has been removed by rerunning the *Find-AdmPwdExtendedRights* PowerShell command:
Find-AdmPwdExtendedRights -Identity "Workstation" | ft
[](https://docs.coltscomputer.services/uploads/images/gallery/2024-01/hQ090nmtPvaS8JBr-confirm-permissions-removed-600x102.png)
Confirm permissions removed
Add the permissions for the group that will have access to the passwords:
Note that these permissions are recursive and will apply to the selected OU and everything below it in the tree.
After adding the permissions, verify again using the *Find-AdmPwd* command.
[](https://docs.coltscomputer.services/uploads/images/gallery/2024-01/AQLlnG291JFJHqGr-add-permissions-and-confirm-600x169.png)
Add permissions and confirm
## Grant REST permission to computers
The next step is to allow the computers to update their own admin passwords in the new AD attributes. This needs to be done on all LAPS-managed OUs and is done using the following command:
[](https://docs.coltscomputer.services/uploads/images/gallery/2024-01/mACLxE9jihriYUUs-add-computer-permissions-600x102.png)
Add computer permissions
## Create the Group Policy
Now that Active Directory is ready to receive and store passwords and the appropriate permissions have been assigned to view the passwords, we need to create a policy to configure the LAPS client component. I recommend using a test OU or a test group of machines to begin with until you are confident that everything works.
Open the Group Policy Management Editor on your administration machine or domain controller.
Locate the "Workstations" OU, and right-click it.
Select Create a **GPO in this domain, and Link it here**. Give the Group Policy a meaningful name and click **OK**.
[](https://docs.coltscomputer.services/uploads/images/gallery/2024-01/Or0gBAa9Hv7ZX7mm-creating-the-gpo.png)
Creating the GPO
Right-click your new GPO and select **Edit**.
1. Navigate to **Computer Configuration > Policies > Administrative Templates > LAPS**.
2. Review the settings and apply the values appropriate for your scenario and your organization.
[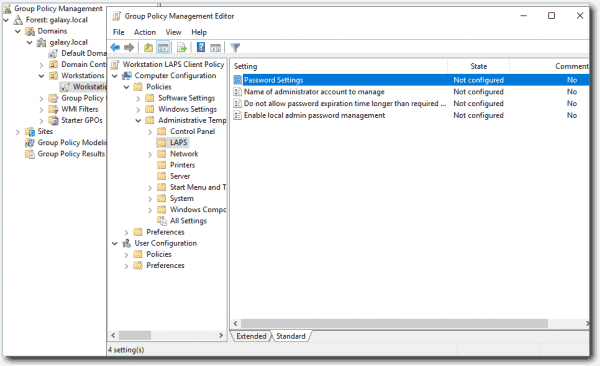](https://docs.coltscomputer.services/uploads/images/gallery/2024-01/btHo7186BdDCEVU8-policy-settings-600x366.png)
Policy settings
The **Password Settings** policy determines the length of the password and the maximum age it can reach before it resets. When the password is reset, the timestamp of the reset date will be recorded in AD. If the time elapsed since the timestamp date and the current date exceeds this value, the computer will reset the password and update AD with the new password and current date and time.
[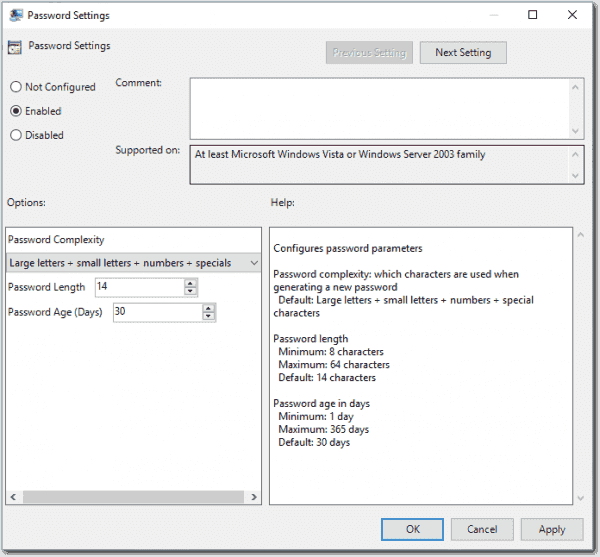](https://docs.coltscomputer.services/uploads/images/gallery/2024-01/Y2zpJHZf7APIGrhr-password-settings-600x557.png)
Password settings
Name the administrator account to manage. If you want to manage the built-in administrator account, leave this setting alone. LAPS will identify the account by the SID even if the account has been renamed.
If you have a specific account you want to manage, such as a company admin account, select **Enabled** and enter the account name.
[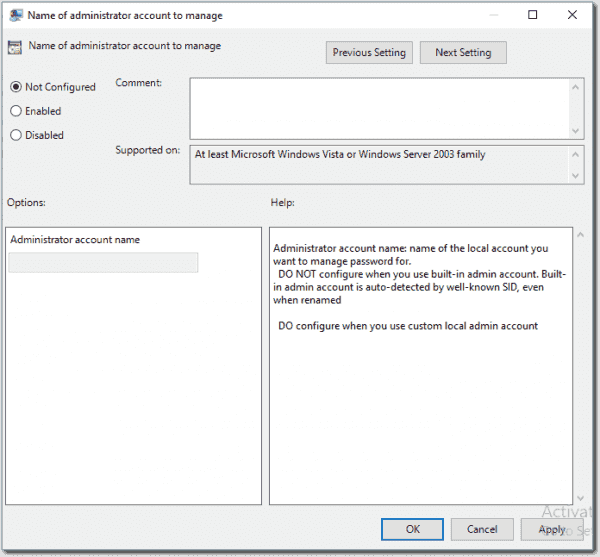](https://docs.coltscomputer.services/uploads/images/gallery/2024-01/v49tDVlHCbXO0e33-selecting-the-admin-account-600x557.png)
Selecting the admin account
Do not allow a password expiration time that is longer than required by policy. Set this to **Enabled**. This will ensure that passwords cannot be forced to have a longer validity period than has been defined in your policy.
[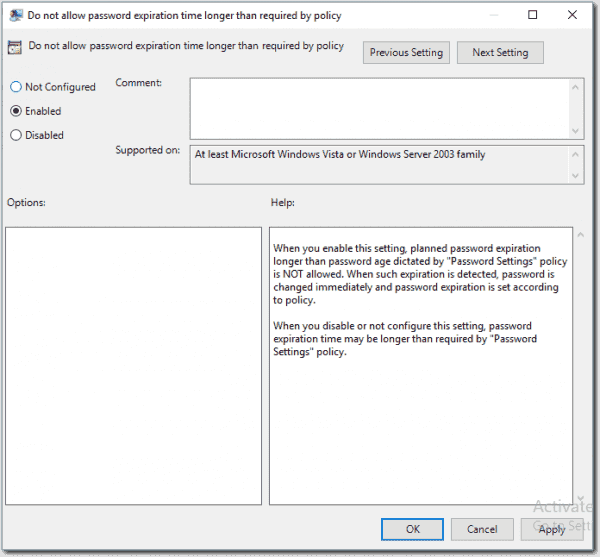](https://docs.coltscomputer.services/uploads/images/gallery/2024-01/DXt48ugcwcfsv6G6-password-expiration-settings-600x557.png)
Password expiration settings
Enable local admin password management. Set this to **Enabled**. This will enable the passwords to be managed for all machines within the scope of this group policy.
[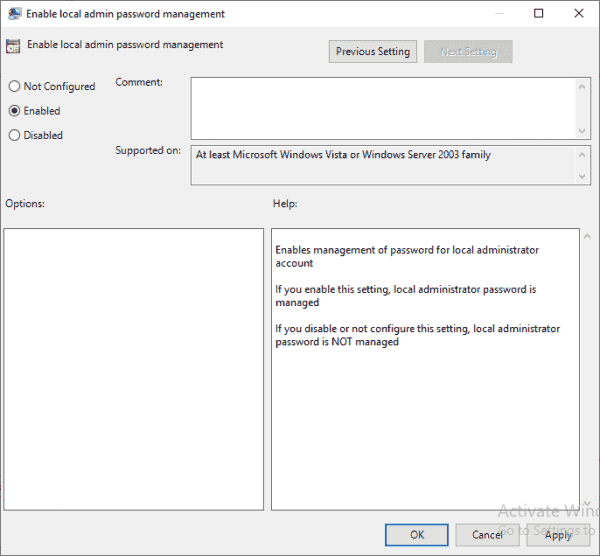](https://docs.coltscomputer.services/uploads/images/gallery/2024-01/9uK57Z5d5RmwmaOz-enabled-local-admin-password-600x556.png)
Enabled local admin password
The following settings will distribute the LAPS client to all in-scope machines. The LAPS client is the tool that will run on each Windows machine to ensure the local password complies with policy. It also updates the AD attributes with the timestamp and new password.
This can be done in any number of ways, from a GPO to an SCCM or InTune package to a third-party software deployment tool. Any system that will deliver and install the executable can be used. In this guide, I have used the same Group Policy that will configure the client.
To create the software deployment policy, you first need to place the installation file on a share that will be accessible to all users/machines. I have shared a subfolder of the domain controller **netlogon** folder. The advantage of this is that it will replicate to all domain controllers automatically, so by using \\\\domain\\share, each client will get the software from their local AD site (note you still need to create the share on each DC unless you put the installer in **netlogon**).
In the GPMC, navigate to **Computer Configuration > Policies > Software Settings > Software installation**.
Right-click **Software installation** and select **New > Package**.
Browse to the share referenced above, select the installer, and click **Open**. Again, be sure to use the correct "bitness." Here, I am using x64 since all of my machines are 64-bit.
[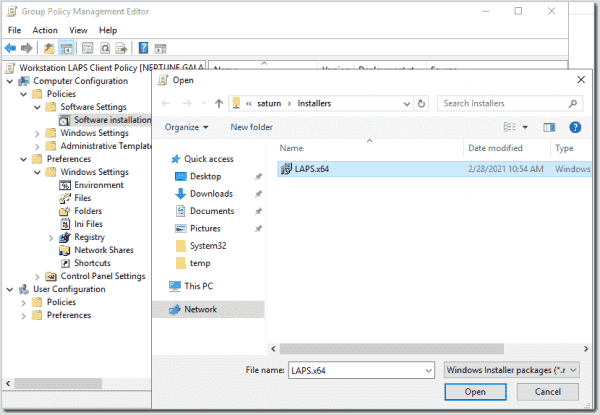](https://docs.coltscomputer.services/uploads/images/gallery/2024-01/cHYK4DDX4Etk6d50-client-software-push-600x415.png)
Client software push
Select the **Assigned** installation type and click **OK**. This will ensure that the software is delivered to machines without user intervention.
[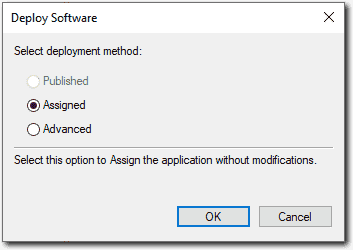](https://docs.coltscomputer.services/uploads/images/gallery/2024-01/3h0jDeE3VdFKcPJw-software-push-assigned.png)
Software push assigned
You will then be returned to the Group Policy settings, where you will see the new software installation settings. You can now close the Group Policy Editor.
[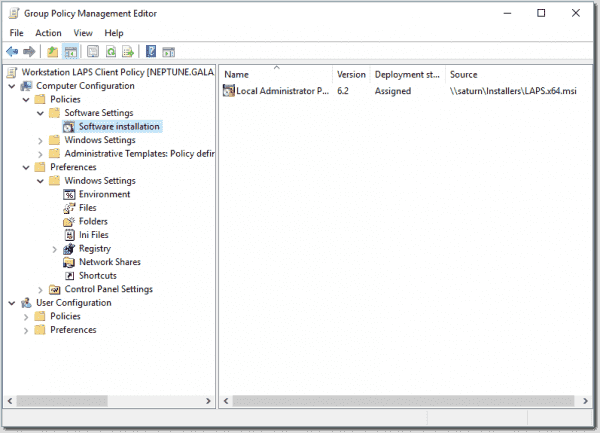](https://docs.coltscomputer.services/uploads/images/gallery/2024-01/Vpgby7Dkqxg3pN12-laps-software-push-policy-600x433.png)
LAPS software push policy
You are now ready to use LAPS. It will take some time for the group policy to be delivered to all machines and for the client to install—so don't expect immediate results. But over the next few hours, or if machines are rebooted, you will see the policies begin to take effect.
## Accessing passwords
Now that your machines are generating random passwords and storing them in Active Directory, you need to be able to get to them.
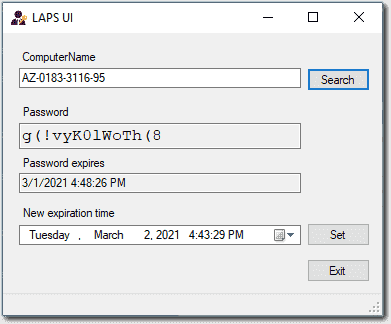
Open the LAPS UI on the management server you used when you installed LAPS at the beginning of this guide. If you are in the security group that was granted access to the LAPS AD attributes, you will be able to paste the machine name and search for the corresponding details:
[](https://docs.coltscomputer.services/uploads/images/gallery/2024-01/idTJENb2XmMkVCvm-laps-gui.png)
LAPS GUI
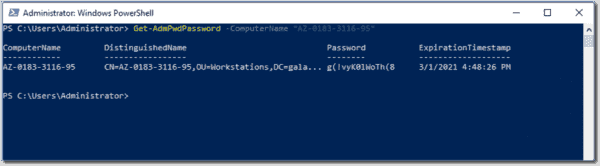
If you need to query multiple machines, or you just prefer the command line, you can also use the PowerShell module to query the password:
[](https://docs.coltscomputer.services/uploads/images/gallery/2024-01/OklyQvE21fyBIXB4-laps-powershell-command-600x166.png)
LAPS PowerShell command
## Trust but verify
Once your deployment is complete, you're going to want to test it before rolling it out to everyone. To test, simply select a test machine that you have access to and retrieve the password using either of the methods above.
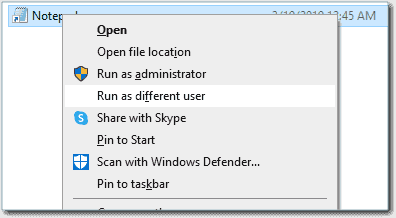
Log in as a restricted user, then locate an application such as Notepad. Right-click (or shift-right-click) the shortcut and select **Run as different user**.
[](https://docs.coltscomputer.services/uploads/images/gallery/2024-01/IPUsGWb52YrVX8dT-run-as-test.png)
Run As Test
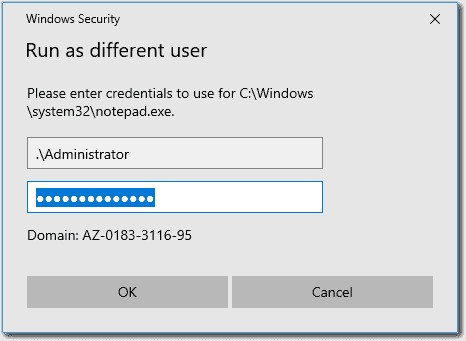
Enter the credentials that you got from the LAPS UI or PowerShell output into the security prompt.
[](https://docs.coltscomputer.services/uploads/images/gallery/2024-01/irvmzXTJTxVoKfzM-test-password.png)
Test password
If everything has gone according to plan, the application will open with elevated access. You can now adjust the scope of your GPO to apply it to all target devices.