Windows OS
- Chkdsk /r replacment
- Chrome Profile Migration
- CMD - SYSPREP
- Decrypt EFS-encrypted files without a cert backup
- Disable Bing Search
- DISM Options
- Find Certificate (SSL) by Thumbprint
- Net USe
- Remove a Domain User Profile from Windows 10
- Remove from Domain
- Remove Local Printer
- Remove Network Printers
- Remove Profile
- Repair Windows
- Reset-ComputerMachinePassword
- Sticky Keys Trick
- Turn off, disable, or uninstall OneDrive
- Unable to see windows updates
- Win 10 Image Restore from Network Location
- Windows 10 update not showing in settings after update
- Windows Update Issues
- Computer Reboot Event Log
Chkdsk /r replacment
https://www.altaro.com/hyper-v/repairing-corrupt-file-systems-vms-repair-volume/Repairing
Corrupt File Systems on VMs with Repair-Volume
Repairing Corrupt File Systems on VMs with Repair-Volume18 Dec 2014 by Luke Orellana9
The other day I ran into one of the most common issues IT pros have to face, file corruption. Out of the blue, one of our clients called in reporting issues printing from their Windows Server 2008 terminal server. This was a VM, which was being hosted on a Server 2008 R2 Hyper-V Cluster. Users were not receiving their redirected printers at logon. It turned out multiple remote desktop services were repeatedly crashing. A read only Check Disk on the system volume reported evidence of corrupt system files. In order to repair the corrupt files, a Check Disk repair had to be run on the system volume which required the server to be offline. This process ended up taking over 6 hours to fully complete the repair resulting in unwanted downtime and lost productivity for the client.
Fortunately, Microsoft has made some improvements to the Check Disk utility in Windows Server 2012 reducing the downtime for offline volume repairs to seconds instead of hours. The Check Disk repair process can now also be ran through Windows PowerShell using the Repair-Volume Cmdlet.
Using the Repair-Volume Cmdlet
Windows PowerShell 4.0 introduced the Repair-Volume Cmdlet. This cmdlet is built upon the Check Disk repair feature and allows repairs to be done on volumes through PowerShell.
In order to scan the volume for corruption without attempting to repair it, open up PowerShell on the VM you’d like to scan and type the following commands. In this example we will use the C volume to scan:
Repair-Volume –driveletter c –scan
repair-volume -scan
Once the scan has completed, PowerShell will report whether or not errors were found on the volume. If there were errors found on the volume, an offline scan and fix will need to be ran in order to fix the errors. This will take the volume offline, scan for errors, and fix any errors that it finds. This will also make the volume inaccessible during the scan, so this needs to be taken into account when planning an offline scan and fix. Also, performing a scan with the –scan parameter is not needed before running an offline scan and fix. You would use the –scan parameter on a volume that you’d want to check for corruption when you can’t take it offline at the moment. In order to perform an offline scan and fix, open up PowerShell and type the following commands:
Repair-Volume –driveletter E -offlinescanandfix
repair-volume -offlinescanandfix
Once the scan and repair is complete, the volume will automatically come back online and will once again be accessible.
Running an Offline Scan and Fix on the System Volume of a Running VM
If you try to run an offline scan and fix on the system volume of a running Windows OS, you will be presented with the following message:
repair-volume -offlinescanandfix failed msg
This is because the system volume is being used to run the Windows OS and cannot be taken offline unless the OS is shut down and that volume is no longer in use. This message can be deceiving because unlike the Check Disk repair utility which gives the option to run the offline repair at the next OS boot; the repair-volume cmdlet does not give the user a choice and will automatically flag the OS to run the Scan at next boot.
Using the Spotfix Parameter
Windows Server 2012 introduced an awesome feature called Check Disk spot fix. This feature allows you to do an online scan on a volume and logs any issues to a file called $corrupt. You can then issue a spot fix repair that will reference that file and repair the logged issues without needing to scan the entire volume again. This considerably speeds up the repair process taking only seconds to take a volume offline and repair, preventing the need to hassle with long outages.
To run a spot fix repair on a volume, first run an online scan on the volume to search for any errors with the following command, in this example we will use the system volume:
Repair-volume –driveletter c –scan
After the scan is run, any issues are automatically logged in the background. You can now initiate a scan using the –Spotfix parameter:
Repair-volume –driveletter c –spotfix
repair-volume -spotfix
Since this is a system volume, just like the example above, the “failed” message will show. However, once a reboot of the OS is done, the spot fix repair will automatically initiate and repair any issues that were logged from the online scan.
Disk Repair on Multiple VMs
The repair-volume cmdlet also allows for multiple VM’s to be scanned for file system issues with just a single line. In the example below I will perform an online scan of the System volume of 3 servers using the –cimsession parameter:
Repair-Volume –driverletter c -scan –cimsession dc01,fs02,fw
repair-volume -cimsession
The online scan will run on each server and the progress of each scan will be displayed.
repair-volume -cimsession results
At the end of the scans the results of each server will be displayed. You can also scan multiple drives of multiple servers by listing all the possible drives you would like to scan.
Repair-Volume –driverletter C,D,E -scan –cimsession dc01,fs02,fw
There are many scenarios where being able to scan multiple servers at once can be beneficial. One example would be if a SAN went down hard because of a power or hardware issue. Once it was back up and fully functional, a good procedure would be to run a repair-volume scan on all the VMs residing on that storage target to check for any instances of file corruption. The repair-volume cmdlet not only allows us to be efficient, but also proactive.
Chrome Profile Migration
Here’s everything you need to do:
-
On the computer that has the Chrome profiles that you want to retain:
-
Copy the “User Data” folder found in this path to portable media: C:\Users\%username%\AppData\Local\Google\Chrome\
-
Export this registry key to the same portable media: [HKEY_CURRENT_USER\Software\Google\Chrome\PreferenceMACs]
-
-
Move the portable media to your new computer.
On the computer that you want to move the Chrome profiles to:
-
Make sure all Chrome browser windows are closed and chrome.exe is not running
-
Copy the “User Data” folder from your portable media to C:\Users\%username%\AppData\Local\Google\Chrome\
-
Double-click the registry key that you saved to portable media in step 2
-
Open Chrome, and you’ll find your profiles are present!
From <https://workconsultants.com/blog/move-google-chrome-profiles-to-a-new-computer/>
CMD - SYSPREP
%WINDIR%\system32\sysprep\sysprep.exe /generalize /shutdown /oobe /quiet
Decrypt EFS-encrypted files without a cert backup
https://tinyapps.org/docs/decrypt-efs-without-cert-backup.html
tinyapps.org / docs / Decrypt EFS-encrypted files without a cert backup
Windows users may unintentionally enable EFS encryption (even from just unpacking a ZIP file created under macOS), resulting in errors like these when trying to copy files from a backup or offline system, even as root:
- Windows:
- File Access Denied
- Access is denied.
- macOS:
- The operation can’t be completed because you don’t have permission to access some of the items.
- Permission denied
- Linux:
- Error splicing file: Permission denied
- Permission denied
Despite popular perception ("If you don't have a copy of the certificate then your files are forever lost.", "If you didn't export the encryption certificates from the computer that encrypted the files then the data in those files is gone forever", etc.), it may be possible to create the necessary certificate from an offline system or backup thanks to Benjamin Delpy's mimikatz and his guide howto ~ decrypt EFS files. Here is an abbreviated (and by turns amplified) version:
0. Copy necessary files
From the offline system, copy these folders and paste them into the directory containing mimikatz.exe on a running system:
- %USERPROFILE%\AppData\Roaming\Microsoft\
- SystemCertificates\
- Crypto\
- Protect\
If the password is unknown, copy these two files as well:
- %WINDIR%\system32\config\
- SAM
- SYSTEM
1. Retrieve certificate thumbprint from one of the encrypted files
cipher /c "D:\Users\foo\Pictures\secret.jpg"
...
    Certificate thumbprint: 096B A4D0 21B5 0F5E 78F2 B985 4A74 6167 8EDA A006

  No recovery certificate found.

  Key information cannot be retrieved.

The specified file could not be decrypted.
2. Export certificate and its public key to DER
mimikatz # crypto::system /file:"SystemCertificates\My\Certificates\096BA4D021B50F5E78F2B9854A7461678EDAA006" /export
...
        Key Container  : d209e940-6952-4c9d-b906-372d5a3dbd50
        Provider       : Microsoft Enhanced Cryptographic Provider v1.0
...
  Saved to file: 096BA4D021B50F5E78F2B9854A7461678EDAA006.der
3. Find the master key
Check files within Crypto\RSA\SID\ to find the one containing a pUniqueName which matches the key container found in step 2, e.g.,
mimikatz # dpapi::capi /in:"Crypto\RSA\S-1-5-21-3425643682-3879794161-2639006588-1000\43838b0ac634d4f965f7c24f0fa91b2b_a55eeef9-ab65-4716-a466-adfc937caecd"
...
  pUniqueName        : d209e940-6952-4c9d-b906-372d5a3dbd50
...
  guidMasterKey      : {92f17fce-aae6-488b-9fd8-7774c6c3eb16}
4. Recover NTLM hash if necessary
If the password is unknown, recover the NTLM hash:
mimikatz # lsadump::sam /system:SYSTEM /SAM:SAM
...
RID  : 000003e8 (1000)
User : foo
  Hash NTLM: 31d6cfe0d16ae931b73c59d7e0c089c0
For domain accounts, you'll only need the NTLM hash (/hash:xx); for local accounts, you'll need either the corresponding password (/password:xx) or its SHA1 hash (/hash:xx), which means knowing, cracking, or looking it up:1
- Lookup online:
- Lookup offline:
- Crack via hashcat or similar
5. Decrypt the master key
In this example, we have a local account with an NTLM hash of 31d6cfe0d16ae931b73c59d7e0c089c0, which corresponds to a blank password and a SHA1 hash of da39a3ee5e6b4b0d3255bfef95601890afd80709:
mimikatz # dpapi::masterkey /in:"Protect\S-1-5-21-3425643682-3879794161-2639006588-1000\92f17fce-aae6-488b-9fd8-7774c6c3eb16" /hash:da39a3ee5e6b4b0d3255bfef95601890afd80709
...
[masterkey] with hash: da39a3ee5e6b4b0d3255bfef95601890afd80709 (sha1 type)
  key : 6e24723a56a885fc957f25d4872cbbf10589b1f08033d32174ef3618a192f0e101e41196ca76d689057737429af000af2d7e19497ef2151344dfdfdfb9a6bfd0
  sha1: 4505118da94b7df471bbbcf6d2c6c744a612e62b
6. Decrypt the private key
mimikatz # dpapi::capi /in:"Crypto\RSA\S-1-5-21-3425643682-3879794161-2639006588-1000\43838b0ac634d4f965f7c24f0fa91b2b_a55eeef9-ab65-4716-a466-adfc937caecd" /masterkey:4505118da94b7df471bbbcf6d2c6c744a612e62b
...
        Private export : OK - 'raw_exchange_capi_0_d209e940-6952-4c9d-b906-372d5a3dbd50.pvk'
7. Build PFX certificate
with OpenSSL:2
openssl.exe x509 -inform DER -outform PEM -in 096BA4D021B50F5E78F2B9854A7461678EDAA006.der -out public.pem openssl.exe rsa -inform PVK -outform PEM -in raw_exchange_capi_0_d209e940-6952-4c9d-b906-372d5a3dbd50.pvk -out private.pemwriting RSA keyopenssl.exe pkcs12 -in public.pem -inkey private.pem -password pass:bar -keyex -CSP "Microsoft Enhanced Cryptographic Provider v1.0" -export -out cert.pfx
8. Install PFX certificate
certutil -user -p bar -importpfx cert.pfx NoChain,NoRoot
Certificate "user" added to store.
CertUtil: -importPFX command completed successfully.
9. Access your files!
Your files should now be accessible, but you may want to take this opportunity to decrypt them:
cipher /d "D:\Users\foo\Pictures\secret.jpg"

cipher /d /s:"D:\Users\foo\Pictures\"
(or right click → Advanced → uncheck "Encrypt contents to secure data" → OK).
Footnotes
-
Benjamin mentions a few other possibilities: domain backup key, CREDHIST, and extracting NTLM & SHA1 hashes along with masterkeys from a full memory dump.
-
3gstudent suggests using cert2spc.exe and pvk2pfx.exe instead of openssl.exe:
cert2spc.exe 096BA4D021B50F5E78F2B9854A7461678EDAA006.der public.spc
pvk2pfx.exe -pvk raw_exchange_capi_0_d209e940-6952-4c9d-b906-372d5a3dbd50.pvk -pi test -spc public.spc -pfx cert.pfx -f
A potential downside of this approach is having to download the 810MB Windows 10 SDK rather than a 2MB OpenSSL binary; on the other hand, you don't have to trust a third party. Mount the Windows 10 SDK ISO and extract cert2spc.exe and pvk2pfx.exe via lessmsi; find cert2spc.exe in Installers\Windows SDK Signing Tools-x86_en-us.msi (ARM, x64, and x86 versions included) and pvk2pfx.exe in Installers\Windows SDK Desktop Tools x86-x86_en-us.msi, Installers\Windows SDK Desktop Tools x64-x86_en-us, and Installers\Windows SDK Desktop Tools arm64-x86_en-us.msi.
Sources
- howto ~ decrypt EFS files
- Retrieving lost Windows 10 password, using Kali Linux, mimikatz and hashcat
Related
- Search for EFS-encrypted files:
cipher /u /n - View or backup existing certs via reykeywiz.exe or certmgr.msc
- Advanced EFS Data Recovery "helps recovering the encrypted files under various circumstances.
- EFS-protected disk inserted into a different PC
- Deleted users or user profiles
- User transferred into a different domain without EFS consideration
- Account password reset performed by system administrator without EFS consideration
- Damaged disk, corrupted file system, unbootable operating system
- Reinstalled Windows or computer upgrades
- Formatted system partitions with encrypted files left on another disk"
- Encrypting File System
- About EFS (Encryption File System)
- So my dad asked me to help regain access to some "encrypted files"...
- encrypted file system recovery
- Files remain encrypted after you copy the files from an encrypted folder to a WebDAV share if the files are copied by using a computer that is running Windows 7 or Windows Server 2008 R2
- Encrypting File System (EFS) files appear corrupted when you open them
- HOW TO: Prevent Files from Being Encrypted When Copied to a Server
- To Create A Personal Information Exchange (PFX) File
- MCTS 70-680: Encrypting File System (EFS)
- EFS and decrypting a file:
If you have your original profile, you can use "reccerts" tool to retrieve the private key to recovery EFS file.
...reccerts.exe -path: "profile path" -password:<password>
But you have to contact to Microsoft Support to get this tool.
created: 2019.10.18, updated: 2022.11.19
Disable Bing Search
-
Run Regedit.exe—just hit the Windows key and the R key to launch Run: dialog, type “Regedit,” and hit “OK.” Then hit “Yes” when it asks if you want to make changes.
-
Find HKEY_CURRENT_USER\SOFTWARE\Microsoft\Windows\CurrentVersion\Search
-
Find BingSearchEnabled, and if it’s not there, create it by selecting New > DWORD (32-bit) Value > entering “BingSearchEnabled”
-
Select that, set it to 0, and select “OK”
-
Repeat the steps for BingSearchEnabled for CortanaConsent
-
Reboot and you’re done
From <https://gizmodo.com/search-on-windows-10-was-borked-but-microsoft-says-it-1841471161>
DISM Options
|
DISM.exe /Online /Cleanup-image /Restorehealth |
|
DISM.exe /Online /Cleanup-Image /RestoreHealth /Source:C:\RepairSource\Windows /LimitAccess |
|
DISM /Online /Cleanup-Image /StartComponentCleanup |
|
DISM /Online /Cleanup-Image /AnalyzeComponentStore |
|
DISM /Online /Cleanup-Image /RestoreHealth /Source:E:\Sources\install.wim |
DISM /Online /Cleanup-Image /ScanHealth
DISM /Online /Cleanup-Image /CheckHealth
Find Certificate (SSL) by Thumbprint
-
Open Powershell as admin
-
Change to the cert directory by using the command:
-
cd cert:
-
Search for a certificate by using this command:
-
dir -recurse | where {$_.Thumbprint -eq “THUMBPRINT”} | Format-List -property *
Net USe
To get a cmd line listing of network drives:
Net use
To remove a network drive (f:)
Net use F: /delete
To map a network drive (F: to //myserver/myshare
Net use F: //myserver/myshare
#to use different account than login
net use g: \\RHSC-00-HVSRV05\C$ /user:rhsc\adminjohnson
Remove a Domain User Profile from Windows 10
To delete a user profile in Windows 10, do the following.
-
Press Win + R hotkeys on the keyboard. The Run dialog will appear on the screen. Type the following into the text box and press Enter:
SystemPropertiesAdvanced

-
Advanced System Properties will open. There, click on the Settings button in the User Profiles section.

-
In the User Profiles window, select the profile of the user account and click the Delete button.
-
Confirm the request, and the profile of the user account will now be deleted.
The next time the user signs in, his or her profile will be re-created automatically, with all the default options and settings.
You might also be interested in learning how to delete a user profile manually. This procedure involves File Explorer and the Registry editor app.
Delete a user profile in Windows 10 manually
-
Open File Explorer.
-
Go to the folder C:\Users and look for the user name which you want to delete. The appropriate folder contains everything related to the user profile, so you just need to delete this folder.
-
Now, open Registry Editor.
-
Go to the following Registry key.
HKEY_LOCAL_MACHINE\SOFTWARE\Microsoft\Windows NT\CurrentVersion\ProfileList
See how to go to a Registry key with one click. -
On the left, go through the subkeys. For each subkey, look for the value data of the ProfileImagePath string value. Once you find the one which points to the deleted user profile, remove it. See the following screenshot:
That's it! You just deleted the user profile for the account. It will be re-created using defaults the next time the user signs in.
From <https://winaero.com/blog/delete-user-profile-windows-10/>
https://winaero.com/blog/delete-user-profile-windows-10/
https://us-clover.passportalmsp.com/digidocs/digidoc/app/4337118/340870#/view
Remove from Domain
Cmd
netdom remove RHSC-14-HVSRV01 /domain:RHSC.local
POWERSHELL
$cmpter = hostname
netdom remove $cmpter /domain:$env:USERDOMAIN
Remove Local Printer
RUNDLL32 printui.dll, PrintUIEntry /dl /n "HP Color LaserJet 2600n (Copy 1)"
RUNDLL32 printui.dll, PrintUIEntry /dl /n "Generic /Text Only Test"
RUNDLL32 printui.dll, PrintUIEntry /dl /n "HP Officejet Pro X576dw MFP PCL 6 (Network)"
RUNDLL32 printui.dll, PrintUIEntry /dl /n "Fax - HP Officejet Pro X576dw MFP (Network)"
RUNDLL32 printui.dll, PrintUIEntry /dl /n "HPDCA377 (HP Photosmart 6520 series)"
RUNDLL32 printui.dll, PrintUIEntry /dl /n "Canon MB2300 series FAX"
Remove Network Printers
You can remotely remove the printer from the registry (I assume you have
admin rights on the remote system).
HKCU\printers\connections
just delete the key for the old printer then stop/start the spooler
Pasted from <http://help.lockergnome.com/windows/Removing-ers-remotely--ftopict440987.html>
To remove stuck print jobs:
net stop spooler
del %systemroot%\system32\spool\printers\*.shd
del %systemroot%\system32\spool\printers\*.spl
net start spooler
From <https://support.microsoft.com/en-us/kb/946737>
"Remove-Printer -Name ""*ServerName*"""
"Get-Printer -Name ""*ServerName*"""
Remove Profile
If you have a corrupt profile in Windows 10 there are two easy ways to remove it and rebuild it:
1: REMOVE CORRUPT WINDOWS PROFILE USING GUI:
CONTROL PANEL > SYSTEM AND SECURITY > SYSTEM > ADVANCED SYSTEM SETTINGS (from the menu on the LEFT)
.
Click SETTINGS button in the USER PROFILES section
.
Click on the user that has issues and click the DELETE button (note that you can not delete the profile you are using)
2: REMOVE CORRUPT WINDOWS PROFILE MANUALLY:
Open File Explorer (This PC) and go to C:\USERS\
.
Right click on the profile you want to remove and select DELETE
.
remove-corrupt-windows10-profile-manuallyOpen RegEdit
.
Expand HKLM > SOFTWARE > MICROSOSFT > WINDOWS NT > CURRENTVERSION > PROFILELIST
.
Click on each entry until you see the PROFILE IMAGE PATH that matches the one you want to delete
.
Right click on that entry and select DELETE
Reboot and sign in with the username you just removed and a nice new profile should be created.
Repair Windows
There are several ways to repair Windows when corrupt. Running sfc /scannow is a good start. If this does not repair then you can try the DISM tool. A good article about the DISM tool can be found here:
http://www.windowscentral.com/how-use-dism-command-line-utility-repair-windows-10-image
<img height="1" width="1" style="display:none" src="https://www.facebook.com/tr?id=220642544984887&ev=PageView&noscript=1"/>
Before you begin
It's important to note that you'll be making changes to your computer, as such it's recommended to do a full backup or create a system restore point in case things go wrong, and you need to rollback the changes.
How to run DISM commands to fix Windows 10
There are three main options you can use with DISM to repair the Windows image on your computer, including CheckHealth, ScanHealth, and RestoreHealh -- and you want to use them in this order.
Using DISM with the CheckHealth option
Use the DISM command with the /CheckHealth switch to verify whether any corruption has been detected. This command can only be used to see if corruption exists, but it doesn't perform any repairs.
To run the command do the following:
-
Use the Windows key + X keyboard shortcut to open the Power User menu and select Command Prompt (Admin).
-
Type the following command and press Enter:
DISM /Online /Cleanup-Image /CheckHealth

Using DISM with the ScanHealth option
Use the DISM command with the /ScanHealth switch to scan the Windows image for any corruption. Unlike the /CheckHealth, the /ScanHealth witch can take up to 10 minutes to complete the process.
To run the command do the following:
-
Use the Windows key + X keyboard shortcut to open the Power User menu and select Command Prompt (Admin).
-
Type the following command and press Enter:
DISM /Online /Cleanup-Image /ScanHealth

Using DISM with the RestoreHearlh option
Use the DISM command with the /RestoreHealth switch to scan the Windows image for any corruption and to perform a repair automatically. Unlike the /ScanHealth switch, the /RestoreHealth switch can take up to 20 minutes to complete the process.
To run the command do the following:
-
Use the Windows key + X keyboard shortcut to open the Power User menu and select Command Prompt (Admin).
-
Type the following command and press Enter:
DISM /Online /Cleanup-Image /RestoreHealth

Note: While the running DISM using the /RestoreHealth or /ScanHealth, you will notice the process will seem stuck at 20% or 40%, but it's normal behavior. After a few minutes, the operation will finish as expected.
When you run the command mentioned above, DISM will try to use Windows Update to replace the damaged files. However, if the problem has also extended to the Windows Update components, then you'll need to specify a source containing the known good files to repair the image.
Using DISM with the RestoreHearlh and Source options
You can specify a new location for the known good files by using the /Source switch alongside /RestoreHealth.
Before you can use the repair commands, you will either need a copy of the install.wim file from another computer, a Windows 10 installation media, or the Windows 10 ISO file. It's also very important that the source of the known good files matches the same version, edition, and language of the operating system you're using.
You can download the ISO for Windows 10 using these instructions:
-
Visit the Microsoft Windows 10 download page.
-
Click the Download tool now button.
-
Double-click the file to run the Media Creation Tool.
-
Follow the on-screen directions to create an ISO file with the same version and edition of your current version of Windows 10.
-
Once the process completes, double-click the file to mount the ISO, and note the drive letter as you'll need it set the source path.
Note: If you come across any issues using the ISO using the Media Creation Tool, you can try downloading the Windows 10 installation files from the Microsoft's Tech Bench Upgrade Program site.
Now you are ready to run the command to fix the Windows image:
-
Use the Windows key + X keyboard shortcut to open the Power User menu and select Command Prompt (Admin).
-
Type the following command and press Enter:
DISM /Online /Cleanup-Image /RestoreHealth /Source:repairSource\install.wim

Or you can also run the following to limit the use of Windows Update:
DISM /Online /Cleanup-Image /RestoreHealth /Source:repairSource\install.wim /LimitAccess

Alternatively, you can also use following variant of the previous command to accomplish the same task:
DISM /Online /Cleanup-Image /RestoreHealth /Source:wim:repairSource\install.wim:1 /LimitAccess
Note: Remember to replace "repairSource" for the path to the source with known good files. For example, D:\Sources\install.wim.
The command will perform a Windows image repair using the known good files included within the install.wim file using the Windows 10 installation media, and without trying to use Windows Update as a source to download the required files for repair.
Using DISM with an install.ESD file
Alternatively, you can not only specify a source pointing to install.WIM, but you can also use an install.ESD file, which is an encrypted version of Windows image.
If you have upgraded to Windows 10 from a previous version of the operating system, the installation files may still stored on the C: drive, which means that you may just have a source of known good files.
To use the install.esd to repair the Windows image in your computer use the following steps:
-
Use the Windows key + X keyboard shortcut to open the Power User menu and select Command Prompt (Admin).
-
Type the following command and press Enter:
DISM /Online /Cleanup-Image /RestoreHealth /Source:C:\$Windows.~BT\Sources\Install.esd
Or you can also run the following to limit the use of Windows Update:
DISM /Online /Cleanup-Image /RestoreHealth /Source:C:\$Windows.~BT\Sources\Install.esd /LimitAccess
Alternatively, you can also use following variant of the previous command to accomplish the same task:
DISM /Online /Cleanup-Image /RestoreHealth /Source:esd:C:\$Windows.~BT\Sources\Install.esd:1 /LimitAccess
Or if the install.esd is located on another drive use the following command:
DISM /Online /Cleanup-Image /RestoreHealth /Source:repairSource\Install.esd

Note: Remember to replace "repairSource" for the path to the source with known good files. For example, D:\Sources\install.esd.
The Deployment Image Servicing and Management (DISM) utility will always create a log file at %windir%/Logs/CBS/CBS.log capturing any problems the command-line utility fixed or found.
How to repair Windows 10 problems
The instructions you've learned thus far are to repair the Windows image. Now you can use the Windows image to fix the problems in your Windows 10 installation using the System File Checker (SFC) utility.
-
Use the Windows key + X keyboard shortcut to open the Power User menu and select Command Prompt (Admin).
-
In the Command Prompt type the following command and press Enter:
sfc /scannow
From <http://www.windowscentral.com/how-use-dism-command-line-utility-repair-windows-10-image>
Reset-ComputerMachinePassword
Reset-ComputerMachinePassword
Resets the machine account password for the computer.
Syntax
Reset-ComputerMachinePassword
     [-Server <String>]
     [-Credential <PSCredential>]
     [-WhatIf]
     [-Confirm]
     [<CommonParameters>]
Description
The Reset-ComputerMachinePassword cmdlet changes the computer account password that the computers use to authenticate to the domain controllers in the domain. You can use it to reset the password of the local computer.
Examples
Example 1: Reset the password for the local computer
Reset-ComputerMachinePasswordThis command resets the computer password for the local computer. The command runs with the credentials of the current user.
Example 2: Reset the password for the local computer by using a specified domain controller
Reset-ComputerMachinePassword -Server "DC01" -Credential Domain01\Admin01This command resets the computer password of the local computer by using the DC01 domain controller. It uses the Credential parameter to specify a user account that has permission to reset a computer password in the domain.
Example 3: Reset the password on a remote computer
$cred = Get-Credential
Invoke-Command -ComputerName "Server01" -ScriptBlock {Reset-ComputerMachinePassword -Credential $using:cred}
This command uses the Invoke-Command cmdlet to run a Reset-ComputerMachinePassword command on the Server01 remote computer.
For more information about remote commands in Windows PowerShell, see about_Remote and Invoke-Command.
Parameters
-Confirm
Prompts you for confirmation before running the cmdlet.
| Type: | SwitchParameter |
| Aliases: | cf |
| Position: | Named |
| Default value: | False |
| Required: | False |
| Accept pipeline input: | False |
| Accept wildcard characters: | False |
-Credential
Specifies a user account that has permission to perform this action. The default is the current user.
Type a user name, such as User01 or Domain01\User01, or enter a PSCredential object, such as one generated by the Get-Credential cmdlet. If you type a user name, this cmdlet prompts you for a password.
This parameter was introduced in Windows PowerShell 3.0.
| Type: | PSCredential |
| Position: | Named |
| Default value: | None |
| Required: | False |
| Accept pipeline input: | False |
| Accept wildcard characters: | False |
-Server
Specifies the name of a domain controller to use when this cmdlet sets the computer account password.
This parameter is optional. If you omit this parameter, a domain controller is chosen to service the command.
| Type: | String |
| Position: | Named |
| Default value: | None |
| Required: | False |
| Accept pipeline input: | False |
| Accept wildcard characters: | False |
-WhatIf
Shows what would happen if the cmdlet runs. The cmdlet is not run.
| Type: | SwitchParameter |
| Aliases: | wi |
| Position: | Named |
| Default value: | False |
| Required: | False |
| Accept pipeline input: | False |
| Accept wildcard characters: | False |
Inputs
None
You cannot pipe input to this cmdlet.
Outputs
None
This cmdlet does not generate any output.
Sticky Keys Trick
https://www.thewindowsclub.com/reset-administrator-password-windows-sticky-keys
For a general Windows user, resetting a lost or forgotten administrative password can be a bit troublesome if you don’t have the proper tools and techniques to reset it, depending on the underlying OS that you’re using. However, there are several third-party free password recovery tools available in the market that can help you reset your password, but that’s not our topic here. In this guide, we show you how to reset & recover a lost or forgotten Windows password using a simple Sticky Keys trick.
Sticky Keys enables users to enter key combinations by pressing keys in sequence rather than simultaneously. This is desirable, especially for users who cannot press the keys in combination due to some physical challenges. Although the method of enabling Sticky keys helps simplify various tasks, its system files can be replaced.
You can replace an Ease of Access system file like sethc.exe, with a Command Prompt, and then use cmd.exe to make system changes.
Before proceeding with this method, please make a note of the following:
- When you reset a Windows password, all the files that have been compressed/encrypted using tools such as Encrypting File Systems (EFS) will be lost.
- Stored Internet Explorer passwords and settings will be lost as well.
So if you have a backup it will be good for you.
TIP: Our Ease Of Access Replacer lets you replace Ease of Access button in Windows with useful tools, including CMD.
Reset Administrator password in Windows 11/10
For resetting the password, you will need a Windows PE bootable drive which can be used to access the command prompt where you will have to set the new password.
Follow the below steps once you have the Windows PE DVD booted and ready.
1. Boot from the Windows PE DVD and open Command Prompt from the Advanced troubleshooting menu.
2. Enter the drive letter where your Operating System is installed, which is usually the C: Drive. Initially, you should be on X: drive which is the default residence for Windows PE.
3. Type in the below command after replacing C with the drive where Windows is installed on your PC.
copy C:\Windows\system32\sethc.exe C:\

4. After taking the backup of the original file, run the below command to replace it in the original location.
copy /y C:\Windows\system32\cmd.exe C:\windows\system32\sethc.exe
The above command should replace the sethc.exe file with the cmd.exe file.
5. Now, restart your PC and navigate to the screen where it requires a password. Press the SHIFT key 5 times.
6. A command prompt window should open where you can enter the below command and reset your account password. You can get the list of current users on your PC by using the command net user.
net user your_account new_password
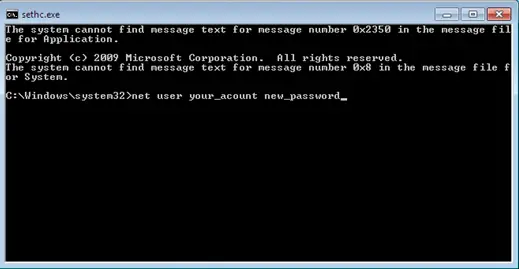
Well, that’s it! You should be able to reset the password now.
Once you are in, you should replace the cmd.exe file with the original sethc.exe system file.
------------------------------------------------------------------------------------------------------------------------
- On Windows computers, you press a special key to access the boot menu or BIOS. If your startup screen doesn't show you which key to press just before the Windows startup logo appears, reboot your computer and quickly press ESC, DELETE, F8, F9, F10, F11, or F12 right as it begins to start up. Search online for "boot menu" and the specific make and model of your computer to find the right key.
- If the boot menu appears, select the Boot from DVD or Boot from USB option to boot from the Windows installation disc you inserted, then move on to step 5.
- If the boot menu doesn't appear after a few restarts, try entering the BIOS menu instead: turn the computer off and on again, and press DELETE, F2, F9, F10, F12, or ESC. Search online for "BIOS" and your computer model to find the right key.
- Once you're inside the BIOS, find the boot options and change the order or priority of your boot devices (often by using your arrow keys) to make the USB or DVD the top option. Then save the changes and exit the BIOS.
- Reboot the computer again. You should briefly see the message Press any key to boot from CD or DVD or Press any key to boot from USB device. Press any key (such as the spacebar) immediately to boot from your DVD or USB.
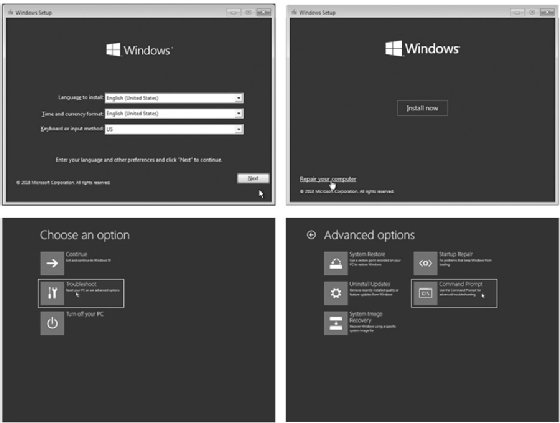
- When the Windows installation disc starts up, click Next>Repair your computer>Troubleshoot>Command Prompt, as shown in Figure 2-2. The menu order or the option names might look different, but look for the Windows command prompt.
Warning: Make sure you don't install Windows 10 -- that would wipe out all the files from the PC you're trying to recover!
No Starch Press
- Once you've reached the Windows command prompt (usually a black, text-based window), type c: and press ENTER to change to the C: drive, as shown here:
X:\> c:
- Enter the command dir to see a list of files and folders on the C: drive. Look for a folder called Windows (it will be marked <DIR>, short for directory).
C:\> dir
This folder (*1) contains the operating system files, including the command prompt application and the Sticky Keys program file that we need to swap out to perform this hack.
Volume in drive C is Windows 10
Volume Serial Number is B4EF-FAC7
Directory of C:\
--snip--
03/15/2018 02:51 AM <DIR> Users
05/19/2019 10:09 AM <DIR> Windows *1
--snip--
- If there's no Windows directory on the C: drive, try the same process in the D: drive by entering d: and then dir. If the D: drive doesn't have the Windows directory either, keep going through the alphabet (E:, F:, G:, and so on) until you find a drive containing Windows in its listing.
Gaining Administrator-Level Access
Now to replace the sethc.exe Sticky Keys program with the cmd.exe command prompt program. Then we'll be able to create a new administrator account on the computer.
- Enter the following three commands:
C:\> cd \Windows\System32\
These commands enter the directory where we can find both sethc.exe and cmd.exe, create a backup copy of the Sticky Keys program, and replace the original Sticky Keys program file with a copy of the command prompt program file. This way, whenever the computer runs sethc.exe, it will open a command prompt window in place of the Sticky Keys program.
C:\Windows\System32\> copy sethc.exe sethc.bak
C:\Windows\System32\> copy cmd.exe sethc.exe
No Starch Press
- After the third command, Windows will ask you if you want to overwrite exe. Enter Y to proceed.
- Remove the Windows 10 installation DVD or USB and reboot the computer.
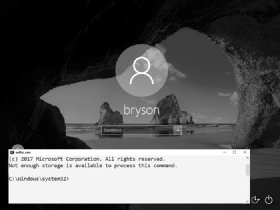
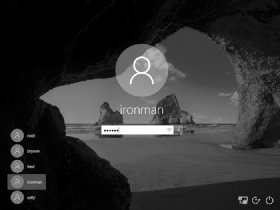
- When the PC boots to the login screen, press SHIFT five times. Instead of the usual Sticky Keys program, you should see a command prompt window pop up in front of the login screen, as shown in Figure 2-3.
- Enter the following two commands into the command prompt window:
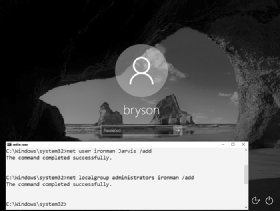
C:\Windows\System32\> net user ironman Jarvis /add
The first command adds a user account named ironman with the password Jarvis to the Windows computer. The second command adds the ironman user to the list of local administrators. This means that when we log in as ironman, we'll have administrator-level access to all the files on the computer.
C:\Windows\System32\> net localgroup administrators ironman /add
No Starch Press
- When you see a success message like the one in Figure 2-4, close the command prompt.
In addition to creating a new user account, you can also reset the password of an existing user from the command prompt window by entering net user followed by the existing username and the new password you want to set -- for example, net user bryson Thisisyournewpassword!. However, you should never reset another person's password without their permission and the permission of the computer's owner.
No Starch Press
Now You're an Administrator. Log In!
Congratulations! You now have access to the machine as an administrator. Go ahead and log in. Enter .\ironman as the username (or select ironman from the list of accounts, as shown in Figure 2-5). The dot and backslash before ironman tell Windows the account is local to the computer and not stored on a network server. After entering the username, enter the password, Jarvis.
No Starch Press
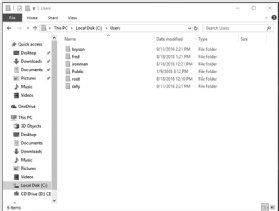
Since we made the ironman user a member of the local administrators group, you should have administrator-level access to all files and folders, including all users and documents in C:\Users\, as shown in Figure 2-6.
When you click into another user's folder for the first time, you'll see a pop-up message saying you need permission to open another user's files, as shown in Figure 2-7. Since you're an administrator, click Continue to grant yourself permanent access!
The Sticky Keys hack works only on Windows machines. However, computers running macOS are vulnerable to physical access hacks as well.

No Starch Press
Turn off, disable, or uninstall OneDrive
https://support.microsoft.com/en-us/office/turn-off-disable-or-uninstall-onedrive-f32a17ce-3336-40fe-9c38-6efb09f944b0#:~:text=Click%20the%20Start%20button%2C%20then,the%20password%20or%20provide%20confirmation.
Unlink OneDrive from your computer
You won't lose files or data by unlinking OneDrive from your computer. You can always access your files by signing in to OneDrive.com.
Windows 10/11
-
Select the OneDrive cloud in your notification area to show the OneDrive pop-up.

-
Go to the Account tab.
-
Select the OneDrive Help and Settings icon then select Settings
macOS
-
Click the OneDrive cloud icon up in your Menu bar, click the three dots to open the menu, and select Preferences.
-
Go to the Account tab.
-
Select Unlink this PC.
Hide or uninstall OneDrive
On some versions of Windows, you can also hide or uninstall OneDrive. You can also uninstall the OneDrive mobile app from Android and iOS devices.
Unable to see windows updates
In Gpedit.msc
The settings page visibility was 'not enabled'. I enabled and set it to 'ShowAll' and this appears to have resolved the issue. Problem is that this issue is on several client computers and just logged in to one workstation remotely that was having this issue. Checked the Settings Page Visibility and found that the setting was the same as on the workstation I was working with - 'Not Enabled'. Windows update was not appearing in the settings window.
See snapshot below -
Enabling setting page visibility and typing 'ShowAll' in the options window brought the Windows Update option back to the settings menu. This should not have to occur - This is a bug in Windows 10. Windows update options should not randomly be removed from the settings page NOR should this group policy item need to be updated to show Windows Update. Microsoft needs to address this issue.
Your answer has resolved the issue, however, I believe that MS would be best to address this problem in the next update, I have a lot of clients that have this same issue.
Thanks.

Win 10 Image Restore from Network Location
|
I have tried for about a week and a half to restore an image backup of my system from a network location.
Windows 10 originally successfully completed the image backup to the network location (share): it told me it was successful, and I also inspected the network location to see if the contents made sense: they did.
I am using the repair disk I created originally when I updated my system to Win 10. I have read and tried all of the usually suggested solutions like loading the network driver after repair disk startup and moving the image to "root level" of a share and nothing works. I have also tried copying the image to an external usb drive: again, no luck (there is no option to point to an image location on a USB drive, only a network location).
From my searches for a solution, I see I am not alone with this problem.
After loading network drivers (after repair disk startup), I looked to see if I could access my network location share where the image backup is by pretending to look for a driver to add, and sure enough, I got prompted for the share's user id and password, which I presented, after which I could see my backup image. Then I went back to the Advanced setting to select a network location to restore my image and the system (restore image utility) asked for the network location, then it asked for the share user id and password, which I entered (as in the previous step), and the system momentarily flashed a dialogue screen and went right back to the start of the process and offered no insight as to whether there was a problem or not.
Now, in an older post on this site - http://blogs.technet.com/b/filecab/archive/2009/10/31/learn-more-about-system-image-backup.aspx - from the Microsoft Storage Team Blog, I found the following statement:
"Considerations while creating a system image Since system image is a critical feature to ensure availability of your system and data after a disaster, it is important to understand how some of the advanced configuration on your system may affect your options during restore. 1. Choosing the backup target System image is supported on internal\external disks, optical removable media, and network locations (Business edition or above). Aside from the usual tradeoffs when picking a storage location such as performance and reliability, here are some additional recommendations to consider for picking a system image backup target:..." While this post is 2009, I wonder whether the stated caveat about system image recovery only being available in "Business edition or above" still applies? So, I have two questions: 1) Can anyone confirm whether image recovery from a network location requires a particular level of Windows OS product? 2) Or if not, can someone from Microsoft provide an answer why image restore from a network location does not seem to work for many, many people, and also, if it does work, what is the restore image utility actually looking for on the network location folder/file-wise and who/what privileges are required over and above authorized access to the network share? Hi,
Thank you for posting your query on Microsoft Community.
You can create and store Recovery image in a network location in Windows 10. System image is stored in the root of the network drive. Therefore, when you try to restore, the image it should be available in the root. If you store multiple back up copies, you must rename all the other backups and save one backup with the original name. The network path should be as follows \\ComputerName\SharePath.
Hope this helps. Please respond if you have further related queries.
Thank you for your reply Jesinta.
I have tried various combinations of path and none seems to work. Examples I have tried are: \\NAStorage\WindowsImageBackup \\NAStorage\WindowsImageBackup\ComputerName \\NAStorage\WindowsImageBackup\ComputerName\Backup 2015-10-13 002128
My NAS drive is a Western Digital My Book Live.
Any further help would be gratefully received as I have three computers backed-up using this image backup method (and a further three friends computers also - so six computers in total depending on this method working if required).
|
|
One of my own computers needs the image to be restored as the hard disk has failed.
Also, can you please confirm or not whether the Windows version is a factor or not: I have Win 10 Pro. |
|
It's an old post, but this issue still remains in 2017 and Windows 10 Creators Update (ver 1703). Anyways, I managed to find a workaround. The workaround is to use command line tool WBADMIN which is installed by default when you create Windows 10 repair disc.
Now you're in command prompt. Start the network with command: startnet
Check that you have valid IP configuration. If you don't, install necessarry driver and check again. ipconfig
Connect to your network location which holds your backups. net use \\pc1\backups /user:localhost\operator In the example above adjust for your network name and user name.
Run wbadmin on it's own to see available parameters. wbadmin Run wbadmin to retrieve available versions of backups that can be recovered. wbadmin get versions -backupTarget:\\pc1\backups This will retrieve available version identifiers in the format 'MM/DD/YYYY-HH:MM' Use the version identifier from above to restore your backup. In the example below, I removed old disk (250 GB) and replaced it with a bigger one (500GB). I chose to recreate disks and restore all volumes. Originaly, I had one disk with two volumes - 'system reserved' volume (500MB) and another volume occupying the rest of the disk. The command below recreated these two volumes succesfully, but when I signed in, I had to extend the volume, because it created it with the original size of 250 GB.
Modify the command below to your needs. specifying version you want to restore, where your backup is being stored (-backupTarget), the machine you want to restore (-machine) and whether you want to recreate disks an restore all volumes.
wbadmin start sysrecovery -version:05/30/2017-22:05 -backuptarget:\\pc1\backups -machine:ds2 -recreateDisks -restoreAllVolumes wbadmin 1.0 - Backup command-line tool Running a recovery operation for volume (C:), copied (20%). ... Running a recovery operation for volume (C:), copied (97%).
__________________________________________________________________________________________________________________________________ I'd like to endorse this method and add some notes to help folks work thru the syntax components. 1st: Avoid spaces / long file names in your server and network locations. If you messed this up in the back up step then you can just move it to a new directory later. wbadmin will still show the old dir when you do a wbadmin get versions but it works fine recovering. If you use spaces / long file names... your probably going to have problems. TLDR: \\My Awesome Server\My Awesome Drive\ is bad \\AwesomeServer\AwesomeDrive\ is good 2nd: You can find the machine name required for -machine: by double clicking into the WindowsImageBackup directory in the share that your back up is stored in. That next level directory is the machine names, choose the machine name you are restoring. 3rd: When doing the net use, i recommend using the net use * \\pc1\backups\ format. This will prompt you for user name / password and save you a lot of heart ache trying to get the syntax right. This process allowed me to back up and restore a 1 TB Surface Book 2 15" when I had to send it back to Microsoft for service. Thanks to @Les52 for the original guide. |
| When you add your network administrative password, add your domain name, ex: contuso.org\admin name. Worked for me. |
|
No joy with this procedure. I did see that WBADMIN supports pointing to a local drive to search for a backup. My backup is on an external drive mounted as D:.
|
| But wbadmin get versions -backupTarget:d: resulted in ERROR - No backup was found. |
| Directory of D: includes a WindowsImageBackup folder created by a system image backup I did before hosing my Windows 10 boot capability. I eventually reinstalled fresh Windows 10 Home and want to restore this image. |
|
I too was having problems with the "net use"
I added "*" so that the command would ask for a password for the user account on my NAS |
Windows 10 update not showing in settings after update
The solution is to disable blocking of settings visibility.
RUN - gpedit.msc
Change Computer Configuration>Administrative Templates>Control Panel>Settings Page Visibility to Disabled. Then changed back to not configured
Changed User Configuration>Administrative Templates>Control Panel>All items>Show Only Specified Control Pane Items to Disabled.
Windows Update Issues
|
Subject |
Windows update issues |
|
From |
Michael Felker |
|
To |
Keith Johnson; Barron Gillon; Jim Silvers; Phil Wright |
|
Sent |
Tuesday, August 23, 2011 1:43 PM |
Sometimes with windows you get an error when trying to update. This will almost fix the issue every time! Enjoy J
1. Disable Windows Update
a. Click on start
b. Click on all programs
c. Click on accessories
d. Click on Run
e. Type services.msc and press ok
f. Right click on "Windows Update"
g. Click on stop (Windows Update is now disabled)
2. Rename Software Distribution folder
b. Find the folder named: “SoftwareDistribution”
c. Rename that folder to something like “SoftwareDistribution.old”
d. Create a new folder called “SoftwareDistribution”
3. Enable Windows Update
a. Click on start
b. Click on all programs
c. Click on accessories
d. Click on Run
e. Type services.msc and press ok
f. Right click on windows update
g. Click on start
-
Restart
If you are unable to find Software Distribution Folder, follow these
steps before #2 above.
1. From the explorer window press the Alt key to view the file menu.
2. Click Tools
3. Select Folder Options
4. Select the View tab
5. Select “Show hidden files and folders”
6. Remove the selection from “Hide protected operating system files”
7. Click OK
Computer Reboot Event Log
12,13,19,41,1001,1074,6005,6009,7045
Filtering a log by these event ID's will show all system reboots and the reason why.