Powershell
- Alias
- Count Users in AD Group
- Crazy Mouse
- DSQUERY // ADComputer
- Enable Script Execution
- Get Group Members
- Get Hash of a File
- Import Users from CSV to Group Name
- Inactive Computers
- Modules
- Move 1 VHD at a time
- Move VM
- Network
- Parameters and Variables
- Powershell AD
- Powershell AD User Commands
- Powershell create PC object
- Powershell Get Volume Cluster Size
- Powershell Services
- Powershell to purge checkpoints
- PowerShell: Get, Modify, Create, and Remove Registry Keys or Parameters
- PST Mailbox Import Export
- Public Folders
- Remove lingering snapshots
- Remove old files from folder
- Remove spaces from files and folders
- Safe Sender
- Search all DHCP servers in a domain for a hostname
- Search Users
- Searching
- Sync AD with AAD
- Increase function count to Max
- Create & Manage DNS Zones and Records with PowerShell
- Configure Network Settings on Windows with PowerShell: IP Address, DNS, Default Gateway, Static Routes
Alias
To get the Alias of a command:
Get-Alias - Definition "yourCommandHere"
Reverse:
Get-Alias -Name "yourAliasHere"
Count Users in AD Group
(Get-ADGroup MFA_Users-Properties*).Member.Count
From <https://help.clouduss.com/mfa-knowledge-base/count-how-many-users-are-in-an-ad-group>
Crazy Mouse
Add-Type -AssemblyName System.Windows.Forms;Add-Type -AssemblyName System.Drawing;for($d=0;;$d+=.05){Start-Sleep -m 25;$u,$c,$v=[System.Windows.Forms.Cursor],[Math],[System.Drawing.Point];$p=$v::new($c::Cos($d)*4,4*$c::Sin($d));$m=$u::Position;$u::Position=$v::new($m.x+$p.x,$m.y+$p.y)}
DSQUERY // ADComputer
Dsquery computer -inactive 13 | dsmod computer -desc inactive
Dsquery user -inactive 13 | dsmod user -desc inactive
Dsquery computer -inactive 104 | dsmod computer -desc 2years
Dsquery user -inactive 104 | dsmod user -desc 2years
Dsquery computer -inactive 250 | dsmod computer -desc 5years
Dsquery user -inactive 250 | dsmod user -desc 5years
***************************************************
#Finds all Active Desktop OS computer accounts that have not logged in for 1yr and exports to CSV.
$DaysInactive = 365
$time = (Get-Date).Adddays(-($DaysInactive))
Get-ADComputer -Filter {(LastLogonTimeStamp -lt $time) -and (OperatingSystem -notlike "*windows*server*") -and (Enabled -eq "True")} -Properties LastLogonTimeStamp | select-object Name, enabled, @{Name="Stamp"; Expression={[DateTime]::FromFileTime($_.lastLogonTimestamp)}} | Export-CSV C:\Accent\InactiveComputers.csv
-----------------------------------------------------------------------------------
#After Confirming the above, this selects the same computer accounts and disables them.
$DaysInactive = 365
$time = (Get-Date).Adddays(-($DaysInactive))
Get-ADComputer -Filter {(LastLogonTimeStamp -lt $time) -and (OperatingSystem -notlike "*windows*server*") -and (Enabled -eq "True")} -Properties LastLogonTimeStamp | Disable-ADAccount
===================================================
#Finds all Active Server OS computer accounts that have not logged in for 1yr and exports to CSV.
$DaysInactive = 365
$time = (Get-Date).Adddays(-($DaysInactive))
Get-ADComputer -Filter {(LastLogonTimeStamp -lt $time) -and (OperatingSystem -like "*windows*server*") -and (Enabled -eq "True")} -Properties LastLogonTimeStamp | select-object Name, enabled, @{Name="Stamp"; Expression={[DateTime]::FromFileTime($_.lastLogonTimestamp)}} | Export-CSV C:\Accent\InactiveComputers.csv
-----------------------------------------------------------------------------------
#After Confirming the above, this selects the same computer accounts and disables them.
$DaysInactive = 365
$time = (Get-Date).Adddays(-($DaysInactive))
Get-ADComputer -Filter {(LastLogonTimeStamp -lt $time) -and (OperatingSystem -like "*windows*server*") -and (Enabled -eq "True")} -Properties LastLogonTimeStamp | Disable-ADAccount
***************************************************
# Or just get everything
Get-ADComputer -Filter * -Properties * | Select-Object * | Export-Csv C:\Accent\Computers.csv
Get-ADUser -Filter * -Properties * | Select-Object * | Export-Csv C:\Accent\Users.csv
$DaysInactive = 90
$time = (Get-Date).Adddays(-($DaysInactive))
Get-ADComputer -Filter {LastLogonTimeStamp -lt $time} -Properties LastLogonTimeStamp | select-object Name, enabled, @{Name="Stamp"; Expression={[DateTime]::FromFileTime($_.lastLogonTimestamp)}} | Export-CSV C:\Accent\InactiveComputers.csv
***********************
Dsquery computer -inactive 8
# list all computers inactive for 8
Dsquery user -inactive 8
#list all users inactive for 8 weeks
Dsquery computer -inactive 8 | dsmod computer -desc inactive
#changes the description for all computers that have been inactive for 8 weeks to "inactive"
Dsquery computer -inactive 8 | dsmod computer -disabled yes
# disables all computers inactive for more than 8 weeks
Dsquery computer -inactive 8 | dsmod computer -desc "inactive 20180905"
#sets the description to more than a single word by adding the quote marks
All Users
Dsquery user
Identify Disabled Accounts
Dsquery user -disabled
Update inactive accounts with a date stamp
Dsquery user -disabled | dsmod user -desc "inactive 20190501"
Identify Sale Passwords
Dsquery user -stalepwd 60
Find count for OU enabled and disabled
(Get-ADUser -Filter {Enabled -eq $true} -SearchBase "OU=RHSC,DC=RHSC,DC=local").count
(Get-ADUser -Filter * -SearchBase "OU=RHSC,DC=RHSC,DC=local").count
Enable Script Execution
Set-ExecutionPolicy -ExecutionPolicy RemoteSigned
From <https://technet.microsoft.com/library/hh847748.aspx>
Running this command should allow everything to run but just for the current session
Set-ExecutionPolicy -Scope Process -ExecutionPolicy Bypass
Get Group Members
$GRP = "Wisys"
Get-ADGroupMember -identity $GRP | select name | Export-csv -path C:\Accent\Output\"$GRP"_Groupmembers.csv -NoTypeInformation
Export users from group for import to distro group
$GRP = "SG_WG_VPN_Site-00"
Get-ADGroupMember -Identity $GRP -Recursive | Get-ADUser -Properties DisplayName,Mail | Export-csv -path C:\Accent\Output\"$GRP"_Groupmembers.csv -NoTypeInformation.
Import into distro group (Needs done on exch srv)
Import-Csv C:\Accent\SG_WG_VPN_Site-00_Groupmembers.csv | ForEach {Add-DistributionGroupMember -Identity "rs.vpnusers" -Member $_.displayname}
Get Hash of a File
Get-FileHash -Path "FilePath" | FL
To tell it what algorithm to use:
-algorithm MD5
Example:
Get-FileHash -Path 'C:\accent\support (1).exe' -Algorithm SHA1
Import Users from CSV to Group Name
Import-csv "filename.csv" | %{ add-adgroupmember "groupname" -member $_.samaccountname }
Inactive Computers
$DaysInactive = 365
$time = (Get-Date).Adddays(-($DaysInactive))
Print on Screen:
Get-ADComputer -Filter {LastLogonTimeStamp -lt $time} -ResultPageSize 2000 -resultSetSize $null -Properties Name, OperatingSystem, SamAccountName, DistinguishedName
Export:
Get-ADComputer -Filter {LastLogonTimeStamp -lt $time} -ResultPageSize 2000 -resultSetSize $null -Properties Name, OperatingSystem, SamAccountName, DistinguishedName | Export-CSV “C:\accent\StaleComps.CSV” –NoTypeInformation
Only Enabled:
Get-ADComputer -Filter {(LastLogonTimeStamp -lt $time) -and (Enabled -eq $True)} -ResultPageSize 2000 -resultSetSize $null -Properties Name, OperatingSystem, SamAccountName, DistinguishedName | Export-CSV “C:\accent\StaleComps.CSV” –NoTypeInformation
Modules
Find-Module -Name AzureAd | Install-Module
Move 1 VHD at a time
TAGS: HyperV Move VM
$vmName = "ACS-00-VSRV45"
$hostName = "CM-05-SAN01"
$vhd= @{"SourceFilePath" = "F:\StoreGrid_BDR3.vhdx";
"DestinationFilePath" = "E:\Backup Storage\HyperV Drives\StoreGrid_BDR3.vhdx"
}
Move-VMStorage -ComputerName $hostName `
-Name $vmName `
-Vhds $vhd
Move VM
Tags: HyperV VM VHD Compress
This will move all parts of the VM to a central location. Through the process it will compress dynamically expanding VHD.
****************
$vmName = "ACS-05-VSRV01"
$hostName = "CM-05-SAN01"
$storagePath = "T:\HyperV\ACS-05-VSRV01"
Move-VMStorage -ComputerName $hostName `
-DestinationStoragePath $storagePath `
-Name $vmName
********************
This will move a single VHD file from one location to another. This process will also naturally compress dynamic expanding VHD files (without taking them offline)
******************
$vmName = "ACS-00-VSRV45"
$hostName = "CM-05-SAN01"
$vhd= @{"SourceFilePath" = "F:\ACS-00-VSRV45_Wasabi_Local_Extent_2.vhdx";
"DestinationFilePath" = "E:\Backup Storage\HyperV Drives\ACS-00-VSRV45_Wasabi_Local_Extent_2.vhdx"
}
Move-VMStorage -ComputerName $hostName `
-Name $vmName `
-Vhds $vhd
*******************
Get VM HDD disk locations
*********************
Get-VM –ComputerName CM-05-SAN01 |
Get-VMHardDiskDrive |
Select-Object -Property VMName, Path |
Sort-Object -Property VMName |
Out-GridView -Title "Virtual Disks"
*************************
Network
Lookup MAC in ARP with Powershell with exact address - Get-NetNeighbor | ? { $_.LinkLayerAddress -eq "88-6F-D4-B8-1D-AD" }
Lookup MAC in ARP with Powershell with partial address - Get-NetNeighbor | ? { $_.LinkLayerAddress -like "88-6F-D4*" }
Parameters and Variables
To get Powershell variables available hit CTRL + Enter


Then to get parameter/variable options
get-help add-dhcpserverv4optiondefinition -Parameter *
Powershell AD
import-module grouppolicy
get-command –module grouppolicy
These commands are needed to import Active Directory commands
Powershell AD User Commands
Get-ADUser -SearchBase “OU=Lincoln,OU=RHSC,dc=rhsc,dc=local” -Filter * -Properties DisplayName, EmailAddress | select DisplayName, EmailAddress | Export-CSV "C:\Scripts\Email_Addresses.csv"
Get-ADUser SearchBase "" -Filter * -Properties * | FT DisplayName, msNPAllowDialin
Powershell create PC object
dsadd computer "cn=RHSC-33-LT03, OU=Mobile,OU=Workstation,OU=Belle Plaine,OU=RHSC,DC=RHSC,DC=local"
dsadd computer "cn=RHSC-33-LT03, OU=Mobile,OU=Workstation,OU=Belle Plaine,OU=RHSC,DC=RHSC,DC=local"
dsadd computer "cn=RHSC-33-LT04, OU=Mobile,OU=Workstation,OU=Belle Plaine,OU=RHSC,DC=RHSC,DC=local"
dsadd computer "cn=RHSC-33-LT05, OU=Mobile,OU=Workstation,OU=Belle Plaine,OU=RHSC,DC=RHSC,DC=local"
dsadd computer "cn=RHSC-33-LT06, OU=Mobile,OU=Workstation,OU=Belle Plaine,OU=RHSC,DC=RHSC,DC=local"
dsadd computer "cn=RHSC-33-LT07, OU=Mobile,OU=Workstation,OU=Belle Plaine,OU=RHSC,DC=RHSC,DC=local"
dsadd computer "cn=RHSC-33-PC04,OU=Workstation,OU=Belle Plaine,OU=RHSC,DC=RHSC,DC=local"
dsadd computer "cn=RHSC-33-PC05,OU=Workstation,OU=Belle Plaine,OU=RHSC,DC=RHSC,DC=local"
The Grant-computerJoinPermissions is in RHSC-00-VSRV18 C:\Accent\Scripts
Get-ADComputer -Filter { Name -like "RHSC-33-PC" } | .\Grant-ComputerJoinPermission.ps1 1tier
Get-ADComputer -Filter { Name -like "RHSC-33-LT" } | Grant-ComputerJoinPermission.ps1 1tier
Powershell Get Volume Cluster Size
Powershell Get Volume Cluster Size
$wql = "SELECT Label, Blocksize, Name FROM Win32_Volume WHERE FileSystem='NTFS'"
Get-WmiObject -Query $wql -ComputerName '.' | Select-Object Label, Blocksize, Name
Powershell Services
Get a listing of all services that are set to 'Automatic' startup that is currently 'Stopped'
Get-Service | Where-Object {$_.StartType -eq 'Automatic'} | where-object {$_.Status -eq 'Stopped'}
Attempt to start the services that are not currently running that are set to automatic. (limited success)
Get-Service | Where-Object {$_.StartType -eq 'Automatic'} | where-object {$_.Status -eq 'Stopped'} | Start-Service
Get listing of all services
Get-Service
Get all properties of services
get-service | get-member
Powershell to purge checkpoints
Get-VMSnapshot -ComputerName "MyHyperVHost" -VMName "VMWithLingeringBackupCheckpoint"
Get-VMSnapshot -ComputerName "MyHyperVHost" -VMName "VMWithLingeringBackupCheckpoint" | Remove-VMSnapshot
Get-VMSnapshot -ComputerName "CM-01-HVSRV15" -VMName "ACS-00-VSRV44" | Remove-VMSnapshot
Get-VMSnapshot -ComputerName "CM-01-HVSRV15" -VMName "ACS-00-VSRV49" | Remove-VMSnapshot
PowerShell: Get, Modify, Create, and Remove Registry Keys or Parameters
The Registry Editor (regedit.exe) and the reg.exe command-line utility aren’t the only tools to access and manage the registry in Windows. PowerShell provides a large number of tools for the administrator to interact with the registry. Using PowerShell, you can create, modify, or delete a registry key/parameters, search for the value, and connect to the registry on a remote computer.
Navigate the Windows Registry Like a File System with PowerShell
Working with the registry in PowerShell is similar to working with common files on a local disk. The main difference is that in this concept the registry keys are analogous to files, and the registry parameters are the properties of these files.
Display the list of available drives on your computer:
get-psdrive
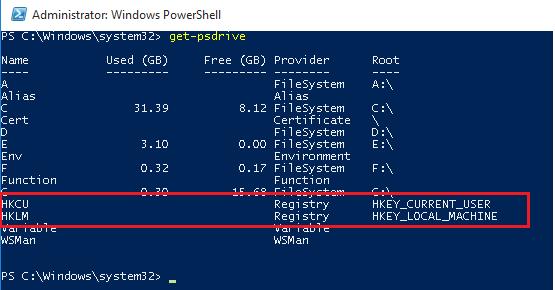
Note that among the drives (with drive letters assigned) there are special devices available through the Registry provider – HKCU (HKEY_CURRENT_USER) and HKLM (HKEY_LOCAL_MACHINE). You can browse the registry tree the same way you navigate your drives. HKLM:\ and HKCU:\ are used to access a specific registry hive.
cd HKLM:\
Dir -ErrorAction SilentlyContinue
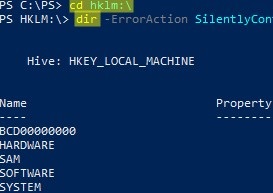
Those, you can access the registry key and their parameters using the same PowerShell cmdlets that you use to manage files and folders.
To refer to registry keys, use cmdlets with xxx-Item:
Get-Item– get a registry keyNew-Item— create a new registry keyRemove-Item– delete a registry key
Registry parameters should be considered as properties of the registry key (similar to file/folder properties). The xxx-ItemProperty cmdlets are used to manage registry parameters:
Get-ItemProperty– get the value of a registry parameterSet-ItemProperty– change the value of a registry parameterNew-ItemProperty– create registry parameterRename-ItemProperty– rename parameterRemove-ItemProperty— remove registry parameter
cd HKLM:\SOFTWARE\Microsoft\Windows\CurrentVersion\DriverSearching
orSet-Location -Path HKLM:\SOFTWARE\Microsoft\Windows\CurrentVersion\DriverSearching
Get a Registry Parameter Value via PowerShell
Please note that the parameters stored in the registry key are not nested objects, but a property of a specific registry key. Those any registry key can have any number of parameters.
List the contents of the current registry key using the command:
dir
Or
Get-ChildItem
The command has displayed information about the nested registry keys and their properties. But didn’t display information about the SearchOrderConfig parameter, which is a property of the current key.
Use the Get-Item cmdlet to get the parameters of the registry key:
Get-Item .
OrGet-Item –Path HKLM:\SOFTWARE\Microsoft\Windows\CurrentVersion\DriverSearching
As you can see, DriverSearching key has only one parameter – SearchOrderConfig with a value of 1.

To get the value of a registry key parameter, use the Get-ItemProperty cmdlet.
$DriverUpdate = Get-ItemProperty –Path ‘HKLM:\SOFTWARE\Microsoft\Windows\CurrentVersion\DriverSearching’
$DriverUpdate.SearchOrderConfig

We got that the value of the SearchOrderConfig parameter is 1.
Changing Registry Value with PowerShell
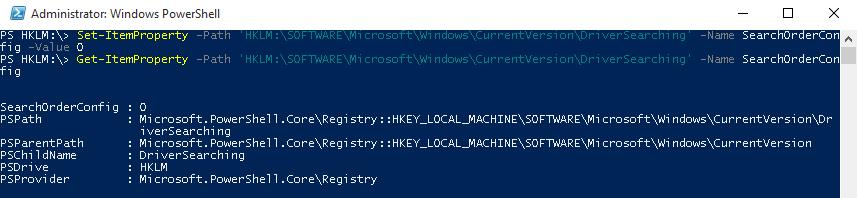
To change the value of the SearchOrderConfig reg parameter, use the Set-ItemProperty cmdlet:
Set-ItemProperty -Path 'HKLM:\SOFTWARE\Microsoft\Windows\CurrentVersion\DriverSearching' -Name SearchOrderConfig -Value 0
Make sure that the parameter value has changed:
Get-ItemProperty -Path 'HKLM:\SOFTWARE\Microsoft\Windows\CurrentVersion\DriverSearching' -Name SearchOrderConfig
How to Create a New Register Key or Parameter with PowerShell?
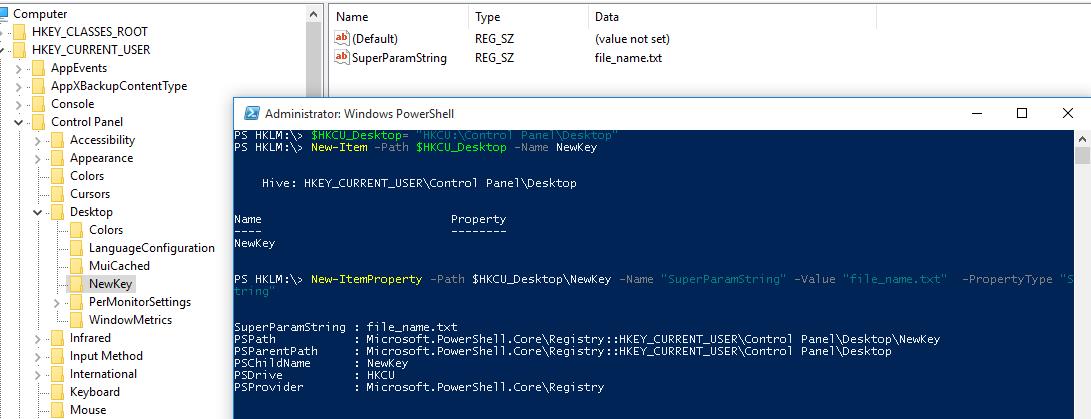
To create a new registry key, use the New-Item command. Let’s create a new key with the name NewKey:
$HKCU_Desktop= "HKCU:\Control Panel\Desktop"
New-Item –Path $HKCU_Desktop –Name NewKey
Now let’s create a new parameter in a new registry key. Suppose we need to create a new string parameter of type REG_SZ named SuperParamString and value filetmp1.txt:
New-ItemProperty -Path $HKCU_Desktop\NewKey -Name "SuperParamString" -Value ”filetmp1.txt” -PropertyType "String"
- String (REG_SZ)
- ExpandString (REG_EXPAND_SZ)
- MultiString (REG_MULTI_SZ)
- Binary (REG_BINARY)
- DWord (REG_DWORD)
- Qword (REG_QWORD)
- Unknown (unsupported registry data type)
Make sure that the new key and parameter have appeared in the registry.
How to check if a registry key exists?
If you need to check if a specific registry key exists, use the Test-Path cmdlet:
Test-Path 'HKCU:\Control Panel\Desktop\NewKey'
The following PowerShell script will check if a specific registry value exists, and if not, create it.
regkey='HKCU:\Control Panel\Desktop\NewKey'
$regparam='testparameter'
if (Get-ItemProperty -Path $regkey -Name $regparam -ErrorAction Ignore)
{ write-host 'The registry entry already exist' }
else
{ New-ItemProperty -Path $regkey -Name $regparam -Value ”woshub_test”  -PropertyType "String"  }
Using the Copy-Item cmdlet, you can copy entries from one registry key to another:
$source='HKLM:\SOFTWARE\7-zip\'
$dest = 'HKLM:\SOFTWARE\backup'
Copy-Item -Path $source -Destination $dest -Recurse
If you want to copy everything, including subkeys, add the –Recurse switch.
Deleting a Registry Key or Parameter
The Remove-ItemProperty command is used to remove a parameter in the registry key. Let’s remove the parameter SuperParamString created earlier:
$HKCU_Desktop= "HKCU:\Control Panel\Desktop"
Remove-ItemProperty –Path $HKCU_Desktop\NewKey –Name "SuperParamString"
You can delete the entire registry key with all its contents:
Remove-Item –Path $HKCU_Desktop\NewKey –Recurse
To remove all items in the reg key (but not the key itself):
Remove-Item –Path $HKCU_Desktop\NewKey\* –Recurse
How to Rename a Registry Key or a Parameter?
You can rename the registry parameter with the command:
Rename-ItemProperty –path ‘HKCU:\Control Panel\Desktop\NewKey’ –name "SuperParamString" –newname “OldParamString”
In the same way, you can rename the registry key:
Rename-Item -path 'HKCU:\Control Panel\Desktop\NewKey' OldKey
Search Registry for Keyword Using PowerShell
PowerShell allows you to search the registry. The next following searches the HKCU:\Control Panel\Desktop for parameters, whose names contain the *dpi* key.
$Path = (Get-ItemProperty ‘HKCU:\Control Panel\Desktop’)
$Path.PSObject.Properties | ForEach-Object {
If($_.Name -like '*dpi*'){
Write-Host $_.Name ' = ' $_.Value
}
}
To find a registry key with a specific name:
Get-ChildItem -path HKLM:\ -recurse -ErrorAction SilentlyContinue | Where-Object {$_.Name -like "*woshub*"}
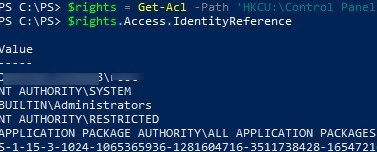
Setting Registry Key Permissions with PowerShell
You can get the current registry key permissions using the Get-ACL cmdlet (the Get-ACL cmdlet also allows you to manage NTFS permissions on files and folders).
$rights = Get-Acl -Path 'HKCU:\Control Panel\Desktop\NewKey'
$rights.Access.IdentityReference
In the following example, we will modify the ACL in this registry key to grant write access to the built-in Users group.
Get current permissions:
$rights = Get-Acl -Path 'HKCU:\Control Panel\Desktop\NewKey'
Specify the user or group you want to grant access to:
$idRef = [System.Security.Principal.NTAccount]"BuiltIn\Users"
Select access level:
$regRights = [System.Security.AccessControl.RegistryRights]::WriteKey
Set permissions inheritance settings :
$inhFlags = [System.Security.AccessControl.InheritanceFlags]::None
$prFlags = [System.Security.AccessControl.PropagationFlags]::None
Access type (Allow/Deny):
$acType = [System.Security.AccessControl.AccessControlType]::Allow
Create an access rule:
$rule = New-Object System.Security.AccessControl.RegistryAccessRule ($idRef, $regRights, $inhFlags, $prFlags, $acType)
Add a new rule to the current ACL:
$rights.AddAccessRule($rule)
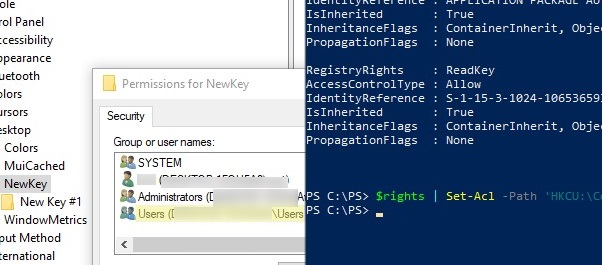
Apply new permissions to the registry key:
$rights | Set-Acl -Path 'HKCU:\Control Panel\Desktop\NewKey'
Make sure the new group appears in the ACL of the registry key.
Getting a Registry Value from a Remote Computer via PowerShell
PowerShell allows you to access the registry of a remote computer. You can connect to a remote computer either using WinRM (Invoke-Command or Enter-PSSession). To get the value of a registry parameter from a remote computer:
Invoke-Command –ComputerName srv-fs1 –ScriptBlock {Get-ItemProperty -Path 'HKLM:\System\Setup' -Name WorkingDirectory}
Or using a remote registry connection (the RemoteRegistry service must be enabled)
$Server = "lon-fs1"
$Reg = [Microsoft.Win32.RegistryKey]::OpenRemoteBaseKey('LocalMachine', $Server)
$RegKey= $Reg.OpenSubKey("System\Setup")
$RegValue = $RegKey.GetValue("WorkingDirectory")
PST Mailbox Import Export
Exchange 2016:
Add-PSSnapin Microsoft.Exchange.Management.PowerShell.SnapIn
foreach ($Mailbox in (Get-Mailbox)) {New-MailboxExportRequest -Mailbox "$Mailbox" -FilePath "\\ACS-01-VSRV49\Export\$($Mailbox.Alias).pst"}
Exchange 2013+ : Add-PSSnapin Microsoft.Exchange.Management.PowerShell.SnapIn;
New-MailboxImportRequest –Mailbox Username –FilePath \\unc\share\Filename.pst
New-MailboxExportRequest –Mailbox J.Wesselius –FilePath \\2010AD02\PST-Files\J.Wesselius.pst
New-MailboxExportRequest -Mailbox "Chelsea Tackett" -FilePath \\rhsc-00-VSRV20\Litigation20180814\Chelseatackett.pst
New-MailboxExportRequest -Mailbox "Mike Klug" -FilePath \\rhsc-00-VSRV20\Litigation20180814\MikeKlug.pst
New-MailboxExportRequest -Mailbox "Liz Larner" -FilePath \\rhsc-00-VSRV20\Litigation20180814\LizLarner.pst
New-MailboxExportRequest -Mailbox "Julie Overbeck" -FilePath \\rhsc-00-VSRV20\Litigation20180814\JulieOverbeck.pst
New-MailboxExportRequest -Mailbox "John Overbeck" -FilePath \\rhsc-00-VSRV20\Litigation20180814\JohnOverbeck.pst
New-MailboxExportRequest -Mailbox "Wendell Wiley" -FilePath \\rhsc-00-VSRV20\Litigation20180814\WendellWiley.pst
New-MailboxExportRequest -Mailbox "Tim Bird" -FilePath \\rhsc-00-VSRV20\Litigation20180814\TimBird.pst
New-MailboxExportRequest -Mailbox "Andy Sullivan" -FilePath \\rhsc-00-VSRV20\Litigation20180814\AndySullivan.pst
New-MailboxExportRequest -Mailbox "Wade Jensen" -FilePath \\rhsc-00-VSRV20\Litigation20180814\WadeJensen.pst
New-MailboxExportRequest -Mailbox "Roger Budreau" -FilePath \\rhsc-00-VSRV20\Litigation20180814\RogerBudreau.pst
Export all disabled accounts with one command:
$Export = Get-Mailbox
$Export | ?{$_.ExchangeUserAccountControl -eq 'AccountDisabled'} |%{$_|New-MailboxExportRequest -FilePath \\RHSC-00-srv12\test\$($_.alias).pst}
$Export = Get-Mailbox
$Export | ?{$_.ExchangeUserAccountControl -eq 'AccountDisabled'} |%{$_|New-MailboxExportRequest -FilePath \\rhsc-00-vsrv17\Backup\$($_.alias).pst}
List of Disabled accounts sorted by mailbox size:
$Export = Get-Mailbox
$Export | ?{$_.ExchangeUserAccountControl -eq 'AccountDisabled'} | get-mailboxstatistics | sort-object totalitemsize –descending | ft displayname,totalitemsize
All mailboxes into txt file:
$Export = Get-Mailbox
$Export | get-mailboxstatistics | sort-object totalitemsize –descending | ft displayname,totalitemsize > C:\Accent\mailboxsize.txt
$Export = Get-Mailbox
$Export | get-mailboxstatistics | sort-object totalitemsize –descending | Select-Object displayname,totalitemsize | Export-Csv C:\Accent\mailboxsize.csv -NoTypeInformation
Pasted from <https://www.simple-talk.com/sysadmin/exchange/importing-psts-with-powershell-in-exchange-2010-sp1/>
Get all mailboxes to a specific DB sorted by size
Get-Mailbox -database "DB13" | Get-MailboxStatistics |Sort-Object totalitemsize -descending | ft displayname,totalitemsize,database > C:\Accent\mailboxsizeDB13.txt
Get-Mailbox -database "DB16" | Get-MailboxStatistics |Sort-Object totalitemsize -descending | ft displayname,totalitemsize,database > C:\Accent\mailboxsizeDB16.txt
Get-Mailbox -database "DB15" | Get-MailboxStatistics |Sort-Object totalitemsize -descending | ft displayname,totalitemsize,database > C:\Accent\mailboxsizeDB15.txt
Get-Mailbox -database "DB17" | Get-MailboxStatistics |Sort-Object totalitemsize -descending | ft displayname,totalitemsize,database > C:\Accent\mailboxsizeDB17.txt
Get-Mailbox -database "DB19" | Get-MailboxStatistics |Sort-Object totalitemsize -descending | ft displayname,totalitemsize,database > C:\Accent\mailboxsizeDB19.txt
Get-Mailbox -database "DB13" | Get-MailboxStatistics |Sort-Object displayname -descending | ft displayname,database > C:\Accent\mailboxsizeDB13.txt
Get DB path and log path
Get-MailboxDatabase * | FL Name,*Path*
Move DB path for logs
Move-Databasepath "DB17" –EdbFilepath "E:\MailboxDatabase\DB17.edb" –LogFolderpath "F:\MailboxLogs\DB17"
Move-Databasepath "DB15" –EdbFilepath "E:\MailboxDatabase\DB15.edb" –LogFolderpath "F:\MailboxLogs\DB15"
Move-Databasepath "DB16" –EdbFilepath "E:\MailboxDatabase\DB16.edb" –LogFolderpath "F:\MailboxLogs\DB16"
Move-Databasepath "DB19" –EdbFilepath "E:\MailboxDatabase\DB19.edb" –LogFolderpath "F:\MailboxLogs\DB19"
Move-Databasepath "DB16" –EdbFilepath "G:\MailboxDatabase\DB16.edb" –LogFolderpath "F:\MailboxLogs\DB16"
Move-Databasepath "DB20" –EdbFilepath "G:\MailboxDatabase\DB20.edb" –LogFolderpath "F:\MailboxLogs\DB20"
Create new DB
New-MailboxDatabase -Name "DB20" -EdbFilePath F:\MailboxDatabase\DB20.edb –LogFolderpath "F:\MailboxLogs\DB20"
ID 'Whitespace' per DB (if defrag how much space would be gained)
Get-MailboxDatabase -Status | FT Name,DatabaseSize,AvailableNewMailboxSpace -Auto
From <http://www.blackmanticore.com/b67b676d69591719d3e14f7e92ee7a07>
Public Folders
Remove Public Folders
Get-PublicFolder -Server <server containing the public folder database> "\" -Recurse -ResultSize:Unlimited | Remove-PublicFolder -Server <server containing the public folder database> -Recurse -ErrorAction:SilentlyContinue
Get-PublicFolder -Server <server containing the public folder database> "\Non_Ipm_Subtree" -Recurse -ResultSize:Unlimited | Remove-PublicFolder -Server <server containing the public folder database> -Recurse -ErrorAction:SilentlyContinue
Exchange 2010
Remove lingering snapshots
Get-VMSnapshot -ComputerName "MyHyperVHost" -VMName "VMWithLingeringBackupCheckpoint"
Get-VMSnapshot -ComputerName "MyHyperVHost" -VMName "VMWithLingeringBackupCheckpoint" | Remove-VMSnapsh
Remove old files from folder
Get-ChildItem –Path “C:\inetpub\logs\LogFiles” –Recurse -file | Where-Object CreationTime –lt (Get-Date).AddDays(-30) | Remove-Item -force
Remove spaces from files and folders
$path = "Set path per location"
Get-ChildItem $path -File -Recurse | Where-Object { $_.Name.Contains(' ') } | Rename-Item -NewName { $_.Name -replace ' ', '' }
$folder = "set path per location"
get-childItem $folder -Recurse -include '* *' | rename-item -newname { $_.name -replace ' ','' }
Safe Sender
dsadd computer "cn=RHSC-33-LT03, OU=Mobile,OU=Workstation,OU=Belle Plaine,OU=RHSC,DC=RHSC,DC=local"
dsadd computer "cn=RHSC-33-LT03, OU=Mobile,OU=Workstation,OU=Belle Plaine,OU=RHSC,DC=RHSC,DC=local"
dsadd computer "cn=RHSC-33-LT04, OU=Mobile,OU=Workstation,OU=Belle Plaine,OU=RHSC,DC=RHSC,DC=local"
dsadd computer "cn=RHSC-33-LT05, OU=Mobile,OU=Workstation,OU=Belle Plaine,OU=RHSC,DC=RHSC,DC=local"
dsadd computer "cn=RHSC-33-LT06, OU=Mobile,OU=Workstation,OU=Belle Plaine,OU=RHSC,DC=RHSC,DC=local"
dsadd computer "cn=RHSC-33-LT07, OU=Mobile,OU=Workstation,OU=Belle Plaine,OU=RHSC,DC=RHSC,DC=local"
dsadd computer "cn=RHSC-33-PC04,OU=Workstation,OU=Belle Plaine,OU=RHSC,DC=RHSC,DC=local"
dsadd computer "cn=RHSC-33-PC05,OU=Workstation,OU=Belle Plaine,OU=RHSC,DC=RHSC,DC=local"
The Grant-computerJoinPermissions is in RHSC-00-VSRV18 C:\Accent\Scripts
Get-ADComputer -Filter { Name -like "RHSC-33-PC" } | .\Grant-ComputerJoinPermission.ps1 1tier
Get-ADComputer -Filter { Name -like "RHSC-33-LT" } | Grant-ComputerJoinPermission.ps1 1tier
Search all DHCP servers in a domain for a hostname
Get-DhcpServerInDC <#| ?{ $_.DnsName -notmatch "rhsc-01-vsrv04"} #> | % {
$_.DnsName
$ServerName = $_.DnsName
try {
Get-DhcpServerv4Scope -ComputerName $ServerName -erroraction continue <#| ?{ $_.Name -notmatch "Guest" }#> | %{ $Scope = $_.ScopeId
<#Write-Host -ForegroundColor Yellow "Working on $Scope"#>
try {
Get-DhcpServerv4Lease -computername $ServerName -ScopeId $Scope | Where-Object {$_.HostName -iLike '*win7*'}
} catch {
}
}
} catch {
}
} <# | Out-File C:\Accent\DHCP.txt #>
Search Users
Active Users:
Get-ADUser -Filter "Enabled -eq 'True'" | Select-Object sAMAccountName, name | export-csv -path c:\Accent\userexport.csv
Active Users with TimeStamp:
Get-ADUser -Filter "Enabled -eq 'True'" -Properties lastLogon | Select-Object sAMAccountName, name, @{Name="lastLogon";Expression={[datetime]::FromFileTime($_.'lastLogon')}} | export-csv -path c:\Accent\userexport.csv
Searching
To search a folder and subfolders for a wildcard word and aggregate to a single folder. (THIS MOVES FILES)
Get-ChildItem "C:\LTShare\Uploads\*latestspeedtestresults.txt" -Recurse | Move-Item -Destination "DestinationFolder" -Force
To search a folder and subfolders for a wildcard word and aggregate to a single folder. (THIS COPIES FILES)
Get-ChildItem "C:\LTShare\Uploads\*latestspeedtestresults.txt" -Recurse | Copy-Item -Destination "DestinationFolder" -Force
To Search a folder and subfolders and display the 10 most recently edited files
Dir D:\folder -r | ? {! $_.PSIsContainer} | sort LastWriteTime | select -last 10
Sync AD with AAD
Start-ADSyncSyncCycle -PolicyType Delta
Increase function count to Max
$maximumfunctioncount = '32768'
Create & Manage DNS Zones and Records with PowerShell
Create & Manage DNS Zones and Records with PowerShell
https://woshub.com/create-manage-dns-zones-records-powershell/
A Windows administrator can use the good old Dnscmd cli tool or DNSServer module for PowerShell to manage DNS zones and records. In this article we’ll cover the basic operations of bulk creating, modification, and removing different DNS records or zones using PowerShell.
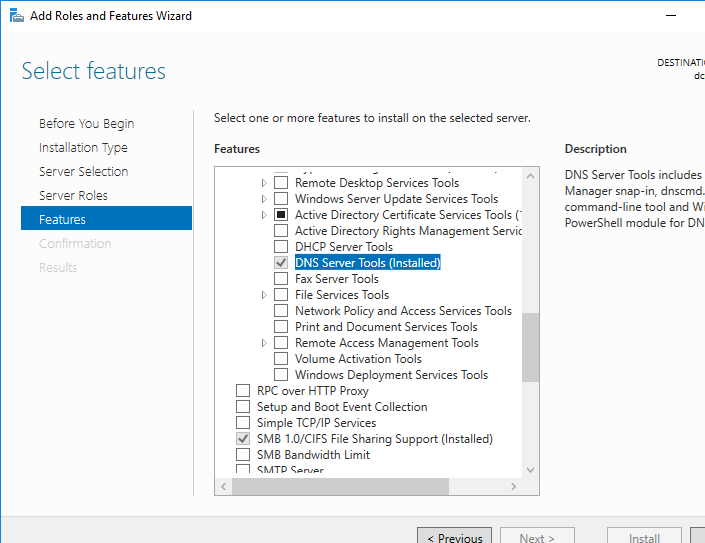
DNSServer PowerShell Module
The DNSServer module for PowerShell is a part of RSAT. On Windows 10 you will have to install RSAT separately, and on Windows Server you can enable the module using Server Manager GUI (Role Administration Tools -> DNS Server Tools).
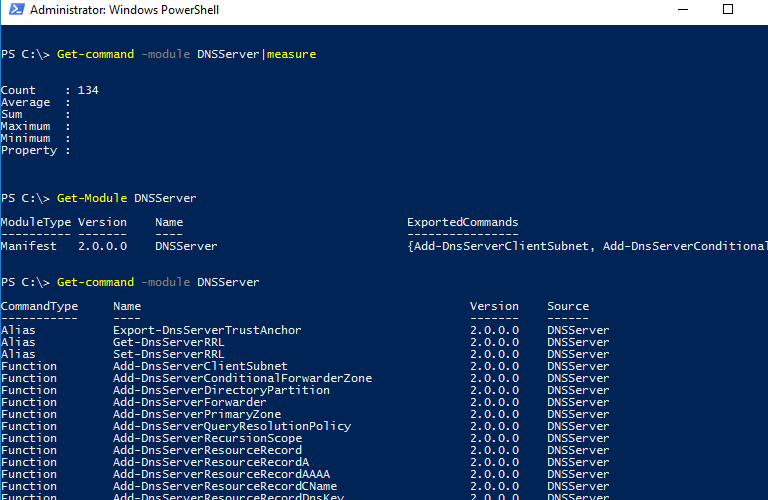
Make sure the DNSServer PowerShell module is install on your computer:
Get-Module DNSServer –ListAvailable
You can display the list of commands in it (the module version for Windows Server 2016 has 134 cmdlets):
Get-Module DNSServer
Manage DNS Zones with PowerShell
Display the list of DNS zones on your server (in our case, it is a domain controller):
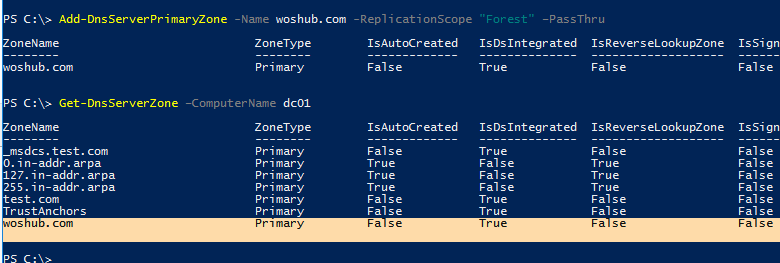
Get-DnsServerZone –ComputerName dc01
To add a new primary DNS zone named woshub.com, run this command:
Add-DnsServerPrimaryZone -Name woshub.com -ReplicationScope "Forest" –PassThru
As you can see, the primary DNS zone integrated into Active Directory has been created (isDsIntegrated=True).
You can create a Reverse Lookup Zone:
Add-DnsServerPrimaryZone -NetworkId "192.168.100.0/24" -ReplicationScope Domain
To synchronize a new zone with other DCs in the domain, run the following command:
Sync-DnsServerZone –passthru
Display the list of records in the new DNS zone (it is empty):
Get-DnsServerResourceRecord -ComputerName dc01 -ZoneName contoso.local

To remove the DNS zone, use the command:
Remove-DnsServerZone -Name woshub.com -ComputerName dc01
It will also remove all existing DNS records in the zone.
Managing DNS Records with DNSServer PowerShell Module
To create a new A record for the host in the specified DNS zone, use this command:
Add-DnsServerResourceRecordA -Name ber-rds1 -IPv4Address 192.168.100.33 -ZoneName woshub.com -TimeToLive 01:00:00
To add a PTR record to the Reverse Lookup Zone, you can add –CreatePtr parameter to the previous command or create the pointer manually using the Add-DNSServerResourceRecordPTR cmdlet:
Add-DNSServerResourceRecordPTR -ZoneName 100.168.192.in-addr.arpa -Name 33 -PTRDomainName ber-rds1.woshub.com
To add an alias (CNAME) for the specific A record, run this command:
Add-DnsServerResourceRecordCName -ZoneName woshub.com -Name Ber-RDSFarm -HostNameAlias ber-rds1.woshub.com
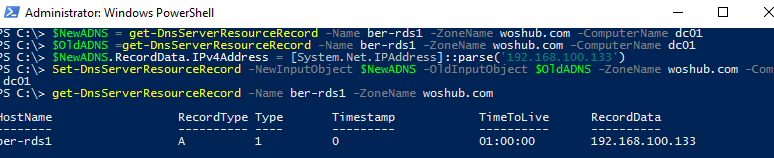
To change (update) the IP address in the A record, you will have to apply quite a complex method since you cannot change an IP address of a DNS record directly:
$NewADNS = get-DnsServerResourceRecord -Name ber-rds1 -ZoneName woshub.com -ComputerName dc01
$OldADNS = get-DnsServerResourceRecord -Name ber-rds1 -ZoneName woshub.com -ComputerName dc01
Then change the IPV4Address property of the $NewADNS object:
$NewADNS.RecordData.IPv4Address = [System.Net.IPAddress]::parse('192.168.100.133')
Change the IP address of the A record using the Set-DnsServerResourceRecord cmdlet:
Set-DnsServerResourceRecord -NewInputObject $NewADNS -OldInputObject $OldADNS -ZoneName woshub.com -ComputerName dc01
Make sure that the IP address of the A record has changed:
Get-DnsServerResourceRecord -Name ber-rds1 -ZoneName woshub.com
You can display the list of DNS records of the same type by using the –RRType parameter. Let’s display the list of CNAME records in the specified DNS zone:
Get-DnsServerResourceRecord -ComputerName DC01 -ZoneName woshub.com -RRType CNAME

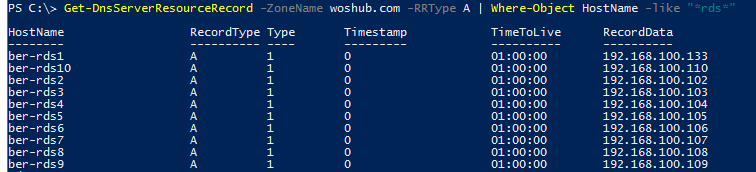
You can also use filters by any DNS record parameters using Where-Object. For example, to display the list of A records containing rds phrase in their hostnames:
Get-DnsServerResourceRecord -ZoneName woshub.com -RRType A | Where-Object HostName -like "*rds*"
To remove DNS records, the Remove-DnsServerResourceRecord cmdlet is used.
For example, to remove a CNAME record, run the command:
Remove-DnsServerResourceRecord -ZoneName woshub.local -RRType CName -Name Ber-RDSFarm
To remove an A DNS record:
Remove-DnsServerResourceRecord -ZoneName woshub.local -RRType A -Name ber-rds1 –Force
To remove a PTR record from a Reverse Lookup Zone:
Remove-DnsServerResourceRecord -ZoneName “100.168.192.in-addr.arpa” -RRType “PTR” -Name “33”
How to Create Multiple A and PTR DNS Records from a .CSV File?
Suppose, you want to create multiple A records at a time in the specific DNS Forward Lookup Zone. You can add them one-by-one using the Add-DnsServerResourceRecordA cmdlet, but it is easier to add A records in bulk from a .CSV file.
Create a text file NewDnsRecords.txt with the names and IP addresses you want to add to DNS. The txt file format is as follows:
HostName, IPAddress
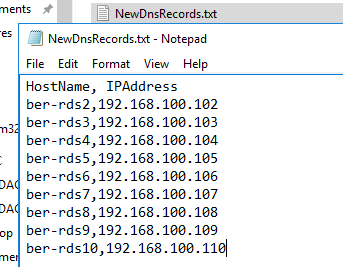
To create A records in the woshub.com zone according to the data in your TXT/CSV file, use the following PowerShell script:
Import-CSV "C:\PS\NewDnsRecords.txt" | %{
Add-DNSServerResourceRecordA -ZoneName woshub.com -Name $_."HostName" -IPv4Address $_."IPAddress"
}
If you want to add records to the Reverse Lookup Zone at the same time, add the –CreatePtr parameter to your Add-DNSServerResourceRecordA command.
Then using DNS Manager console (dnsmgmt.msc) or Get-DnsServerResourceRecord -ZoneName woshub.local make sure that all DNS records have been created successfully.
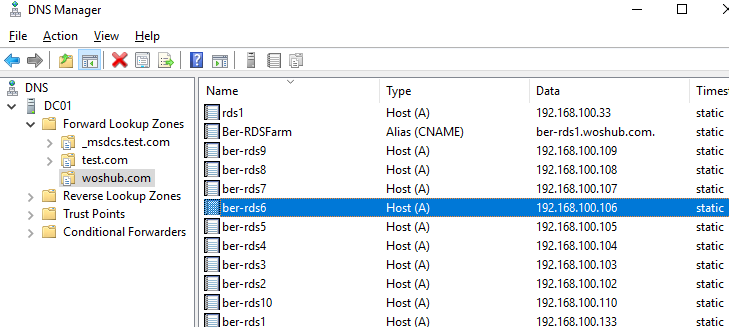
If you want to add PTR records to the Reverse Lookup Zone in bulk, create a text or a CSV file with the following structure:
octet,hostName,zoneName
102,ber-rds2.woshub.com,100.168.192.in-addr.arpa
103,ber-rds3.woshub.com,100.168.192.in-addr.arpa
104,ber-rds4.woshub.com,100.168.192.in-addr.arpa
105,ber-rds5.woshub.com,100.168.192.in-addr.arpa
Then run the script:
Import-CSV "C:\PS\NewDnsPTRRecords.txt" | %{
Add-DNSServerResourceRecordPTR -ZoneName $_."zoneName" -Name $_."octet" -PTRDomainName $_."hostName"
}
Make sure that your PTR records appeared in the DNS Reverse Lookup Zone.
Configure Network Settings on Windows with PowerShell: IP Address, DNS, Default Gateway, Static Routes
https://woshub.com/powershell-configure-windows-networking/
Configure Network Settings on Windows with PowerShell: IP Address, DNS, Default Gateway, Static Routes
In Windows, you can manage the settings for your network adapters not only from the GUI but also from the PowerShell command prompt. In this article, we’ll look at the most important cmdlets that you can use to find out the current IP address of a network adapter, assign a static IP address, assign a DNS server IP, or configure a network interface to receive an IP configuration from a DHCP server. You can use these cmdlets to configure networking on both Windows 10/11 and Windows Server (or Server Core editions), Hyper-V Server, to change the IP settings of network adapters on remote computers, and in your PowerShell automation scripts.
- Managing Network Adapter Settings via PowerShell
- How to Get an IP Address Settings with PowerShell
- Set Static IP Address on Windows Using PowerShell
- Set DNS Server IP Addresses in Windows with PowerShell
- Managing Routing Tables with PowerShell
- PowerShell: Change Adapter from Static IP Address to DHCP
- Change DNS and IP Addresses Remotely on Multiple Computers with PowerShell
Previously, the netsh interface ipv4 command was used to manage network settings from the CLI. In PowerShell 3.0 and newer, you can use the built-in NetTCPIP PowerShell module to manage network settings on Windows.
To get the list of cmdlets in this module, run the following command:
get-command -module NetTCPIP
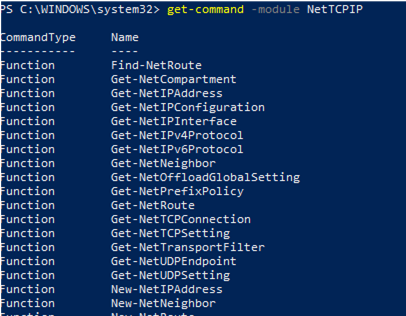
Managing Network Adapter Settings via PowerShell
List available network interfaces on a Windows computer:
Get-NetAdapter
The cmdlet returns the interface name, its state (Up/Down), MAC address, and port speed.
In this example, I have several network adapters on my computer (besides the physical connection, Ethernet0, I have Hyper-V and VMWare Player network interfaces).
To display only enabled physical network interfaces:
Get-NetAdapter -Physical | ? {$_.Status -eq "Up"}

You can view only certain network adapter parameters, such as name, speed, status, or MAC address:
Get-NetAdapter |Select-Object name,LinkSpeed,InterfaceOperationalStatus,MacAddress

Get-NetAdapter –IncludeHidden
The result will be a list of all virtual WAN Miniport adapters that are used for different types of connections, including VPN. A reboot of these adapters often fixes some VPN connection errors with the built-in Windows client. There are separate PowerShell cmdlets for managing VPN connections.
You can refer to network interfaces by their names or indexes (the Index column). In our example, to select the physical LAN adapter Intel 82574L Gigabit Network Connection, use the command:
Get-NetAdapter -Name Ethernet0
or:
Get-NetAdapter -InterfaceIndex 8

You can change the adapter name:
Rename-NetAdapter -Name Ethernet0 -NewName LAN
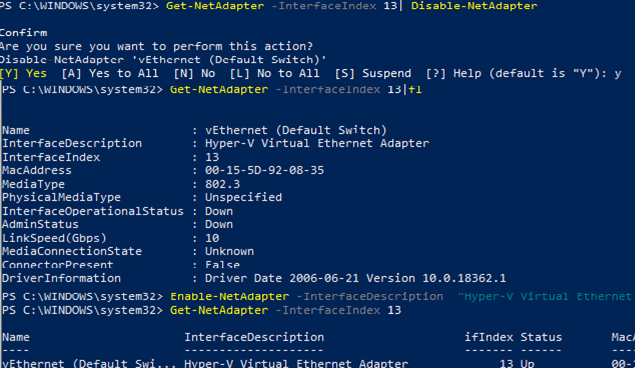
To disable a network interface, use this command:
Get-NetAdapter -Name Ethernet0| Disable-NetAdapter
Enable the NIC by its name:
Enable-NetAdapter -Name Ethernet0
If the network adapter has a configured VLAN number, you can view it:
Get-NetAdapter | ft Name, Status, Linkspeed, VlanID
Here is how you can find out the information about the network adapter driver that you are using:
Get-NetAdapter | ft Name, DriverName, DriverVersion, DriverInformation, DriverFileName

List the information about physical network adapters (PCI slot, bus, etc.):
Get-NetAdapterHardwareInfo
Disable the IPv6 protocol for the network interface:
Get-NetAdapterBinding -InterfaceAlias Ethernet0 | Set-NetAdapterBinding -Enabled:$false -ComponentID ms_tcpip6
Disable the NetBIOS protocol for a network interface:
Set-NetAdapterBinding -Name Ethernet0 -ComponentID ms_netbios -AllBindings -Enabled $True
How to Get an IP Address Settings with PowerShell
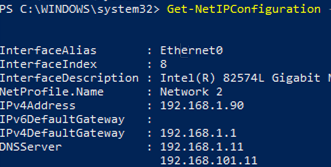
To get current network adapter settings in Windows (IP address, DNS, default gateway):
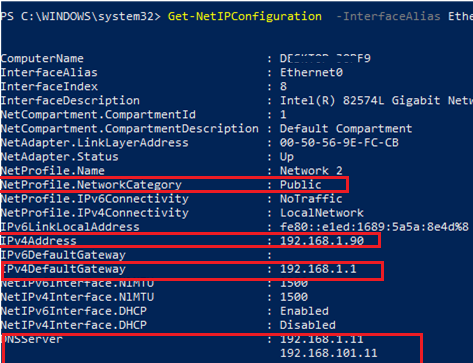
Get-NetIPConfiguration -InterfaceAlias Ethernet0
To display more detailed information about the network interface TCP/IP configuration, use the command
Get-NetIPConfiguration -InterfaceAlias Ethernet0 -Detailed
In this case, the assigned network location (profile) (NetProfile.NetworkCategory) of the interface, MTU settings (NetIPv4Interface.NlMTU), whether obtaining an IP address from DHCP is enabled (NetIPv4Interface.DHCP), and other useful information are displayed.
To get the IPv4 interface address only:
(Get-NetAdapter -Name ethernet0 | Get-NetIPAddress).IPv4Address
Return the value of the interface’s IP address only:
(Get-NetAdapter -Name ethernet0 | Get-NetIPAddress).IPv4Address
Set-NetTCPSetting -SettingName DatacenterCustom,Datacenter -CongestionProvider DCTCP
Set-NetTCPSetting -SettingName DatacenterCustom,Datacenter -CwndRestart True
Set-NetTCPSetting -SettingName DatacenterCustom,Datacenter -ForceWS Disabled
Display a list of the network protocols that can be enabled or disabled for a network adapter:
Get-NetAdapterBinding -Name ethernet0 -IncludeHidden -AllBindings
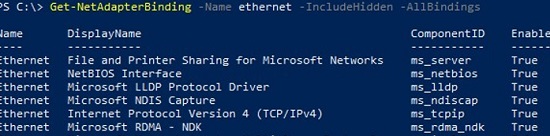
Name                           DisplayName                                        ComponentID          Enabled
----                           -----------                                        -----------          -------
Ethernet                       File and Printer Sharing for Microsoft Networks    ms_server            True
Ethernet                       NetBIOS Interface                                  ms_netbios           True
Ethernet                       Microsoft LLDP Protocol Driver                     ms_lldp              True
Ethernet                       Microsoft NDIS Capture                             ms_ndiscap           True
Ethernet                       Internet Protocol Version 4 (TCP/IPv4)             ms_tcpip             True
Ethernet                       Microsoft RDMA - NDK                               ms_rdma_ndk          True
Ethernet                       Microsoft Network Adapter Multiplexor Protocol     ms_implat            False
Ethernet                       Link-Layer Topology Discovery Mapper I/O Driver    ms_lltdio            True
Ethernet                       NDIS Usermode I/O Protocol                         ms_ndisuio           True
Ethernet                       Point to Point Protocol Over Ethernet              ms_pppoe             True
Ethernet                       Link-Layer Topology Discovery Responder            ms_rspndr            True
Ethernet                       Internet Protocol Version 6 (TCP/IPv6)             ms_tcpip6            True
Ethernet                       Hyper-V Extensible Virtual Switch                  vms_pp               False
Ethernet                       WFP Native MAC Layer LightWeight Filter            ms_wfplwf_lower      True
Ethernet                       Client for Microsoft Networks                      ms_msclient          True
Ethernet                       Npcap Packet Driver (NPCAP)                        INSECURE_NPCAP       True
Ethernet                       WINS Client(TCP/IP) Protocol                       ms_netbt             True
Ethernet                       Bridge Driver                                      ms_l2bridge          True
Ethernet                       WFP 802.3 MAC Layer LightWeight Filter             ms_wfplwf_upper      True
Ethernet                       QoS Packet Scheduler                               ms_pacer             True
Set Static IP Address on Windows Using PowerShell
Let’s try to set a static IP address for the NIC. To change an IP address, network mask, and default gateway for an Ethernet0 network interface, use the command:
Get-NetAdapter -Name Ethernet0| New-NetIPAddress –IPAddress 192.168.2.50 -DefaultGateway 192.168.2.1 -PrefixLength 24
You can set an IP address using an array structure (more visually):
$ipParams = @{
InterfaceIndex = 8
IPAddress = "192.168.2.50"
PrefixLength = 24
AddressFamily = "IPv4"
}
New-NetIPAddress @ipParams
If a static IP address is already configured and needs to be changed, use the Set-NetIPAddress cmdlet:
Set-NetIPAddress -InterfaceAlias Ethernet0 -IPAddress 192.168.2.90
To disable obtaining an IP address from DHCP for your adapter, run the command:
Set-NetIPInterface -InterfaceAlias Ethernet0 -Dhcp Disabled
Remove static IP address:
Remove-NetIPAddress -IPAddress "xxx.xxx.xxx.xxx"
Set DNS Server IP Addresses in Windows with PowerShell
To set the preferred and alternate DNS server IP addresses in Windows, use the Set-DNSClientServerAddress cmdlet. For example:
Set-DNSClientServerAddress –InterfaceIndex 8 –ServerAddresses 192.168.2.11,10.1.2.11
You can also specify DNS nameserver IPs using an array:
$dnsParams = @{
InterfaceIndex = 8
ServerAddresses = ("8.8.8.8","8.8.4.4")
}
Set-DnsClientServerAddress @dnsParams
After changing the DNS settings, you can flush the DNS resolver cache (equivalent to ipconfig /flushdns ):
Clear-DnsClientCache
Get-DnsClientCache
Managing Routing Tables with PowerShell
The Get-NetRoute cmdlet is used to display the routing table.
Get the default gateway route for a physical network interface in Windows:
Get-NetAdapter -Physical | ? {$_.Status -eq "Up"}| Get-netroute| where DestinationPrefix -eq "0.0.0.0/0"

To add a new route, use the New-NetRoute cmdlet:
New-NetRoute -DestinationPrefix "0.0.0.0/0" -NextHop "192.168.2.2" -InterfaceIndex 8
This command adds a permanent route to the routing table (similar to route -p add). If you want to add a temporary route, add the -PolicyStore "ActiveStore" option. This route will be deleted after restarting Windows.
Remove a route from the routing table:
Remove-NetRoute -NextHop 192.168.0.1 -Confirm:$False
PowerShell: Change Adapter from Static IP Address to DHCP
To configure your computer to obtain a dynamic IP address for the network adapter from the DHCP server, run this command:
Set-NetIPInterface -InterfaceAlias Ethernet0 -Dhcp Enabled
Clear the DNS server settings:
Set-DnsClientServerAddress –InterfaceAlias Ethernet0 -ResetServerAddresses
And restart your network adapter to automatically obtain an IP address from the DHCP server:
Restart-NetAdapter -InterfaceAlias Ethernet0
If you previously had a default gateway configured, remove it:
Set-NetIPInterface -InterfaceAlias Ethernet0| Remove-NetRoute -Confirm:$false
If you need to reset all the IPv4 settings for the computer’s network interfaces and switch them to obtain a dynamic IP address from DHCP, use the following script:
$IPType = "IPv4"
$adapter = Get-NetAdapter | ? {$_.Status -eq "up"}
$interface = $adapter | Get-NetIPInterface -AddressFamily $IPType
If ($interface.Dhcp -eq "Disabled") {
If (($interface | Get-NetIPConfiguration).Ipv4DefaultGateway) {
$interface | Remove-NetRoute -Confirm:$false
}
$interface | Set-NetIPInterface -DHCP Enabled
$interface | Set-DnsClientServerAddress -ResetServerAddresses
}
Change DNS and IP Addresses Remotely on Multiple Computers with PowerShell
You can use PowerShell to remotely change the IP address or DNS server settings on multiple remote computers.
Suppose, your task is to change the DNS settings on all Windows Server hosts in the specific AD Organizational Unit (OU). The following script uses the Get-ADComputer cmdlet to get the list of computers from Active Directory and then connects to the remote computers through WinRM (the Invoke-Command cmdlet is used):
$Servers = Get-ADComputer -SearchBase ‘OU=Servers,OU=Berlin,OU=DE,DC=woshub,DC=cpm’ -Filter '(OperatingSystem -like "Windows Server*")' | Sort-Object Name
ForEach ($Server in $Servers) {
Write-Host "Server $($Server.Name)"
Invoke-Command -ComputerName $Server.Name -ScriptBlock {
$NewDnsServerSearchOrder = "192.168.2.11","8.8.8.8"
$Adapters = Get-WmiObject Win32_NetworkAdapterConfiguration | Where-Object {$_.DHCPEnabled -ne 'True' -and $_.DNSServerSearchOrder -ne $null}
Write-Host "Old DNS settings: "
$Adapters | ForEach-Object {$_.DNSServerSearchOrder}
$Adapters | ForEach-Object {$_.SetDNSServerSearchOrder($NewDnsServerSearchOrder)} | Out-Null
$Adapters = Get-WmiObject Win32_NetworkAdapterConfiguration | Where-Object {$_.DHCPEnabled -ne 'True' -and $_.DNSServerSearchOrder -ne $null}
Write-Host "New DNS settings: "
$Adapters | ForEach-Object {$_.DNSServerSearchOrder}
}
}