# RADIUS
# Authenticating from Active Directory using RADIUS/NPS
[https://docs.netgate.com/pfsense/en/latest/recipes/radius-windows.html](https://docs.netgate.com/pfsense/en/latest/recipes/radius-windows.html)
Windows Servers can be configured as a RADIUS server using the Microsoft Network Policy Server (NPS). This allows a Windows Server to handle authentication for OpenVPN, Captive Portal, the PPPoE server, or even the firewall GUI itself. NPS can authenticate based on Windows Server local user accounts or Active Directory.
Note
While support for NPS has been present since Windows Server 2008, this document focuses on current versions of Windows Server software.
The options may vary slightly depending on the version of Windows Server software.
## Choosing a server for NPS
NPS requires a minimal amount of resources and is suitable for addition to an existing Windows Server in most environments. Microsoft recommends installing it on an Active Directory domain controller to improve performance in environments where NPS is authenticating against Active Directory.
Tip
NPS can also be installed on a member server, which may be desirable in some environments to reduce the attack footprint of domain controllers. Each network-accessible service provides another potential avenue for compromising a server. NPS has a solid security record, especially compared to other services that must be running on domain controllers for Active Directory to function, so this isn’t much of a concern in most network environments.
Most environments install NPS on one of their domain controllers. Microsoft recommends running it on each domain controller in the forest and using NPS proxies to share the load for a busy environment.
## Installing NPS
- Open the Server Manager Dashboard
- Click **Add Roles and Features**
This may be on the main screen or under the **Manage** menu.
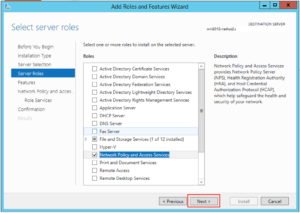
- Click **Next** until the wizard displays the server selection screen
- Select this server from the list
- Click **Next** again
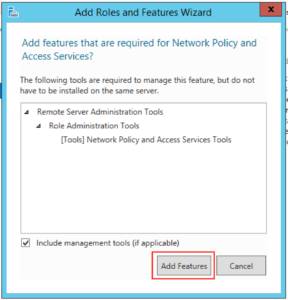
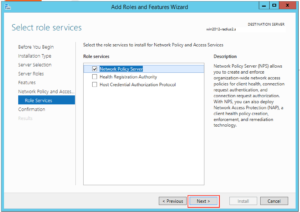
- Check **Network Policy and Access Services** on the list of roles
- Click **Add Features** if it appears
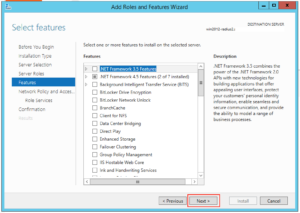
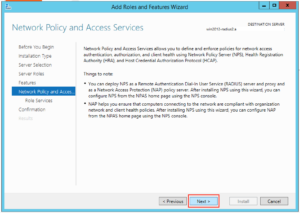
- Click **Next** on each screen until the end of the wizard
- Click **Finish** or **Install**, depending on the windows server version
- Click **Close** once the installation completes
## Configuring NPS
To configure NPS, bring up the Server Manager and select the new role. The name varies on different versions of Windows Server but may be NPAS (2022), NAP (2012), Network Policy and Access Services, or a similar name.
First configure a RADIUS client for the firewall, then setup remote access policies.
### Adding a RADIUS Client
- Open the **Server Manager** dashboard
- Click **NPAS** or its equivalent name (**NAP**, etc)
- Right click on this server in the server list
- Click **Network Policy Server**
- Expand **RADIUS Clients and Server**
- Click **RADIUS Clients**
- Right click on **RADIUS Clients**
- Click **New**, as shown in Figure [Add New RADIUS Client](https://docs.netgate.com/pfsense/en/latest/recipes/radius-windows.html#figure-add-new-radius-client)
- Enter a **Friendly name** for the firewall, as shown in Figure [Add New RADIUS Client Address](https://docs.netgate.com/pfsense/en/latest/recipes/radius-windows.html#figure-add-new-radius-client-address).
This can be the hostname or an FQDN.
- Enter the **Address (IP or DNS)** for the firewall.
This must be the IP address from which the firewall will initiate RADIUS requests or an FQDN which resolves to that IP address.
Note
This is the IP address of the firewall interface closest to the RADIUS server. If the RADIUS server is reachable via the firewall LAN interface, this will be the LAN IP address of the firewall. In deployments where the firewall is not the perimeter firewall, and the WAN interface resides on the internal network where the RADIUS server resides, the WAN IP address would be the correct address.
- Enter a **Shared secret**, as shown in Figure [Add New RADIUS Client Shared Secret](https://docs.netgate.com/pfsense/en/latest/recipes/radius-windows.html#figure-add-new-radius-client-shared-secret).
This shared secret is used by the firewall to authenticate itself when making RADIUS access requests.
Windows can automatically create a shared secret using the **Generate** option.
- Click OK.
The NPS configuration for the RADIUS client is now complete. The RADIUS Client is visible as in Figure [Listing of the RADIUS Client](https://docs.netgate.com/pfsense/en/latest/recipes/radius-windows.html#figure-listing-of-the-radius-client).
Refer to other sections in this documentation describing the service to be used with RADIUS for more guidance on how to utilize the service. The [User Manager](https://docs.netgate.com/pfsense/en/latest/usermanager/index.html) can use NPS as an authentication server which also enables RADIUS for IPsec, OpenVPN, and [Captive Portal](https://docs.netgate.com/pfsense/en/latest/captiveportal/common-scenarios.html#captiveportal-radius). Other services such as the [PPPoE server](https://docs.netgate.com/pfsense/en/latest/services/pppoe-server.html) can use it directly as well.
### Configuring Users and Network Policies
**Network Policies** control whether or not a user can authenticate via RADIUS. Using Network Policies, an administrator can place a user in a specific Active Directory group to allow VPN access and also offer more advanced capabilities such as time of day restrictions.
More information on remote access policies can be found in Microsoft’s documentation at [http://technet.microsoft.com/en-us/library/cc785236%28WS.10%29.aspx](http://technet.microsoft.com/en-us/library/cc785236%28WS.10%29.aspx).
#### Adding a Network Policy
- Open the **Server Manager** dashboard
- Click **NPAS** or its equivalent name (**NAP**, etc)
- Right click on this server in the server list
- Click **Network Policy Server**
- Expand **NPS (Local)**, **Policies**, then **Network Policies**
- Right click on **Network Policies**
- Click **New**
- Enter `AllowfromFirewall` in the **Policy name**
- Leave the **Type of network access server** set to *Unspecified*
- Click **Next**
- Click **Add** in the Specify Conditions window
- Select **Windows Groups**
- Click **Add**
- Enter or select the name of the user group which contains VPN users, e.g. `VPNUsers`
- Click **OK**
- Click **Next**
- Choose **Access granted**
- Click **Next**
- Add **EAP Types** / **Authentication Methods** as needed:
- Leave existing authentication methods selected
- Add or Select **Microsoft: Secured Password (EAP-MSCHAP v2)** if the firewall will use this policy for IPsec IKEv2 EAP-RADIUS authentication
- Select **Encrypted Authentication (CHAP)**
- Select **Unencrypted Authentication (PAP, SPAP)**
- Click **Next**
- Click **No** or **Decline** if the wizard prompts to view a help topic about security
- Configure any additional access constraints, if necessary
- Click **Next** on the remaining screens until the final screen is reached
- Click **Finish**
#### Editing an Existing Network Policy
Existing policies can be altered to change their constraints or other properties. For example, to edit an older policy to enable it for use by IPsec for IKEv2 EAP-RADIUS:
- Open the **Server Manager** dashboard
- Click **NPAS** or its equivalent name (**NAP**, etc)
- Right click on this server in the server list
- Click **Network Policy Server**
- Expand **NPS (Local)**, **Policies**, then **Network Policies**
- Edit the policy currently in use (e.g. right click, click **Properties**)
- Click the **Constraints** tab
- Click **Authentication Methods**
- Click **Add**
- Select **Microsoft: Secured Password (EAP-MSCHAP v2)**
- Click **OK**
- Click **Apply** to restart NPS
- Click **OK**
## Check Users and Groups
These steps are only necessary if the use case for this setup requires group authentication on the firewall.
Before proceeding, ensure any users who must authenticate using NPS are members of the correct groups (e.g. `VPNUsers`).
Create a matching group with a remote scope on the firewall ([Manage Local Groups](https://docs.netgate.com/pfsense/en/latest/usermanager/groups.html)).
Edit the NPS policy on the Windows server so it returns the group name:
- Open the **Server Manager** dashboard
- Click **NPAS** or its equivalent name (**NAP**, etc)
- Right click on this server in the server list
- Click **Network Policy Server**
- Expand **NPS (Local)**, **Policies**, then **Network Policies**
- Edit the policy currently in use (e.g. right click, click **Properties**)
- Click the **Settings** tab
- Click **Standard** under **RADIUS Attributes**
- Select **Class** from the list
- Click **Add**
- Select **String** for the attribute value type
- Enter a group name which matches a group on the firewall (e.g. `VPNUsers`)
- Click **OK**
- Click **Close**
- Click **Apply** to restart NPS
- Click **OK**
## Add Authentication Server
Now that NPS is ready to accept authentication requests, the next step is to add an authentication server entry on the firewall.
See also
[RADIUS Authentication Servers](https://docs.netgate.com/pfsense/en/latest/usermanager/radius.html)
- Open the firewall GUI
- Navigate to **System > User Manager**, **Authentication Servers** tab
- Click  **Add** to create a new entry
- Enter the following settings:
Descriptive name
`ActiveDirectoryNPS`
Type
*RADIUS*
Hostname or IP address
`198.51.100.30` – Replace this with the IP address of the Windows server
Shared Secret
The password added to the NAS entry in NPS
Services offered
*Authentication*
Authentication port
`1812`
- Click **Save**
## Test Authentication
On the firewall GUI, test the authentication:
- Navigate to **Diagnostics > Authentication**
- Set **Authentication Server** to the entry for NPS
- Enter a username and password for a user which should have access
- Click **Test**
If that test succeeded, then configure other services such as IPsec or OpenVPN to use the new RADIUS server and attempt authentication there.
## Troubleshooting NPS
This section describes the most common problems users encounter with NPS.
### Verify port
First ensure NPS is using the default port `1812`. If the NPS server was already installed, it may have be using a non-standard port.
- Open the **Server Manager** dashboard
- Click **NPAS** or its equivalent name (**NAP**, etc)
- Right click on this server in the server list
- Click **Network Policy Server**
- Right click on **NPS (Local)** at the top left of the console
- Click **Properties**
- Click the **Ports** tab
- Verify that the **Authentication** port set includes port `1812`
NPS can use multiple ports separated with commas, as shown in figure [NPS Ports](https://docs.netgate.com/pfsense/en/latest/recipes/radius-windows.html#figure-nps-ports).
- Verify the **Accounting** port set includes port `1813` (optional)
This is only necessary if the use case requires RADIUS accounting.
### Check Event Viewer
When NPS handles a RADIUS authentication request it creates a log entry in the Security log in Event Viewer with the result of the authentication request. If it denies access, it logs the reason in the event log.
These log entries can be viewed in one of two ways:
View the **Security** log. This method is easier to identify success vs failure but on a busy server it may be difficult to isolate entries specific to NPS.
- Open Event Viewer on the Windows Server
- Expand **Windows Logs**
- Click **Security**
- Look for entries in the log which reference NPS
Use the custom view which only displays NPS log entries:
- Open Event Viewer on the Windows Server
- Expand **Custom Views**
- Expand **Server Roles**
- Click **Network Policy and Access Services**
Similar messages are available in both locations thought their format may vary slightly.
The contents of the log message contain a **Reason:** line which explains why authentication failed. The common two failures are:
- “Authentication failed due to a user credentials mismatch”
This indicates that the user supplied an invalid username or password.
- “The Network Access Permission setting in the dial-in properties of the user account in Active Directory is set to Deny access to the user.”
Indicates that the user account is set to deny access or the network policies in NPS do not allow access for that user. For example, they may not be a member of the correct group.
If NPS is logging that authentication was successful, but the client is receiving a bad username or password message, ensure that the RADIUS secret configured in NPS and on the firewall match.
# Configure pfsense for 2FA using Duo RADIUS auth proxy with NPS
Guide assumes that you have an installation of pfsense. Further assumes you have an account with Duo security. Third, assumes you have setup and configured some form of RADIUS authentication, in that case using Windows Server Network Policy Server.
Requirements
1.Server to run the RADIUS
2.Server to run Duo Auth Proxy application.
a.Either linux or windows. This guide will be using windows server
b.Future guide will be used to setup the linux version
3.Both functions can be on the same server, but we will need to change the default port numbers to get it working.
Steps
1.Go to admin.dousecurity.com and configure a new RADIUS application
2.Download and install the Duo Auth Proxy application on the proxy server. This can be the same server as the RADIUS function, but will require changing port numbers. For higher performance applications using separate servers is recommended
3.In the NPS, configure the duo auth proxy server as a RADIUS client
4.In pfsense configure duo auth proxy as a RADIUS authentication server
5.In pfsense create a group and assign permissions as necessary. IE pfsense-admins group and assign admin permissions
6.In NPS configure the connection policies that will allow authentication on the pfsense. Be sure to include the name of the pfsense group the user should be a part of as a class attribute.
7.Configure the duo auth proxy application using the duo security information and by pointing to the NPS server as the RADIUS client. Be sure to include “pass\_through\_all=true” variable to pass through the class attribute to the pfsense server to assign groups properly.
# Configuring 802.1x Network Device Authentication
[https://teradici.com/web-help/pcoip\_zero\_client/tera2/20.10/config\_8021x\_network\_device\_authentication/](https://teradici.com/web-help/pcoip_zero_client/tera2/20.10/config_8021x_network_device_authentication/)
# Configuring 802.1x Network Device Authentication[¶](https://teradici.com/web-help/pcoip_zero_client/tera2/20.10/config_8021x_network_device_authentication/#configuring-8021x-network-device-authentication "Permanent link")
Setting
Default
AWI
OSD
Management Console
Enable 802.1x security
Identity
Authentication
TLS (this is the only available setting)
Client Certificate
Enable 802.1X Support for Legacy Switches
This section describes the components you need to configure 802.1x authentication, and the detailed steps you need to follow to configure the authentication. The instructions provided in this topic were done on a Microsoft 2019 Datacenter. If you are performing these instructions from a different version of Microsoft Server you may have to consult your server documentation for any changes in procedures.
## Preparing for 802.1x Configuration[¶](https://teradici.com/web-help/pcoip_zero_client/tera2/20.10/config_8021x_network_device_authentication/#preparing-for-8021x-configuration "Permanent link")
The supported 802.1x configuration has the PCoIP Zero Client pre-populated with a proper certificate. It then connects and presents the certificate to the 802.1x switch and is authenticated. PCoIP Zero Clients will also connect under a different configuration of the switch which has the MAC address of authorized endpoints stored in it's configuration.
Using certificates to sign other certificates
If a certificate is used to sign another certificate, it must have the digitalSignature key usage field enabled.
Before you begin the configuration process, make sure you have these components:
- Tera2 PCoIP Zero Client with firmware 5.x or newer
- PCoIP Management Console 2 or newer
- Windows Server 2019 with AD DS (Active Directory Domain Services)
- Windows Server 2019 with AD CS (Active Directory Certificate Services)
- Windows Server 2019 with NPS (Network Policy and Access Services)
- A switch with 802.1x support configured
## Configuring Devices for 802.1x Authentication[¶](https://teradici.com/web-help/pcoip_zero_client/tera2/20.10/config_8021x_network_device_authentication/#configuring-devices-for-8021x-authentication "Permanent link")
To configure 802.1x device authentication, complete the following steps:
1. [Create a 802.1x Client User.](https://teradici.com/web-help/pcoip_zero_client/tera2/20.10/config_8021x_network_device_authentication/#create-a-8021x-client-user)
2. [Export the Root CA Certificate.](https://teradici.com/web-help/pcoip_zero_client/tera2/20.10/config_8021x_network_device_authentication/#export-the-root-ca-certificate)
3. [Create a Certificate Template for 802.1x Client Authentication.](https://teradici.com/web-help/pcoip_zero_client/tera2/20.10/config_8021x_network_device_authentication/#create-a-certificate-template-for-8021x-client-authentication)
4. [Issue the 802.1x Client Certificate.](https://teradici.com/web-help/pcoip_zero_client/tera2/20.10/config_8021x_network_device_authentication/#issue-the-8021x-client-certificate)
5. [Export the 802.1x Client Certificate.](https://teradici.com/web-help/pcoip_zero_client/tera2/20.10/config_8021x_network_device_authentication/#export-the-8021x-client-certificate)
6. [Convert the Certificate Format from .pfx to .pem.](https://teradici.com/web-help/pcoip_zero_client/tera2/20.10/config_8021x_network_device_authentication/#convert-the-certificate-format-from-pfx-to-pem)
7. [Import the 802.1x Client Certificate into the Client User Account.](https://teradici.com/web-help/pcoip_zero_client/tera2/20.10/config_8021x_network_device_authentication/#import-the-8021x-client-certificate-into-the-client-user-account)
8. [Import the Certificates to the 802.1x Client Device.](https://teradici.com/web-help/pcoip_zero_client/tera2/20.10/config_8021x_network_device_authentication/#import-the-certificates-to-the-8021x-client-device)
The following sections assume you are using Windows Server 2019 Datacenter
The instructions in the following sections are based on Windows Server 2019 Datacenter. If you are using a newer version of Windows Server, the steps may vary slightly.
## Create a 802.1x Client User[¶](https://teradici.com/web-help/pcoip_zero_client/tera2/20.10/config_8021x_network_device_authentication/#create-a-8021x-client-user "Permanent link")
In the Windows server, create a 802.1x client user.
**Create a 802.1x Client User**
1. Log in to the Windows server.
2. Click **Start > Windows Administrative Tools > Active Directory Users and Computers**.
3. Navigate to **Roles > Active Directory Domain Services > Active Directory Users and Computers > <your\_domain.local> > Users**.
4. Right-click Users, select **New > User**, and follow the wizard.
(Example: Create a user called pcoip\_endpoint which would have a UPN name of pcoip\_endpoint@<mydomain.local>)
## Export the Root CA Certificate[¶](https://teradici.com/web-help/pcoip_zero_client/tera2/20.10/config_8021x_network_device_authentication/#export-the-root-ca-certificate "Permanent link")
In the Certificate Authority (CA) server, export the root CA certificate.
**To export the root CA certificate:**
1. Log in to the Certificate Authority (CA) server.
2. Open a Microsoft Management Console window (for example,enter **mmc.exe** in the **Start** menu search field).
3. From the console window, select **File > Add/Remove Snap-in**.
4. Add the **Certificates** snap-in, selecting **Computer account** and then **Local computer**.
5. Click **OK** to close the *Add or Remove Snap-ins* dialog.
6. From the console, select **Certificates (Local Computer) > Trusted Root Certification Authorities > Certificates**.
7. In the right panel, right-click the certificate, and select **All Tasks > Export**.
8. Follow the wizard to export the certificate:
1. Select **Base-64 encoded X.509 (.CER)** and click **Next**.
2. Click **Browse**, specify a name and location for the certificate, and then click **Save**.
3. Click **Finish**, and then click **OK**.
## Create a Certificate Template for 802.1x Client Authentication[¶](https://teradici.com/web-help/pcoip_zero_client/tera2/20.10/config_8021x_network_device_authentication/#create-a-certificate-template-for-8021x-client-authentication "Permanent link")
In the CA Server, create a certificate template for client authentication.
**To create a certificate template for client authentication:**
1. From the CA Server, click **Start > Administrative Tools > Certification Authority**.
2. Expand the tree for your CA.
3. Right-click **Certificate Templates**, and then click **Manage**.
4. Right-click the *Computer* template, and then click **Duplicate Template**.
5. Configure the template as follows:
1. From the *Compatibility* tab, select **Windows Server 2003**.
2. From the *Extensions* tab, ensure the **Digital signature** is included in the certificate **Key Usage**
3. From the *General* tab, enter a name for the template (for example, **PCoIP Endpoint 802.1x**) and change the validity period to match the organization’s security policy.
4. From the *Request Handling* tab, select **Allow private key to be exported**.
5. From the *Subject Name* tab, select **Supply in the request** and then click **OK**.
6. From the *Security* tab, select the user who will be requesting the certificate, and give **Enroll** permission to this user.
7. Click **OK** and close the *Certificate Templates Console* window.
6. From the *Certification Authority* window, right-click **Certificate Templates**, select **New**, and then click **Certificate Template to Issue**.
7. Select the certificate you just created (that is, **PCoIP Endpoint 802.1x**), and then click **OK**. The template will now appear in the *Certificate Templates* list.
8. Close the window.
## Issue the 802.1x Client Certificate[¶](https://teradici.com/web-help/pcoip_zero_client/tera2/20.10/config_8021x_network_device_authentication/#issue-the-8021x-client-certificate "Permanent link")
From the CA Web Enrollment interface for the certificate server, issue the client certificate.
**To issue the 802.1x client certificate:**
Use Internet Explorer to log in to certificate server
Do not use any other browser except Internet Explorer to log into the certificate server or some options may not appear.
1. Using Internet Explorer on your local machine, go to your Certificate Authority URL using the format **https://<server&tgt/certsrv/** (for example, **[https://ca.domain.local/certsrv/](https://ca.domain.local/certsrv/)**).
2. Click **Request a certificate** and then click **advanced certificate request**.
3. Click **Create and submit a request to this CA**.
4. From the pop-up window, click **Yes**.
5. Fill out the *Advanced Certificate Request* form as follows:
1. In the *Certificate Template* section, select the certificate for clients (for example, **PCoIP Endpoint 802.1x**).
2. In the *Identifying Information for Offline Template* section, enter the account name in the *Name* field. The other fields are not required.
The other fields are not required.
Enter the same name as the universal principal name of the client user
The name you enter in the *Name* field must be the universal principal name (UPN) of the client user you created in [Create a 802.1x Client User](https://teradici.com/web-help/pcoip_zero_client/tera2/20.10/config_8021x_network_device_authentication/#create-a-8021x-client-user)(for example, **pcoip\_endpoint@mydomainlocal**)
3. In the *Key Options* section, check **Mark keys as exportable**.
4. In the *Additional Options* section, set the Request Format to **PKCS10**.
5. If desired, enter a name in the *Friendly Name* field.
6. Click **Submit**.
7. From the *Certificate Issued* window, click the **Install this certificate** link.
(This will save the certificate in the **Current User > Personal** store.)
## Export the 802.1x Client Certificate[¶](https://teradici.com/web-help/pcoip_zero_client/tera2/20.10/config_8021x_network_device_authentication/#export-the-8021x-client-certificate "Permanent link")
From the machine on which you issued the certificate, export the client certificate.
**To export the client certificate:**
1. From the machine on which you issued the certificate, open a Microsoft Management Console window (for example, enter `mmc.exe` in the **Start** menu search field).
2. From the console window, select **File > Add/Remove Snap-in**.
3. Add the **Certificates** snap-in, selecting **My user account**.
4. Click **Finish**, and then click **OK** to close the *Add or Remove Snap-ins* dialog.
5. Select **Certificates - Current User > Personal > Certificates**.
6. In the right panel, right-click the certificate, and select **All Tasks > Export**.
7. Follow the Certificate Export wizard to export the certificate by clicking **Next**:
1. Click **Yes, export the private key**.
2. Select **Personal Information Exchange - PKCS #12 (.PFX)**.
3. Enter a password for the certificate.
4. Click **Browse**, specify a name and location for the certificate, and then click **Save**.
5. Click **Next**, **Finish**, and then click **OK**.
8. Repeat Steps 5 to 7 again to export the PCoIP endpoint certificate, but this time without the private key (**No, do not export the private key**), selecting the **DER encoded binary X.509 (.CER)** format instead of the PKCS format.
9. Save this `.cer` file to a location where it can be accessed by the Domain Controller and imported into Active Directory.
## Convert the Certificate Format from .pfx to .pem[¶](https://teradici.com/web-help/pcoip_zero_client/tera2/20.10/config_8021x_network_device_authentication/#convert-the-certificate-format-from-pfx-to-pem "Permanent link")
Using OpenSSL, convert the certificate format from .pfx to .pem.
**To convert the certificate format from .pfx to .pem:**
1. Download and install Windows OpenSSL from **[https://www.slproweb.com/products/Win32OpenSSL.html](https://www.slproweb.com/products/Win32OpenSSL.html)**. (The light version is sufficient.)
2. Copy the **.pfx** client certificate file you saved above to the **C:\\OpenSSL-Win32\\bin** directory.
3. Open a command prompt window (C:\\OpenSSL-Win32\\bin), and enter the following command to convert the certificate format from **.pfx** to **.pem** where *<client\_cert>* is the name of the **.pfx** certificate file you saved to your local machine.
`openssl.exe pkcs12 ‑in .pfx ‑out .pem ‑nodes`
4. When prompted, enter the password for the certificate file.
5. At the command prompt, enter the following command to create an RSA private key file where is the name of the .pem certificate file you created in the previous step.
`openssl.exe rsa –in .pem –out < client_cert>_rsa.pem`
6. In Notepad:
1. Open both the original .pem file and the RSA .pem file you just created. The RSA **.pem** file contains only an RSA private key. Because the PCoIP Endpoint certificate requires its private key in RSA format, you need to replace its private key with this RSA private key.
2. Copy the entire contents of the RSA .pem file (everything from `-----BEGIN RSA PRIVATE KEY -----` to `-----END RSA PRIVATE KEY-----`), and paste it into the original .pem file, replacing its private key with this RSA private key.
RSA .pem file
In other words, make sure that all the text from `-----BEGIN PRIVATE KEY-----` to `-----END PRIVATE KEY` (including the dashes) in the *original .pem* file is replaced with the contents of `-----BEGIN RSA PRIVATE KEY -----` to `-----END RSA PRIVATE KEY-----` (including the dashes) from the RSA .pem file.
3. Save the original **.pem** file and close it. The certificate is now ready to be uploaded to the PCoIP Endpoint.
## Import the 802.1x Client Certificate into the Client User Account[¶](https://teradici.com/web-help/pcoip_zero_client/tera2/20.10/config_8021x_network_device_authentication/#import-the-8021x-client-certificate-into-the-client-user-account "Permanent link")
In the Windows Domain Controller, import the client certificate into the client user account.
**To import the 802.1x client certificate into the client user account:**
1. Log in to the Windows Domain Controller.
2. Click **Start > Administrative Tools > Active Directory Users and Computers**.
3. From the **View** menu, select **Advanced Features**.
4. Navigate to the user you created for the PCoIP Endpoint.
5. Right-click the user, and select **Name Mappings**.
6. In the *X.509 Certificates* section, click **Add**.
7. Locate and select the PCoIP Endpoint certificate you exported that does not contain the private key (This file was saved to a network location in step 9 of [Export the 802.1x Client Certificate](https://teradici.com/web-help/pcoip_zero_client/tera2/20.10/config_8021x_network_device_authentication/#export-the-8021x-client-certificate).)
8. Make sure both identity boxes are selected and click **OK**, and then click **OK** again.
## Import the Certificates to the 802.1x Client Device[¶](https://teradici.com/web-help/pcoip_zero_client/tera2/20.10/config_8021x_network_device_authentication/#import-the-certificates-to-the-8021x-client-device "Permanent link")
From the PCoIP endpoint’s AWI, import the certificates.
To import the certificates into a profile using the PCoIP Management Console, see the [PCoIP® Management Console Administrators’ Guide](https://teradici.com/web-help/pcoip_management_console/20.10/).
**To import the certificates to a device using the AWI:**
1. From a browser, log into the AWI for the PCoIP Endpoint.
2. From the AWI, select **Upload > Certificate**.
3. Upload both the Root CA certificate and the certificate with the private key, using the Browse button to locate each certificate and the Upload button to upload them.
4. From the OSD or AWI, select **Configuration > Network**.
5. Select **Enable 802.1x Security**.
6. Click **Choose** beside the *Client Certificate* field.
7. Select the certificate with the private key, and then click **Select**.
8. Enter the identity name of the certificate. Typically, this is the universal principal name (UPN) that appears after Subject: (for example, **[pcoip\_endpoint@mydomain.local](mailto:pcoip_endpoint@mydomain.local)**).
Windows server may be configured to use the certificate’s Subject, the Subject Alternative Name, or another field
For the identity name, your Windows server may be configured to use the certificate’s *Subject*, the *Subject Alternative Name*, or another field. Check with your administrator.
9. To enable greater 802.1x compatibility for older switches on the network, select **Enable 802.1X Support for Legacy Switches**. This setting is only available from the PCoIP endpoints AWI *Network* page.
10. Click **Apply**, and then click **Reset**.
# Dynamic VLAN assignment on Unifi Devices
[https://community.ui.com/questions/I-need-help-setting-up-dynamic-vlan-assignment/a490768f-c8b5-44ac-baab-fc8c0593f882#comment/74376dd4-2316-46fa-89a4-224f434d192d](https://community.ui.com/questions/I-need-help-setting-up-dynamic-vlan-assignment/a490768f-c8b5-44ac-baab-fc8c0593f882#comment/74376dd4-2316-46fa-89a4-224f434d192d)
Framed-Protocol : PPP
Service-Type : Framed
Termination-Action : RADIUS-Request
Tunnel-Medium-Type : 802
Tunnel-Pvt-Group-ID : (VLAN number, as an octet string)
Tunnel-Type : VLAN
USE\_TUNNELED\_REPLY = YES
Of course you need to set tagged port configuration to the switch connected to the APs. To connect something to the base (untagged) VLAN, leave the Tunnel-Pvt-Group-ID out for that policy.
# Dynamic VLAN via Microsoft 2012 R2 NPS Server
[https://community.ui.com/questions/Dynamic-VLAN-via-Microsoft-2012-R2-NPS-Server/a869664e-dca4-42d7-a901-525b56df9330](https://community.ui.com/questions/Dynamic-VLAN-via-Microsoft-2012-R2-NPS-Server/a869664e-dca4-42d7-a901-525b56df9330)
We currently are using UniFi AP's with controller 5.3.8.2.
Is it possible to have Microsoft 2012 R2 NPS Server assign Dynmica LAN's to clients that connected to the AP's?
### Responses (18)
Take a look [here](https://community.ui.com/questions/a490768f-c8b5-44ac-baab-fc8c0593f882#comment/74376dd4-2316-46fa-89a4-224f434d192d) and [here](https://www.gypthecat.com/how-to-configure-windows-2012-nps-for-radius-authentication-with-ubiquiti-unifi)Cheers,jonatha
Thank you for the response.
I have been able to configure successuflly the RADIUS portion of the setup, but have been unsuccessful in the Dynamic VLAN portion.
The solution in the link was for FreeRADIUS. However, I may be able to utilize the following settings and see where that goes.
Framed-Protocol : PPP
Service-Type : Framed
Termination-Action : RADIUS-Request
Tunnel-Medium-Type : 802
Tunnel-Pvt-Group-ID : (VLAN number, as an octet string)
Tunnel-Type : VLAN
I'm having same issue.
Server 2012R2
Unifi AP-AC-PRO running 3.7.21.5389
Unifi Controller running 5.2.9
I've got Radius working fine with NPS as long as I don't try to use Dynamic VLAN via Radius.
Radius Attributes I add are:
Tunnel-Pvt\_Group-ID = <VLAN I WANT>
Tunnel-Type = Virtual LANs (VLAN)
Tunne-Medium-Type = 802
Enabled Radius Assigned VLAN within Unif Controller.
Looking at logs with debug mode on, on the AP, I see that Radius completes, and the AP understand that the client should be getting the correct VLAN as per the following being logged:
Jan 15 13:09:05 UBNT user.warn kernel: \[ 3262.410000\] ieee80211\_ioctl\_setparam: VLANID32 = <CORRECTVLANHERE>
However, client doesn't get DHCP. I statically set the IP on the device and no change. Enabled port mirroring on the switch port that the AP connects to, and wiresharked that traffic, and never see any packets coming from the client computer in question (looked via IP and/or MAC address). Almost seems like the endpoints are put into limbo within the AP after RADIUS handshaking is completed.
Behavior is same regardless if it's an Android phone, or 2 different Windows 10 wireless laptops.
I've also simply tried communicating (ping, etc) between the 2 laptops, with static IP's set, that should be on the same VLAN (and show as such via AP logs handshaking results, like what I listed above), and they can't communicate with eachother.
I've also SSH into the AP, run tcpdump wide open (not restricted to a specific interface) and see zero of the traffic attempting to be generated from either of the laptops.
I'm testing this with only a single SSID for simplicity. I've tried differing VLAN's too, no change. Wired devices do not have any issue, it's only wireless devices behind the AP.
Only thing I've found from others with same behavior is regarding FreeRadius and needing to enable "use\_tunneled\_reply = yes" to solve the problem, however I don't know how to do that within NPS or if that's even possible.
I have tried all kinds of options ad can only get it to work with static VLAN for the SSID.
Does the port and switch that is connected to the AP have the VLAN trucking.
My initial thought is maybe the switch is stripping the tag.
The switch is trunked on thsoe VLANs.
The switch isn't stripping the VLAN tags, as I've wiresharked the feed from the AP and see ZERO traffic from the devices once they are assigned vlan via Radius. In addition, besides wiresharking, I've also ran TCPDUMP directly on the wireless access point and also see ZERO traffic from the devices once they are assigned the dynamic vlan via radius.
It's not the switch. It's like the AP puts the devices into some kind of limbo/jail.
If I go back to static VLAN per SSID, it works fine.
Didn't think it was just wanted to verify.
You're issue is the exact issue I have as well.
Until they fix this issue or give me an official response as to what's going on, I've needed to look at other vendors to expand my wifi network.
The only resolution that I came up with was multiple SSID's with static VLAN and have the switch segregate the traffic. This is only temporary until I replace the AP's with something else that supports dynamic VLAN and I can get actual support outside of Forums.
i have this running without issues on the latest beta controller and latest beta firmware, but it has been running like this since it first came out.
things to verify :
are all vlans trunked to the ap ?
is you ias log actually returning tge vlan value ?
have you removed under networks any ref. networks that have the same vlan tag ?
VLANs trunked correctly (As other SSID's are using them already)
The IAS logs return the VLAN (can be seen on the packet capture and on the AP's logs too)
The network work fine when I fix the value as fixed vlan (so 2 SSID's with the same VLAN on the same AP, so I don't think this would be the issue?)
> ---
>
> wrote:VLANs trunked correctly (As other SSID's are using them already)---
Do you mean you have other SSIDs using the same VLAN as a static assignment? That specifically is documented to be an invaild configuration.
RADIUS-assigned VLANs can not be also statically assigned to SSIDs. This has been in the release notes for a long time:
> - You cannot re-use a VLAN ID for dynamic VLAN if it is set as a static value for another SSID on the same AP. So, if I have a SSID set to use VLAN 10, I cannot use VLAN ID 10 for RADIUS controlled VLAN users as those users will not get an IP.
Sorry for bringing this back but I'm having the same issue and I don't understand why I have to remove the network VLAN with same VLAN ID that NPS is given. If I delete it how am I supposed to configure DHCP?
I'm sure I am missing something here because does not make any sense.. hahahah
# How Duo Auth Proxy Works in my Setup
[](https://44.214.88.72/uploads/images/gallery/2023-12/Yidimage.png)
# How To Configure NPS and Active Directory For Dynamic Radius based Vlan assignment
[https://community.cambiumnetworks.com/t/how-to-configure-nps-and-active-directory-for-dynamic-radius-based-vlan-assignment/55086](https://community.cambiumnetworks.com/t/how-to-configure-nps-and-active-directory-for-dynamic-radius-based-vlan-assignment/55086)
This document is to describe the steps to configure NPS(network policy servicer)server with below use case
- Vlans need to be assigned based on different Radius group i.e Sales group to Vlan 10
Account group to Vlan 20.
Steps:-
1. Open Active directory Users and Computers. Right click on Users .Create a new group.
8.Press Ok . Now the user is part of the domain user and group .
**Configuring NPS server**
==================================
9.Click on Network Policy and click on New
# How to Configure Windows 2012 NPS for Radius Authentication with Ubiquiti Unifi
[https://www.gypthecat.com/how-to-configure-windows-2012-nps-for-radius-authentication-with-ubiquiti-unifi](https://www.gypthecat.com/how-to-configure-windows-2012-nps-for-radius-authentication-with-ubiquiti-unifi)
In a corporate environment shared key encryption is rarely used due to the problems associated with distributing the appropriate keys. In the corporate wireless world many organisations prefer to use 802.1x or Radius authentication so that their users can log on to the wireless networks with their domain credentials.
I was recently asked to set up just s system with Unifi access points and controllers on Windows Server 2012 with Microsofts own Radius solution NPS (or Network Policy Server) and 802.1x. There is plenty of information out there but I found that some of it was out of date and others were missing some fairly key components. So I present this tutorial to hopefully helps others get this up and running as quickly as possible.
The Unifi system was running 4.8.18, and obviously may change a little as things progress. The network I was working on looking like the following:
- Windows Server 2012 Active Directory – 192.168.1.50
- Ubuntu Server 14.04LTS Unifi Controller – 192.168.1.60
- Floor 1 Unifi AP – 192.168.1.250
- Floor 2 Unifi AP – 192.168.1.251
- Floor 3 Unifi AP – 192.168.1.252
As part of this project we wanted to turn on the following:
- Windows Server 2012 Network Policy Server – 192.168.1.55
The client also provided the server it’s own server certificate to allow clients to authenticate, and we installed that too.
I will assume you already have Active Directory installed, and you have a server ready to install Network Policy Server which is joined to the appropriate domains.
Oh and feel free to click on any of the screenshots for a bigger picture!
## Step 1 – OPTIONAL – Install a Trusted Certificate for Authentication
Update 16 July 2016: An emailer has suggested that if you’ve got an enterprise Windows Certificate Services server setup you shouldn’t need to manually import a certificate, you should be able to do it quite happily via the usual certificate request process. Thanks Anon for the clarification suggestion 🙂
In this particular example the customer had a full and proper PKI infrastructure so they wanted to provide a certificate on the Radius/NPS server which clients could authenticate with. You don’t need to do this step, but if not you’ll have to get users to accept the certificate when they connect or otherwise distribute the certificate.
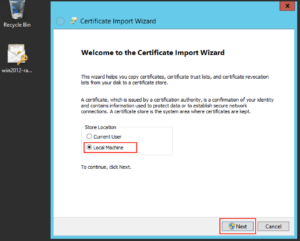
Download the certificate (in this case a .p12) and double click to install and you’ll probably want to install it on the “Local Machine” as opposed to the “Current User”, and click “Next”:
[](https://www.gypthecat.com/wp-content/uploads/2016/05/P12-Certificate-Install-01.png)
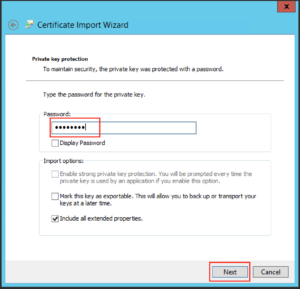
Type the password as appropriate for the file and click “Next”:
[](https://www.gypthecat.com/wp-content/uploads/2016/05/P12-Certificate-Install-02.png)
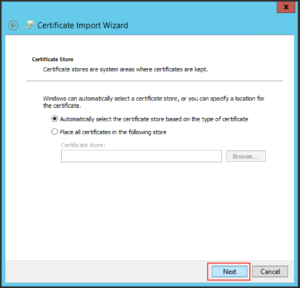
Leave the default on the next screen and click “Next”:
[](https://www.gypthecat.com/wp-content/uploads/2016/05/P12-Certificate-Install-03.png)
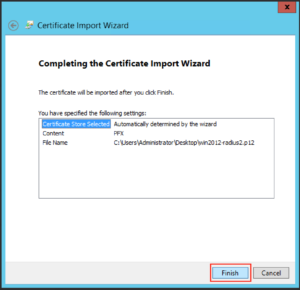
Then click “Finish”
[](https://www.gypthecat.com/wp-content/uploads/2016/05/P12-Certificate-Install-04.png)
And you should get a message like the following:
[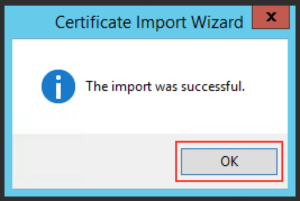](https://www.gypthecat.com/wp-content/uploads/2016/05/P12-Certificate-Install-05.png)
# Step 2 – Install Microsoft Network Policy Server for Radius & 802.1x
From the Server Manager click “Add Roles or Features”
[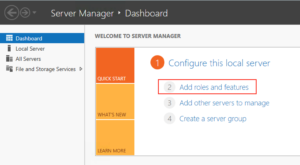](https://www.gypthecat.com/wp-content/uploads/2016/05/Windows-2012-NPS-Installation-0.png)
Make sure “Role-based or feature-based installation” is selected and click “Next”
[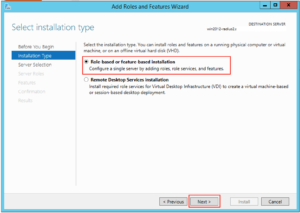](https://www.gypthecat.com/wp-content/uploads/2016/05/Windows-2012-NPS-Installation-02.png)
Select the appropriate server in the next screen and click “Next”
[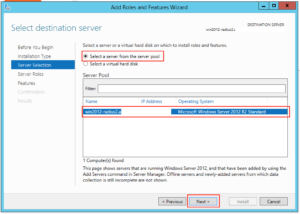](https://www.gypthecat.com/wp-content/uploads/2016/05/Windows-2012-NPS-Installation-03.png)
Click on “Network Policy and Access Services”:
[](https://www.gypthecat.com/wp-content/uploads/2016/05/Windows-2012-NPS-Installation-04.png)
A box like this should pop up, click on “Add Features”:
[](https://www.gypthecat.com/wp-content/uploads/2016/05/Windows-2012-NPS-Installation-05.png)
Then click “Next”:
[](https://www.gypthecat.com/wp-content/uploads/2016/05/Windows-2012-NPS-Installation-06.png)
And click “Next” again:
[](https://www.gypthecat.com/wp-content/uploads/2016/05/Windows-2012-NPS-Installation-07.png)
And “Next” again:
[](https://www.gypthecat.com/wp-content/uploads/2016/05/Windows-2012-NPS-Installation-08.png)
And yet again, click “Next”:
[](https://www.gypthecat.com/wp-content/uploads/2016/05/Windows-2012-NPS-Installation-09.png)
And then click “Install”:
[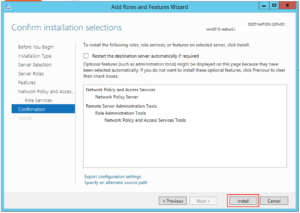](https://www.gypthecat.com/wp-content/uploads/2016/05/Windows-2012-NPS-Installation-10.png)
The Wizard should happily go away and install the NPS role for you. When it’s finished press “Close”:
[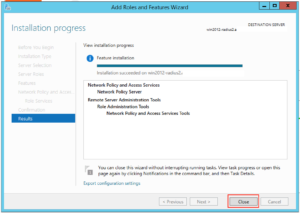](https://www.gypthecat.com/wp-content/uploads/2016/05/Windows-2012-NPS-Installation-12.png)
## Step 3 – Configure NPS for Unifi Authentication
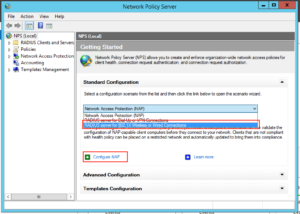
Next we have to set up our server to allow domain authentication via 802.1x for our wireless clients. Click on Start and find the icon for Network Policy Server and click on it:
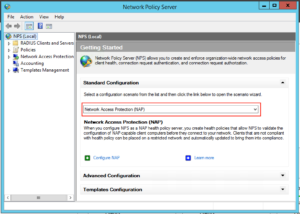
[](https://www.gypthecat.com/wp-content/uploads/2016/05/Windows-2012-NPS-Configuration-01.png)
On the window that opens up drop down to “RADIUS Server for 802.1x Wireless or Wired Connections” and then click “Configure NAP”:
[](https://www.gypthecat.com/wp-content/uploads/2016/05/Windows-2012-NPS-Configuration-02.png)
[](https://www.gypthecat.com/wp-content/uploads/2016/05/Windows-2012-NPS-Configuration-03.png)
Make sure “Secure Wireless Connections” is highlighted, give it a sensible name and click “Next”:
[](https://www.gypthecat.com/wp-content/uploads/2016/05/Windows-2012-NPS-Configuration-04.png)
The next screen is where we will add the details for all our Unifi access points, so click “Add”:
[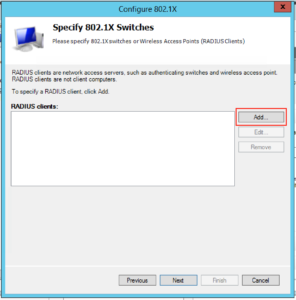](https://www.gypthecat.com/wp-content/uploads/2016/05/Windows-2012-NPS-Configuration-05.png)
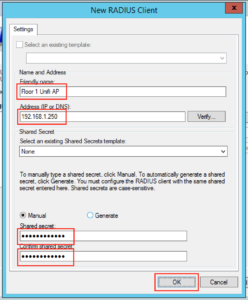
You will want to fill in the client area like this, note our “IP addresses” and “Shared Secret”. You’ll probably want to make the “Shared Secret” some complex string, but for this example I’ve just used “Password123!”. You need to type this into the Unifi controller for each AP. When complete click “Ok”:
[](https://www.gypthecat.com/wp-content/uploads/2016/05/Windows-2012-NPS-Configuration-06.png)
When you’ve completed the process for the rest of your access points your screen will probably look like this, when you’re happy click “Next”:
[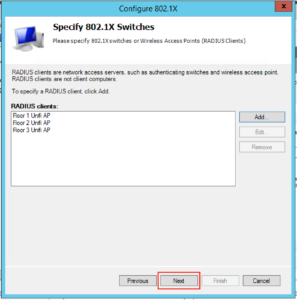](https://www.gypthecat.com/wp-content/uploads/2016/05/Windows-2012-NPS-Configuration-07.png)
On the next screen you want to drop down the EAP type to “Microsoft: Protected EAP (PEAP)”, and then click “Configure”:
[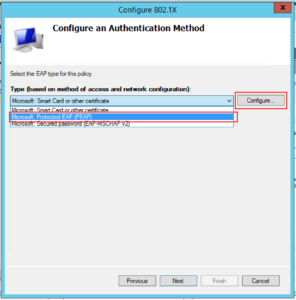](https://www.gypthecat.com/wp-content/uploads/2016/05/Windows-2012-NPS-Configuration-08.png)
On this screen you will want to select the certificate you want to present to the clients connecting over Wifi. Since in Option 1 I installed a given certificate just for this purpose this is what I need to select, and make sure “Enable Fast Reconnect” is ticked. When you’re happy with it click “Ok”:
[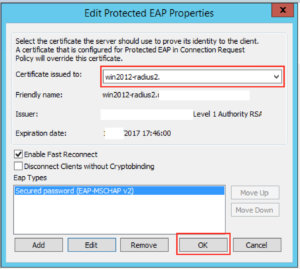](https://www.gypthecat.com/wp-content/uploads/2016/05/Windows-2012-NPS-Configuration-09.png)
Then click “Next”:
[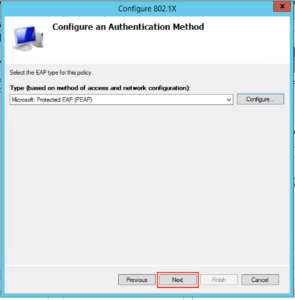](https://www.gypthecat.com/wp-content/uploads/2016/05/Windows-2012-NPS-Configuration-10.png)
The next screen lets us select which groups we want to allow to authenticate wirelessly, click “Add” and find your appropriate group(s) and when you’re happy click “Next”:
[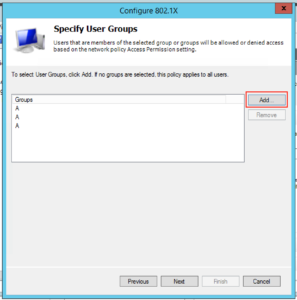](https://www.gypthecat.com/wp-content/uploads/2016/05/Windows-2012-NPS-Configuration-11.png)
Click “Next” on the following screen since we’re happy with the defaults:
[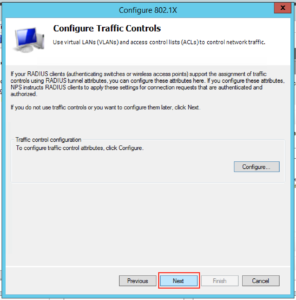](https://www.gypthecat.com/wp-content/uploads/2016/05/Windows-2012-NPS-Configuration-12.png)
On the next screen click “Finish”:
[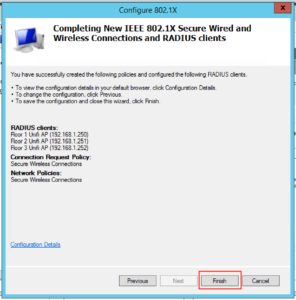](https://www.gypthecat.com/wp-content/uploads/2016/05/Windows-2012-NPS-Configuration-13.png)
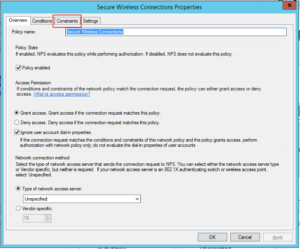
Next we need to disable some insecure options. Under Policies, Network Policies, right click “Secure Wireless Connections” and click “Properties”:
[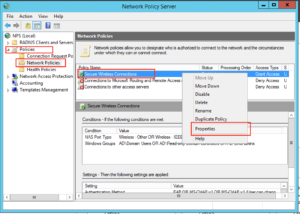](https://www.gypthecat.com/wp-content/uploads/2016/05/Windows-2012-NPS-Configuration-14.png)
Click on the Constraints tab:
[](https://www.gypthecat.com/wp-content/uploads/2016/05/Windows-2012-NPS-Configuration-15.png)
By default we have some insecure methods enabled:[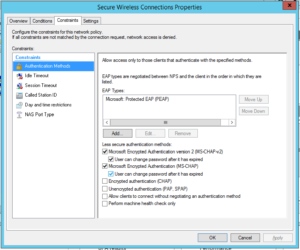](https://www.gypthecat.com/wp-content/uploads/2016/05/Windows-2012-NPS-Configuration-16.png)
Make sure they are all unchecked, like this and click “Ok”:
[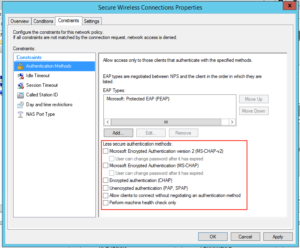](https://www.gypthecat.com/wp-content/uploads/2016/05/Windows-2012-NPS-Configuration-17.png)
Well done! Your NPS server should be ready to go.
## Step 3 – Configure Unifi to use NPS
WARNING: Your access points will likely have to re-provision at the end of this step. This means anyone connected to the APs will lose connectivity, if in doubt do it out of hours.
The previous Step was most certainly the biggest one, on Unifi it’s quick and easy.
[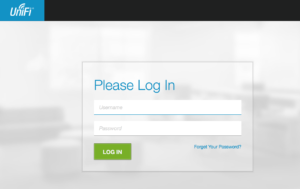](https://www.gypthecat.com/wp-content/uploads/2016/05/Unifi-Radius-Configuration-01.png)
Logon to your controller as normal and click on “Settings”:
[](https://www.gypthecat.com/wp-content/uploads/2016/05/Unifi-Radius-Configuration-02.png)
Click on “Create New Wireless Network” or edit an existing one. Fill in the Wireless Network like this, make sure you select WPA-Enterprise and fill in the IP Address and Share Secret of the appropriate details, in our example it looks like the below. When you’re happy click “Save”:
[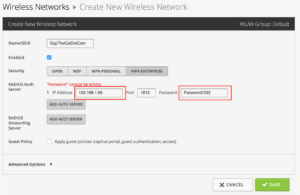](https://www.gypthecat.com/wp-content/uploads/2016/05/Unifi-Radius-Configuration-03.png)
At this point we found that the APs restarted, but not to worry if you’ve come this far it’s obviously going to be ok.
## Step 4 – Connect Clients to Unifi Network
Now all that is configuered, you should be ready to attach your clients to the wireless network.
In the optional first step we installed a certificate specifically to allow the Radius server to be trusted by our clients. If you’ve got a proper PKI in place then all your devices should trust the Radius server already, so your steps below may be slightly different than mine (I deliberately didn’t install the certificate for testing purposes).
If you search for wireless networks the network you’ve added should show up, click on it:
[](https://www.gypthecat.com/wp-content/uploads/2016/05/Unifi-Client-Configuration-01.png)
Now enter your network details as normal and click Join:
[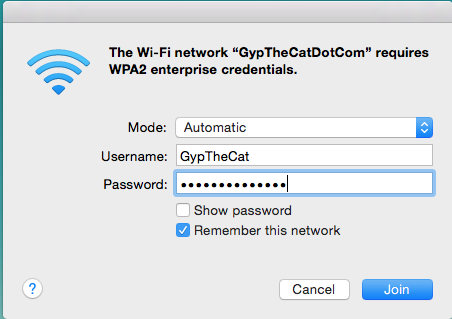](https://www.gypthecat.com/wp-content/uploads/2016/05/Unifi-Client-Configuration-02.png)
If you DON’T have the certificate trusted by the end point you’ll get a warning like this, click on “Show Certificate” to make sure it’s as it should be:
[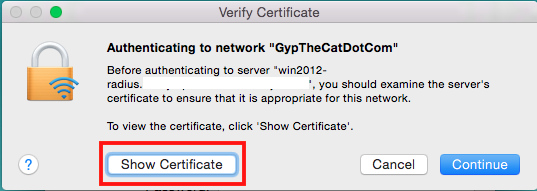](https://www.gypthecat.com/wp-content/uploads/2016/05/Unifi-Client-Configuration-03.png)
That screen should look something like this (please note I’ve deleted some bits):
[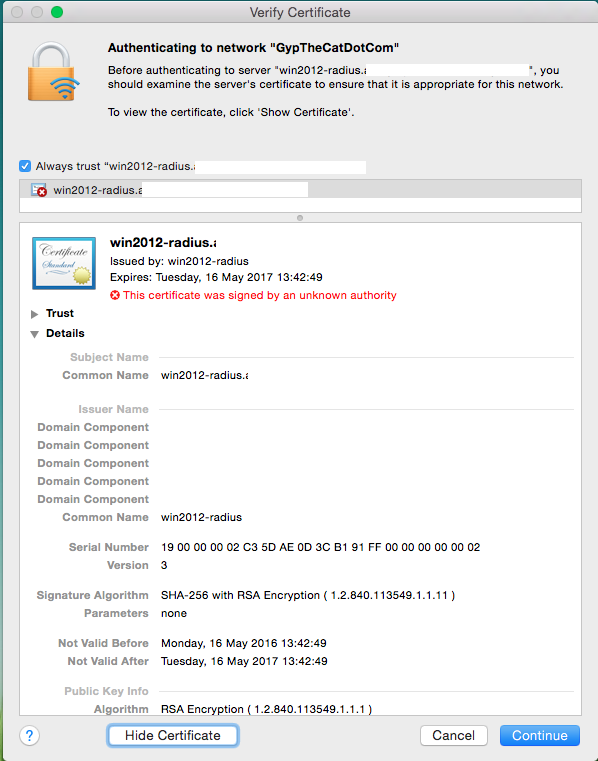](https://www.gypthecat.com/wp-content/uploads/2016/05/Unifi-Client-Configuration-06.png)
You can check that it’s how it should be, and this process will let you install the certificate so it will never ask you again for it.
But again if you’re using a properly trusted certificate by your end point you shouldn’t see this communication!
Once you’re connected you should have data like the following, notice it says 802.1X at the bottom:
[](https://www.gypthecat.com/wp-content/uploads/2016/05/Unifi-Client-Configuration-05.png)
Well done, you’ve got your Unifi using Radius authentication!
# Network Policy Server
Currently the NPS is [CH-VM-DC02](https://44.214.88.72/books/colthome/page/ch-vm-dc02 "CH-VM-DC02")
The following is the configuration of this server
There is a backup at \\\\truenas.coltscomputer.services\\Mass-Storage\\Computer Technician\\Upload to Cloud\\NPS
The RADIUS server is used by the Unifi Controller for both Wifi networks, pFsense to control the VPN access and login to the home screen.
[](https://44.214.88.72/uploads/images/gallery/2023-12/image.png)
[](https://44.214.88.72/uploads/images/gallery/2023-12/9MXimage.png)
[](https://44.214.88.72/uploads/images/gallery/2023-12/fMLimage.png)
[](https://44.214.88.72/uploads/images/gallery/2023-12/sv7image.png)
[](https://44.214.88.72/uploads/images/gallery/2023-12/wXzimage.png)
[](https://44.214.88.72/uploads/images/gallery/2023-12/tr3image.png)
[](https://44.214.88.72/uploads/images/gallery/2023-12/BFWimage.png)
[](https://44.214.88.72/uploads/images/gallery/2023-12/i0Aimage.png)
[](https://44.214.88.72/uploads/images/gallery/2023-12/Fhbimage.png)
# pfSense admin logins via RADIUS using Active Directory Accounts
[https://community.spiceworks.com/how\_to/128944-pfsense-admin-logins-via-radius-using-active-directory-accounts](https://community.spiceworks.com/how_to/128944-pfsense-admin-logins-via-radius-using-active-directory-accounts)
This guide will allow you to setup RADIUS authentication to log into your pfSense firewall.
It assumes you have already installed the Network Policy Server role. If you have not already installed this role, do this now through the Add Roles and Features Wizard. I usually install this role on a domain controller.
If a setting is not mentioned throughout this guide, leave the setting at its default.
This will only work on pfSense v 2.3.1 or later.
Section 1 is Windows configuration. Section 2 is pfSense configuration.
## 6 Steps total
## Step 1: Section 1.1 Create an AD group

Create a new local group that will be used to grant members access to pfSense. Add the members who should have access.
I have called the group pfSense.
## Step 2: Section 1.2 Network Policy Server RADIUS Clients

First we need to define a new RADIUS client. pfSense will be the client that queries active directory (via RADIUS) to authenticate the login. The RADIUS client and server use a matching key pair to authenticate communication with each other.
-Server Manager – Tools – Network Policy Server – RADIUS Clients and Servers – RADIUS Clients – Action - New
-Settings tab --Friendly name: Enter a name for this client. I have used the DNS name of the firewall. --Address: Enter the IP address of your pfSense firewall --Select an existing Shared Secrets template: None --Generate: Generate a shared secret and copy this to notepad, we will need this again later. --Click OK to finish.
## Step 3: Section 1.3 Network Policy Server Network Policies

Create the policy used to grant access to members of the AD group.
-Server Manager – Tools – Network Policy Server – Policies – Network Policies – Action – New
This starts the New Network policy wizard
-Specify Name and connection type --Policy Name: Enter a name for the policy. I have used ‘shr-gw1 Policy’. --Type of network access server: Unspecified --Next
-Specify Conditions --Add.. – Windows Groups – \[select the group you created\] --Add.. – Client IPv4 Address – \[enter the IP address of pfSense\] --Next
-Specify Access Permission --Access granted --Next
-Configure Authentication Methods --Unencrypted authentication (PAP, SPAP) – enabled --All other types off -Next
-Configure Constraints --No changes --Next
-Configure Settings --RAIDUS Attributes – Standard – Add… - Class – Add… - String – \[enter the name of the AD Group you created\] – OK (Note: the class string will be parsed back to pfSense where a matching group name to this string must exist. For simplicity I have used the same group name in AD and in pfSense, therefore the Class string matches both)
\--Next --Finish
## Step 4: Section 2.1 Authentication Servers

Add the RADIUS server.
-pfSense – System – User Manager – Authentication Servers – Add --Descriptive Name: Name of the RADIUS Server --Type: RADIUS --Hostname or IP address: Enter the DNS name or IP address --Shared Secret: Enter the secret you copied to notepad in an earlier step --Services Offered: Authentication and Accounting --Save
## Step 5: Section 2.2 Groups

Add a shadow group to pfSense with the same name as the AD group you created.
-pfSense – System – User Manager – Groups – Add --Group Name: \[enter the same name as the AD group, this is where the class string parsed from the RADIUS server looks for this group name\] --Scope: Local (I tested with Remote and it worked with that setting too) --Group membership: no members need to be added --Assigned Privileges – Add – ‘WebCfg - All pages’ --Save
## Step 6: Section 2.3 Settings

Enable the RADIUS server as the authentication method
-pfSense – System – User Manager - Settings --Athentication Server: \[choose your authentication server\] --Save
You should now be able to add users to the AD group and login using your AD credentials with full access.
You can use this same method to create multiple groups in pfSense with various levels of access. To do this, create a new AD group, a new Network Server Policy with a different ‘Class’ string to parse back to pfSense, then create a pfSense group of the same name and give the group only access to the pages you wish them to have.
# RADIUS Clients
Devices that will be sending RADIUS requests must be setup and clients on the RADIUS server. These are not the individual devices connecting to the network, but the Network Devices that will be doing the authentication. Example Switches, APs, Server, etc
[](https://44.214.88.72/uploads/images/gallery/2023-12/rO4image.png)
# Core Network Companion Guide: Deploying Password-based 802.1X Authenticated Wireless Access
[https://learn.microsoft.com/en-us/previous-versions/windows/it-pro/windows-server-2012-R2-and-2012/jj721726(v=ws.11)?redirectedfrom=MSDN](https://learn.microsoft.com/en-us/previous-versions/windows/it-pro/windows-server-2012-R2-and-2012/jj721726(v=ws.11)?redirectedfrom=MSDN)
## About this guide
This guide provides instructions about how to deploy a WiFi access infrastructure that uses the following components:
- One or more 802.1X-capable 802.11 wireless access points (APs).
- AD DS Users and Computers.
- Group Policy Management.
- One or more Network Policy Server (NPS) servers.
- Server certificates for computers running NPS.
- Wireless client computers running Windows® 8, Windows® 7, Windows Vista® or Windows XP with Service Pack 2.
This guide is designed for network and system administrators who have:
1\. Followed the instructions in the Windows Server 2012 **Core Network Guide** to deploy a core network, or for those who have previously deployed the core technologies included in the core network, including AD DS, Domain Name System (DNS), Dynamic Host Configuration Protocol (DHCP), TCP/IP, NPS, and Windows Internet Name Service (WINS).
The **Core Network Guide** is available at the following locations:
- The Windows Server 2012 Core Network Guide is available in the Windows Server 2012 Technical Library ([https://go.microsoft.com/fwlink/?LinkId=154884](https://go.microsoft.com/fwlink/?linkid=154884)).
- The Core Network Guide is also available in Word format at the Microsoft TechNet Gallery ([https://gallery.technet.microsoft.com/Windows-Server-2012-and-7c5fe8ea](https://gallery.technet.microsoft.com/windows-server-2012-and-7c5fe8ea)).
2\. Either followed the instructions in the Windows Server 2012 **Core Network Companion Guide: Server Certificate Deployment** to deploy and use Active Directory Certificate Services (AD CS) to autoenroll server certificates to computers running NPS, or who have purchased a server certificate from a public CA, such as VeriSign, that client computers already trust. A client computer trusts a CA if that CA cert is already in the Trusted Root Certification Authorities certificate store on Windows-based computers. By default, computers running Windows have multiple public CA certificates installed in their Trusted Root Certification Authorities certificate store.
The **Core Network Companion Guide: Server Certificate Deployment** is available at the following locations.
- The Windows Server 2012 [Core Network Companion Guide: Server Certificate Deployment](https://gallery.technet.microsoft.com/windows-server-2012-core-e0970aa7) in Word format in the Microsoft TechNet Gallery.
- The Windows Server 2012 [Core Network Companion Guide: Server Certificate Deployment](https://learn.microsoft.com/en-us/previous-versions/windows/it-pro/windows-server-2012-R2-and-2012/jj125379(v=ws.11)) in HTML format in the Technical Library.
It is recommended that you review the design and deployment guides for each of the technologies that are used in this deployment scenario. These guides can help you determine whether this deployment scenario provides the services and configuration that you need for your organization's network.
## Requirements
Following are the requirements for deploying a wireless access infrastructure by using the scenario documented in this guide:
- Before deploying this scenario, you must first purchase and install 802.1X-capable wireless access points to provide wireless coverage in the desired locations at your site.
- Active Directory Domain Services (AD DS) is installed, as are the other network technologies, according to the instructions in the Windows Server 2012 Core Network Guide.
- Server certificates are required when you deploy the PEAP-MS-CHAP v2 certificate-based authentication method.
- You or someone else in your organization is familiar with the IEEE 802.11 standards that are supported by your wireless APs and the wireless network adapters installed in the client computers on your network; for example, radio frequency types, 802.11 wireless authentication (WPA2 or WPA), and ciphers (AES or TKIP).
## What this guide does not provide
Following are some items this guide does not provide:
**Comprehensive guidance for selecting 802.1X-capable wireless access points**
Because many differences exist between brands and models of 802.1X-capable wireless APs, this guide does not provide detailed information about:
- Determining which brand or model of wireless AP is best suited to your needs.
- The physical deployment of wireless APs on your network.
- Advanced wireless AP configuration, such as for wireless VLAN.
- Instructions on how to configure wireless AP vendor-specific attributes in NPS.
Additionally, terminology and names for settings vary between wireless AP brands and models, and might not match the generic setting names referenced in this guide. For wireless AP configuration details, you must review the product documentation provided by the manufacturer of your wireless APs.
**Instructions for deploying NPS server certificates**
There are two alternatives for deploying NPS server certificates. This guide does not provide comprehensive guidance to help you determine which alternative will best meet your needs. In general, however, the choices you face are:
- Purchasing certificates from a public CA, such as VeriSign, that are already trusted by Windows-based clients. This option is typically recommended for smaller networks.
- Deploying a Public Key Infrastructure (PKI) on your network by using AD CS.
The following table describes some of the main considerations for deciding whether to deploy a PKI or purchase a certificate from a public CA.
Features
Purchased Public CA certificate
PKI
Scales well
No.
Certificates must be purchased and installed on a per-server basis.
Yes.
If autoenrollment is used, NPS servers automatically enroll certificates. New NPS servers you add later will also automatically enroll certificates.
Has recurring costs over time
Yes.
Public CA certificates must be renewed.
No.
When certificates expire, the CA automatically issues new ones.
Requires extensive planning and knowledge
No.
On smaller networks, certificates can be purchased and installed on a per-server basis more easily than deploying a PKI.
Yes.
Deploying a PKI requires knowledge of AD CS.
Requires additional hardware
No.
Maybe.
To deploy one or more CAs, you must have additional servers or virtual machines.
Is easily extensible
No.
Yes.
You can use the PKI to deploy additional authentication methods and certificates used for other purposes.
**NPS network policies and other NPS settings**
Except for the configuration settings made when you run the **Configure 802.1X** wizard, as documented in this guide, this guide does not provide detailed information for manually configuring NPS conditions, constraints or other NPS settings.
For more information about NPS, see [Additional Resources](https://technet.microsoft.com/library/ff919510(v=ws.10).aspx) in this guide.
**DHCP**
This deployment guide does not provide information about designing or deploying DHCP subnets for wireless LANs.
For more information about DHCP, see the [Additional Resources](https://technet.microsoft.com/library/ff919510(v=ws.10).aspx) in this guide.
## Technology overviews
Following are technology overviews for deploying wireless access:
## IEEE 802.1X
The IEEE 802.1X standard defines the port-based network access control that is used to provide authenticated network access to Ethernet networks. This port-based network access control uses the physical characteristics of the switched LAN infrastructure to authenticate devices attached to a LAN port. Access to the port can be denied if the authentication process fails. Although this standard was designed for wired Ethernet networks, it has been adapted for use on 802.11 wireless LANs.
## 802.1X-capable wireless access points (APs)
This scenario requires the deployment of one or more 802.1X-capable wireless APs that are compatible with the Remote Authentication Dial-In User Service (RADIUS) protocol.
802.1X and RADIUS-compliant APs, when deployed in a RADIUS infrastructure with a RADIUS server such as an NPS server, are called *RADIUS clients*.
## Wireless clients
This guide provides comprehensive configuration details to supply 802.1X authenticated access for domain-member users who connect to the network with wireless client computers running Windows 8, Windows 7, Windows Vista or Windows XP with Service Pack 2 or later. Computers must be joined to the domain in order to successfully establish authenticated access.
Wireless computers that are running Windows Server 2012 configured by the same configuration settings as for Windows 8, Windows 7 and Windows Vista. Wireless computers running Windows Server 2003 are configured by the same wireless security and connectivity settings as for computers running Windows XP.
Note
On your domain wireless client computers running Windows 8, Windows 7, and Windows Vista, users can view the profiles you configure in the Windows Vista Wireless Network Policy by opening **Network and Sharing Center** and then clicking **Manage wireless networks**
The Windows Vista Wireless Policies in Windows Server 2012 Group Policy also provide settings that you can use to manage specific features and enhancements that are found only in wireless client computers running Windows 7.
## Support for IEEE 802.11 Standards
Windows 8, Windows Server 2012, Windows 7, Windows Vista Windows Server 2003, and, Windows XP, provide built-in support for 802.11 wireless networking. An installed 802.11 wireless network adapter appears as a wireless network connection in the Network Connections folder. Although there is built-in support for 802.11 wireless networking, the wireless components of Windows are dependent upon the following:
- The capabilities of the wireless network adapter. The installed wireless network adapter must support the wireless LAN or wireless security standards that you require. For example, if the wireless network adapter does not support Wi-Fi Protected Access (WPA), you cannot enable or configure WPA security options.
- The capabilities of the wireless network adapter driver. To allow you to configure wireless network options, the driver for the wireless network adapter must support the reporting of all of its capabilities to Windows. Verify that the driver for your wireless network adapter was written for the capabilities of Windows Vista or Windows XP and is the most current version by checking Microsoft Update or the Web site of the wireless network adapter vendor.
The following table shows the transmission rates and frequencies for common IEEE 802.11 wireless standards.
Standards
Frequencies
Bit Transmission Rates
Usage
802.11
S-Band Industrial, Scientific, and Medical (ISM) frequency range (2.4 to 2.5 GHz)
2 megabits per second (Mbps)
Obsolete. Not commonly used.
802.11b
S-Band ISM
11 Mbps
Commonly used.
802.11a
C-Band ISM (5.725 to 5.875 GHz)
54 Mbps
Not commonly used due to expense and limited range.
802.11g
S-Band ISM
54 Mbps
Widely used. 802.11g devices are compatible with 802.11b devices.
802.11n (IEEE standards development are in progress)
C-Band and S-Band ISM
250 Mbps
Devices based on the pre-ratification IEEE 802.11n standard became available in August 2007. Many 802.11n devices are compatible with 802.11a, b, and g devices.
## Wireless network security methods
**Wireless network security methods** is an informal grouping of wireless authentication (sometimes referred to as wireless security) and wireless security encryption. Wireless authentication and encryption are used in pairs to prevent unauthorized users from accessing the wireless network, and to protect wireless transmissions. When configuring wireless security settings in the Wireless Network Policies of Group Policy there are multiple combinations to choose from. However, only the WPA2-Enterprise, WPA-Enterprise, and Open with 802.1X authentication standards are supported for 802.1X Authenticated wireless deployments. You must select WPA2-Enterprise, WPA-Enterprise, or Open with 802.1X in order to gain access the EAP settings in the Wireless Network Policies that are required for 802.1X authenticated wireless deployments.
## Wireless authentication
This guide recommends the use of two wireless authentication standards for 802.1X authenticated wireless deployments:
**Wi-Fi Protected Access – Enterprise (WPA-Enterprise)** WPA is an interim standard developed by the WiFi Alliance to comply with the 802.11 wireless security protocol. The WPA protocol was developed in response to a number of severe flaws that were discovered in the preceding Wired Equivalent Privacy (WEP) protocol.
WPA-Enterprise provides improved security over WEP by:
1. Requiring authentication that uses the 802.1X EAP framework as part of the infrastructure that ensures centralized mutual authentication and dynamic key management
2. Enhancing the Integrity Check Value (ICV) with a Message Integrity Check (MIC), to protect the header and payload
3. Implementing a frame counter to discourage replay attacks
**Wi-Fi Protected Access 2 – Enterprise (WPA2-Enterprise)** Like the WPA-Enterprise standard, WPA2-Enterprise uses the 802.1X and EAP framework. WPA2-Enterprise provides stronger data protection for multiple users and large managed networks. WPA2-Enterprise is a robust protocol that is designed to prevent unauthorized network access by verifying network users through an authentication server.
## Wireless security encryption
Wireless security encryption is used to protect the wireless transmissions that are sent between the wireless client and the wireless AP. Wireless security encryption is used in conjunction with the selected network security authentication method. By default, computers running Windows 8, Windows 7 and Windows Vista support two encryption standards:
1. **Temporal Key Integrity Protocol** (TKIP) is an older encryption protocol that was originally designed to provide more secure wireless encryption than what was provided by the inherently weak Wired Equivalent Privacy (WEP) protocol. TKIP was designed by the IEEE 802.11i task group and the Wi-Fi Alliance to replace WEP without requiring the replacement of legacy hardware. TKIP is a suite of algorithms that encapsulates the WEP payload, and allows users of legacy WiFi equipment to upgrade to TKIP without replacing hardware. Like WEP, TKIP uses the RC4 stream encryption algorithm as its basis. The new protocol, however, encrypts each data packet with a unique encryption key, and the keys are much stronger than those by WEP. Although TKIP is useful for upgrading security on older devices that were designed to use only WEP, it does not address all of the security issues facing wireless LANs, and in most cases is not sufficiently robust to protect sensitive government or corporate data transmissions.
2. **Advanced Encryption Standard** (AES) is the preferred encryption protocol for the encryption of commercial and government data. AES offers a higher level of wireless transmission security than either TKIP or WEP. Unlike TKIP and WEP, AES requires wireless hardware that supports the AES standard. AES is a symmetric-key encryption standard that uses three block ciphers, AES-128, AES-192 and AES-256.
Important
Wired Equivalency Privacy (WEP) was the original wireless security standard that was used to encrypt network traffic. You should not deploy WEP on your network as there are well-known vulnerabilities in this outdated form of security.
## Enhanced encryption
AES encryption is strengthened by enabling the Federal Information Processing Standard (FIPS) 140-2 standard. FIPS 140-2 is a U.S. government computer security standard that is used to certify cryptographic modules, and specify that wireless transmissions adhere to the FIPS 140-2 standard for cryptography. The option to enable FIPS 140-2 is only available when WPA2-Enterprise with AES, or WPA2-Personal with AES are selected. You must select WPA2-Enterprise with AES to deploy FIPS-140-2 in 802.1X authenticated wireless deployments.
## Wireless authentication and encryption pairs
The following table shows wireless security standards (as listed in the Wireless Network Policies extensions of Group Policy) and their corresponding authentication and encryption methods that can be used in 802.1X authenticated deployments.
Wireless network authentication type:
Wireless encryption:
Encryption key bit size:
Comments:
WPA2-Enterprise
Advanced Encryption Standard (AES)
128
Strongest 802.1X-based wireless network authentication with very strong AES encryption.
WPA2-Enterprise
Temporal Key Integrity Protocol (TKIP)
128
Strongest 802.1X-based wireless network authentication with less strong TKIP encryption.
WPA-Enterprise
Advanced Encryption Standard (AES)
128
Mid-strength 802.1X-based wireless network authentication with very strong AES encryption.
WPA-Enterprise
Temporal Key Integrity Protocol (TKIP)
128
Mid-strength 802.1X-based wireless network authentication with less strong TKIP encryption.
IEEE 802.1X
Open
N/A
Not recommended for production environments.
IEEE 802.11
WEP
40 or 104
Use in production environments is strongly discouraged due to weak Wi-Fi authentication and encryption.
## Active Directory Doman Services (AD DS)
AD DS provides a distributed database that stores and manages information about network resources and application-specific data from directory-enabled applications. Administrators can use AD DS to organize elements of a network, such as users, computers, and other devices, into a hierarchical containment structure. The hierarchical containment structure includes the Active Directory forest, domains in the forest, and organizational units (OUs) in each domain. A server that is running AD DS is called a *domain controller*.
AD DS contains the user accounts, computer accounts, and account properties that are required by IEEE 802.1X and PEAP-MS-CHAP v2 to authenticate user credentials and to evaluate authorization for wireless connections.
## Active Directory Users and Computers
Active Directory Users and Computers is a component of AD DS that contains accounts that represent physical entities, such as a computer, a person, or a security group. A *security group* is a collection of user or computer accounts that administrators can manage as a single unit. User and computer accounts that belong to a particular group are referred to as *group members*.
## Group Policy Management
Group Policy Management is a Windows Server 2012 feature that enables directory-based change and configuration management of user and computer settings, including security and user information. You use Group Policy to define configurations for groups of users and computers. With Group Policy, you can specify settings for registry entries, security, software installation, scripts, folder redirection, remote installation services, and Internet Explorer maintenance. The Group Policy settings that you create are contained in a Group Policy object (GPO). By associating a GPO with selected Active Directory system containers—sites, domains, and OUs—you can apply the GPO's settings to the users and computers in those Active Directory containers. To manage Group Policy objects across an enterprise, you can use the Group Policy Management Editor Microsoft Management Console (MMC).
This guide provides detailed instructions about how to specify settings in the Wireless Network (IEEE 802.11) Policies extension of Group Policy Management. The Wireless Network (IEEE 802.11) Policies configure domain-member wireless client computers with the necessary connectivity and wireless settings for 802.1X authenticated wireless access.
## Server certificates
This deployment scenario requires server certificates for each NPS server that performs 802.1X authentication.
A server certificate is a digital document that is commonly used for authentication and to secure information on open networks. A certificate securely binds a public key to the entity that holds the corresponding private key. Certificates are digitally signed by the issuing CA, and they can be issued for a user, a computer, or a service.
A certification authority (CA) is an entity responsible for establishing and vouching for the authenticity of public keys belonging to subjects (usually users or computers) or other CAs. Activities of a certification authority can include binding public keys to distinguished names through signed certificates, managing certificate serial numbers, and revoking certificates.
Active Directory Certificate Services (AD CS) is a Windows Server 2012 server role that issues certificates as a network CA. An AD CS certificate infrastructure, also known as a *public key infrastructure (PKI)*, provides customizable services for issuing and managing certificates for the enterprise.
## EAP, PEAP, and PEAP-MS-CHAP v2
Extensible Authentication Protocol (EAP) extends Point-to-Point Protocol (PPP) by allowing additional authentication methods that use credential and information exchanges of arbitrary lengths. With EAP authentication, both the network access client and the authenticator (such as the NPS server) must support the same EAP type for successful authentication to occur. Windows Server 2012 includes an EAP infrastructure, supports two EAP types, and the ability to pass EAP messages to NPS servers. By using EAP, you can support additional authentication schemes, known as *EAP types*. The EAP types that are supported by Windows Server 2012 are:
- Transport Layer Security (TLS)
- Microsoft Challenge Handshake Authentication Protocol version 2 (MS-CHAP v2)
Strong EAP types (such as those that are based on certificates) offer better security against brute-force attacks, dictionary attacks, and password guessing attacks than password-based authentication protocols (such as CHAP or MS-CHAP version 1).
Protected EAP (PEAP) uses TLS to create an encrypted channel between an authenticating PEAP client, such as a wireless computer, and a PEAP authenticator, such as an NPS server or other RADIUS servers. PEAP does not specify an authentication method, but it provides additional security for other EAP authentication protocols (such as EAP-MS-CHAP v2) that can operate through the TLS encrypted channel provided by PEAP. PEAP is used as an authentication method for access clients that are connecting to your organization's network through the following types of network access servers (NASs):
- 802.1X-capable wireless access points
- 802.1X-capable authenticating switches
- Computers running Windows Server 2012 and the Routing and Remote Access service (RRAS) that are configured as virtual private network (VPN) servers
- Computers running Windows Server 2012 and Terminal Services Gateway
PEAP-MS-CHAP v2 is easier to deploy than EAP-TLS because user authentication is performed by using password-based credentials (user name and password), instead of certificates or smart cards. Only NPS or other RADIUS servers are required to have a certificate. The NPS server certificate is used by the NPS server during the authentication process to prove its identity to PEAP clients.
This guide provides instructions to configure your wireless clients and your NPS server(s) to use PEAP-MS-CHAP v2 for 802.1X authenticated access.
## Network Policy Server
Network Policy Server (NPS) is included in Windows Server 2012, and allows you to centrally configure and manage network policies by using the following three components: Remote Authentication Dial-In User Service (RADIUS) server, RADIUS proxy, and Network Access Protection (NAP) policy server. NPS is an optional service of a core network, but it is required to deploy 802.1X wireless access.
When you configure your 802.1X wireless access points as RADIUS clients in NPS, NPS processes the connection requests sent by the APs. During connection request processing, NPS performs authentication and authorization. Authentication determines whether the client has presented valid credentials. If NPS successfully authenticates the requesting client, then NPS determines whether the client is authorized to make the requested connection, and either allows or denies the connection. This is explained in more detail as follows:
**Authentication**
Successful mutual PEAP-MS-CHAP v2 authentication has two main parts:
1. The client authenticates the NPS server. During this phase of mutual authentication, the NPS server sends its server certificate to the client computer so that the client can verify the NPS server's identity with the certificate. To successfully authenticate the NPS server, the client computer must trust the CA that issued the NPS server certificate. The client trusts this CA when the CA’s certificate is present in the Trusted Root Certification Authorities certificate store on the client computer.
If you deploy your own private CA, the CA certificate is automatically installed in the Trusted Root Certification Authorities certificate store for the Current User and for the Local Computer when Group Policy is refreshed on the domain member client computer. If you decide to deploy server certificates from a public CA, ensure that the public CA certificate is already in the Trusted Root Certification Authorities certificate store.
2. The NPS server authenticates the user. After the client successfully authenticates the NPS server, the client sends the user’s password-based credentials to the NPS server, which verifies the user’s credentials against the user accounts database in Active Directory Doman Services (AD DS).
If the credentials are valid and authentication succeeds, the NPS server begins the authorization phase of processing the connection request. If the credentials are valid and authentication succeeds, the NPS server begins the authorization phase of processing the connection request. If the credentials are not valid and authentication fails, NPS sends an Access Reject message and the connection request is denied.
**Authorization**
The server running NPS performs authorization as follows:
1. NPS checks for restrictions in the user or computer account dial-in properties in AD DS.
2. NPS then processes its network policies to find a policy that matches the connection request. If a matching policy is found, NPS either grants or denies the connection based on that policy’s configuration.
If both authentication and authorization are successful, and if the matching network policy grants access, NPS grants access to the network, and the user and computer can connect to network resources for which they have permissions.
Note
To deploy wireless access, you must configure NPS policies. This guide provides instructions to use the **Configure 802.1X wizard** in NPS to create NPS policies for 802.1X authenticated wireless access.
## Bootstrap profiles
In 802.1X-authenticated wireless networks, wireless clients must provide security credentials that are authenticated by a RADIUS server in order to connect to the network. For Protected EAP \[PEAP\]-Microsoft Challenge Handshake Authentication Protocol version 2 \[MS-CHAP v2\], the security credentials are a username and password. For EAP-Transport Layer Security \[TLS\], the security credentials are certificates, such as client user and computer certificates or smart cards.
When connecting to a network that is configured to perform either PEAP-MS-CHAP v2 or EAP-TLS authentication, by default, Windows wireless clients must also validate a computer certificate that is sent by the RADIUS server. The computer certificate that is sent by the RADIUS server for every authentication session is commonly referred to as a server certificate.
As mentioned previously, RADIUS servers can be issued server certificate in one of two ways: from a commercial CA (such as VeriSign, Inc.,), or from a private CA that you deploy on your network. If the RADIUS server sends a computer certificate that was issued by a commercial CA that already has a root certificate installed in the client's Trusted Root Certifications Authorities certificate store, then the wireless client can validate the RADIUS server's computer certificate, regardless of whether the wireless client has joined the Active Directory domain. In this case the wireless client can connect to the wireless network, and then join the computer to the domain.
Note
The behavior requiring the client to validate the server certificate can be disabled, but disabling server certificate validation is not recommended in production environments.
Wireless bootstrap profiles are temporary profiles that are configured in such a way as to enable wireless client users to connect to the 802.1X-authenticated wireless network before the computer is joined to the domain, and/or before the user has successfully logged on to the domain by using a given wireless computer for the first time. This section summarizes what problem is encountered when trying to join a wireless computer to the domain, or for a user to use a domain-joined wireless computer for the first time to log on to the domain.
For deployments in which the user or IT administrator cannot physically connect a computer to the wired Ethernet network to join the computer to the domain, and the computer does not have the necessary issuing root CA certificate installed in its **Trusted Root Certification Authorities** certificate store, you can configure wireless clients running Windows 8, Windows 7 and Windows Vista with a temporary wireless connection profile, called a *bootstrap profile*, to connect to the wireless network. A *bootstrap profile* removes the requirement to validate the RADIUS server's computer certificate. This temporary configuration enables the wireless user to join the computer to the domain, at which time the Wireless Network (IEEE 802.11) Policies are applied and the appropriate root CA certificate is then installed on the computer. When Group Policy is applied, one or more wireless connection profiles that enforce the requirement for mutual authentication are applied on the computer; the bootstrap profile is no longer removed. After joining the computer to the domain and restarting the computer, the user can use a wireless connection to log on to the domain.
## Wireless Access Deployment Overview
The following illustration shows the components that are required to deploy 802.1X authenticated wireless access with PEAP-MS-CHAP v2.
.jpeg)
## Wireless access deployment components
The following components are required for this wireless access deployment:
## 802.1X-capable Wireless access points
After the required network infrastructure services supporting your wireless local area network are in place, you can begin the design process for the location of the wireless APs. The wireless AP deployment design process involves these steps:
- Identify the areas of coverage for wireless users. While identifying the areas of coverage, be sure to identify whether you want to provide wireless service outside the building, and if so, determine specifically where those external areas are.
- Determine how many wireless APs to deploy to ensure adequate coverage.
- Determine where to place wireless APs.
- Select the channel frequencies for wireless APs.
## Active Directory Domain Services
**Users and Computers**
Use the Active Directory Users and Computers snap-in to create and manage user accounts, and to create a wireless security group for each domain member to whom you want to grant wireless access.
**Wireless Network (IEEE 802.11) Policies**
You can use the Wireless Network (IEEE 802.11) Policies extension of Group Policy Management to configure policies for computers that are running Windows 8, Windows® 7 and Windows Vista®, and Windows XP. As is the case with Group Policy Management found in Windows Server 2012, there are two separate wireless policy nodes in the Windows Server 2012 Wireless Network (IEEE 802.11) Policies extension of Group Policy. For the purpose of this discussion, a wireless policy node is a collection of Group Policy settings that can be applied to computers running specific operating systems. By default, the two wireless policy nodes in the Windows Server 2012 Wireless Network (IEEE 802.11) Policies are named:
- **New XP Wireless Network Policy**
- **New Wireless Network Policy**
Tip
When configuring either the New XP Wireless Network Policy or the New Wireless Network Policy you are provided the option to change the name and description of the policy. If you change the name of either policy, that change is reflected in the Details pane of Group Policy Management Editor, and on the title bar of the wireless network policy dialog. Regardless of how you rename your policies, the New XP Wireless Policy will always be listed in Group Policy Management Editor with the **Type** displaying **XP**. The New Wireless Network Policy will always be listed with the **Type** showing **Vista and later Releases**.
The following table describes which of the operating systems can be configured by each wireless policy.
Policy
Can be applied to computers running Windows XP,
Windows Server 2003
Can be applied to computers running Windows Vista,
Windows Server 2008
Can be applied to Windows 7
Windows Server 2008 R2,
Windows 8,
Windows Server 2012
**New XP Wireless Network Policy**
Yes
Yes
But this policy cannot configure new wireless features in Windows Vista
Yes
But this policy cannot configure new wireless features in Windows 7, Windows Server 2008 R2, Windows 8, and Windows Server 2012.
**New Wireless Network Policy**
No
Yes
Includes settings for all of the wireless features in Windows Vista.
Yes
Includes settings for all of the wireless features in Windows Vista, and settings for wireless feature enhancements in Windows 7, Windows Server 2008 R2, Windows 8, and Windows Server 2012. Computers running Windows Vista will ignore Windows 7-specific settings.
Note
To enable wireless service on computers running Windows Server 2008 R2 and Windows Server 2012, you must enable the wireless LAN Service. For more information, see [Wireless LAN Service Overview](https://learn.microsoft.com/en-us/previous-versions/windows/it-pro/windows-server-2012-R2-and-2012/hh994698(v=ws.11)).
The Windows Vista Wireless Network Policy enables you to configure, prioritize, and manage multiple wireless profiles. A wireless profile is a collection of connectivity and security settings that are used to connect to a specific wireless network. When Group Policy is updated on your wireless client computers, the profiles you create in the Windows Vista Wireless Network Policy are automatically added to your wireless client computers that are running Windows 7 and Windows Vista to which the Wireless Network Policy applies.
If you have wireless clients that you want to be able to connect to more than one wireless network, you can configure a wireless profile that contains the specific connectivity and security settings for each network. For example, assume your company has one wireless network for the main corporate office, with a service set identifier (SSID) WlanCorp. Your branch office also has a wireless network to which you also want to connect. The branch office has the SSID configured as WlanBranch. In this scenario, you can configure a profile for each network, and laptops that are used at both the corporate office and branch office will be able to connect to the wireless networks when they are at either location.
Alternately, assume your network has a mixture of wireless computers that support different security standards. Perhaps some older computers have wireless adapters that can only use WPA-Enterprise, while newer devices can use the stronger WPA2-Enterprise standard. You can create two different profiles that use the same SSID and nearly identical connectivity and security settings. However in one profile, you can set the wireless authentication to WPA2-Enterprise with AES, and in the other profile you can specify WPA-Enterprise with TKIP. This is commonly known as a mixed-mode deployment. The ability to configure mixed-mode deployments using a common SSID is one of the enhancements in the Wireless Network (IEEE 802.11) Policies for Windows Vista.
## NPS
Network Policy Server (NPS) enables you to create and enforce network access policies for client health, connection request authentication, and connection request authorization. When you use NPS as a RADIUS server, you configure network access servers, such as wireless access points, as RADIUS clients in NPS. You also configure the network policies that NPS uses to authenticate access clients and authorize their connection requests.
## Wireless client computers
For the purpose of this guide, wireless client computers are computers that are equipped with IEEE 802.11 wireless network adapters and that are most typically running Windows 8, Windows 7, Windows Vista or Windows XP. Within the context of this deployment scenario, however, wireless client computers can also be computers that are running Windows Server 2012, Windows Server 2008 R2 or Windows Server 2003.
By default, the functionality for 802.11 wireless is disabled on computers that are running Windows Server 2012 and Windows Server 2008 R2. To use 802.11 wireless on computers running Windows Server 2012 and Windows Server 2008 R2 you must first install and enable the Wireless LAN Service feature on the server computer. You can install the Wireless LAN Service feature by using the Add Features Wizard in Server Manager.
## Wireless access deployment process
The process of configuring and deploying wireless access occurs in these stages:
**Stage 1 – AP Deployment**
Plan, deploy, and configure your APs for wireless client connectivity and for use with NPS. Depending on your preference and network dependencies, you can either pre-configure settings on your wireless APs prior to installing them on your network, or you can configure them remotely after installation.
**Stage 2 – AD DS Group Configuration**
You must create one or more wireless users security groups. Then, you must add each user for whom you want to allow wireless access to the wireless network to the appropriate wireless users security group.
**Stage 3 – Group Policy Configuration**
Configure the Wireless Network (IEEE 802.11) Policies extension of Group Policy by using the Group Policy Management Editor Microsoft Management Console (MMC).
To configure domain-member computers using the settings in the wireless network policies, you must apply Group Policy. When a computer is first joined to the domain Group Policy is automatically applied. If changes are made to Group Policy, the new settings are automatically applied:
- by Group Policy at pre-determined intervals
- if a domain user logs off and then back on to the network
- by restarting the client computer and logging on to the domain
You can also force Group Policy to refresh by running gpupdate at the command prompt.
**Stage 4 – NPS server configuration**
Use a configuration wizard in NPS to add wireless access points as RADIUS clients, and to create the network policies that NPS uses when processing connection requests. When using the wizard to create the network policies, specify PEAP as the EAP type, and the wireless users security group that was created in the second stage.
**Stage 5 – Deploy wireless clients**
Use client computers to connect to the network.
For domain member computers that can log on to the wired LAN, the necessary wireless configuration settings are automatically applied when Group Policy is refreshed. If you have enabled the setting in Wireless Network (IEEE 802.11) Policies to connect automatically when the computer is within broadcast range of the wireless network, your wireless, domain-joined computers will then automatically attempt to connect to the wireless LAN. To connect to the wireless network, users need only supply their domain user name and password credentials when prompted by Windows.
## Wireless Access Deployment Planning
Before you deploy wireless access, you must plan the following items:
- Installation of wireless access points (APs) on your network
- Wireless client configuration and access
## Planning wireless AP installations
When you design your wireless network access solution, you must determine what standards your wireless APs must support, the areas where you want to provide wireless service, and where to locate wireless APs. Additionally, you must plan an IP address scheme for your wireless AP’s and wireless clients. See the section **Plan the configuration of wireless AP’s in NPS** below for related information.
## Verify wireless AP support for standards
For the purposes of consistency and ease of deployment and AP management, it is recommended that you deploy wireless APs of the same brand and model.
The wireless APs that you deploy must support the following:
- **IEEE 802.1X**
- **RADIUS authentication**
- **Wireless Authentication and Cipher.** Listed in order of most to least preferred:
1. WPA2-Enterprise with AES
2. WPA2-Enterprise with TKIP
3. WPA-Enterprise with AES
4. WPA-Enterprise with TKIP
Note
To deploy WPA2, use wireless network adapters and wireless APs that also support WPA2. Otherwise, use WPA-Enterprise.
In addition, to provide enhanced security for the network, the wireless APs must support the following options:
- **DHCP filtering.** The wireless AP must filter on IP ports to prevent the transmission of DHCP broadcast messages in those cases in which the client is a DHCP server. The wireless AP must block the client from sending IP packets from UDP port 68 to the network.
- **DNS filtering.** The wireless AP must filter on IP ports to prevent a client from performing as a DNS server. The wireless AP must block the client from sending IP packets from TCP or UDP port 53 to the network.
- **Client isolation** If your wireless access point provides client isolation capabilities, it should be enabled to prevent possible Address Resolution Protocol (ARP) spoofing, exploits.
## Identify areas of coverage for wireless users
Use architectural drawings of each floor for each building to identify the areas where you want to provide wireless coverage. For example, identify the appropriate offices, conferences rooms, lobbies, cafeterias, or courtyards. On the drawings, indicate any devices that interfere with the wireless signals, such as medical equipment, wireless video cameras, cordless telephones that operate in the 2.4 through 2.5 GHz Industrial, Scientific and Medical (ISM) range, and Bluetooth-enabled devices. On the drawing, mark aspects of the building that might interfere with wireless signals; metal objects used in the construction of a building can affect the wireless signal. For example, the following common objects can interfere with signal propagation: Elevators, heating and air-conditioning ducts, and concrete support girders.
Refer to your AP manufacturer for information about sources that might cause wireless AP radio frequency attenuation. Most APs provide testing software that you can use to check for signal strength, error rate, and data throughput.
## Determine where to install wireless APs
On the architectural drawings, locate your wireless APs close enough together to provide ample wireless coverage but far enough apart that they do not interfere with each other. The necessary distance between APs depends upon the type of AP and AP antenna, aspects of the building that block wireless signals, as well as other sources of interference. Typically, mark wireless APs placements so that each wireless AP is not more than 300 feet from any adjacent wireless AP. See the wireless AP manufacturer’s documentation for AP specifications and guidelines for placement.
Temporarily install wireless APs in the locations specified on your architectural drawings. Then using a laptop equipped with an 802.11 wireless adapter and the site survey software that is commonly supplied with wireless adapters, determine the signal strength within each coverage area. In coverage areas where signal strength is low, reposition the AP to improve signal strength for the coverage area, install additional wireless APs to provide the necessary coverage, relocate or remove sources of signal interference.
Update your architectural drawings to indicate the final placement of all wireless APs. Having an accurate AP placement map will assist later during troubleshooting operations or when you want to upgrade or replace APs.
## Plan the configuration of wireless APs in NPS
NPS has the ability to configure wireless APs individually or in groups. If the following conditions are met, you can configure the wireless APs that you deploy in groups:
1. If you are running NPS servers on computers running Windows Server 2012 Enterprise or Windows Server 2012 Datacenter
2. If you have deployed wireless APs within the same IP address range
3. And if the wireless APs are all configured with the same shared secret
The advantage of configuring your wireless APs in NPS by groups is that it cuts down on your administrative overhead; which is very useful feature if you have deployed a large number of wireless APs. If you have not deployed your NPS servers on computers running either Windows Server 2012 Enterprise or Windows Server 2012 Datacenter, then you must configure each wireless AP individually in NPS.
## Plan the use of PEAP Fast Reconnect
In an 802.1X infrastructure, wireless access points are configured as RADIUS clients to RADIUS servers. When PEAP fast reconnect is deployed, a wireless client that roams between two or more access points is not required to be authenticated with each new association. PEAP fast reconnect reduces the response time for authentication between client and authenticator because the authentication request is forwarded from the new access point to the NPS server that originally performed authentication and authorization for the client connection request. Because both the PEAP client and NPS server both use previously cached Transport Layer Security (TLS) connection properties (the collection of which is named the TLS handle), the NPS server can quickly determine that the client is authorized for a reconnect.
Important
For fast reconnect to work, the APs must be configured as RADIUS clients of the same NPS server
If the original NPS server becomes unavailable, or if the client moves to an access point that is configured as a RADIUS client to a different RADIUS server, full authentication must occur between the client and the new authenticator.
## Wireless AP configuration
The following list summarizes items commonly configured on 802.1X-capable wireless APs:
Note
The item names can vary by brand and model and might be different from those in the following list. See your wireless AP documentation for configuration-specific details.
- **Service set identifier (SSID).** This is the name of the wireless network (for example, ExampleWlan), and the name that is advertised to wireless clients. To reduce confusion, the SSID that you choose to advertise should not match the SSID that is broadcast by any wireless networks that are within reception range of your wireless network.
In cases in which multiple wireless APs are deployed as part of the same wireless network, configure each wireless AP with the same SSID. In cases in which multiple wireless APs are deployed as part of the same wireless network, configure each wireless AP with the same SSID.
In cases where you have a need to deploy different wireless networks to meet specific business needs, your wireless AP’s on one network should broadcast a different SSID than the SSID your other network(s). For example, if you need a separate wireless network for your employees and guests, you could configure your wireless APs for the business network with the SSID set to broadcast **ExampleWLAN**. For your guest network, you could then set each wireless AP’s SSID to broadcast **GuestWLAN**. In this way your employees and guests can connect to the intended network without unnecessary confusion.
Tip
Some wireless AP’s have the ability to broadcast multiple SSID’s to accommodate multi-network deployments. Wireless AP’s that can broadcast multiple SSID’s can reduce deployment and operational maintenance costs.
- **Wireless authentication and encryption.**
Wireless authentication is the security authentication that is used when the wireless client associates with a wireless access point.
Wireless encryption is the security encryption cipher that is used with wireless authentication to protect the communications that are sent between the wireless AP and the wireless client.
- **Wireless AP IP address (static).** Each wireless AP, configure a unique static IP address that falls within the DHCP exclusion range as documented in the Windows Server 2012 Core Network Guide procedure “Creating a new DHCP Scope.”
- **DNS name.** Some wireless APs can be configured with a DNS name. Configure each wireless AP with a unique name. For example, if you have a deployed wireless APs in a multi-story building, you might name the first three wireless APs that are deployed on the third floor AP3-01, AP3-02, and AP3-03.
- **Wireless AP subnet mask.** Configure the mask to designate which portion of the IP address that is the network ID and which portion of the IP address is the host.
- **AP DHCP service.** If your wireless AP has a built-in DHCP service, disable it.
- **RADIUS shared secret.** Use a unique RADIUS shared secret for each wireless AP. Each shared secret should be a random sequence at least 22 characters long of uppercase and lowercase letters, numbers, and punctuation. To ensure randomness, you can use a random character generation program to create your shared secrets. It is recommended that you record the shared secret for each wireless AP and store it in a secure location, such as an office safe. When you configure RADIUS clients in the NPS console you will create a virtual version of each AP. The shared secret that you configure on each virtual AP in NPS must match the shared secret on the actual, physical AP.
- **RADIUS server IP address.** Type the IP address of the NPS server that you want to use to authenticate and authorize connection requests to this access point...
- **UDP port(s).** By default, NPS uses UDP ports 1812 and 1645 for RADIUS authentication messages and UDP ports 1813 and 1646 for RADIUS accounting messages. It is recommended that you do not change the default RADIUS UDP ports settings.
- **VSAs.** Some wireless APs require vendor-specific attributes (VSAs) to provide full wireless AP functionality.
- **DHCP filtering.** Configure wireless APs to block wireless clients from sending IP packets from UDP port 68 to the network. See the documentation for your wireless AP to configure DHCP filtering.
- **DNS filtering.** Configure wireless APs to block wireless clients from sending IP packets from TCP or UDP port 53 to the network. See the documentation for your wireless AP to configure DNS filtering.
## Planning wireless client configuration and access
When planning the deployment of 802.1X-authenticated wireless access, you must consider several client-specific factors:
- **Planning support for multiple standards.**
Determine whether your wireless computers are all using the same version of Windows. For example, determine whether all of your wireless client computers all running Windows 8, or whether your wireless deployment include have a mixture of computers running Windows 8, Windows 7, Windows Vista and Windows XP.
Determine whether all of the wireless network adapters on all of the wireless client computers support the same wireless standards, or whether you need to support varying standards. For example, determine whether some network adapter hardware drivers support WPA2-Enterprise and AES, while others support only WPA-Enterprise and TKIP.
- **Planning client authentication mode.** Authentication modes define how Windows clients process domain credentials. You can select from the following three network authentication modes in the wireless network policies.
1. **User re-authentication** This mode specifies that authentication is always performed by using security credentials based on the computer's current state. When no users are logged on to the computer, authentication is performed by using the computer credentials. When a user is logged on to the computer, authentication is always performed by using the user credentials.
2. **Computer only** Computer only mode specifies that authentication is always performed by using only the computer credentials.
3. **User authentication** User authentication mode specifies that authentication is only performed when the user is logged on to the computer. When there are no users logged on to the computer, authentication attempts are not performed.
- **Planning wireless restrictions.** Determine whether you want to provide all of your wireless users with the same level of access to your wireless network, or whether you want to restrict access for some of your wireless users. You can apply restrictions in NPS against specific groups of wireless users. For example, you can define specific days and hours that certain groups are permitted access the wireless network.
- **Planning methods for adding new wireless computers.** For wireless-capable computers that are joined to your domain before you deploy your wireless network, if the computer is connected to a segment of the wired network that is not protected by 802.1X, the wireless configuration settings are automatically applied on those computers after you configure Wireless Network (IEEE 802.11) Policies and Group Policy is refreshed.
For computers that are not already joined to your domain, however, you must plan a method to apply the settings that are required for 802.1X-authenticated access. For example, determine whether you want to join the computer to the domain by:
1. Connecting the computer to a segment of the wired network that is not protected by 802.1X, the joining the computer to the domain
2. Provide your wireless users with the steps and settings that they require to add their own wireless bootstrap profile, and the join the computer to the domain
3. Having the configuration performed by members of your IT staff
## Planning support for multiple standards
In Windows Server 2012, the Wireless Network (IEEE 802.11) Policies extension in Group Policy provides a wide range of configuration options to support a variety of deployment options. You can deploy wireless APs that are configured with the standards that you want to support, and then configuring multiple wireless profiles in Wireless Network (IEEE 802.11) Policies, with each profile specifying one of the required set of standards.
For example, if your network has wireless computers that support WPA2-Enterprise and AES, other computers that support WPA-Enterprise and AES, while other computers support only WPA-Enterprise and TKIP, you must determine whether you want to:
- Configure a single profile to support all of the wireless computers using the weakest encryption but which all of your computer can use; in this case, WPA-Enterprise and TKIP.
- Configure two profiles to provide the best possible security that is supported by each wireless computer. In this instance you would configure one profile that specifies the strongest encryption (WPA2-Enterprise and AES), and one profile that uses the weaker WPA-Enterprise and TKIP encryption. In this example, it is essential that you place the profile that uses WPA2-Enterprise and AES highest in the preference order. Computers that are not capable of using WPA2-Enterprise and AES will automatically skip to the next profile in the preference order and process the profile that specifies WPA-Enterprise and TKIP.
Important
The profile with the most secure standards should be placed higher in the list because connecting computers will use the first profile that they are capable of using.
## Planning restricted access to the wireless network
In many cases, you might want to provide wireless users with varying levels of access to the wireless network. For example, you might want to allow some users unrestricted access, any hour of the day, every day of the week. For other users, you might only want to allow access during core hours, Monday through Friday, and deny access on Saturday and Sunday.
This guide provides instructions to create an access environment that places all of your wireless users in a group with common access to wireless resources. You create one wireless users security group in the Active Directory Users and Computers snap-in, and then make every user for whom you want to grant wireless access – a member of that group. When you configure NPS network policies, you specify the wireless users security group as the object that NPS processes when determining authorization.
However, if your deployment requires support for varying levels of access you need only do the following:
1. Follow the procedure [Create a Wireless Users Security Group](https://technet.microsoft.com/library/ff919531(v=ws.10).aspx) in this guide, to create additional wireless security groups in Active Directory Users and Computers, each security group specifying a unique name.
2. Follow the procedure [Add Users to the Wireless Security Group](https://technet.microsoft.com/library/ff919511(v=ws.10).aspx) to make each user a member of the appropriate security group.
3. Follow the procedure [Create NPS Policies for 802.1X Wireless Using a Wizard](https://technet.microsoft.com/library/ff919513(v=ws.10).aspx) to configure an additional set of NPS policies for each additional wireless security group. In step 9 of the procedure, in **Specify User Groups**, click **Add**, and then type the name of the security group that you configured in Active Directory Users and Computers.
## Planning methods for adding new wireless computers
The preferred method to join new wireless computers to the domain and then log on to the domain is by using a wired connection to a segment of the LAN that has access to domain controllers, and is not protected by an 802.1X authenticating Ethernet switch.
In some cases, however, it might not be practical to use a wired connection to join computers to the domain, or, for a user to use a wired connection for their first logon attempt by using computers that are already joined to the domain. To join a computer to the domain by using a wireless connection or for users to logon to the domain the first time by using a domain-joined computer and a wireless connection, wireless clients must first establish a connection to the wireless network on a segment that has access to the network domain controllers.
For more information about the steps to join computers to the domain by using a wired connection, and to log on to the domain by using a wired connection, see the Windows Server 2012 Core Network Guide, in the section titled **Joining computers to the Domain and Logging On**. The Windows Server 2012 Core Network Guide is available for download in Word formant at the Microsoft Download Center ([https://www.microsoft.com/download/details.aspx?id=29248](https://www.microsoft.com/download/details.aspx?id=29248)) and in HTML format in the Windows Server 2012 Technical Library ([https://technet.microsoft.com/library/hh911995.aspx](https://learn.microsoft.com/en-us/previous-versions/windows/it-pro/windows-server-2012-R2-and-2012/hh911995(v=ws.11))).
This guide provides the following methods to configure wireless computers running Windows Vista with wireless profiles that users can use to either join the computer to the domain by using a wireless connection, or to log on to the domain by using a wireless connection and a computer that is already joined to the domain:
1. **A member of the IT staff joins a wireless computer to the domain, and then configures a Single Sign On bootstrap wireless profile.** In this method, an IT administrator connects the wireless computer to the wired Ethernet network, and then joins the computer to the domain. Then the administrator distributes the computer to the user. When the user starts the computer, the domain credentials that they manually specify for the user logon process are used to both establish a connection to the wireless network and log on to the domain.
2. **The user manually configures wireless computer with bootstrap wireless profile, and then joins the domain.** In this method, users manually configure their wireless computers with a bootstrap wireless profile based on instructions from an IT administrator. The bootstrap wireless profile allows users to establish a wireless connection, and then join the computer to the domain. After joining the computer to the domain and restarting the computer, the user can log on to the domain by using a wireless connection and their domain account credentials.
## Wireless Access Deployment
Follow these steps to deploy wireless access:
- [Deploying and Configuring Wireless APs](https://technet.microsoft.com/library/ff919545(v=ws.10).aspx)
- [Creating Security Groups for Wireless Users](https://technet.microsoft.com/library/ff919509(v=ws.10).aspx)
- [Configuring Wireless Network (IEEE 802.11) Policies](https://technet.microsoft.com/library/ff919525(v=ws.10).aspx)
- [Configuring your NPS Server](https://technet.microsoft.com/library/ff919502(v=ws.10).aspx)
- [Joining New Wireless Computers to the Domain](https://technet.microsoft.com/library/ff919542(v=ws.10).aspx)
## Deploying and Configuring Wireless APs
Follow these steps to deploy and configure your wireless APs:
- [Specify Channel Frequencies for Wireless APs \[preliminary\]](https://technet.microsoft.com/library/ff919519(v=ws.10).aspx)
- [Configure Wireless APs \[Preliminary\]](https://technet.microsoft.com/library/ff919551(v=ws.10).aspx)
Note
The procedures in this guide do not include instructions for cases in which the **User Account Control** dialog box opens to request your permission to continue. If this dialog box opens while you are performing the procedures in this guide, and if the dialog box was opened in response to your actions, click **Continue**.
## Specify Wireless AP Channel Frequencies
When you deploy multiple wireless APs at a single geographical site, you must configure wireless APs that have overlapping signals to use unique channel frequencies to reduce interference between wireless APs.
#### To specify unique channel frequencies for wireless APs
1. If there are other organizations that have offices in close proximity or in the same building as your organization, identify whether there are any wireless networks owned those organizations. Find out both the placement and the assigned channel frequencies of their wireless AP’s, because you need to assign different channel frequencies to your AP’s and you need to determine the best location to install your AP’s.
2. Identify overlapping wireless signals on adjacent floors within your own organization. After identifying overlapping coverage areas outside and within your organization, assign channel frequencies for your wireless APs, ensuring that any two wireless APs with overlapping coverage are assigned different channel frequencies.
## Configure Wireless APs
Use this information with the product documentation provided by the wireless AP manufacturer to configure your wireless APs.
This procedure enumerates items commonly configured on a wireless AP. The item names can vary by brand and model and might be different from those listed in the following list. For configuration-specific details, see your wireless AP documentation.
#### To configure your wireless APs
- **SSID.** Specify the name of the wireless network(s) (for example, ExampleWLAN). This is the name that is advertised to wireless clients.
- **Encryption.** Specify WPA2-Enterprise (preferred) or WPA-Enterprise, and either AES (preferred) or TKIP encryption cipher, depending on which versions are supported by your wireless client computer network adapters.
- **Wireless AP IP address (static).** On each AP, configure a unique static IP address that falls within the exclusion range of the DHCP scope. Using an address that is excluded from assignment by DHCP prevents the DHCP server from assigning the same IP address to a computer or other device.
- **Subnet mask.** Configure this to match the subnet mask settings of the LAN to which you have connected the wireless AP.
- **DNS name.** Some wireless APs can be configured with a DNS name. The DNS service on the network can resolve DNS names to an IP address. On each wireless AP that supports this feature, enter a unique name for DNS resolution.
- **DHCP service.** If your wireless AP has a built-in DHCP service, disable it.
- **RADIUS shared secret.** Use a unique RADIUS shared secret for each wireless AP. Each shared secret should be a random sequence at least 22 characters long of uppercase and lowercase letters, numbers, and punctuation. To ensure randomness, you can use a random character generation, such as the random character generator found in the NPS **Configure 802.1X** wizard, to create the shared secrets.
Tip
Record the shared secret for each wireless AP and store it in a secure location, such as an office safe. You must know the shared secret for each wireless AP when you configure RADIUS clients in the NPS.
- **RADIUS server IP address.** Type the IP address of the server running NPS.
- **UDP port(s).** By default, NPS uses UDP ports 1812 and 1645 for authentication messages and UDP ports 1813 and 1646 for accounting messages.
Tip
Do not change the default RADIUS UDP port settings.
- **VSAs.** Some wireless APs require vendor-specific attributes (VSAs) to provide full wireless AP functionality. VSAs are added in NPS network policy.
- **DHCP filtering.** Configure wireless APs to block wireless clients from sending IP packets from UDP port 68 to the network, as documented by the wireless AP manufacturer.
- **DNS filtering.** Configure wireless APs to block wireless clients from sending IP packets from TCP or UDP port 53 to the network, as documented by the wireless AP manufacturer.
## Creating Security Groups for Wireless Users
Follow these steps to create one or more wireless users security groups, and then add users to the appropriate wireless users security group:
- Create a Wireless Users Security Group
- Add Users to the Wireless Security Group
## Create a Wireless Users Security Group
You can use this procedure to create a wireless security group in the Active Directory Users and Computers Microsoft Management Console (MMC) snap-in.
Membership in **Domain Admins**, or equivalent, is the minimum required to perform this procedure.
### To create a wireless users security group
1. Click **Start**, click **Administrative Tools**, and then click **Active Directory Users and Computers**. The Active Directory Users and Computers snap-in opens. If it is not already selected, click the node for your domain. For example, if your domain is example.com, click **example.com**.
2. In the details pane, right-click the folder in which you want to add a new group (for example, right-click **Users**), point to **New**, and then click **Group**.
3. In **New Object – Group**, in **Group name**, type the name of the new group. For example, type **Wireless Group**.
4. In **Group scope**, select one of the following options:
- **Domain local**
- **Global**
- **Universal**
5. In **Group type**, select **Security**.
6. Click **OK**.
## Add Users to the Wireless Users Security Group
You can use this procedure to add a user, computer, or group to your wireless security group in the Active Directory Users and Computers Microsoft Management Console (MMC) snap-in.
Membership in **Domain Admins**, or equivalent is the minimum required to perform this procedure.
### To add users to the wireless security group
1. Click **Start**, click **Administrative Tools**, and then click **Active Directory Users and Computers**. The Active Directory Users and Computers MMC opens. If it is not already selected, click the node for your domain. For example, if your domain is example.com, click **example.com**.
2. In the details pane, double-click the folder that contains your wireless security group.
3. In the details pane, right-click the wireless security group, and then click **Properties**. The **Properties** dialog box for the security group opens.
4. On the **Members** tab, click **Add**, and then complete one of the following procedures:
### To add a user or group
1. In **Enter the object names to select**, type the name of the user or group that you want to add, and then click **OK**.
2. To assign group membership to other users or groups, repeat step 1 of this procedure.
### To add a computer
1. Click **Object Types**. The **Object Types** dialog box opens.
2. In **Object types**, select **Computers**, and then click **OK**.
3. In **Enter the object names to select**, type the name of the computer that you want to add, and then click **OK**.
4. To assign group membership to other computers, repeat steps 1-3 of this procedure.
## Configuring Wireless Network (IEEE 802.11) Policies
Follow these steps to configure Wireless Network (IEEE 802.11) Policies Group Policy extension:
- Open or Add and Open a Group Policy Object
- Activate Default Wireless Network (IEEE 802.11) Policies
- Open Wireless Network (IEEE 802.11) Policies for Editing
- Configure the New Wireless Network Policy
- Configure the New Windows XP Wireless Network Policy
## Open or Add and Open a Group Policy Object
By default, the Group Policy Management feature is installed on computers running Windows Server 2012 when the Active Directory Domain Services (AD DS) server role is installed. The procedure that follows describes how to open the Group Policy Management Console (GPMC) on your domain controller running Windows Server 2012. The procedure then describes how to either open an existing domain-level Group Policy object (GPO) for editing, or create a new domain GPO and open it for editing.
Membership in **Domain Admins**, or equivalent, is the minimum required to perform this procedure.
#### To open or add and open a Group Policy object
1. On your Windows Server 2012 domain controller, click **Start**, point to **Administrative Tools**, and then double-click **Group Policy Management**. The Group Policy Management Console opens.
2. In the left pane, double-click your forest. For example, double-click **Forest: example.com**.
3. In the left pane, double-click **Domains**, and then double-click the domain for which you want to manage a Group Policy object. For example, double-click **example.com**.
4. Do one of the following:
- **To open an existing domain-level GPO for editing**, double click the domain that contains the Group Policy object that you want to manage, right-click the domain policy you want to manage, and then click **Edit**.
- **To create a new Group Policy object and open for editing**, right-click the domain for which you want to create a new Group Policy object, and then click **Create a GPO in this domain, and Link it here**.
In **New GPO**, in **Name**, type a name for the new Group Policy object, and then click **OK**.
Right-click your new Group Policy object, and then click **Edit**. Group Policy Management Editor opens.
## Activate Default Wireless Network (IEEE 802.11) Policies
This procedure describes how to activate the default Wireless Network (IEEE 802.11) Policies by using the Group Policy Management Editor (GPME).
Note
After you activate either the Windows Vista version of the Wireless Network (IEEE 802.11) Policies or the Windows XP version, it is removed from the list of options when you right-click **Wireless Network (IEEE 802.11) Policies**, and it is added in the details pane of the GPME when you select the **Wireless Network (IEEE 802.11) Policies** node. This state remains until the wireless policy is deleted, at which time the wireless policy returns to the menu when you right-click **Wireless Network (IEEE 802.11) Policies** in the GPME. Additionally, the Windows Vista and Windows XP wireless policies are only listed in the GPME details pane when the **Wireless Network (IEEE 802.11) Policies** node is selected.
Membership in **Domain Admins**, or equivalent, is the minimum required to perform this procedure.
#### To activate default Wireless Network (IEEE 802.11) Policies
1. On your Windows Server 2012 domain controller, do one of the following:
- If Group Policy Management Editor is already open, proceed to step 2.
- If GPME is not already open, do the following:
1. Click **Start**, point to **Administrative Tools**, and then double-click **Group Policy Management**. The Group Policy Management Microsoft Management Console (MMC) snap-in opens.
2. In the left pane, double-click your forest. For example, double-click **Forest: example.com**.
3. In the left pane, double-click **Domains**, and then double-click the domain in which you want to manage a Group Policy object (GPO). For example, double-click **example.com**.
4. Right-click the domain-level GPO you want to manage, and then click **Edit**. The Group Policy Management Editor MMC opens. Proceed to step 2.
2. In the GPME, in the left pane, double-click **Computer Configuration**, double-click **Policies**, double-click **Windows Settings**, and then double-click **Security Settings**.
3. In **Security Settings**, right-click **Wireless Network (IEEE 802.11) Policies**, and then click either **Create a new Wireless Policy for Windows Vista and Later Releases** or **Create a new Windows XP Policy**. The properties dialog box opens for the policy you selected.
4. Click **OK**. The default policy is activated and listed in the details pane of the GPME.
To access the properties of a policy you have already created, select **Wireless Network (IEEE 802.11) Policies**. In the details pane, right-click either the Windows Vista or Windows XP policy that you want to modify, and then click **Properties**.
## Open Wireless Network (IEEE 802.11) Policies for Editing
You can use this procedure to open activated Wireless Network (IEEE 802.11) Policies for editing. If a policy was previously activated, you do not need to perform this step.
Membership in **Domain Admins**, or equivalent, is the minimum required to complete this procedure.
#### To open activated Wireless Network (IEEE 802.11) Policies for editing
1. On your Windows Server 2012 domain controller, if Group Policy Management Editor is not already open, do the following: click **Start**, point to **Administrative Tools**, and then click **Group Policy Management**. The Group Policy Management Microsoft Management Console (MMC) snap-in opens.
2. In the left pane, double-click your forest. For example, double-click **Forest: example.com**.
3. In the left pane, double-click **Domains**, and then double-click the domain in which you want to manage a Group Policy object. For example, double-click **example.com**.
4. Right-click the Group Policy object you want to manage, and then click **Edit**. For example, right-click **Default Domain Policy**, and then click **Edit**. The Group Policy Management Editor opens.
Note
The Group Policy object that you select must be the same object that you specified when you activated the Wireless Network (IEEE 802.11) Policies.
5. In Group Policy Management Editor, in the right pane, if it is not already expanded, double-click **Computer Configuration**, double-click **Policies**, double-click **Windows Settings**, double-click **Security Settings**, and then select **Wireless Network (IEEE 802.11) Policies**.
6. In the details pane: right-click either **New Wireless Network Policy** or **New XP Wireless Network Policy**, and then click **Properties**. The properties dialog box for the policy you selected opens.
1. To open the Windows Vista policy, right-click **New Wireless Network Policy**, and then click **Properties**. The **New Wireless Network Policy Properties** dialog opens.
2. To open the Windows XP policy, right click **New XP Wireless Network Policy**, and then click **Properties**. The **New XP Wireless Network Policy Properties** opens.
Note
Wireless network policies are not necessarily listed as **New Wireless Network Policy** or **New XP Wireless Network Policy** in the details pane of the Group Policy Management Editor. If the default policy name was previously changed from to another name, the name change is reflected in the Group Policy Management Editor details pane, but with the **Type** specified as either **Vista** or **XP**.
## Configure the New Wireless Network Policy
Use the procedures in this section to configure Wireless Network (IEEE 802.11) Policies for client computers running Windows 8, Windows 7 and Windows Vista that connect to your wireless network by using 802.1X-capable wireless access points (APs). This policy enables you to configure security and authentication settings, manage wireless profiles, and specify permissions for wireless networks that are not configured as preferred networks.
- Configure a Wireless Connection Profile for PEAP-MS-CHAP v2
- Set the Preference Order for Wireless Connection Profiles
- Define Network Permissions
## Configure a Wireless Connection Profile for PEAP-MS-CHAP v2
This procedure provides the steps required to configure a PEAP-MS-CHAP v2 wireless profile.
Membership in **Domain Admins**, or equivalent, is the minimum required to complete this procedure.
##### To configure a Windows Vista wireless connection profile for PEAP-MS-CHAP v2
1. If you have not already done so, use the steps in the topic Open Wireless Network (IEEE 802.11) Policies for Editing to open the Windows Vista **New Wireless Network Policy Properties** dialog.
2. On your domain controller running Windows Server 2012, in **New Wireless Network Policy Properties**, on the **General** tab, in the **Policy Name** field, type a name for the policy, or accept the default name.
Tip
If you change the default policy name, **New Wireless Network Policy**, then both the **New Wireless Network Policy Properties** dialog and the activated policy module in Group Policy Management Editor will change to match the new policy name.
3. In **Description**, type a brief description for the policy.
4. To specify that WLAN AutoConfig is used to configure wireless network adapter settings, select **Use Windows WLAN AutoConfig service for clients**.
5. On the **General** tab, do one of the following:
- To add and configure a new profile, click **Add**, and then select **Infrastructure**.
- To edit an existing profile, select the profile you want to modify, and then click **Edit**. The **New Profile properties** dialog opens.
6. On the **Connection** tab, in the **Profile Name** field:
1. If you are adding a new profile, it is recommended that you type a new name for the profile. For example, type **Example.com WLAN Profile for Windows Vista**.
2. If you are editing a profile that is already added, use the existing profile name, or modify the name as needed.
7. In **Network Name(s) (SSID)**, type the SSID that corresponds to the SSID configured on your wireless APs, and then click **Add**.
If your deployment uses multiple SSIDs and each wireless AP uses the same wireless security settings, repeat this step to add the SSID for each wireless AP to which you want this profile to apply.
If your deployment uses multiple SSIDs and the security settings for each SSID do not match, configure a separate profile for each group of SSIDs that use the same security settings. For example, if you have one group of wireless APs configured to use WPA2-Enterprise and AES, and another group of wireless APs to use WPA-Enterprise and TKIP, configure a profile for each group of wireless APs.
8. If **NEWSSID** is present, select it, and then click **Remove**.
9. If you deployed wireless access points that are configured to suppress the broadcast beacon, select **Connect even if the network is not broadcasting**.
Note
Enabling this option can create a security risk because wireless clients will probe for and attempt connections to any wireless network. By default, this setting is not enabled.
10. Click the **Security** tab, click **Advanced**, and then configure the following:
1. To configure advanced 802.1X settings, in **IEEE 802.1X**, select **Enforce advanced 802.1X settings**.
When the advanced 802.1X settings are enforced, the default values for **Max Eapol-Start Msgs**, **Held Period**, **Start Period**, and **Auth Period** are sufficient for typical wireless deployments.
2. To enable Single Sign On, select **Enable Single Sign On for this network**.
3. The remaining default values in **Single Sign On** are sufficient for typical wireless deployments.
4. In **Fast Roaming**, select **This network uses pre-authentication**, if your wireless AP is configured for pre-authentication.
11. To specify that wireless communications meet FIPS 140-2 standards, select **Perform cryptography in FIPS 140-2 certified mode**.
12. Click **OK** to return to the **Security** tab. In **Select the security methods for this network**, in **Authentication**, select **WPA2-Enterprise** if it is supported by your wireless AP and wireless client network adapters. Otherwise, select **WPA-Enterprise**.
13. In **Encryption**, select **AES**, if it is supported by your wireless AP and wireless client network adapters. Otherwise, select **TKIP**.
Note
The settings for both **Authentication** and **Encryption** must match the settings configured on your wireless AP. The default settings for **Authentication Mode**, **Max Authentication Failures**, and **Cache user information for subsequent connections to this network** are sufficient for typical wireless deployments.
14. In **Select a network authentication method**, select **Protected EAP (PEAP)**, and then click **Properties**. The **Protected EAP Properties** page opens.
15. In **Protected EAP Properties**, confirm that **Verify the server’s identity by validating the certificate** is selected.
16. In **Trusted Root Certification Authorities**, select the trusted root certification authority (CA) that issued the server certificate to your NPS server.
Note
This setting limits the root CAs that clients trust to the selected CAs. If no trusted root CAs are selected, then clients will trust all root CAs listed in their trusted root certification authority store.
17. In the **Select Authentication Method** list, select **Secured password (EAP-MS-CHAP v2)**.
18. To enable PEAP Fast Reconnect, select **Enable Fast Reconnect**.
19. If Network Access Protection (NAP) is configured on your network, select **Network Access Protection**. Otherwise, clear this check box.
20. To require server cryptobinding TLV on connection attempts, select **Disconnect if server does not present cryptobinding TLV**.
21. To specify that user identity is masked in phase one of authentication, select **Enable Identity Privacy**, and in the textbox, type an anonymous identity name, or leave the textbox blank.
Tip
The NPS policy for 802.1X Wireless must be created by using NPS **Connection Request Policy**. If the NPS policy is created in by using NPS **Network Policy**, then identity privacy will not work.
Note
EAP identity privacy is provided by certain EAP methods where an empty or an anonymous identity (different from the actual identity) is sent in response to the EAP identity request. PEAP sends the identity twice during the authentication. In the first phase, the identity is sent in plain text and this identity is used for routing purposes, not for client authentication. The real identity—used for authentication—is sent during the second phase of the authentication, within the secure tunnel that is established in the first phase. If **Enable Identity Privacy** checkbox is selected, the username is replaced with the entry specified in the textbox. For example, assume **Enable Identity Privacy** is selected and the identity privacy alias **anonymous** is specified in the textbox. For a user with a real identity alias **jdoe@example.com**, the identity sent in first phase of authentication will be changed to **anonymous@example.com**. The realm portion of the 1st phase identity is not modified as it is used for routing purposes.
22. Click **Configure**. In the **EAP MSCHAPv2 Properties** dialog box, verify **Automatically use my Windows logon name and password (and domain if any)** is selected, click **OK**, and then click **OK** to close **Protected EAP Properties**.
23. Click **OK** to close the **Security** tab, and then click **OK** again to close the Vista Wireless Network Policy.
## Set the Preference Order for Wireless Connection Profiles
This procedure provides the steps to specify the order in which wireless connection profiles are used to connect domain member wireless clients to wireless networks.
Membership in **Domain Admins**, or equivalent, is the minimum required to complete this procedure.
##### To set the preference order for wireless connection profiles
1. On your domain controller running Windows Server 2012, open **Vista Wireless Network (IEEE 802.11) Policy Properties**.
2. On the **General** tab, in **Connect to available networks in the order of profiles listed below**, select the profile that you want to reposition, and then click either the "up arrow" button or “down arrow” button to move the profile to the desired location in the list.
3. Repeat step 2 for each profile that you want to reposition in the list.
4. Click **OK** to save all changes.
## Define Network Permissions
You can configure settings on the **Network Permissions** tab for your domain members running Windows 8, Windows 7 and Windows Vista to which Wireless Network (IEEE 802.11) Policies apply. You can only apply these setting for wireless networks that are not configured on the **General** tab in the \*\*Vista Wireless Network Policy Properties \*\*page:
- Allow or deny connections to specific wireless networks that you specify by network type and Service Set Identifier (SSID)
- Allow or deny connections to ad hoc networks
- Allow or deny connections to infrastructure networks
- Allow or deny users to view network types (ad hoc or infrastructure) to which they are denied access
- Allow or deny users to create a profile that applies to all users
- Users can only connect to allowed networks by using Group Policy profiles
Membership in **Domain Admins**, or equivalent, is the minimum required to complete these procedures.
##### To allow or deny connections to specific wireless networks
1. On your domain controller running Windows Server 2012, open **Vista Wireless Network (IEEE 802.11) Policy Properties**, and then click **Network Permissions**.
2. On the **Network Permissions** tab, click **Add**. The **New Permissions Entry** dialog box opens.
3. In the **New Permission Entry** dialog box, in the **Network Name (SSID)** field, type the network SSID of the network for which you want to define permissions.
4. In **Network Type**, select **Infrastructure** or **Ad hoc**.
Note
If you are uncertain whether the broadcasting network is an infrastructure or ad hoc network, you can configure two network permission entries, one for each network type.
5. In **Permission**, select **Allow** or **Deny**.
6. Click **OK**, to return to the **Network Permissions** tab.
##### To specify additional network permissions
1. On the **Network Permissions** tab, configure any or all of the following:
- To deny your domain members running Windows 8, Windows 7 and Windows Vista access to ad hoc networks, select **Prevent connections to ad-hoc networks**.
- To deny your domain members running Windows 8, Windows 7 and Windows Vista access to infrastructure networks, select **Prevent connections to infrastructure networks**.
- To allow your domain members running Windows 8, Windows 7 and Windows Vista to view network types (ad hoc or infrastructure) to which they are denied access, select **Allow user to view denied networks**.
- To allow users of computers that are running Windows 8, Windows 7 or Windows Vista to create profiles that apply to all users, select **Allow everyone to create all user profiles**.
- To specify that your users can only connect to allowed networks by using Group Policy profiles, select **Only use Group Policy profiles for allowed networks**.
##### Windows 7-specific settings
1. To block users from hosting a wireless network on computers running Windows 7 that are equipped with wireless network adapters that support the Soft Access Point and Virtual Wi-Fi capability, select **Don’t allow hosted networks**.
Note
Computers running Windows Vista are not affected by these Windows 7 settings.
2. To deny users with computers running Windows 7 to enter and store their domain credentials (username and password) which the computer can then use to authenticate to the network (even though the user is not actively logged on), in **Windows 7 Policy Settings**, select **Don’t allow shared user credentials for network authentication**.
Note
Shared user credentials can be allowed to enable the computer to reconnect to the network after the computer is restarted. This enables the computer to continue to receive updates, such as those made through Group Policy and Windows Updates, during extended periods when a user is not actively logged on to the computer.
3. To specify the duration for which computers running Windows 7 are prohibited from making auto connection attempts to the network, select **Enable Block Period**, and in **Block Period (minutes)**, specify the number of minutes for which you want the block period to apply. The valid range of minutes is 1-60.
Note
For more information about the settings on any tab, press F1 while viewing that tab.
4. Click **OK** to save the settings, and close the **Network Permissions** tab.
## Configure the New Windows XP Wireless Network Policy
Use the procedures in this section to configure Wireless Network (IEEE 802.11) Policies for client computers running Windows XP that connect to your wireless network by using 802.1X-capable wireless access points (APs).
## To configure a Windows XP wireless connection profile for PEAP-MS-CHAP v2
This procedure provides the steps required to configure a PEAP-MS-CHAP v2 wireless profile for computers running Windows XP.
Membership in **Domain Admins**, or equivalent, is the minimum required to complete this procedure.
#### To configure a Windows XP wireless connection profile for PEAP-MS-CHAP v2
1. If you have not already done so, use the steps in the topic Open Wireless Network (IEEE 802.11) Policies for Editing to open the **XP Wireless Network (IEEE 802.11) Policies Properties** page.
2. On the **General** tab of the policy properties, in **XP Policy Name**, type a name for the policy, or leave the default name. In **Description**, type a brief description of the policy.
Note
For conceptual information about the settings on any tab of Wireless Network (IEEE 802.11) Policies, press F1 while viewing that tab.
3. In **Networks to access**, select either **Any available network (wireless AP preferred)** or **Access Point (infrastructure) network only**.
4. To specify that WLAN AutoConfig is used to configure wireless network adapter settings, select **Use Windows WLAN AutoConfig service for clients**.
5. To allow clients to automatically connect to networks that are not specifically defined on the **Preferred Networks** tab, select **Automatically connect to non-preferred networks**.
6. On the **Preferred Networks** tab, in **Networks**, click **Add**, and then select **Infrastructure**. The **Network Properties** dialog box opens.
7. On the **Network Properties** dialog box, in **Network Name (SSID)**, type the Service Set Identifier (SSID) that corresponds with the SSID configured on the wireless access point (AP).
8. In **Description**, enter a description for the wireless network.
9. If you deployed wireless APs that are configured to suppress the broadcast beacon frames, select **Connect even if network is not broadcasting**.
Note
Enabling this option can create a security risk because wireless clients will probe for and attempt connections to any wireless network. By default, this setting is not enabled.
10. In **Select the security methods for this network**, in **Authentication**, select either **WPA2** or **WPA**, and then in **Encryption**, specify either **AES** or **TKIP**.
Additional considerations for these settings:
1. In the XP Wireless Network (IEEE 802.11) Policy, WPA2 and WPA correspond to the Windows Vista Wireless Network (IEEE 802.11) Policy settings, WPA2-Enterprise and WPA-Enterprise settings, respectively.
2. WPA2 is preferred over WPA; AES is preferred over TKIP. However, not all wireless network adapter drivers in Windows XP and Windows Vista support WPA2 or AES.
3. Selecting WPA2 exposes additional settings for Fast Roaming that are not provided by WPA. The default settings for Fast Roaming are sufficient for typical deployments.
4. Although available, do not select either WPA2-PSK or WPA-PSK. WPA2-PSK and WPA-PSK are intended for small office and home office networks, and cannot be used in this scenario.
11. Click the **IEEE 802.1X** tab. In **EAP type**, by default, **Protected EAP (PEAP)** is selected.
12. Click **Settings**. The **Protected EAP Properties** page opens.
13. On the **Protected EAP Properties** page, in **When Connecting**, do the following:
1. To specify that wireless clients must verify the authenticity of the NPS server certificate, select **Verify the server’s identity by validating the certificate** (recommended).
2. To specify which RADIUS servers wireless clients must use to provide network authentication and authorization, type the name of each NPS server exactly as it appears in the **Subject** field of each RADIUS server’s certificate.
3. In **Trusted Root Certification Authorities**, select the trusted root certification authority corresponding to your NPS server certificate. For example, if your domain CA in example.com is named CA-01, select **example-CA-01-CA**.
4. Click **OK** to close the **Protected EAP Properties** page, and then click **OK** to close the **XP Wireless Network (IEEE 802.11) Policies Properties** page.
## Configuring your NPS Server
Follow these steps to configure NPS to perform 802.1X authentication for wireless access:
- Register NPS in Active Directory Domain Services
- Configure a Wireless AP as an NPS RADIUS Client
- Create NPS Policies for 802.1X Wireless using a Wizard
## Register NPS in Active Directory Domain Services
You can use this procedure to register a server running Network Policy Server (NPS) in Active Directory Domain Services (AD DS) in the domain where the NPS server is a member. For NPS servers to be granted permission to read the dial-in properties of user accounts during the authorization process, each NPS server must be registered in AD DS. Registering an NPS server adds the server to the **RAS and IAS Servers** security group in AD DS.
Membership in **Domain Admins**, or equivalent, is the minimum required to complete this procedure.
#### To register an NPS server in its default domain
1. On your NPS server, click **Start**, click **Administrative Tools**, and then click **Network Policy Server**. The NPS snap-in opens.
2. Right-click **NPS (Local)**, and then click **Register Server in Active Directory**. The **Network Policy Server** dialog box opens.
3. In **Network Policy Server**, click **OK**, and then click **OK** again.
## Configure a Wireless AP as an NPS RADIUS Client
Use this procedure to configure a wireless access point (AP), also known as a *network access server (NAS)*, as a Remote Authentication Dial-In User Service (RADIUS) client by using the NPS snap-in. Unless your NPS servers are running Windows Server 2012 Enterprise or Windows Server 2012 Datacenter, you must repeat this procedure for every wireless AP that you deploy on your network.
Important
Client computers, such as wireless portable computers and other computers running client operating systems, are not RADIUS clients. RADIUS clients are network access servers—such as wireless access points, 802.1X-capable switches, virtual private network (VPN) servers, and dial-up servers—because they use the RADIUS protocol to communicate with RADIUS servers such as Network Policy Server (NPS) servers.
Membership in **Domain Admins**, or equivalent, is the minimum required to complete this procedure.
#### To add a network access server as a RADIUS client in NPS
1. On the NPS server, click **Start**, click **Administrative Tools**, and then click **Network Policy Server**. The NPS snap-in opens.
2. In the NPS snap-in, double-click **RADIUS Clients and Servers**. Right-click **RADIUS Clients**, and then click **New**.
3. In **New RADIUS Client**, verify that the **Enable this RADIUS client** check box is selected.
4. In **New RADIUS Client**, in **Friendly name**, type a display name for the wireless access point.
Tip
In NPS a wireless access point is one type of device that falls within a group called network access server (NAS).
For example, if you want to add a wireless access point (AP) named AP-01, type **AP-01**.
5. In **Address (IP or DNS)**, type the IP address or fully qualified domain name (FQDN) for the NAS.
If you enter the FQDN, to verify that the name is correct and maps to a valid IP address, click **Verify**, and then in **Verify Address**, in the **Address** field, click **Resolve**. If the FQDN name maps to a valid IP address, the IP address of that NAS will automatically appear in **IP address**. If the FQDN does not resolve to an IP address you will receive a message indicating that no such host is known. If this occurs, verify that you have the correct AP name and that the AP is powered on and connected to the network.
Click **OK** to close **Verify Address**.
6. In **New RADIUS Client**, in **Shared Secret**, do one of the following:
- To manually configure a RADIUS shared secret, select **Manual**, and then in **Shared secret**, type the strong password that is also entered on the NAS. Retype the shared secret in **Confirm shared secret**.
- To automatically generate a shared secret, select the **Generate** check box, and then click the **Generate** button. Save the generated shared secret, and then use that value to configure the NAS so that it can communicate with the NPS server.
Important
The RADIUS shared secret that you enter for your virtual AP’s in NPS must exactly match the RADIUS shared secret that is configured on your actual wireless AP’s. If you use the NPS option to generate a RADIUS shared secret, then you must configure the matching actual wireless AP with the RADIUS shared secret that was generated by NPS.
7. In **New RADIUS Client**, on the **Advanced** tab, in **Vendor name**, specify the NAS manufacturer name. If you are not sure of the NAS manufacturer name, select **RADIUS standard**.
8. In **Additional Options**, if you are using any authentication methods other than EAP and PEAP, and if your NAS supports the use of the message authenticator attribute, select **Access Request messages must contain the Message-Authenticator attribute**.
9. If you plan on deploying Network Access Protection (NAP) and your NAS supports NAP, select **RADIUS client is NAP-capable**.
10. Click **OK**. Your NAS appears in the list of RADIUS clients configured on the NPS server.
## Create NPS Policies for 802.1X Wireless Using a Wizard
You can use this procedure to create the connection request policies and network policies required to deploy either 802.1X-capable wireless access points as Remote Authentication Dial-In User Service (RADIUS) clients to the RADIUS server running Network Policy Server (NPS).
Important
Client computers, such as wireless portable computers and other computers running client operating systems, are not RADIUS clients. RADIUS clients are network access servers—such as wireless access points, 802.1X-capable switches, virtual private network (VPN) servers, and dial-up servers—because they use the RADIUS protocol to communicate with RADIUS servers such as Network Policy Server (NPS) servers.
After you run the wizard, the following policies are created:
- One connection request policy
- One network policy
Note
You can run the New IEEE 802.1X Secure Wired and Wireless Connections wizard every time you need to create new policies for 802.1X authenticated access.
Membership in **Domain Admins**, or equivalent, is the minimum required to complete this procedure.
#### Create policies for 802.1X authenticated wireless by using a wizard
1. Open the NPS snap-in. If it is not already selected, click **NPS (Local)**. If you are running the NPS MMC snap-in and want to create policies on a remote NPS server, select the server.
2. In **Getting Started**, in **Standard Configuration**, select **RADIUS server for 802.1X Wireless or Wired Connections**. The text and links below the text change to reflect your selection.
3. Click **Configure 802.1X**. The Configure 802.1X wizard opens.
4. On the **Select 802.1X Connections Type** wizard page, in **Type of 802.1X connections**, select **Secure Wireless Connections**, and in **Name**, type a name for your policy, or leave the default name **Secure Wireless Connections**. Click **Next**.
5. On the **Specify 802.1X Switches** wizard page, in **RADIUS clients**, all 802.1X switches and wireless access points that you have added as RADIUS Clients in the NPS snap-in are shown. Do any of the following:
- To add additional network access servers (NASs), such as wireless APs, in **RADIUS clients**, click **Add**, and then in **New RADIUS client**, enter the information for: **Friendly name**, **Address (IP or DNS)**, and **Shared Secret**.
- To modify the settings for any NAS, in **RADIUS clients**, select the AP for which you want to modify the settings, and then click **Edit**. Modify the settings as required.
- To remove a NAS from the list, in **RADIUS clients**, select the NAS, and then click **Remove**.
Warning
Removing a RADIUS client from within the **Configure 802.1X** wizard deletes the client from the NPS server configuration. All additions, modifications, and deletions that you make within the **Configure 802.1X** wizard to RADIUS clients are reflected in the NPS snap-in, in the **RADIUS Clients** node under **NPS** / **RADIUS Clients and Servers**. For example, if you use the wizard to remove an 802.1X switch, the switch is also removed from the NPS snap-in.
6. Click **Next**. On the **Configure an Authentication Method** wizard page, in **Type (based on method of access and network configuration)**, select **Microsoft: Protected EAP (PEAP)**, and then click **Configure**.
Tip
If you receive an error message indicating that a certificate cannot be found for use with the authentication method, and you have configured Active Directory Certificate Services to automatically issue certificates to RAS and IAS servers on your network, first ensure that you have followed the steps to Register NPS in Active Directory Domain Services, then use the following steps to update Group Policy: Click **Start**, click **Run**, and in **Open**, type **gpupdate**, and the press ENTER. When the command returns results indicating that both user and computer Group Policy have updated successfully, select **Microsoft: Protected EAP (PEAP)** again, and then click **Configure**. If after refreshing Group Policy you continue to receive the error message indicating that a certificate cannot be found for use with the authentication method, the certificate is not being displayed because it does not meet the minimum server certificate requirements as documented in the Core Network Companion Guide: Server Certificate Deployment. If this happens, you must discontinue NPS configuration, revoke the certificate issued to your NPS server(s), and then follow the instructions to configure a new certificate by using the version of deployment guide that corresponds to the operating system installed on your CA. For Windows Server 2012, the **Core Network Companion Guide: Server Certificate Deployment**, available for download in Word format at the Microsoft Download Center ([https://go.microsoft.com/fwlink/?LinkId=251761](https://go.microsoft.com/fwlink/?linkid=251761)) and in HTML format in the Windows 8 Technical Library ([https://technet.microsoft.com/library/jj125379.aspx](https://learn.microsoft.com/en-us/previous-versions/windows/it-pro/windows-server-2012-R2-and-2012/jj125379(v=ws.11))). For Windows 8, the **Core Network Companion Guide: Server Certificate Deployment**, available for download in Word format at the Microsoft Download Center ([https://www.microsoft.com/download/details.aspx?id=29691](https://www.microsoft.com/download/details.aspx?id=29691)) and in HTML format in the Windows 8 Technical Library ([https://technet.microsoft.com/library/jj125379.aspx](https://learn.microsoft.com/en-us/previous-versions/windows/it-pro/windows-server-2012-R2-and-2012/jj125379(v=ws.11))).
7. On the **Edit Protected EAP Properties** wizard page, in **Certificate issued**, ensure that the correct NPS server certificate is selected, and then do the following:
Note
Verify that the value in **Issuer** is correct for the certificate selected in **Certificate issued**. For example, the expected issuer for a certificate issued by a CA running Windows Server 2012 Active Directory Certificate Services (AD CS) named corp-DC1, in the domain contoso.com, is **corp-DC1-CA**.
- To allow users to roam with their wireless computers between access points without requiring them to reauthenticate each time they associate with a new AP, select **Enable Fast Reconnect**.
- To specify that connecting wireless clients will end the network authentication process if the RADIUS server does not present cryptobinding Type-Length-Value (TLV), select **Disconnect Clients without Cryptobinding**.
- To modify the policy settings for the EAP type, in **EAP Types**, click **Edit**, in **EAP MSCHAPv2 Properties**, modify the settings as needed, and then click **OK**.
8. Click **OK**. The Edit Protected EAP Properties dialog box closes, returning you to the **Configure 802.1X** wizard. Click **Next**.
9. In **Specify User Groups**, click **Add**, and then type the name of the security group that you configured for your wireless clients in the Active Directory Users and Computers snap-in. For example, if you named your wireless security group Wireless Group, type **Wireless Group**. Click **Next**.
10. Click **Configure** to configure RADIUS standard attributes and vendor-specific attributes for virtual LAN (VLAN) as needed, and as specified by the documentation provided by your wireless AP hardware vendor. Click **Next**.
11. Review the configuration summary details, and then click **Finish**.
## Joining New Wireless Computers to the Domain
The easiest method to join new wireless computers that are running Windows 8, Windows 7, Windows Vista, or Windows XP to the domain is to physically attach the computer to a segment of the wired LAN (a segment not controlled by an 802.1X switch) before joining the computer to the domain. This is easiest because wireless group policy settings are automatically and immediately applied and, if you have deployed your own PKI, the computer receives the CA certificate and stores it in the Trusted Root Certification Authorities certificate store, allowing the wireless client to trust NPS servers with server certs issued by your CA.
Likewise, after a new wireless computer is joined to the domain, the preferred method for users to log on to the domain is to perform log on by using a wired connection to the network.
**Computers running Windows Vista**
In cases where it is not practical to join computers running Windows Vista to the domain by using a wired Ethernet connection, or in cases where the user cannot log on to the domain for the first time by using a wired connection, you must use an alternative method. This guide provides the following alternative methods to configure profiles that allow users to join computers to the domain and then log on, or log on to the domain by using a wireless connection:
- **Method 1.** A member of the IT staff joins a wireless computer running Windows Vista to the domain and configures a Single Sign On bootstrap wireless profile. In this method, the IT administrator connects the wireless computer to the wired Ethernet network and joins the computer to the domain. Then the administrator distributes the computer to the user. When the user starts the computer without using a wired connection, the domain credentials that they manually specify for the user logon are used to both establish a connection to the wireless network and to log on to the domain.
For more information, see Join the Domain and Log On by using Wireless Method 1.
- **Method 2.** The user manually configures the wireless computer running Windows Vista with bootstrap wireless profile and joins the domain based on instructions from an IT administrator. The bootstrap wireless profile allows the user to establish a wireless connection and then join the domain. After joining the computer to the domain and restarting the computer, the user can log on to the domain by using a wireless connection and their domain account credentials.
For more information, see Join the Domain and Log On by using Wireless Method 2.
**Computers running Windows XP**
In cases where it is not practical to either join computers running Windows XP to the domain by using a wired Ethernet connection or the user cannot log on to the domain for the first time by using a wired connection, you must manually configure a connection profile. This guide provides the following alternative methods to configure a profile that allows users to join computers running Windows XP to the domain by using a wireless connection, and then log on to the domain by using a wireless connection:
- **Method 3.** The user manually configures the properties of the wireless connection in **Network Connections** on the wireless computer running Windows XP, based on instructions from an IT administrator. The configuration allows the user to establish a wireless connection and then join the domain. After the computer is joined to the domain and restarted, the user can log on to the domain by using a wireless connection and their domain account credentials. For more information, see Join the Domain and Log On by using Wireless Method 3.
## Join the Domain and Log On by using Wireless Method 1
Domain member users with domain-joined wireless client computers running Windows Vista can use a temporary wireless profile to connect to an 802.1X-authenticated wireless network without first connecting to the wired LAN. This temporary wireless profile, known as a *bootstrap wireless profile*, requires the user to manually specify their domain user account credentials, and does not validate the certificate of the Remote Authentication Dial-In User Service (RADIUS) server running Network Policy Server (NPS). After establish wireless connectivity, Group Policy is applied on the wireless client computer, and a new wireless profile is issued. The new policy automatically uses the computer and user account credentials for client authentication. Additionally, as part of the PEAP-MS-CHAP v2 mutual authentication, the client validates the credentials of the RADIUS server.
After you join the computer running Windows Vista to the domain, use this procedure to configure a Single Sign On bootstrap wireless profile, before distributing the wireless computer to the domain-member user.
#### To configure a Single Sign On bootstrap wireless profile
1. Configure a bootstrap profile by using the procedure Configure a Wireless Connection Profile for PEAP-MS-CHAP v2 with the following settings specified:
- PEAP-MS-CHAP v2 authentication
- Validate RADIUS server certificate disabled
- Single Sign On enabled
2. In Windows Vista Wireless Network (IEEE 802.11) Policies, on the **General** tab, click **Export** to export the profile to a network share, USB flash drive, or other easily accessible location.
3. Join the new wireless computer to the domain (for example, through an Ethernet connection that does not require IEEE 802.1X authentication) and add the bootstrap wireless profile to the computer by using the **netsh wlan add profile** command.
Note
For more information, see Netsh Commands for Wireless Local Area Network (WLAN) at [https://technet.microsoft.com/library/dd744890.aspx](https://technet.microsoft.com/library/dd744890).
4. Distribute the new wireless computer to the user with the procedure to “Log on to the domain using computers running Windows Vista.”
When the user starts the computer, Windows Vista prompts the user to enter their domain user account name and password. Because Single Sign On is enabled, the computer uses the domain user account credentials to first establish a connection with the wireless network and then log on to the domain.
#### Log on to the domain using computers running Windows Vista
1. Log off the computer, or restart the computer.
2. Press CTRL + ALT + DELETE. The logon screen appears.
3. Click **Switch User**, and then click **Other User**.
4. In **User name**, type your domain and user name in the format *domain\\user*. For example, to log on to the domain example.com with an account named **User-01**, type **example\\User-01**.
5. In **Password**, type your domain password, and then click the arrow, or press ENTER.
## Join the Domain and Log On by using Wireless Method 2
In this method, you complete the steps in the General steps section, then you provide your domain-member users with the instructions about how to manually configure a wireless computer that is running Windows 8, Windows 7 or Windows Vista® with a bootstrap wireless profile. The bootstrap wireless profile allows the user to establish a wireless connection and then join the domain. After the computer is joined to the domain and restarted, the user can log on to the domain through a wireless connection.
#### General steps
1. Configure a local computer administrator account, in **Control Panel**, for the user.
Important
To join a computer to a domain, the user must be logged on to the computer with the local Administrator account. Alternatively, the user must provide the credentials for the local Administrator account during the process of joining the computer to the domain. In addition, the user must have a user account in the domain to which the user wants to join the computer. During the process of joining the computer to the domain, the user will be prompted for domain account credentials (user name and password).
2. Provide your domain users with the instructions for configuring a bootstrap wireless profile, as documented in the following procedure: To configure a Bootstrap Wireless Profile. Additionally, provide the user with both the local computer credentials (user name and password), and domain credentials (domain user account name and password) in the form *DomainName\\UserName*, as well as the procedures to “Join the computer to the domain,” and to “Log on to the domain,” as documented in the Windows 8 Core Network Guide.
Note
After completing the general steps, provide the following procedures to users at your organization who will connect to your wireless network with computers running Windows 8, Windows 7 or Windows Vista.
#### To configure a bootstrap wireless profile
1. Use the credentials provide to you by your network administrator or IT support professional to log on to the computer with the local computers administrator account.
2. Click **Start**, click **Connect to**, and then click **Set up a connection or network**. The **Connect to a Network** dialog box opens.
3. Click **Manually connect to a wireless network**, and then click **Next**.
4. In **Manually connect to a wireless network**, in **Network name**, type the SSID name of the AP.
5. In **Security type**, select the setting provided by your administrator.
6. In **Encryption type**, select the setting provided by your administrator.
7. Select **Start this connection automatically**, and then click **Next**.
8. In **Successfully added** *Your Network SSID*, click **Change connection settings**.
9. Click **Change connection settings**. The *Your Network SSID* Wireless Network property dialog box opens.
10. Click the **Security** tab, and then in **Choose a network authentication method**, select **Protected EAP (PEAP)**.
11. Click **Settings**. The **Protected EAP (PEAP) Properties** page opens.
12. In the **Protected EAP (PEAP) Properties** page, clear **Validate server certificate**, click **OK** twice, and then click **Close**.
13. Windows Vista attempts to connect to the wireless network. The settings of the bootstrap wireless profile specify that you must provide your domain credentials. When Windows Vista prompts you for an account name and password, type your domain account credentials as follows: *Domain Name\\User Name*, *Domain Password*.
#### To join a computer running to the domain
1. Log on to the computer with the local Administrator account.
2. Click **Start**, right-click **Computer**, and then click **Properties**. The **System** dialog box opens.
3. In **Computer name, domain, and workgroup settings**, click **Change settings**. The **System Properties** dialog box opens.
Note
On computers running Windows Vista, before the **System Properties** dialog box opens, the **User Account Control** dialog box opens, requesting permission to continue. Click **Continue** to proceed.
4. Click **Change**. The **Computer Name/Domain Changes** dialog box opens.
5. In **Computer Name**, in **Member of**, select **Domain**, and then type the name of the domain you want to join. For example, if the domain name is example.com, type **example.com**.
6. Click **OK**. The **Windows Security** dialog box opens.
7. In **Computer Name/Domain Changes**, in **User name**, type the user name, and in **Password**, type the password, and then click **OK**. The **Computer Name/Domain Changes** dialog box opens, welcoming you to the domain. Click **OK**.
8. The **Computer Name/Domain Changes** dialog box displays a message indicating that you must restart the computer to apply the changes. Click **OK**.
9. On the **Computer Name** tab of the **System Properties** page, click **Close**. The **Microsoft Windows** dialog box opens, and displays a message, again indicating that you must restart the computer to apply the changes. Click **Restart Now**.
#### Log on to the domain
1. Log off the computer, or restart the computer.
2. Press CTRL + ALT + DELETE. The logon screen appears.
3. Click **Switch User**, and then click **Other User**.
4. In **User name**, type your domain and user name in the format *domain\\user*. For example, to log on to the domain example.com with an account named **User-01**, type **example\\User-01**.
5. In **Password**, type your domain password, and then click the arrow, or press ENTER.
## Join the Domain and Log On by using Wireless Method 3
In this method, users manually configure the wireless connection settings on computers that are running Windows XP, based on instructions that you provide them. The configuration allows users to establish a wireless connection and then join the domain. After the computer is joined to the domain and restarted, users can log on to the domain by using a wireless connection and their domain account credentials.
#### General steps
1. The IT administrator configures a local computer administrator account, in **Control Panel**, for the user.
Important
To configure the necessary wireless connection settings and join a computer to a domain, the user must be logged on to the computer with a local Administrator account. In addition, the user must have a user account in the domain to which the user wants to join the computer. During the process of joining the computer to the domain, the user will be prompted for domain account credentials (user name and password).
2. The IT administrator provides the user with the following items:
- A wireless computer running Windows XP with Service Pack 2.
- The instructions to manually configure the wireless connection settings in the properties of the wireless connection in **Network Connections**, as documented in the procedure that follows, “Manually configure wireless connection settings for Windows XP.”
When you (the IT administrator) give your users the instructions to manually configure their wireless connection settings, you must provide the following values for your wireless network:
- **Network name (SSID)**: Specify the service set identifier for your wireless network.
- **Connect even if this network is not broadcasting**: Specify whether to clear this check box if your wireless APs are not configured to suppress the broadcast beacon or to select this check box if your wireless APs are configured to suppress the broadcast beacon.
- **Network Authentication**: Specify Wi-Fi Protected Access (WPA) or WPA2.
- **Data encryption**: Specify Temporal Key Integrity Protocol (TKIP) or Advanced Encryption Standard (AES).
- **Validate server certificate**: Specify whether to clear this check box if you have deployed a private certification authority (CA) on your network to issue server certificates to your NPS servers or whether to select this check box if you have purchased server certificates for your servers running Network Policy Server (NPS) from a public CA which are already trusted by your network clients.
- **Trusted Root Certification Authorities**: Specify the name of the CA that issued the server certificate to your NPS server.
Tip
The procedure “Manually configure wireless connection settings for Windows XP” provides a step to specify the CA that issued server certificates to your NPS servers. To simplify the instructions given to your users for configuring wireless connection settings, retain this step regardless of whether **Validate server certificate** is selected or cleared.
- Both the local computer credentials (user name and password), and domain credentials (domain user account name and password) in the form *DomainName\\UserName*.
- The procedures about joining the computer to the domain, and about logging on to the domain, which are provided later in this topic and documented in the Windows 8 Foundation Network Guide.
#### Manually configure wireless connection settings for Windows XP
1. Log on to the computer with your local computer Administrator account.
2. Click **Start**, point to **Connect To**, and then click **Show all connections**. Network Connections opens.
3. In **Network Connections**, in **LAN or High-Speed Internet**, right-click your wireless network connection, and then click **Properties**. The Wireless Network Connection Properties dialog box opens.
4. In **Wireless Network Connection Properties**, click the **Wireless Networks** tab.
5. On the **Wireless Networks** tab, click **Add**. The Wireless Network properties dialog box opens.
6. On the **Association** tab, in **Network name (SSID)**, type the SSID value specified by your administrator.
7. In **Connect even if this network is not broadcasting**, select or clear the check box as specified by your administrator. By default, this check box is cleared.
8. In **Network Authentication**, select **TKIP** or **AES** as specified by your administrator.
9. Ensure that **This is a computer-to-computer (ad-hoc) network: wireless access points are not used** is cleared, and then click the **Authentication** tab.
10. On the **Authentication** tab, ensure that **Enable IEEE 802.1x authentication for this network** is selected.
11. In **EAP type**, select **Protected EAP (PEAP)**, and then click **Properties**. The Protected EAP Properties dialog box opens.
12. On the **Protected EAP Properties** dialog box, in **Validate server certificate**, select or clear the check box as specified by your administrator.
13. In **Trusted Root Certification Authorities**, select the CA specified by your administrator.
14. In **Select Authentication Method**, ensure **Secured password (EAP-MSCHAP v2)** is selected, and then click **OK** two times. The Protected EAP Properties dialog box closes, and the Authentication tab closes, returning you to the Wireless Networks tab.
15. On the **Wireless Network** tab, in **Preferred networks**, select the SSID that you specified in step 6 of this procedure, and then click **Move up** until the wireless network is positioned at the top of the list in **Preferred networks**.
16. Click **OK**. The Wireless Network Connection Properties closes, returning you to Network Connections.
17. Close **Network Connections**.
#### To join computers running Windows XP to the domain
1. Log on to the computer with your local computer Administrator account.
2. Click **Start**, right-click **My Computer**, and then click **Properties**. The **System Properties** dialog box opens.
3. Click **Change**. The **Computer Name Changes** dialog box opens.
4. In **Computer Name Changes**, in **Member of**, select **Domain**, and then type the name of the domain you want to join. For example, if the domain name is example.com, type **example.com**.
5. Click **OK**. The **Computer Name Changes** dialog box opens. In **User name**, type the domain user account name, and in **Password**, type the domain user password, and then click **OK**.
6. The **Computer Name Changes** dialog box opens, welcoming you to the domain.
7. Click **OK**. The **Computer Name Changes** dialog box displays a message indicating that you must restart the computer to apply the changes.
8. Click **OK**.
9. In the **System Properties** dialog box, on the **Computer Name** tab, click **OK**, to close the **System Properties** dialog box. The **System Settings Change** dialog box opens, and displays a message, again indicating that you must restart the computer to apply the changes.
10. Click **Yes**.
#### Log on to the domain using computers running Windows XP
1. Log off the computer, or restart the computer.
2. Press CTRL + ALT + DELETE. The **Log On to Windows** dialog box appears.
3. If **Log on to** is not displayed, click **Options**.
4. In **Log on to**, in the drop down list, select your domain. For example, in the example.com domain, select EXAMPLE.
5. Type your domain and user name in the format *domain\\user*. For example, to log on to the example.com domain with an account named **User-01**, type **example\\User-01**.
6. In **Password**, type your domain password, and then press ENTER.
## Additional Resources
For more information about the technologies in this guide, see the following resources:
- [802.1X Authenticated Wireless Access Overview](https://learn.microsoft.com/en-us/previous-versions/windows/it-pro/windows-server-2012-R2-and-2012/hh994700(v=ws.11)) in the Windows Server 2012 Technical Library at [https://technet.microsoft.com/library/hh994700.aspx](https://technet.microsoft.com/library/hh994700.aspx)
- [Wireless LAN Service Overview](https://learn.microsoft.com/en-us/previous-versions/windows/it-pro/windows-server-2012-R2-and-2012/hh994698(v=ws.11)), for 802.11 wireless-capable computers running Windows Server 2012, in the Windows Server 2012 Technical Library at [https://technet.microsoft.com/library/hh994698.aspx](https://technet.microsoft.com/library/hh994698.aspx)
- [New Wireless Connection Processes](https://learn.microsoft.com/en-us/previous-versions/windows/it-pro/windows-server-2012-R2-and-2012/jj200213(v=ws.11)), for computers running Windows 8, in the Windows Server 2012 Technical Library at [https://technet.microsoft.com/library/jj200213.aspx](https://technet.microsoft.com/library/jj200213.aspx)
- [Managing the Wireless Network (IEEE 802.11) Policies](https://learn.microsoft.com/en-us/previous-versions/windows/it-pro/windows-server-2012-R2-and-2012/hh994695(v=ws.11)) in the Windows Server 2012 Technical Library at [https://technet.microsoft.com/library/hh994695.aspx](https://technet.microsoft.com/library/hh994695.aspx)
- [Improvements to Certificate-based Authentication](https://learn.microsoft.com/en-us/previous-versions/windows/it-pro/windows-server-2012-R2-and-2012/jj200227(v=ws.11)), for wireless computers running Server 8, in the Windows Server 2012 Technical Library at [https://technet.microsoft.com/library/jj200227.aspx](https://technet.microsoft.com/library/jj200227.aspx)
- [Extensible Authentication Protocol (EAP) Settings for Network Access](https://learn.microsoft.com/en-us/previous-versions/windows/it-pro/windows-server-2012-R2-and-2012/hh945104(v=ws.11)) in the Windows Server 2012 Technical Library at [https://technet.microsoft.com/library/hh945104.aspx](https://technet.microsoft.com/library/hh945104.aspx)
- [Active Directory Certificate Services](https://go.microsoft.com/fwlink/?linkid=110923) in the Windows Server 2012 Technical Library at [https://go.microsoft.com/fwlink/?LinkId=218045](https://go.microsoft.com/fwlink/?LinkId=218045)
- [Active Directory Domain Services](https://learn.microsoft.com/en-us/previous-versions/windows/it-pro/windows-server-2012-R2-and-2012/hh831484(v=ws.11)) in the Windows Server 2012 Technical Library at [https://go.microsoft.com/fwlink/?LinkId=96418](https://go.microsoft.com/fwlink/?LinkId=96418)
- [Domain Name System (DNS)](https://learn.microsoft.com/en-us/previous-versions/windows/it-pro/windows-server-2012-R2-and-2012/hh831667(v=ws.11)) in the Windows Server 2012 Technical Library at [https://technet.microsoft.com/library/hh831667.aspx](https://technet.microsoft.com/library/hh831667.aspx)
- [Group Policy](https://learn.microsoft.com/en-us/previous-versions/windows/it-pro/windows-server-2012-R2-and-2012/hh831791(v=ws.11)) in the Windows Server 2012 Technical Library at [https://technet.microsoft.com/library/hh831791.aspx](https://technet.microsoft.com/library/hh831791.aspx)
- [Netsh Commands for Wireless Local Area Network (WLAN)](https://go.microsoft.com/fwlink/?linkid=81752) in the Windows 8 Technical Library at [https://go.microsoft.com/fwlink/?LinkID=81752](https://go.microsoft.com/fwlink/?LinkID=81752)
- [Network Policy Server (NPS)](https://go.microsoft.com/fwlink/?linkid=104545) in the Windows Server 2012 Technical Library at [https://go.microsoft.com/fwlink/?LinkId=104545](https://go.microsoft.com/fwlink/?LinkId=104545) and [Network Policy Server](https://go.microsoft.com/fwlink/?linkid=93758) at [https://go.microsoft.com/fwlink/?LinkId=93758](https://go.microsoft.com/fwlink/?LinkId=93758)