Plex
- Configure Plex with the Porn DB Media Scanner Agent
- Library
- Move Media Content to a New Location
- Move the Plex Data Directory in Windows
- Restore a Database Backup
- Scheduled Server Maintenance
- Scheduled Tasks
- Where is the Plex Media Server data directory located?
- Use IMDB title to search for film
Configure Plex with the Porn DB Media Scanner Agent
- Download unzip and rename the plug in
- https://github.com/ThePornDatabase/ThePornDB.bundle/archive/refs/heads/main.zip
- download the bundle.
- If the bundle is a zip file, unzip it
- edit the file name to remove any extra text after .bundle
- The file extension should be .bundle
- Copy the plug-in bundle in the Plug-ins folder at
%LOCALAPPDATA%\Plex Media Server\Plug-ins - Restart the Plex Media Server
- Log into The Porn DB API interface and get an API token
- Edit the Plex library with the adult video files
- Under the advanced tab select "ThePornDB Scenes" or "ThePornDB Movies" agent
- Fill in the Personal API Key filed with the token obtained in step 5
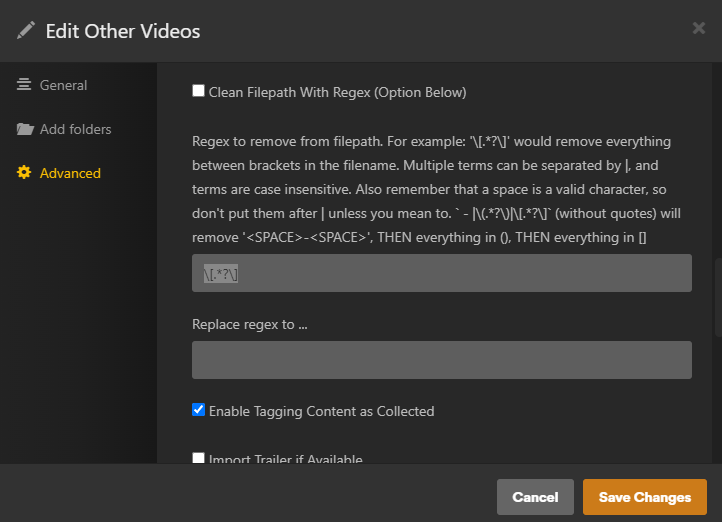
- Make sure all check boxes are cleared, except for use a Custom Title Format
- Change the Title Format to whatever you want using the correct params
- Under the Regex to remove from filepath use " \[.*?\] "
-
- Save changes and exit
- Rename the video files using the proper format
- For a successful match to your Scenes, filenames should be in the format Site YYYY-MM-DD Title (The date is the most important part) For matching movies, try to limit filename as much as possible to the actual name of the movie. Remove any 'release tags' as much as possible
- Using Whisparr to change the file names would be the easiest
- Remove video files from the library, and wait a few minutes
- Add the video files back to the library. This should cause all of the files to match properly assuming the name is correct.
Library
https://support.plex.tv/articles/200289526-library/
Normal Settings
Scan my library automatically
When a change is detected in the source location for a library’s content, the appropriate library will be scanned.
Note: This function relies on the computer’s operating system providing the “something changed” trigger. Some operating systems don’t provide this trigger and content mounted via a network will also typically not work. If your library doesn’t automatically scan, you may have to set a periodical scan or do it manually.
Scan my library periodically
Turning this on will cause your Plex Media Server to run scans on your libraries using the designated interval.
Library scan interval
Choose to scan all of your libraries on a time-based interval. Choose the interval to use from the dropdown. Available frequencies:
- every 15 minutes
- every 30 minutes
- hourly
- every 2 hours
- every 6 hours
- every 12 hours
- daily
The scan interval is based on when the Plex Media Server is started. For instance, if you have it set to “every 6 hours” and you start your server at 12:35pm, then a scan will be started around 6:35pm.
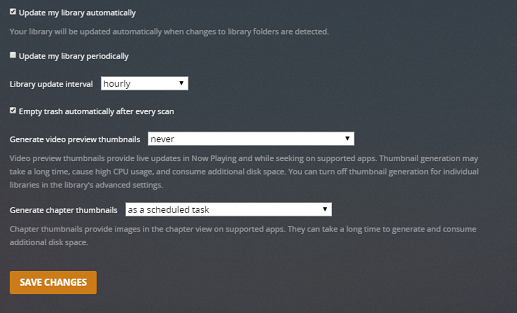
Empty trash automatically after every scan
Choose to empty the library Trash after every update. With this option enabled, when an item’s file is deleted from the drive, it will be removed from the Plex library on the next scan. Disabling this option keeps the item in the library with an indicator superimposed over the item’s poster when the item is removed.
Generate video preview thumbnails
This option creates a series of preview thumbnails from a media item when it is analyzed. Creating these images can take a considerable amount of time, CPU resources, and increase the storage space used. The images are stored in your Plex database so be careful you don’t fill the drive!
These images are used by some Plex apps when you move back and forward in an app with the timeline scrubber. They’ll also be displayed in Now Playing when someone is streaming from you so that you can see where they are in the video.
- never: Never generate thumbnails.
- as a scheduled task: Generate thumbnails during the regular server maintenance period.
- as a scheduled task and when media is added: Generate thumbnails for new items when they’re added and for existing items during the regular server maintenance period.
Warning!: Be careful about enabling this feature prior to adding a large amount of content to your library. Doing so may mean that your server will be generating index files for hours or even days.
Generate intro video markers (Plex Pass)
You can choose to have TV episodes analyzed to try and detect when the “intro” occurs during playback. When detected, apps will then offer a Skip Intro button, allowing you to quickly jump over the intro. This feature requires an active Plex Pass subscription.
- never – Never detect episode intros.
- as a scheduled task – Detect episode intros during the regular server maintenance period.
- as a scheduled task and when media is added – Detect episode intros for new items when they’re added and for existing items during the regular server maintenance period. This is the default behavior.
Generate credits video markers (Plex Pass)
You can choose to have TV episodes and movies analyzed to try and detect when “credits” occur at the end. When detected, apps will then offer a Skip Credits button, allowing you to quickly jump over the credits. This feature requires an active Plex Pass subscription.
- never: Never analyze the media to find credits.
- as a scheduled task: Perform the analysis during the regular server maintenance period.
- as a scheduled task and when media is added: Perform the analysis for new items when they’re added and for existing items during the regular server maintenance period. This is the default behavior.
Generate chapter thumbnails
Chapter thumbnails provide images in the chapter view on supported apps. They can take a little time to generate and consume very minor additional disk space.
- never: Never generate chapter thumbnails.
- as a scheduled task: Generate chapter thumbnails during the regular server maintenance period.
- as a scheduled task and when media is added: Generate chapter thumbnails for new items when they’re added and for existing items during the regular server maintenance period.
We recommend using the default as a scheduled task value.
Analyze audio tracks for loudness
Letting the server to analyze your audio (e.g. music) files for loudness information will allow you to make use of features such as leveling (often referred to as “normalizing”) the loudness as well as letting apps perform smart transitions between tracks. Analysis can cause high CPU usage, but doesn’t take very long to complete for individual tracks or albums. If you’re adding a lot of music (or creating a music library for the first time), the process could take a long time to complete.
- never: Never perform loudness analysis.
- as a scheduled task: Perform loudness analysis during the regular server maintenance period.
- as a scheduled task and when media is added: Perform loudness analysis for new items when they’re added and for existing items during the regular server maintenance period.
Analyze audio tracks for sonic features (Plex Pass)
Letting the server to analyze your audio tracks for sonic characteristics will allow you to make use of features such “Sonically Similar Albums”, “Track Radio”, and “Mixes For You”. This feature requires an active Plex Pass subscription.
Analysis requires significant CPU usage and can take a long time to finish (hours or multiple days for an existing music library, though usually just minutes for a single new album). If you’re adding a lot of music, or creating a music library for the first time, the process could take a long time to complete (hours or even multiple days).
- never: Never perform sonic analysis.
- as a scheduled task: Perform sonic analysis during the regular server maintenance period.
- as a scheduled task and when media is added: Perform sonic analysis for new items when they’re added and for existing items during the regular server maintenance period.
Location visibility
You can set who is allowed to see location names for items which contain geolocation metadata. For instance, photos taken by a mobile phone will often have GPS data embedded, which we make use of to determine where the photo was taken.
By default, only the server admin/owner account will be able to see the location information. You can optionally allow shared users to see the information, too.
OS X Specific Settings
Display notifications
Display system notifications when scanning libraries.
Advanced Settings
Click on the Show Advanced button at the top right of the settings area to toggle display of advanced settings. Be careful when adjusting or using advanced settings.
Run a partial scan when changes are detected
When changes to library folders are detected, only scan the folder which changed rather than the entire content location. This works together with the normal Update my library automatically setting (and requires that setting to be enabled).
Allow media deletion
Plex apps (signed in with the same Plex account as the Plex Media Server) will be able to delete media from the library. If you’ve granted other Plex accounts access to your your server, they will not be authorized to delete media, even with this setting enabled.
Deleted items will be immediately removed from your library and the corresponding media file will also be deleted. Most operating systems will place the file in the system Trash or Recycle Bin, but it’s possible the file will be permanently deleted immediately (particularly when deleting large numbers of items).
Warning!: Be careful enabling this setting as it allows actual source media files to be deleted from your system.
Note: Other users granted access to the Plex Media Server cannot delete media through an app, even with this option enabled. Only the server owner account can delete media.
Weeks to consider for Continue Watching
Lets you choose how many weeks to check for content to be included in the Continue Watching data for a library. The default value of 16 weeks is good for the vast majority of users. You can lower the value if your Continue Watching is particularly slow to appear. (Increasing the value can cause Continue Watching or app dashboards to be much slower to appear.)
Maximum number of Continue Watching items which will appear
Choose the maximum number of shows that can appear in Continue Watching. Setting a very high number can negatively affect performance.
Include season premieres in Continue Watching
Season premieres generally will fall outside of the number of weeks for Continue Watching for most people, since it can be several months before a new season starts. Enabled by default, this setting makes episode one of a new season appear even if it falls outside of Weeks to consider for Continue Watching setting (assuming all previous episodes are watched).
Video played threshold
Set the progress percentage for video playback at which point the video will be marked as played. (Default threshold is 90%.)
Video play completion behavior
Decide whether to use end credits markers to determine the “played” state of video items. When markers are not available the selected threshold percentage (from the above setting) will be used.
- at selected threshold percentage: Base the “played” detection solely off of the completion percentage of playback.
- at final credits marker: Mark the item played when hitting the last credits (which would be after any potential mid- or post-credits scenes).
- at first credits marker: Mark the item played when hitting the first credits (which would be before any potential mid- or post-credits scenes).
- earliest between threshold percent and first credits marker: Use the first credits marker only if it is earlier than the manually set percentage, otherwise use the manually set percentage. This is the default behavior.
Enable smart shuffling on artists and smart music playlists
This affects how shuffling works when shuffling a musical artist or smart (music) playlist. When enabled, playback will prefer highly rated, popular, and less recently heard tracks. When disabled, you’ll get true randomness (which, ironically, often feels less random to people).
Group albums by type (Plex Pass)
Group albums under a musical artist by the type of album (e.g. EP, Single, Compilation, Live, etc.), when the metadata is available. This feature requires an active Plex Pass subscription.
Enable iTunes plugin
Enable local iTunes library path
iTunes library XML path
You can enter the full path to the main XML file for your iTunes library. This is typically only necessary if the iTunes library is in a non-standard location. This is for importing iTunes Playlists
Note: From iTunes Version 12.2 and later the library XML file is not created by iTunes. You must enable it in iTunes advanced preferences. https://support.apple.com/en-us/HT201610
Run scanner tasks at a lower priority
On low-powered systems (e.g. ARM-based NAS devices), it can be beneficial to run scanner tasks at a lower priority than other tasks. This can help ensure they do not interfere with regular streaming.
Marker source
Credits markers can be generated locally and/or retrieved via an online database. Online markers may not always exist, if this preference is set to ‘both’ then any locally detected markers are submitted anonymously back to the online database for future use.
- both, try online first: Your server will first check online to see if any matching marker information already exists. If it exists, the online information will be used. Otherwise, your server will analyze the file locally (and will then contribute back online once finished). This is the default behavior.
- online only (no local detection): Your server will check online to see if any matching marker information already exists. If no matches are found, then no analysis will be performed locally.
- local detection only: If your server generates any marker information, it will not be contributed to the “cloud” data at all.
Database Cache Size (MB)
Set the size of the main database cache, in MB. The default value is 40 and should be sufficient for just about every user. Increasing much beyond the default value is likely to only benefit users with extremely large media collections (as in, hundreds of thousands of episodes or music tracks).
Move Media Content to a New Location
https://support.plex.tv/articles/201154537-move-media-content-to-a-new-location/
As your media collection grows, you might upgrade to a larger hard drive, install a NAS, or otherwise simply have a need to move your content to a new location.
Note: We always recommend Backing Up Plex Media Server Data data before making major changes to your library.
Upgrading a Hard Drive
If you’re simply upgrading to a new/larger hard drive, the easiest thing to do is to name the new location exactly the same as the original one. That means simply making sure the new hard drive is named exactly the same as the old one, and that the media files are in the same location.
The general procedure is outlined below. For this example, we’ll assume that your content is currently on a hard drive named MyMediaDrive.
- Quit/exit your Plex Media Server
- Re-name the old hard drive to a different name (e.g. OriginalMediaDrive)
- Name the new hard drive to the exact same name as the original drive (i.e. MyMediaDrive)
- Copy the content from the old drive to the new drive, making sure that the content ends up in the same relative location
- Start the Plex Media Server
If you’ve done things correctly, your server won’t even know that anything has changed and your content will work right away.
Moving Content to a New Location
If you need to move content to a new location, you’ll have to go through a few additional steps.
Preparation
Disable Emptying of Trash
On your Plex Media Server, you’ll want to disable the Empty trash automatically after every scan preference for the server.
Stop the Plex Media Server
Quit or exit the Plex Media Server so that it is no longer running.
Copy Content to the New Location
Copy your media files to the desired location. You don’t necessarily have to keep the same relative folder structure if you don’t wish to do so.
Update your Plex Media Server Configuration
Start the Plex Media Server
Once your content is available on the new location, start your Plex Media Server.
Launch Plex Web App
Open your Plex Web App and you should see your libraries, though your content is unlikely to work yet.
Edit Your Libraries
In order to update the content location for your media, you’ll need to Edit a library and then add the appropriate folder for where your content is now located. Leave the existing/previous folder location in there for now.
You’ll need to do this for each of your libraries, but you should probably complete the process for one at a time.
Update the Library
After adding the new content folder, a scan of the library will probably start. If not, simply do a standard Scan Library Files.
The server will examine the contents of the new location and associate the content with the existing media items in your library.
Remove Old Content Location
Once everything is completed and you’ve verified that things are working correctly and you can access your content, you can remove the old content location for your libraries. To do so, Edit the library and remove the old/previous folder location.
Once removed, you may need to empty your library trash in order to remove the entries where the content was stored at the old content location.
Move the Plex Data Directory in Windows
To change the Plex data directory in Windows, use the following steps:
- Log onto your Plex server as the user account that is running the Plex Media Server instance.
- Stop the Plex instance running on the server by right-clicking the Plex system tray icon and the select Exit. If Plex is running as a service, you should just stop that service.
- Click the Start button and type services.msc – the Services app should be displayed in the search results. Right-click the Services app and select the Run as administrator option.
- In the Services list, scroll down until your see the Plex Update Service service. Right-click the service and select the Stop option from the context menu.
- Open Windows Explorer and navigate the Plex data directory, which is here by default:
%LOCALAPPDATA%\Plex Media Server
- Copy the contents of the Plex data directory to the new location, for example:
M:\Plex\Plex Media Server
The copy process can take several hours, depending on the size of your media library. - Once the copy has completed, click the Start button and type regedit.exe and the open the registry editor.
- Navigate to the following key in the registry:
HKEY_CURRENT_USER\Software\Plex, Inc.\Plex Media Server
- If the value LocalAppDataPath does not exist in the list on the right, right-click an empty area in the list and select New->String Value. Name the value LocalAppDataPath.
- Double-click the LocalAppDataPath value and enter the path to the new Plex data directory. Do not include the Plex Media Server folder in the path. For my example above, the LocalAppDataPath data value will be:
M:\Plex

The Plex LocalAppDataPath value in the Windows registry - Close the registry editor.
- Restart the computer to have all the Plex services and processes restart and begin to use the new data directory location.
Notes about moving the data directory in Windows
While moving the Plex data directory can be done, there are a few points to consider before moving the directory:
- The file system where the data directory is located must be NTFS.
- The data directory cannot be located on a network share.
- Don’t point the data directory to the root directory of a drive – specify a folder on the drive.
- For performance, you may want to ensure the data directory is on an SSD, and not a spinning hard disk.
The above sections outline how to move the Plex data directory in Windows to a new location. If the system drive in your server is low on drive space, moving the Plex data to another drive could help free up much needed space.
Restore a Database Backup
https://support.plex.tv/articles/202485658-restore-a-database-backed-up-via-scheduled-tasks/
One of the many Scheduled Tasks that a Plex Media Server performs is to make regular backups of the core databases, which hold things such as your viewstate information and media matching details.
Finding the Database Backups
The location of the database backups will vary by operating system. Unless you’ve altered the location via the Backup directory advanced setting, you’ll find the backup files under the Plug-in Support/Databases subdirectory inside the normal server data directory.
The database backups will have the date in the filename and will be named along the lines of:
com.plexapp.plugins.library.db-2020-05-31
com.plexapp.plugins.library.db-2019-06-01
and
com.plexapp.plugins.library.blobs.db-2020-05-31
com.plexapp.plugins.library.blobs.db-2019-06-01Restoring a Backup
Once you’ve found the backup you wish to use:
- Stop/quit your Plex Media Server
- Move the following files out of the directory and store them somewhere for backup, just in case. (You don’t want the “-shm” and “-wal” files to remain in the databases directory when restoring the corresponding database.)
com.plexapp.plugins.library.db
com.plexapp.plugins.library.db-shm
com.plexapp.plugins.library.db-wal
and
com.plexapp.plugins.library.blobs.db com.plexapp.plugins.library.blobs.db-shm com.plexapp.plugins.library.blobs.db-wal - Duplicate the database backup file into the correct directory and then rename them to
com.plexapp.plugins.library.dbandcom.plexapp.plugins.library.blobs.db. - Ensure that Plex Media Server has read/write permissions to the restored database file(s) (e.g. in a Linux install, the
plex:plex(user:group) needs access) - Start your Plex Media Server
Scheduled Server Maintenance
https://support.plex.tv/articles/202197488-scheduled-server-maintenance/
Your Plex Media Server can be scheduled to perform certain maintenance tasks for you. Tasks that can be included in maintenance:
- Automatically back up your critical watched/unwatched/progress viewstates for your Libraries
- Optimize the database
- Clean up remnants of removed Library items
- Refresh local metadata to pick up subtitles, artwork, and more
- Perform a standard Library Update on your Libraries
- Keep your media analysis up to date
- Keep music libraries up to date with concert info and popular tracks
How to Enable Scheduled Tasks
Turning on your Scheduled Tasks is easy. In your Plex Web App, simply go to Settings > Server > Scheduled Tasks.
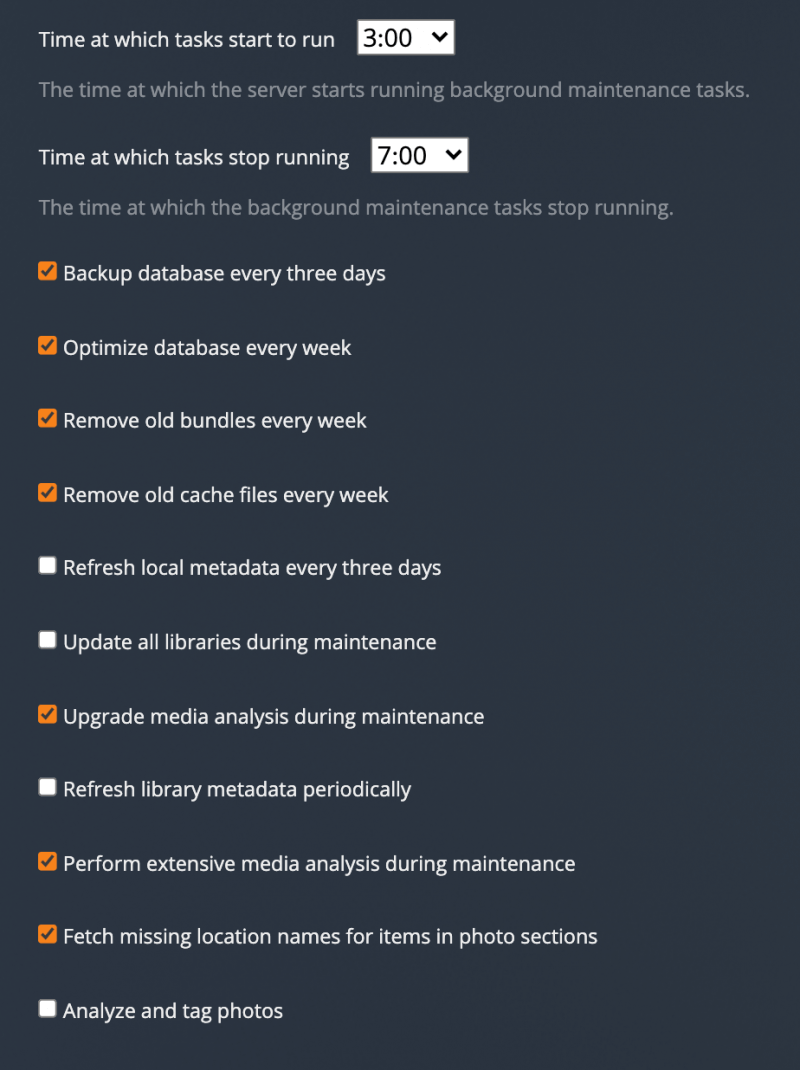
- Choose the start and end times for maintenance (these are based off the local time on your Plex Media Server)
- Choose the tasks you wish to enable
- Save the changes
Most people will want to schedule the maintenance to occur either while they sleep or perhaps while they’re away from home at work. Typically, a 3-4 hour window for maintenance is more than sufficient.
Note: Due to the way scheduling is calculated, tasks which occur every three days or every week may not occur for the first time until a few days after scheduling is enabled.
Available Tasks
Optional Settings
There are multiple tasks available that you can have performed during maintenance. We recommend leaving the default settings checked, aside from choosing the start and end time appropriate to you.
- Schedule the beginning and ending time
- Back up database every three days
- Optimize database every week
- Remove old bundles every week
- Remove old cache files every week
- Refresh local metadata every three days
- Update all libraries during maintenance
- Upgrade media analysis during maintenance
- Refresh (music) metadata periodically
- Perform extensive media analysis during maintenance
- Backup directory location (advanced)
For details on the available settings, see the documentation for the Plex Media Server settings.
Other Tasks Performed During Maintenance
In addition to the settings you can enable or disable directly, there are some other tasks that might also get performed during the maintenance period.
Chapter Thumbnail Generation
Depending on your setting for the Generate chapter thumbnails setting, they may get created during the maintenance period as part of your scheduled tasks. You may notice increased CPU usage when the thumbnails are generated, particularly on lower-powered systems.
Video Preview Thumbnail Generation
If you have set your server to generate Video Preview Thumbnails, those may get created during the maintenance period. Creation of these thumbnails is an intensive process and may cause high CPU usage during the generation.
Scheduled Tasks
https://support.plex.tv/articles/201553286-scheduled-tasks/
Plex Media Server settings related maintenance performed via Scheduled Tasks. You can access these under Settings > Server > Scheduled Tasks in Plex Web App.
Normal Settings
Note: Due to the way scheduling is calculated, tasks which occur every three days or every week may not occur for the first time until a few days after scheduling is enabled.
Schedule Time
You can choose the (local to the server) hour at which the background maintenance tasks should start and end. This defaults to starting at 3am and ending at 6am.
Backup database every three days
Every three days, a backup of your core SQL database file will be created (if it is not already corrupted). This is the database that holds your media viewstate and other critical information. A backup can help protect against corruption which can occur in rare cases when a machine is powered down unexpectedly, for example.
Up to three backup copies will be kept in a rotating manner.
Warning!: This is only a backup of your core database; it is not a backup of all of your metadata content. This should not be considered a replacement for having a backup of your Plex Media Server data.
Optimize database every week
This task ensures the database is running as quickly as possible. Especially after lots of additions or deletions, the database can get slowed down.
Remove old bundles every week
Metadata information, artwork (posters, banners, art, etc.), and similar data are stored in “bundle” packages. When a media item is removed from the library, the bundles retained temporarily by default so that the item can be easily restored if desired. This task removes the bundle packages associated with items no longer in your library.
Remove old cache files every week
When the image processor inside the Plex Media Server processes images (e.g. to resize them), a cached version of the transformed file is kept around for quick access later. This task cleans up files which were created over a month ago.
Refresh local metadata every three days
If you add a new local subtitle or cover art file, the local media agent will pick this up and insert it into the library. This usually happens on-the-fly if the server has detected a change in the directory time. However, it adds a second or two when choosing an item in your library before it appears, so doing it at night ensures things are speedy during the day.
This setting does not download new metadata for your content.
Update all libraries during maintenance
(Disabled by default.) This will run a standard scan on your libraries during the maintenance period, to find new content. It will not force a refresh of metadata for existing content.
Upgrade media analysis during maintenance
We do extensive media analysis on every file to ensure correct playback across the huge range of devices and apps. Occasionally we fix a bug in media analysis, or update things to capture some additional data. Similar to local metadata, this is computed on the fly when needed, but it can add a delay when selecting an item. This task ensures analysis is always up to date.
Refresh metadata periodically
Over the course of the month, the server will refresh the metadata for musical artists and TV shows in your library. This will help ensure that your artists have good tour date information (if you’ve enabled that feature) and that Plex Pass users of music libraries will automatically get new lyrics from LyricFind (if that’s enabled), for instance.
Note: This metadata refreshing currently only occurs for music and TV libraries (assuming the library is on the latest metadata agent).
Perform extensive media analysis during maintenance
This does an extensive bitrate analysis on each file in your library to help with bandwidth controls.
Fetch missing location names for items in photo sections
If you’ve enabled the Save location names preference for a Photo library, this lets the server get the names for locations, based on the geo data embedded in the photos.
Advanced Settings
Click on the Show Advanced button at the top right of the settings area to toggle display of advanced settings. Be careful when adjusting or using advanced settings.
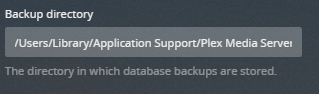
Backup directory
If you wish, you can alter the location where the backups of the SQL database file are stored. Enter the full path to the desired location. As noted above, this should not be considered a replacement for real backups.
Note: If you modify the backup location, you must first create the specified directory (Plex Media Server will not create the directory automatically).
Where is the Plex Media Server data directory located?
https://support.plex.tv/articles/202915258-where-is-the-plex-media-server-data-directory-located/
The main Plex Media Server data directory location will vary based on your operating system. Below are the default locations.
Windows
On Windows, the content is located inside of the user directory.
%LOCALAPPDATA%\Plex Media ServermacOS
Using the Finder’s “Go” menu, select Go To Folder… then enter the following in the dialog box that pops up:
~/Library/Application Support/Plex Media Server/Linux and Other Devices
General
In general, the location for the various Linux versions of Plex Media Server will be found under:
$PLEX_HOME/Library/Application Support/Plex Media Server/ASUSTOR
/volume1/Plex/LibraryDebian, Fedora, CentOS, Ubuntu
/var/lib/plexmediaserver/Library/Application Support/Plex Media Server/Docker
The location for the data directory for Plex Media Server when running Docker will depend on what you specified when setting up the Docker container. See our normal Docker container documentation on GitHub.
FreeBSD
/usr/local/plexdata/Plex Media Server/FreeNAS
FreeNAS 11.3 or newer
${JAIL_ROOT}/Plex Media Server/FreeNAS 11.2 or earlier
${JAIL_ROOT}/var/db/plexdata/Plex Media Server/NVIDIA SHIELD
In a default installation, you will not be able to access the Plex Media Server data directory when running on NVIDIA SHIELD. In order for you to have access, you need to choose to move the storage location for the server. Specifically, when moving the data, you must choose either Internal Storage (user accessible storage location) or a removable drive that you’ve connected to the SHIELD.
Use a standard method to connect to the NVIDIA SHIELD to access the storage, such as that outlined in our “Accessing SHIELD Storage” article. The path to the server data will vary, depending on whether you chose to move to the user-accessible internal storage or to a removable drive that you connected to the device.
- “Internal Storage” path:
/Internal/Android/data/com.plexapp.mediaserver.smb/Plex Media Server/ - “Removable” storage path (where
[removable drive name]is the name of the removable drive, such as “Media“):/[removable drive name]/Android/data/com.plexapp.mediaserver.smb/Plex Media Server/
QNAP
The exact data directory location can vary from system to system. To access it, connect to the Console of QNAP via SSH and then enter:
getcfg -f /etc/config/qpkg.conf PlexMediaServer Install_pathFrom the result given to you, then add /Library/Plex Media Server to the end of it. You might end up with a path like the following (this is just an example!):
/share/CACHEDEV1_DATA/.qpkg/PlexMediaServer/Library/Plex Media ServerReadyNAS
/apps/plexmediaserver/MediaLibrary/Plex Media Server/Seagate
The exact install location can vary from system to system. To access it, first enter the appropriate rainbow container, from the command line:
sudo rainbow —enter com.plex.plexmediaserverOnce in, you can go to the data directory:
/data/plex_conf/Library/Application Support/Plex Media ServerSnap
/var/snap/plexmediaserver/common/Library/Application SupportSynology
DSM 7
/volume1/PlexMediaServer/AppData/Plex Media ServerDSM 6
/volume1/Plex/Library/Application Support/Plex Media Server/TerraMaster
/home/plex/Library/Application Support/Plex Media ServerThecus
/raid/data/module/Plex/sys/Plex Media Server/Western Digital
/mnt/HD/HD_a2/plex_conf/Plex Media Server/Western Digital My Passport Wireless Pro:
/shares/Storage/.wdcache/.plexmediaserver/Application Support/Plex Media Server/Use IMDB title to search for film
https://support.plex.tv/articles/201018497-fix-match-match/
Search for your film using IMDB.com
once found use the ttXXXXXXXXXXXXX number to identify
user "imdb-ttXXXXX" as the search term