# pFsense
# How to Set Up IP Filtering and DNS Blackholing on pfSense Using pfBlockerNG
## What is pfBlockerNG?
pfBlockerNG has two core uses:
**Inbound & outbound traffic filtering**
pfBlockerNG can filter inbound and outbound traffic against IP lists and apply GeoIP restrictions by allowing or denying traffic to/from specific countries. The latter functionality can be very useful if you open ports on your WAN.
**Blocking ads and malicious sites through DNS blackholing**
pfBlockerNG can block ads and access to malicious sites through DNS filtering. Browsing the web, your DNS requests are checked against a blocklist. If there’s a match, the request is blocked. It’s a great way to block ads without using a proxy server.
We’re going to look at both use cases and will go into more detail as we tackle each one.
This guide assumes that you have already set up pfSense with functional WAN and LAN interfaces.
[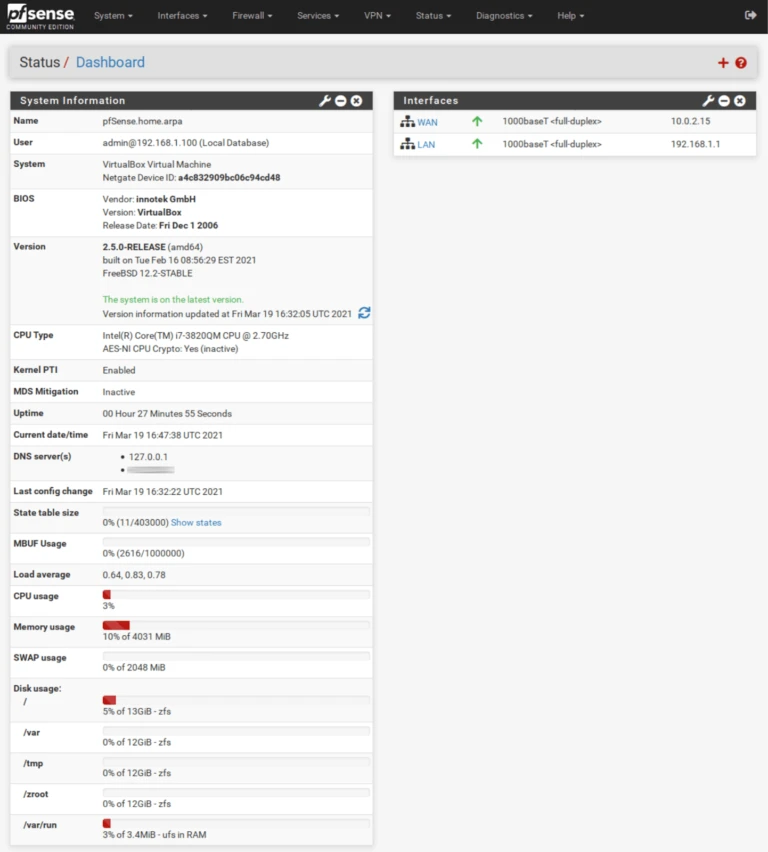](https://docs.coltscomputer.services/uploads/images/gallery/2024-01/51gqln3wlaxR3AOr-1-wan-lan-768x852.webp)
Let’s get started.
## Installing pfBlockerNG-devel
The first thing we need to do is install pfBlockerNG.
## Basic Setup
Now that **pfBlockerNG-devel** is installed, we need to configure our package. And we’re going to start with IP and GeoIP filtering.
We’ll be configuring **pfBlockerNG** section by section. Any settings that are not mentioned should be left at their default values.
### General / General Settings
1. Check the **Enable** box displayed to the right of pfBlockerNG. This enables the service.
2. Click **Save** at the bottom of the page.
3. We will leave the other settings on this page at their default values.
[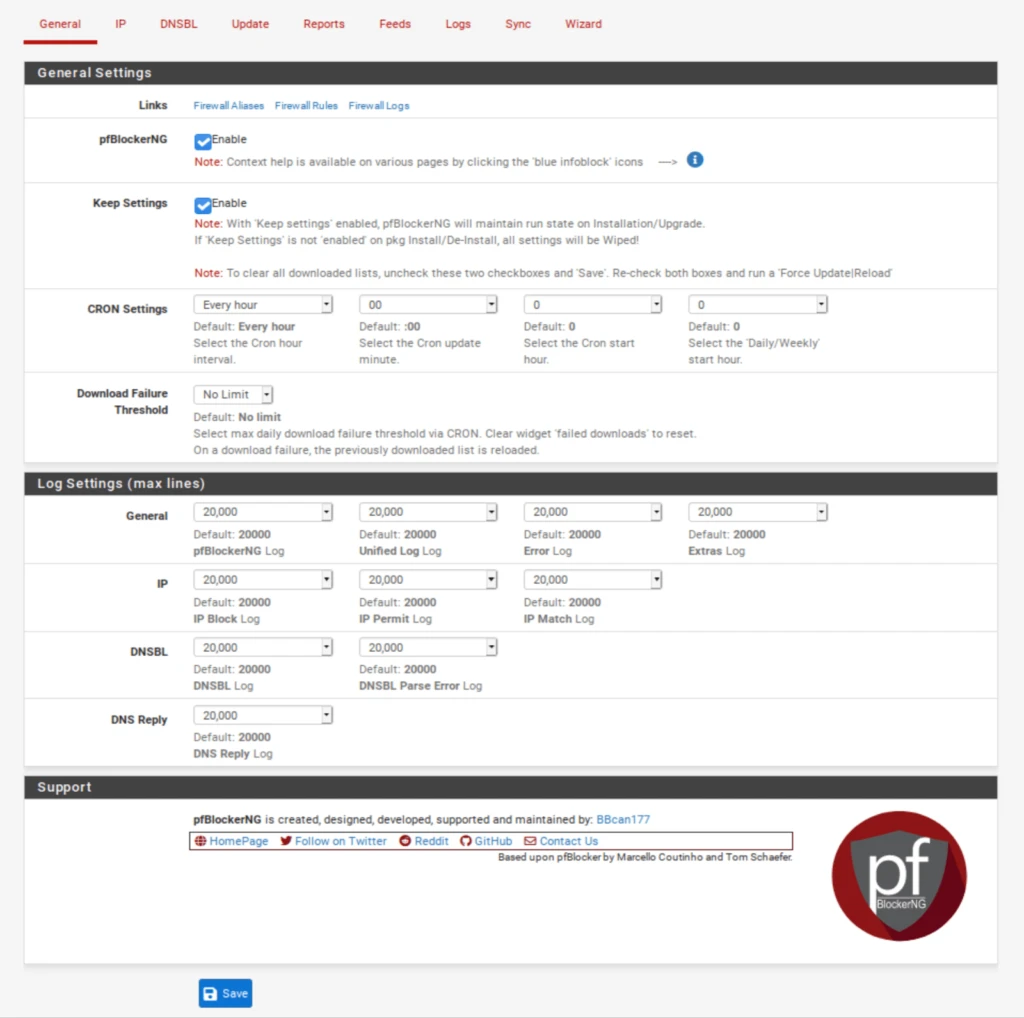](https://docs.coltscomputer.services/uploads/images/gallery/2024-01/0ZEJni3vI4ArFa9g-enablepfblocker-1024x1018.webp)
## IPv4 Filtering
### IP / IP Configuration
1. Select the **IP** tab to access the **IP** settings page. Don’t touch the sub-menus that appear below for now.
2. Enable **De-Duplication**. This will resorb duplicate entries if you are using multiple IP feeds.
3. Enable **CIDR Aggregation**.
4. Enable **Suppression**. Suppression makes sure that your local subnets are not blocked.
[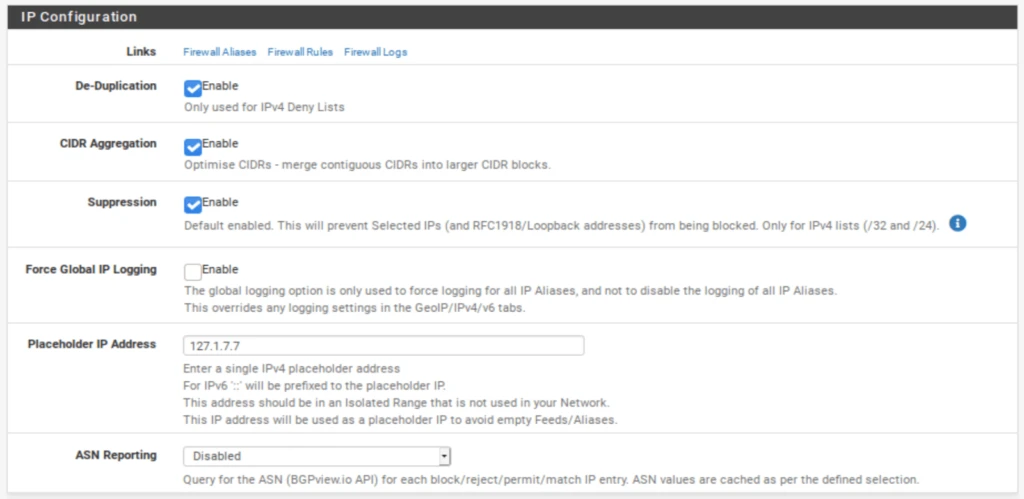](https://docs.coltscomputer.services/uploads/images/gallery/2024-01/JmcfIlJPjEkyUpa3-ipconfiguration-1024x499.webp)
### IP / MaxMind GeoIP configuration
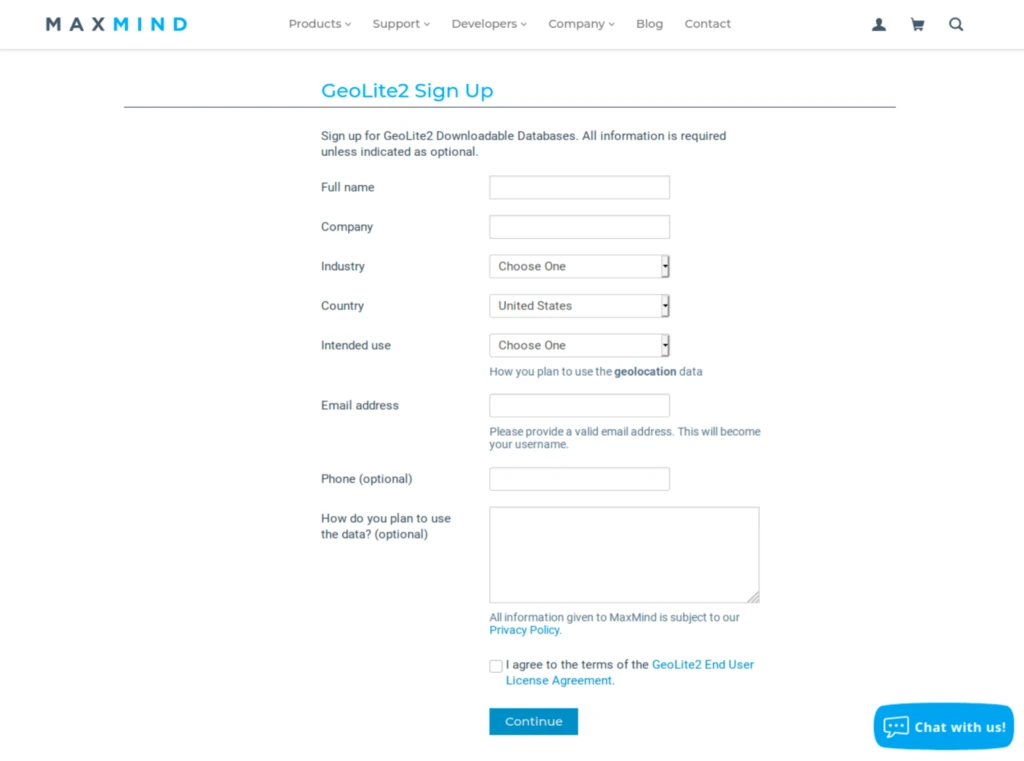
As I mentioned above, the GeoIP feature of pfBlockerNG enables you to filter traffic to and from entire countries or continents. To do this, pfBlocker uses the MaxMind GeoIP database, which requires a license key. A link in the MaxMind License Key field description takes you to the MaxMind registration page. The **MaxMind license key** is free.
Fill out the registration form to obtain your license key. Once you have your license key, insert it in the MaxMind License Key field.
[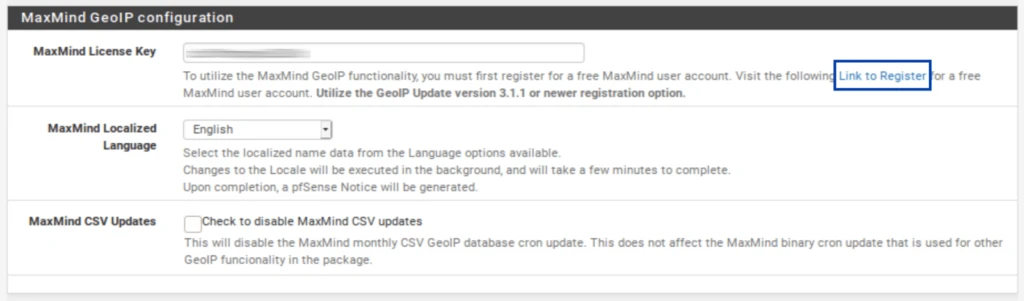](https://docs.coltscomputer.services/uploads/images/gallery/2024-01/loHIKtTKDn1F2vPc-maxmindgeoipconfiguration-1024x301.webp)
And:
[](https://docs.coltscomputer.services/uploads/images/gallery/2024-01/kFNJco0EpdjRVv8B-maxmindregistration-1024x761.webp)
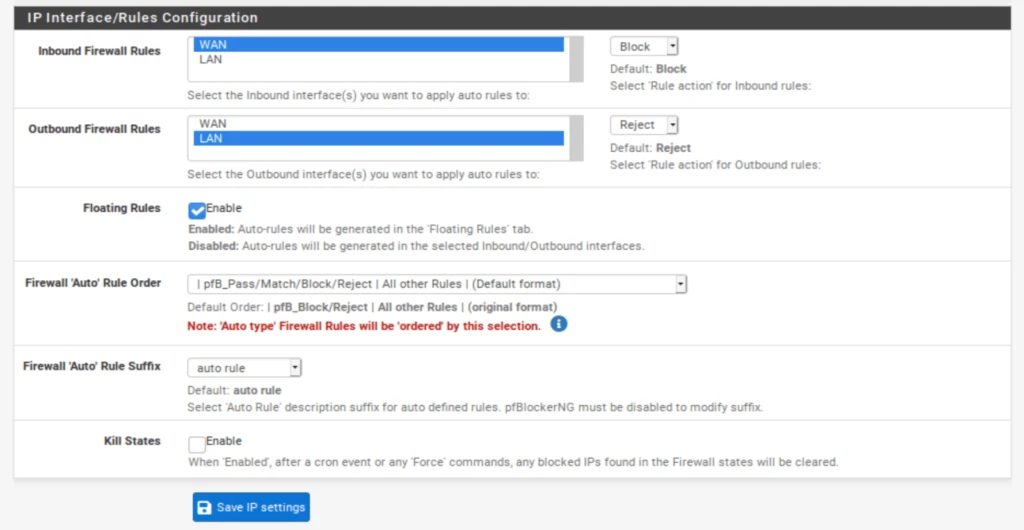
### IP / IP Interface/Rules Configuration
This section determines which inbound and outbound interface(s) pfBlockerNG’s IPv4, IPv6, and GeoIP filtering are applied.
1. Select **WAN** from the **Inbound Firewall Rules** field (and any other WAN interfaces you may have and want to filter).
2. Select **LAN** from the **Outbound Firewall Rules** field (and any other LAN-type interfaces you may have and want to filter).
3. Enable **Floating Rules**. Floating rules are special firewall rules applied before the regular firewall rules. This ensures that pfBlockerNG’s filtering happens as soon as the traffic hits the firewall. The other benefit is that pfBlockerNG will automatically create the floating rules for you.
4. Click **Save** at the bottom of the page.
[](https://docs.coltscomputer.services/uploads/images/gallery/2024-01/X7oT2TCKBlqki0jL-interfaceconfiguration-1024x530.webp)
### Adding IPv4 Feeds
It’s now time to add some blocklists to pfBlockerNG. While you’re free to add your custom feeds, pfBlockerNG has some built-in feeds we can enable (the terms list and feed are interchangeable in this context).
This is very practical because hunting down blocklists on the internet is time-consuming, and many do not work or are no longer maintained. The feeds within pfBlocker are live lists that are regularly updated, so we’re going to use those.
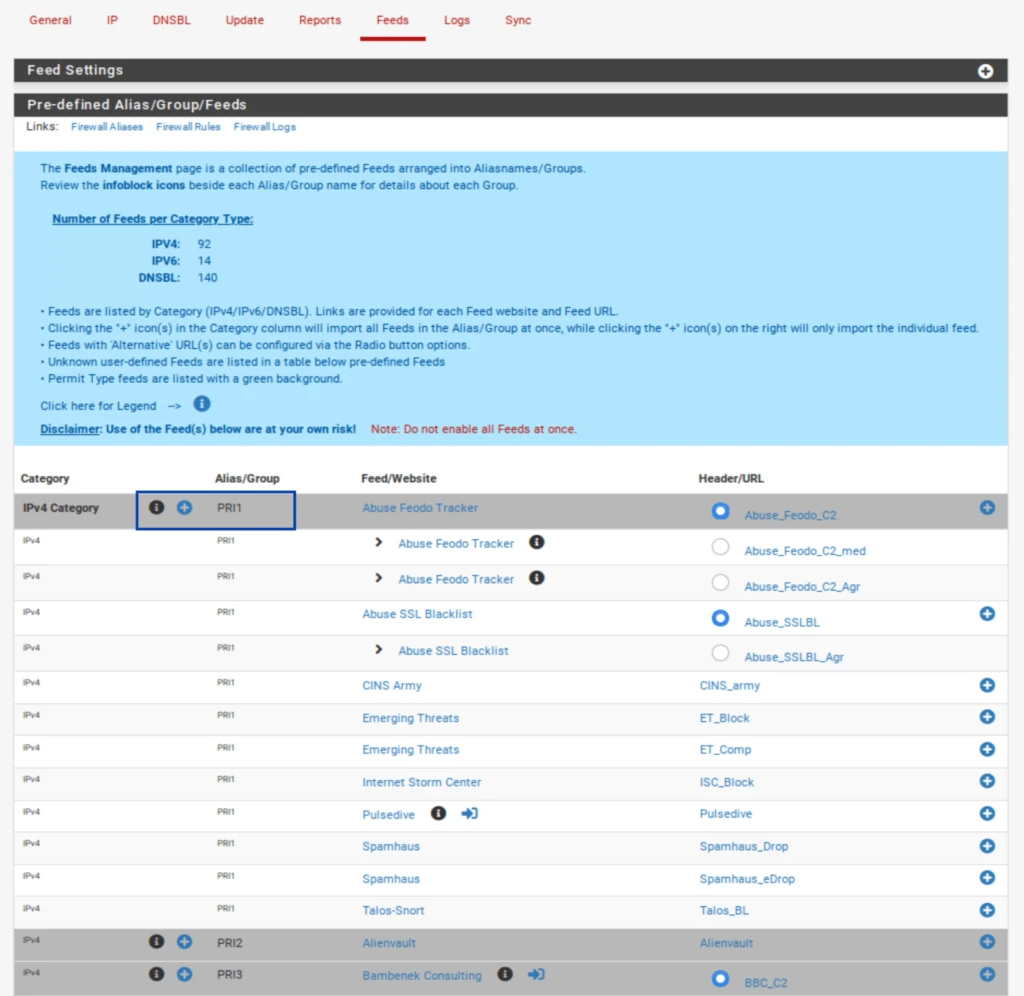
1. Select the **Feeds** tab.
2. Click the blue +, next to **PRI1**. It is the first listing. PRI1 is a collection of feeds, so it comprises several feeds, as we’ll see in a moment. Once you click the blue +, you’re taken to the **IP / IPv4** page, where your selected feeds are listed. And almost all of the relevant fields are automatically populated.
[](https://docs.coltscomputer.services/uploads/images/gallery/2024-01/QRVn3o0SknRETS3r-feedstab-1024x996.webp)
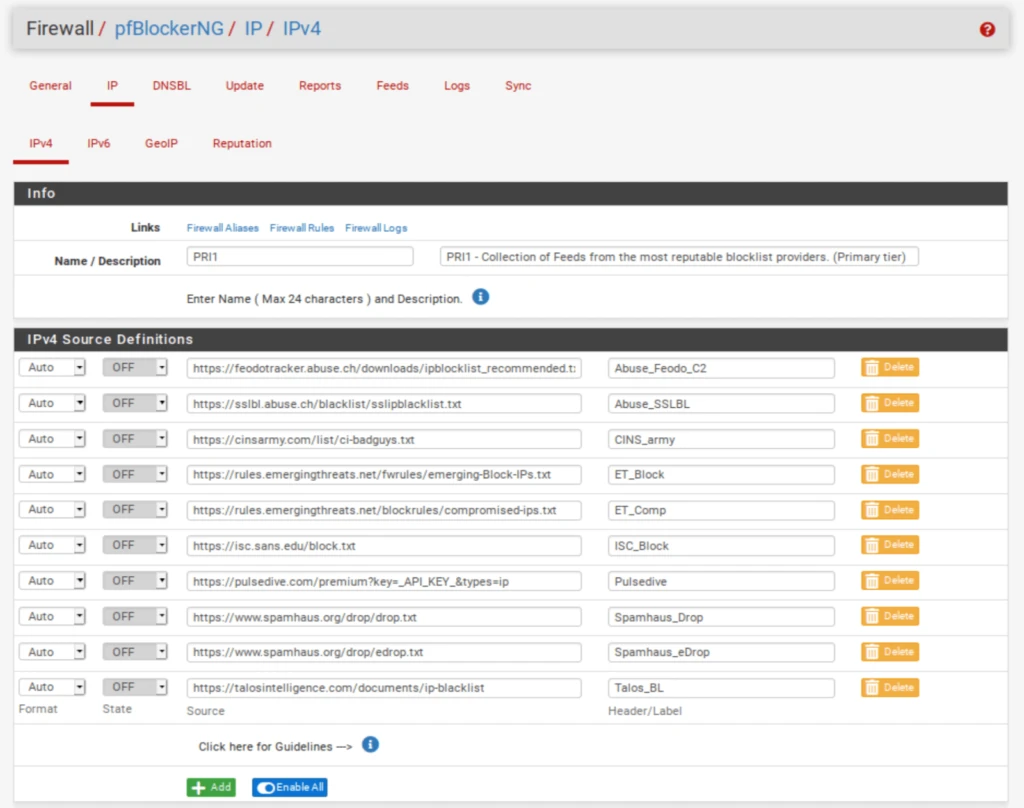
### IP / IPv4
The name of the feed collection is populated along with its description. The feed URLs included in the collection and their associated descriptions are also populated. However, our feeds are set to **OFF** by default. We need to enable them.
[](https://docs.coltscomputer.services/uploads/images/gallery/2024-01/UE75LrLUFEmCib7J-ipv4lists-1024x808.webp)
But before doing that, we need to delete one of the feeds from the PRI1 collection. Pulsedive, the 7th feed from the top, is a premium list that requires a paid API key. We’re not going to get the API key for this tutorial. Click the **Delete** button.
[](https://docs.coltscomputer.services/uploads/images/gallery/2024-01/wXxYwXwFTP0q3Sn7-deletefeed-1024x37.webp)
1. Once you’ve deleted Pulsedive, set all of the feeds to **ON**. [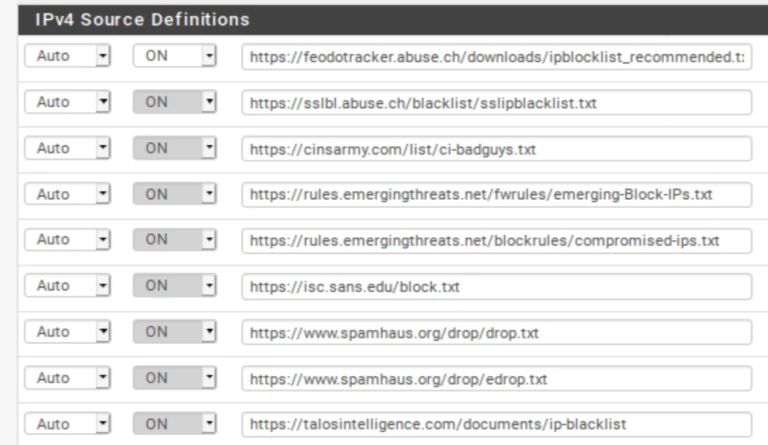](https://docs.coltscomputer.services/uploads/images/gallery/2024-01/cimiXJme8BlEqCq9-listson-768x445.webp)
2. Scroll down to the **Settings** section of the page.
3. From the Action drop-down menu, select **Deny Both**. This will block traffic to and from the IP addresses in the lists/feeds. You can choose only to deny inbound or outbound connections if you like. Just be warned that if you only deny inbound traffic and a host on your network initiates an outbound connection to one of those IPs, the inbound response from that IP will be allowed in. That may be fine depending on your environment – just be warned. For this example, I’m going to select **Deny Both**. [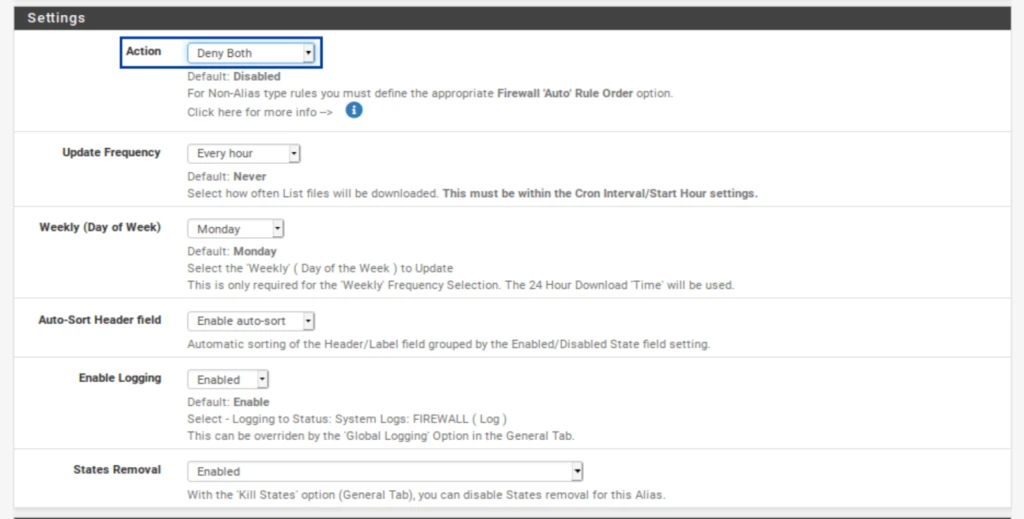](https://docs.coltscomputer.services/uploads/images/gallery/2024-01/ldIC4QwPJ1YPuZdu-ipdenyboth-1024x519.webp)
4. Click **Save IPv4 Settings** at the bottom of the page.
You can repeat the same steps for IPv6 if your ISP assigns an IPv4 and an IPv6 IP address to your WAN. Most of us are still on IPv4-only networks.
## GeoIP Filtering
Before configuring GeoIP filtering, we first need to force an update of pfBlockerNG. pfBlocker automatically updates itself at fixed intervals. But to configure GeoIP filtering, pfBlocker first needs to pull the MaxMind database, and a forced update will do just that.
1. Select the **Update** tab from the pfBlockerNG settings.
2. Click **Run**. The update starts. [](https://docs.coltscomputer.services/uploads/images/gallery/2024-01/F84nwWrf9og4B63F-updatesettings-1024x388.webp)
3. Once the update is complete, you should see **UPDATE PROCESS ENDED** at the bottom of the **Log** window below the **Update Settings**. [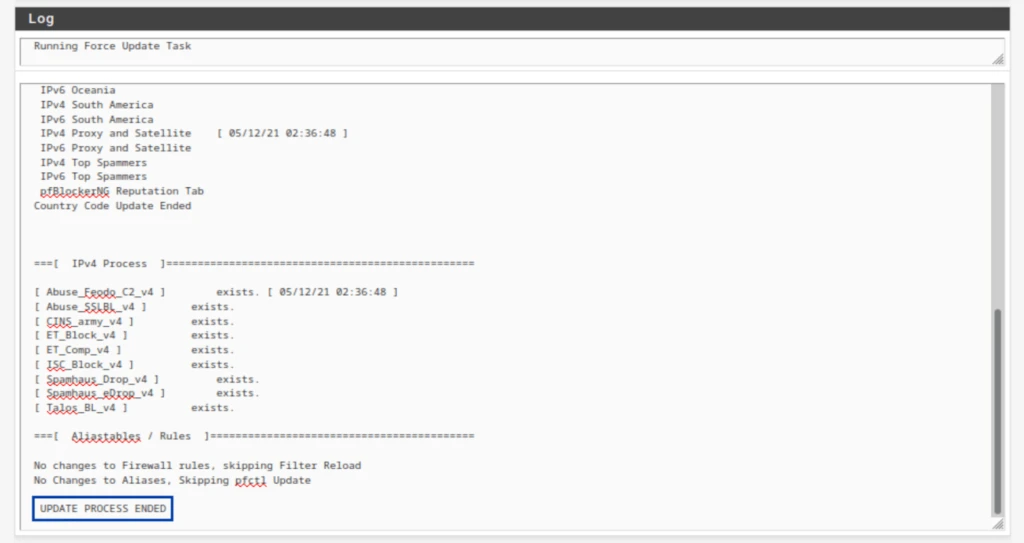](https://docs.coltscomputer.services/uploads/images/gallery/2024-01/nMGUvcW9jhswRj1S-updateprocessended-1024x543.webp)
4. Looking through the Log window, we can see that both my IPv4 feeds and the GeoIP database were updated. **IPv4 logs**
[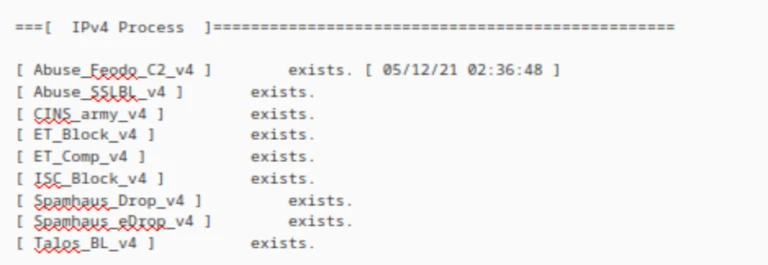](https://docs.coltscomputer.services/uploads/images/gallery/2024-01/0VZXehzZtWO36Let-ipv4logs-768x265.webp)
**GeoIP logs**
[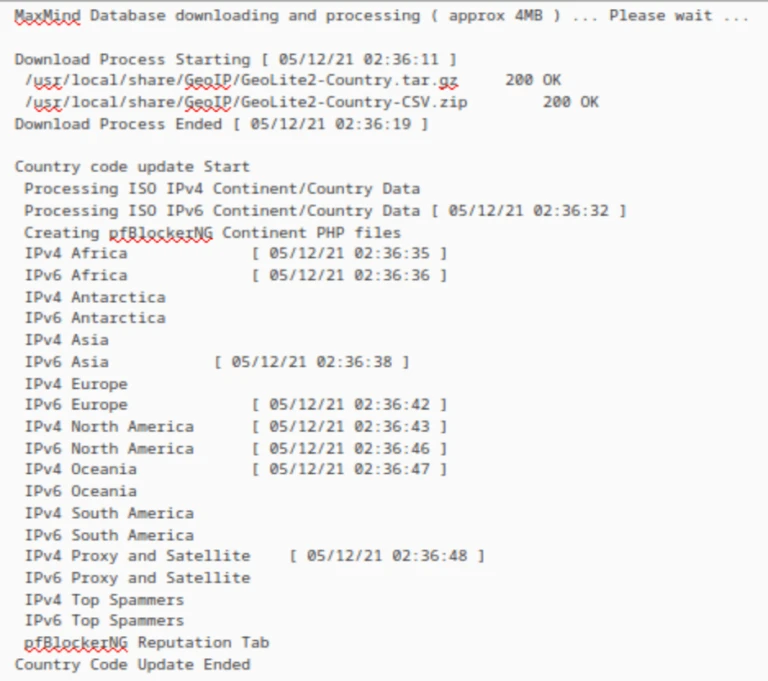](https://docs.coltscomputer.services/uploads/images/gallery/2024-01/Jp0uu2asyekUENJ9-geoiplog-768x681.webp)
5. From the **IP** tab in the pfBlockerNG settings, select the **GeoIP** sub-menu. The GeoIP Summary is displayed. [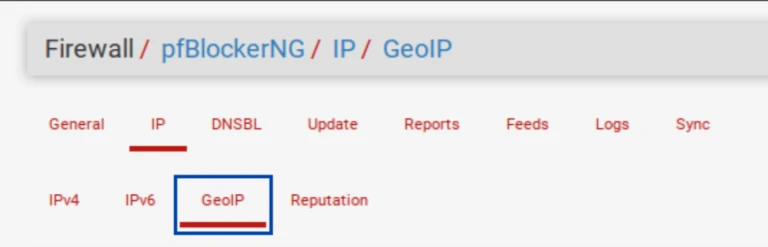](https://docs.coltscomputer.services/uploads/images/gallery/2024-01/ErV9OzKtYGnQ0OFP-geoipmenu-768x247.webp)
The GeoIP Summary consists of IP address feeds organized by continent, with two extra categories: **Top Spammers** and **Proxy and Satellite**. **Top Spammers** is a list of countries known to be a frequent source of online attacks. And **Proxy and Satellite** are known anonymous proxy and satellite providers.
You can filter traffic to/from an entire continent, or you can fine-tune the feed by selecting only the countries you want to filter.
### Customizing country lists
1. Click the **pencil icon** to the right of the feed you want to edit. [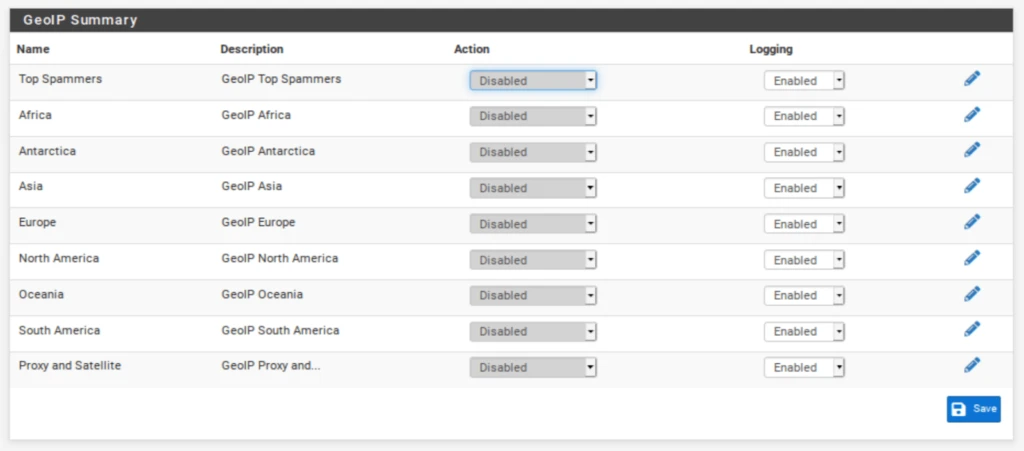](https://docs.coltscomputer.services/uploads/images/gallery/2024-01/mhYvlw7nNyOKNkpG-geoipsummary-1024x451.webp)
2. Select the countries you want pfBlockerNG to filter.
3. Click **Save** at the bottom of the page. [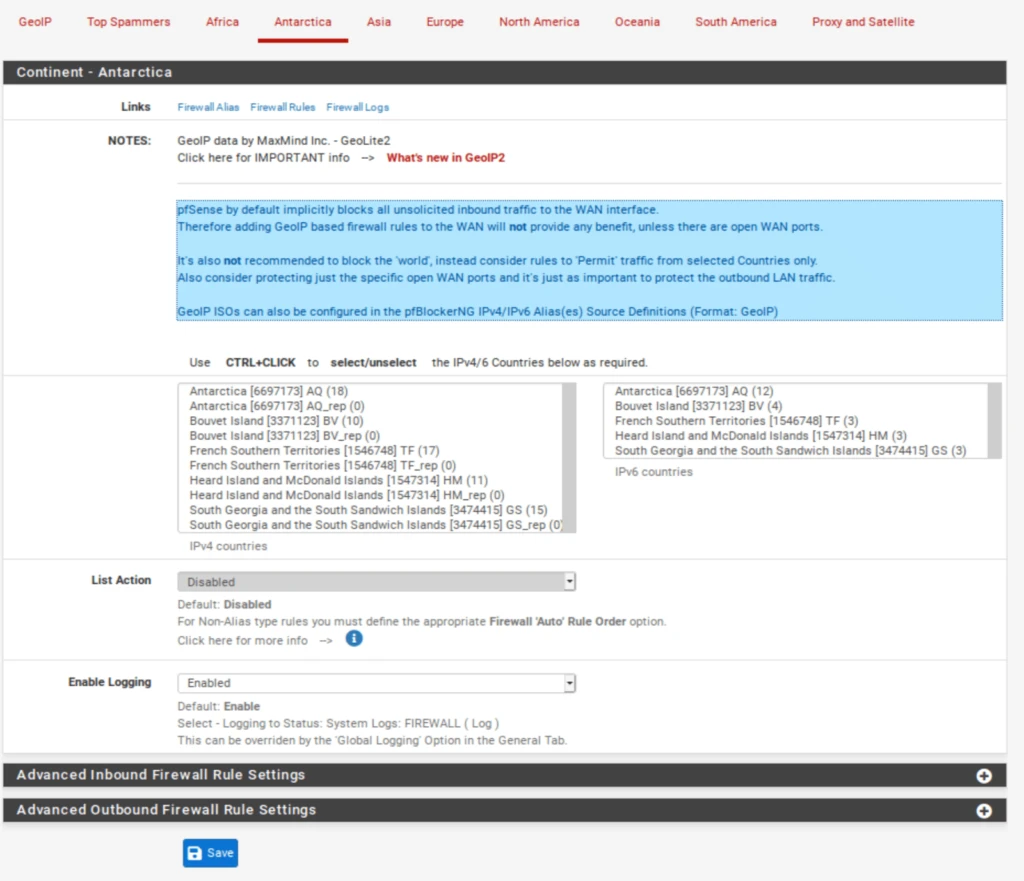](https://docs.coltscomputer.services/uploads/images/gallery/2024-01/jAWYnUPIujLGlP33-antarctica-1024x881.webp)
### Configuring country blocks
1. Go back to the **GeoIP menu** of the **pfBlocker settings**.
2. As we did with the **IPv4** lists, from the **Action** drop-down menu to the right of each field, select either **Block Inbound, Block Outbound**, or **Block Both**. [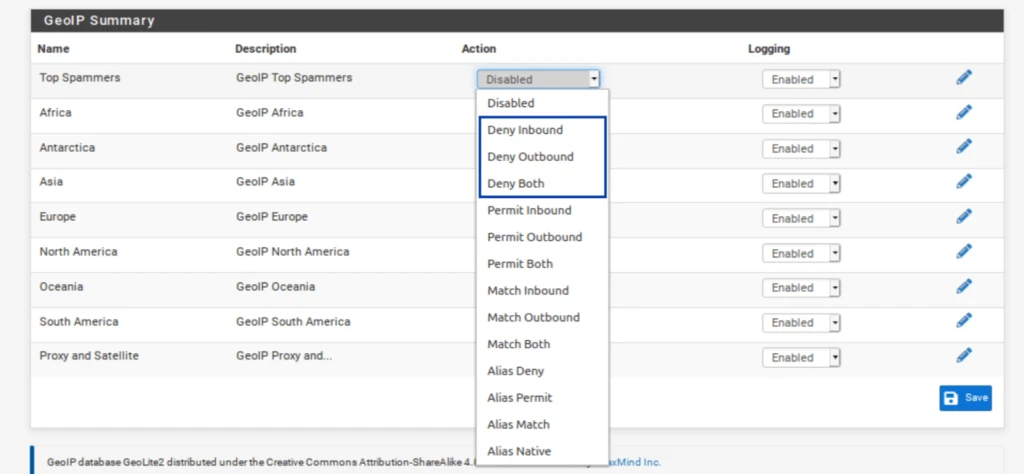](https://docs.coltscomputer.services/uploads/images/gallery/2024-01/hLx5eUsYKSsuhuO1-geoipaction-1024x474.webp)
Now, there are certain things to consider here. If you want to block outbound connections to a country or continent, go right ahead. However, if you’re thinking of blocking inbound links from a government or continent, consider that **pfSense blocks all unsolicited inbound traffic on the WAN by default**.
That means that unless you have open ports on your WAN, blocking countries or continents is useless and will only consume memory for nothing. If you have open ports on your WAN, make sure you don’t block connections from countries you want to allow to connect to your open port(s).
Aliases are IP address lists in themselves that are native to pfSense. Using aliases, you can allow only the specific countries you selected to access your open ports. However, there is a way to create custom aliases from the MaxMind GeoIP database within pfBlockerNG that can be used directly as the source in your port forwarding firewall rules.
### Creating a GeoIP alias in pfBlockerNG
Because pfSense automatically blocks any traffic that isn’t explicitly allowed in the firewall rules, we want to create an alias of the countries we will **allow** through the firewall. pfSense will block the rest by default.
1. Go to the **IPv4** sub-menu and click **Add**. [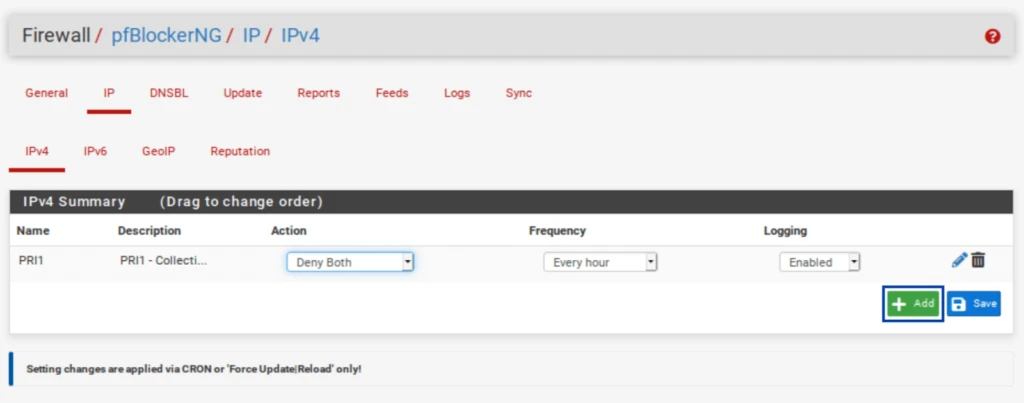](https://docs.coltscomputer.services/uploads/images/gallery/2024-01/G77S7X7IjmfTDTfx-addcustomalias-1024x403.webp)
2. Give your alias a name and a description.
3. Set the **Format** field to **GeoIP**.
4. Set the **State** field to **ON**.
Set the Action to Alias Native.
1. Type the first letters of the country you want to add to the alias. Select the countries you wish to add to the alias. The list of countries appears. [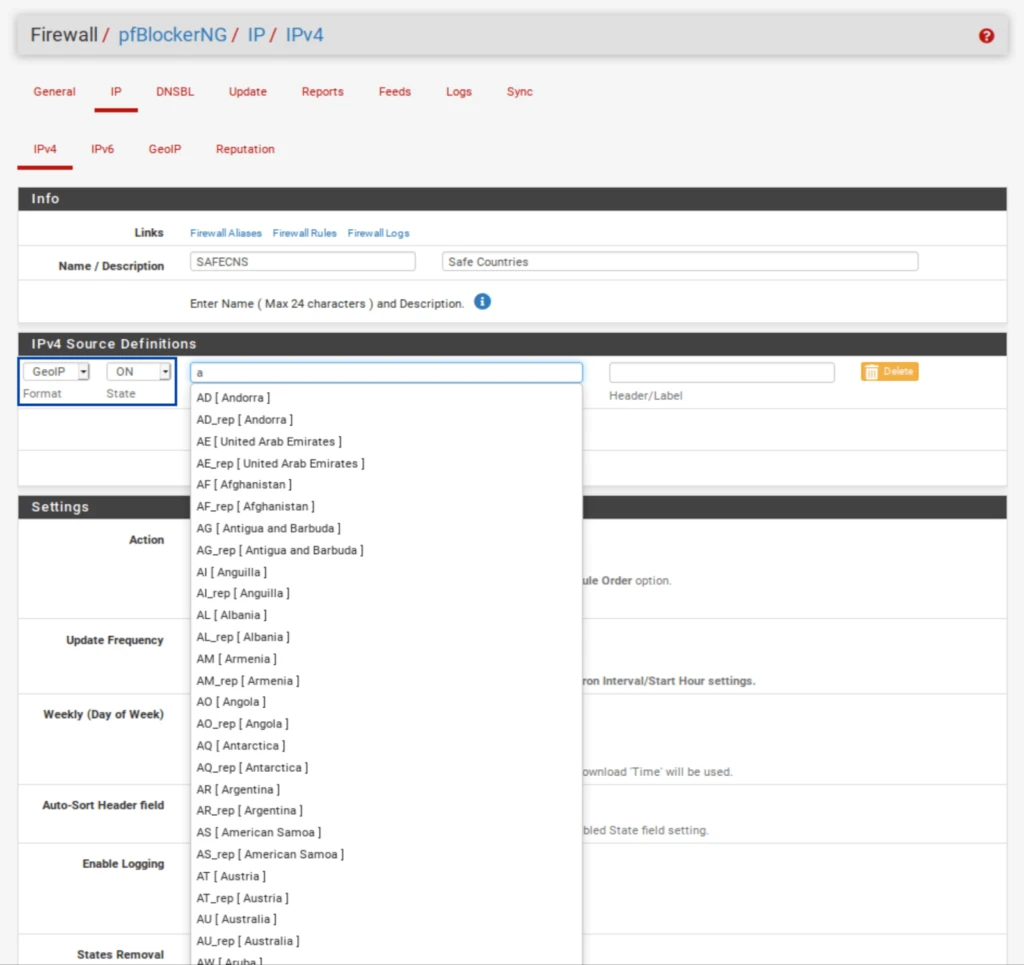](https://docs.coltscomputer.services/uploads/images/gallery/2024-01/oC5yiDlZnxnXnmVk-customaliasesstarttyping-1024x965.webp)
2. You can add more countries to your alias by clicking the green **Add** button. [](https://docs.coltscomputer.services/uploads/images/gallery/2024-01/JJM7PdlYdQ78B3nA-addcountries-1024x172.webp)
3. Set the **Update Frequency** to **Once a day**.
4. Click **Save IPv4 Settings** at the bottom of the page. Once you force an update of pfBlockerNG, your alias will be available for inclusion in your firewall rules. [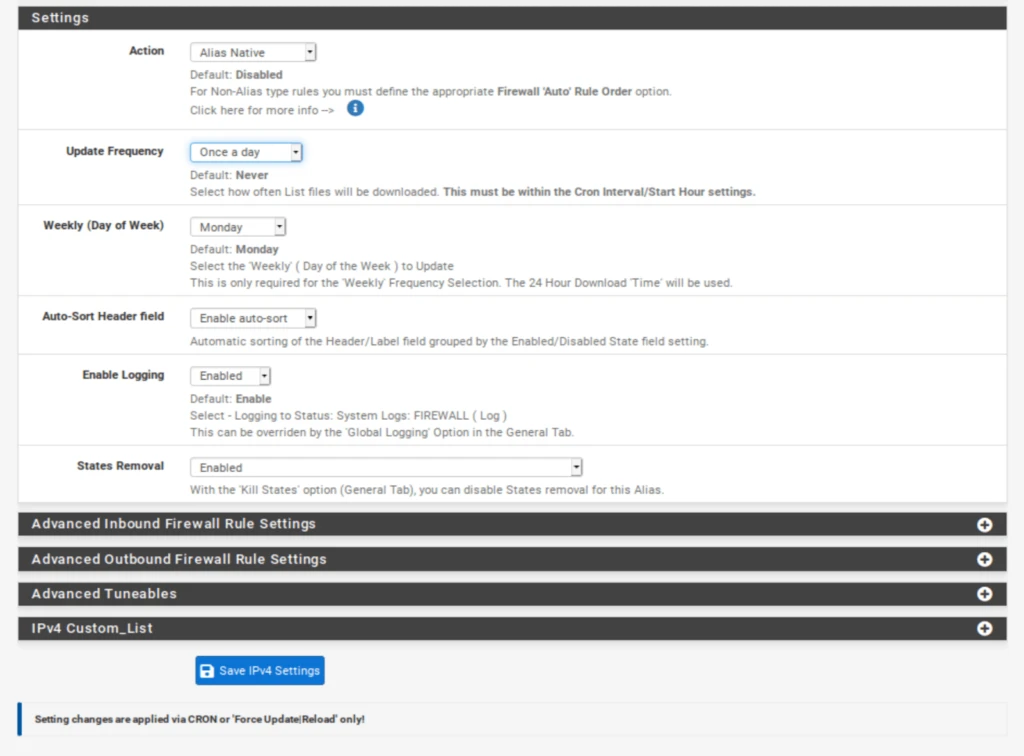](https://docs.coltscomputer.services/uploads/images/gallery/2024-01/kRMa4PRucS51kj9f-customaliassettings-1024x756.webp)
If you do have open ports but want to keep it simple, you can block inbound connections from **Top Spammers** and **Proxy and Satellite** without creating a custom alias. Remember that this is only useful **if you have open ports on your WAN**.
[](https://docs.coltscomputer.services/uploads/images/gallery/2024-01/H1uW0gzYf1IAX3K6-denyspammerssattelite-1024x449.webp)
If you do not have any open ports on your WAN, only block outbound traffic or leave GeoIP filtering disabled.
### Testing IPv4 filtering
To make sure that our traffic is being filtered. We can try to connect to a known IP address in the blocklist. If I try to access 1.13.9.177 (an IP contained in my pfBlockerNG IPv4 feeds) in my browser, the IP address does not get translated to a domain name, and I cannot connect. That’s what we want.
[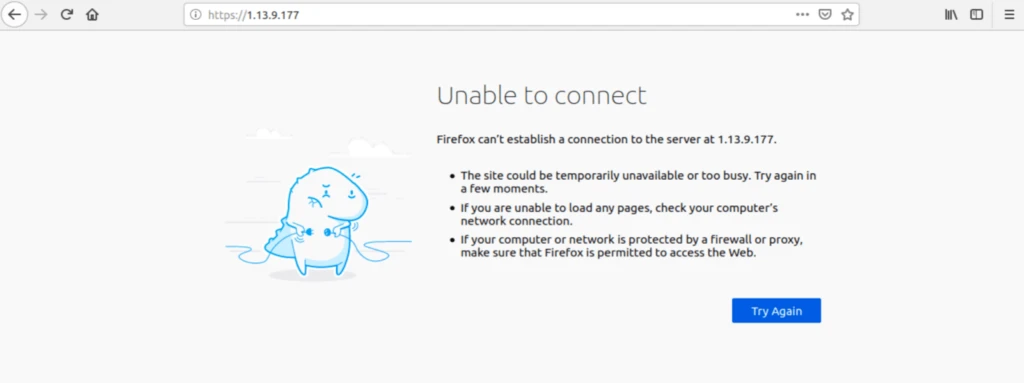](https://docs.coltscomputer.services/uploads/images/gallery/2024-01/lRpTZGQ7TplTyyan-ipv4test-1024x383.webp)
Let’s move on to configuring pfBlocker’s DNSBL.
## DNSBL
Alright. We’ve configured IPv4 filtering and GeoIP filtering, and aliases. It’s now time to move on to using pfBlockerNG for ad-blocking. Ad-blocking in pfBlockerNG is achieved through DNS blackholing. This references your DNS requests against a list of known ad networks and trackers and blocks them at the DNS level whenever there’s a match, resulting in an ad-free internet. Hooray.
To use the DNSBL feature in pfBlockerNG, you must be using the **DNS Resolver** in pfSense for your DNS resolution. That means you can’t assign your hosts’ DNS via DHCP or use the DNS Forwarder (dnsmasq) if you want to use the DNSBL feature.
By default, pfSense uses the DNS Resolver on all interfaces. So if you didn’t make any changes to the DNS Resolver settings, you’re fine. If you made changes, configure the Resolver to bind to your LAN (outgoing) and your WAN (incoming). And select any other LAN-type (OPT interfaces) and WAN-type (multi-WAN setup, VPN gateways) interfaces you want the DNSBL to filter.
[](https://docs.coltscomputer.services/uploads/images/gallery/2024-01/JouMiKLsJxJEyt2l-dnsresolver-1024x759.webp)
### Configuring DNSBL
1. Select the **DNSBL tab**.
2. strong>Enable DNSBL.
3. Next to **DNSBL Mode**, select **Unbound Python mode**. [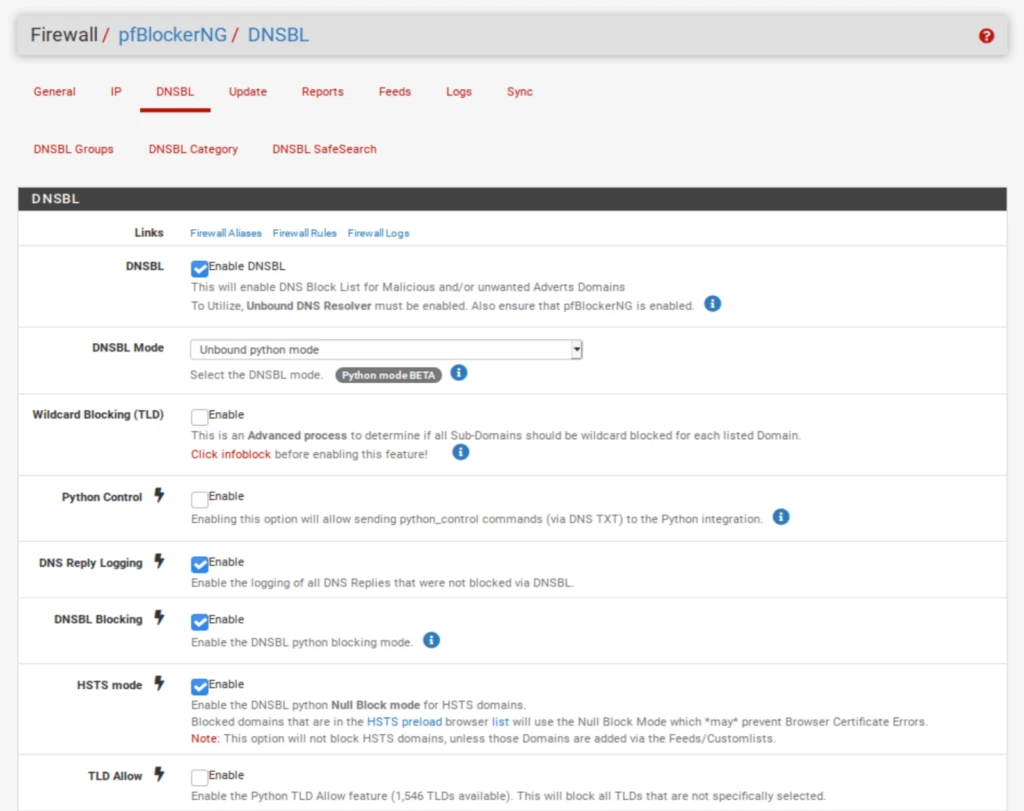](https://docs.coltscomputer.services/uploads/images/gallery/2024-01/TmtA5T2rezo4ybx2-dnsbl1-1024x811.webp)
4. Scroll down to the **DNSBL Configuration** section.
5. Enable **Permit Firewall Rules** and select your LAN and any other LAN-type interfaces you want to filter with DNSBL. This will automatically create floating firewall rules (as we did with IPv4 filtering) so that DNSBL filtering will happen as soon as traffic hits the firewall.
6. Click **Save DNSBL settings** at the bottom of the page. [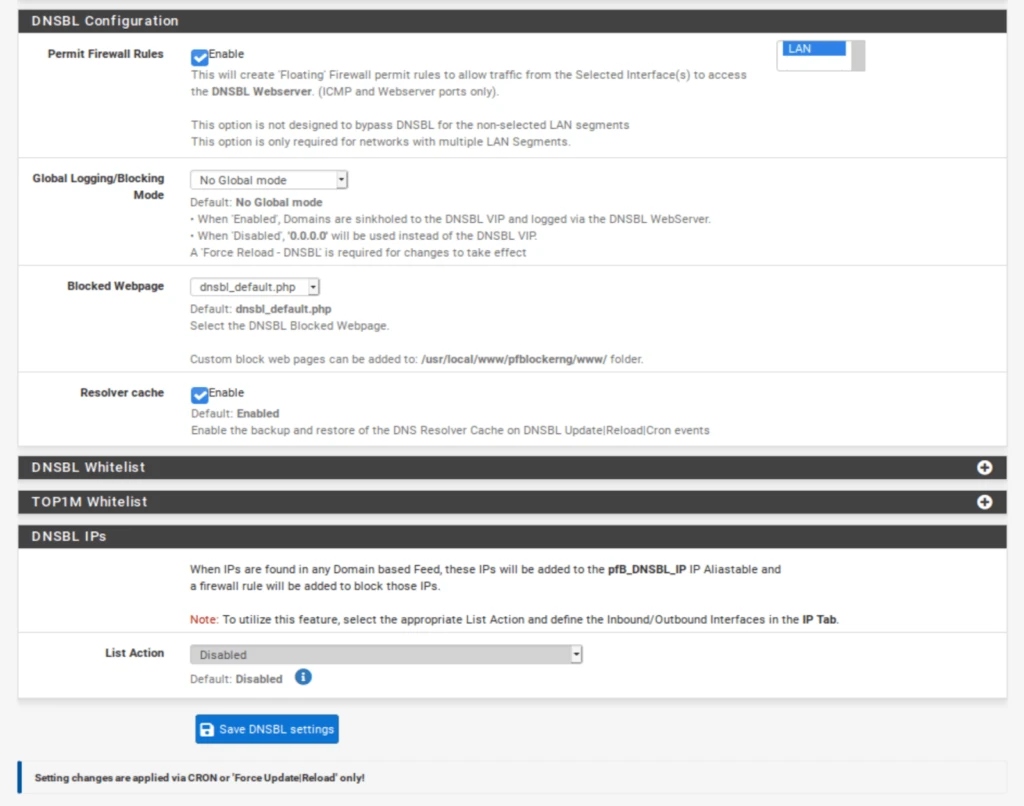](https://docs.coltscomputer.services/uploads/images/gallery/2024-01/QBzAx6sUiVafxE8B-dnsbl2-1024x806.webp)
We now need to add some DNSBL feeds.
### Adding DNSBL feeds
1. Select the **Feeds** tab.
2. Scroll down until you see **DNSBL Category** on the left. The first such entry is **EasyList**.
3. Click the blue + to the left of **EasyList**. You’re taken to the **DNSBL Groups** page, where your selected feeds are listed, as with IPv4 filtering. And almost all of the relevant fields are automatically populated. [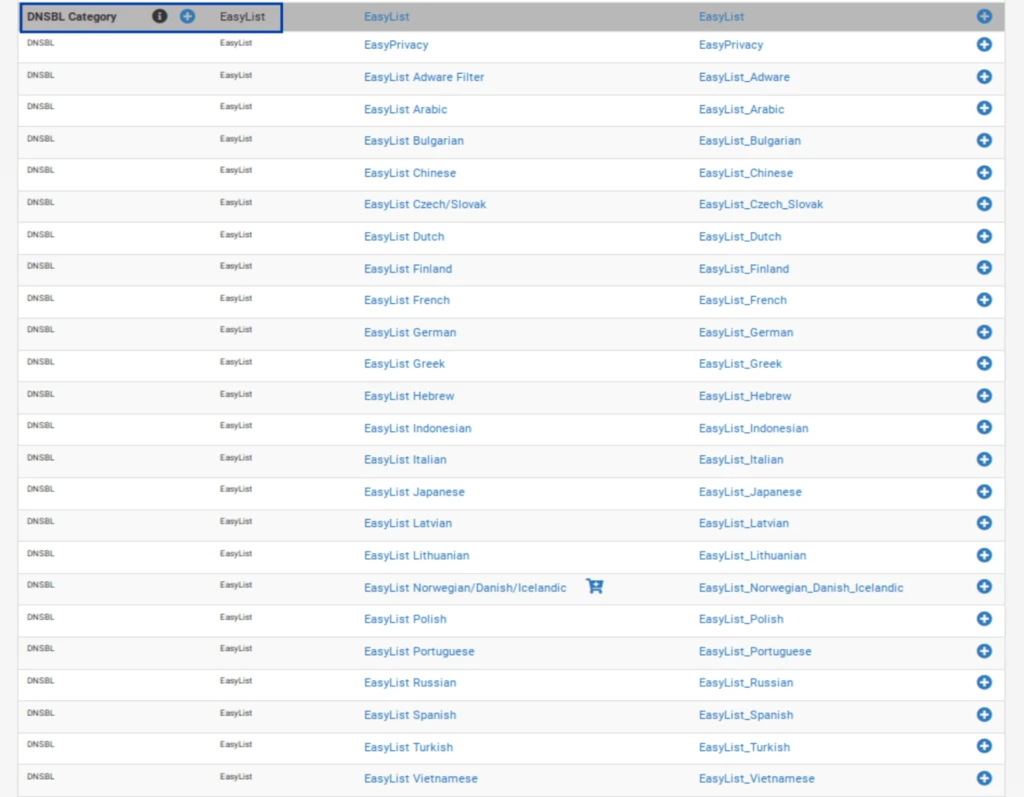](https://docs.coltscomputer.services/uploads/images/gallery/2024-01/5vMEkA1IIKphnjKb-dnsblfeeds-1024x797.webp)
4. Delete all of the feeds except the first and last one: **EasyList** and **EasyList Privacy**.
5. Set the remaining feeds to **ON**. [](https://docs.coltscomputer.services/uploads/images/gallery/2024-01/cH7kjOlNpq34fYWm-dnsbllistson-1024x116.webp)
6. Scroll down to the **Settings** section.
7. Set the **Action** to **Unbound**.
8. Click the + to the right of **DNSBL Custom\_List**. The **DNSBL Custom\_List** window is displayed.
9. Enter **vungle.com** in the **DNSBL Custom\_List** window. We’re adding this domain so we can make sure DNSBL filtering is working by trying to access a known blocked domain.
10. Click **Save DNSBL Settings** at the bottom of the page. [](https://docs.coltscomputer.services/uploads/images/gallery/2024-01/IS5sqvzybCKMdttg-dnsbllistson-1-1024x116.webp)
### Forcing an update of pfBlockerNG
We now need to force an update of pfBlockerNG, as we did above.
1. Select the Update tab. You’re taken to the pfBlockerNG update page.
2. Click **Run**. The update starts. [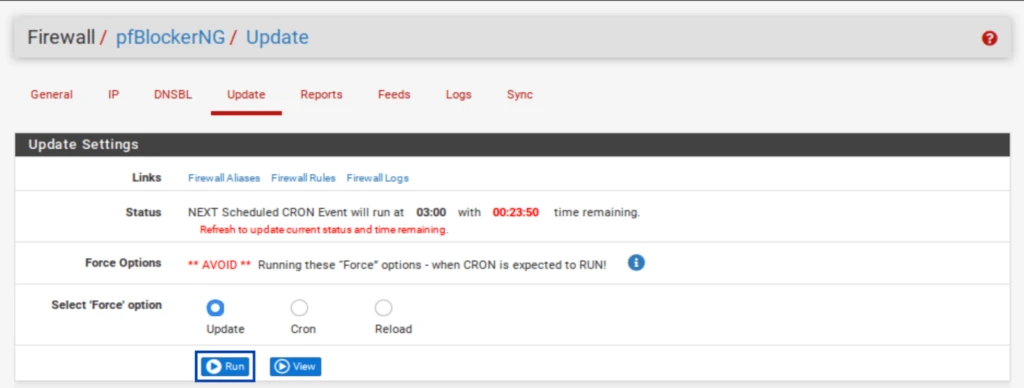](https://docs.coltscomputer.services/uploads/images/gallery/2024-01/xbab1naXJyJTuCe0-updatesettings1-1024x388.webp)
Once the update is complete, we can see that our DNSBL feeds have been updated.
[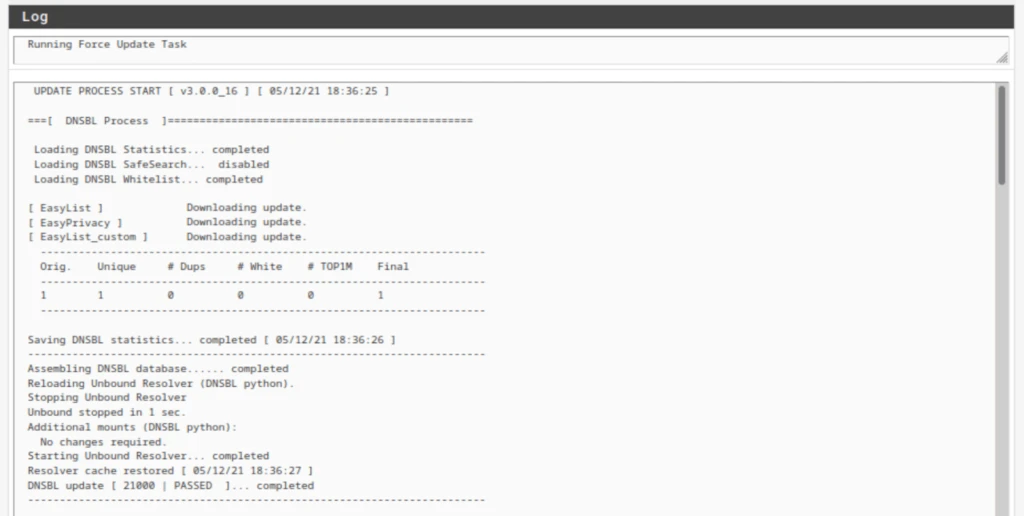](https://docs.coltscomputer.services/uploads/images/gallery/2024-01/01v9TpgIJNkqy76J-dnsblupdatelog-1024x516.webp)
### Testing DNSBL
To ensure that DNSBL filtering is working, we will try to connect to the domain I added to **DNSBL Custom\_List: vungle.com**. If I try to access vungle.com in my browser, the DNSBL block page is displayed with some bits of helpful information.
**Note:** pfBlocker’s DNSBL includes a mini web server that can serve this block page. IPv4, IPv6, and GeoIP filtering extend the existing functionality of the pfSense firewall and block or allow IP addresses without displaying a block page.
[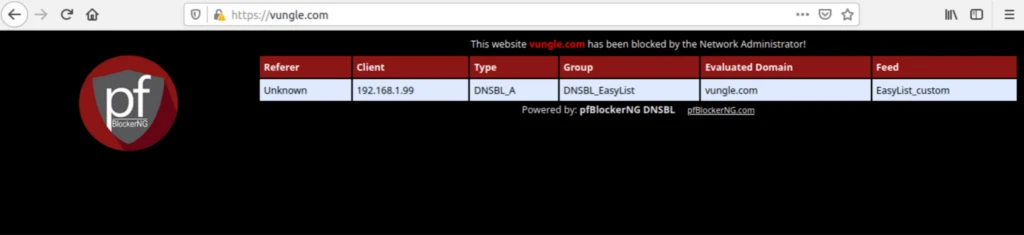](https://docs.coltscomputer.services/uploads/images/gallery/2024-01/17nrqVH7jStJLWES-dnsbltest-1024x235.webp)
## Wrap-up
So there you have it. You’ve successfully installed and configured pfBlockerNG-devel in pfSense. We configured IPv4 filtering, GeoIP filtering, as well as DNSBL filtering. All three of these make your network more secure and private without slowing down your connection.
As your network grows, you may need to open certain ports on your WAN if you want to run a VPN server or if you want to host a web server that’s accessible from the internet. When you do that, pfBlockerNG will be a nice tool in your security toolkit to help you lock down your network and granularly control access from the outside.
# Limiters
[https://docs.netgate.com/pfsense/en/latest/trafficshaper/limiters.html](https://docs.netgate.com/pfsense/en/latest/trafficshaper/limiters.html)
Limiters are an alternate method of traffic shaping. Limiters use [dummynet(4)](https://www.freebsd.org/cgi/man.cgi?query=dummynet&apropos=0&sektion=0&manpath=FreeBSD+12.3-RELEASE+and+Ports&arch=default&format=html) to enact bandwidth limits and perform other prioritization tasks, and they do not rely on ALTQ. Limiters are currently the only way to achieve per-IP address or per-network bandwidth rate limiting using pfSense® software. Limiters are also used internally by Captive Portal for per-user bandwidth limits.
Limiters are managed at **Firewall > Traffic Shaper** on the **Limiters** tab.
Like HFSC and CBQ, Limiters may be nested with queues inside other queues. Root-level limiters (Also called Pipes), may have bandwidth limits and delays, while child limiters (Also called queues), may have priorities (Also called weights). Bandwidth limits can be optionally masked by either the source or destination IP address, so that the limits can be applied on a per-IP address or network basis instead of as a general group.
Limiters are nearly always used in pairs: One for incoming traffic and one for outgoing traffic.
According to its man page the [dummynet(4)](https://www.freebsd.org/cgi/man.cgi?query=dummynet&apropos=0&sektion=0&manpath=FreeBSD+12.3-RELEASE+and+Ports&arch=default&format=html) system was originally designed as a means to test TCP congestion control and it grew up from there. Due to this purpose, a unique feature of limiters is that they can be used to induce artificial packet loss and delay into network traffic. That is primarily used in troubleshooting and testing (or being evil and playing a prank on someone), and not often found in production.
## Uses for Limiters
The primary use for limiters is to apply bandwidth limits for users or specific protocols, e.g. “Maximum of 1Mbit/s for SMTP”, or “Joe’s PC only can use 5Mbit/s”. Limiters can apply a per-IP address or per-network limit, such as “All Users in 192.168.50.0/24 can use a maximum of 3Mbit/s each” or “The guest network and public network can use 1Mbit/s for each segment”.
Limiters are the only type of shaper available in pfSense software which is capable of oversubscription in this manner. The ALTQ shaper requires all child queues to sum up to no more than the speed of the parent queue, but masked limiters allow a set limit to as many IP addresses as can be funneled through the limiter by firewall rules.
Conceptually, consider a limiter as a bucket of bandwidth. All traffic flowing through an unmasked limiter draws bandwidth from the same bucket. Masking a limiter effectively sets up multiple buckets of the same size, one per masked group. Whether that is a single host or an entire network depends on the mask value.
Limiters can also allow for reserved bandwidth by limiting everything *except* a specific protocol which can then consume all remaining bandwidth. In this type of setup on a 10Mbit/s link the firewall would pass traffic from, for example, a SIP server with no limiter. Then the firewall would use a pass rule for all other traffic with a limit of 8Mbit/s. This would let the SIP server use all of the bandwidth it wanted, but it would always have a minimum of 2Mbit/s to itself.
Limiters can also help with issues such as Bufferbloat by controlling the delay of certain packets, using the CoDel algorithm similar to the one available in ALTQ ([CoDel Active Queue Management](https://docs.netgate.com/pfsense/en/latest/trafficshaper/altq-scheduler-types.html#altq-codel)).
See also
- [Configuring CoDel Limiters for Bufferbloat](https://docs.netgate.com/pfsense/en/latest/recipes/codel-limiters.html)
- Enable
- Check the box to enable this limiter. If the limiter is disabled, it will not be available for use by firewall rules.
- Name
- This defines the name of the limiter, as it will appear for selection on firewall rules.
The name must be alphanumeric, and may also include `-` and `_`.
Tip
When choosing a name, avoid using `In` and `Out` since the same limiter, if used on both WAN and LAN, would be used in the *In* direction on one interface and the *Out* direction on another. The best practice is to use `Down` or `Download` and `Up` or `Upload`.
- Bandwidth (Pipes)
- This section defines a bandwidth value for the pipe, or multiple bandwidths if schedules are involved. This option does not appear when editing a child limiter (queue).
- Bandwidth
- The numerical part of the bandwidth for the pipe, e.g. `3` or `500`.
- Bw Type
- The units for the **Bandwidth** field, such as *Mbit/s*, *Kbit/s*, or *Bit/s*.
- Schedule
- If the firewall has schedules defined ([Time Based Rules](https://docs.netgate.com/pfsense/en/latest/firewall/time-based-rules.html)), the firewall offers them in this list. When schedules are in use by the firewall, the limiter can have a bandwidth value for each potential schedule. Define these by clicking  **Add Schedule** to add another bandwidth definition.
If a limiter contains multiple bandwidth specifications, they must each use a different schedule. For example if the firewall has a “Work Day” schedule, then it must also have an “Off Hours” schedule that contains all of the time not included in “Work Day” for the second bandwidth specification.
- Mask
- This drop-down list controls how the limiter will mask addresses in the pipe or queue.
- None
- When set to *none*, the limiter does not perform any masking. The pipe bandwidth will be applied to all traffic as a whole.
- Source / Destination address
- When a limiter is set for *Source Address* or *Destination Address*, the pipe bandwidth limit will be applied on a per-IP address basis or a subnet basis, depending on the masking bits, using the direction chosen in the masking.
In general, a limiter should mask the **Source Address** on **Upload** (In) limiters for LAN-type interfaces, and **Destination Address** on **Download** (Out) limiters on LAN-type interfaces. Similar to swapping the directionality of the limiters when applying to LAN and WAN, masking is swapped as well, so the same masked limiter set for **In** on LAN should be used for **Out** on WAN.
- Mask Bits
- There are separate boxes to control the address masking for IPv4 and IPv6. For IPv4 a value of *32* for **IPv4 mask bits** sets up a per-IPv4 address limit, which is the most common usage. For a per-IPv6-address limit, use *128* as the **IPv6 mask bits** value.
To create per-subnet or similar masks, enter the subnet bits in the appropriate field for either IPv4 or IPv6 mask bits, such as *24* to limit IPv4 in groups of /24 subnets.
- Description
- An optional bit of text to explain the purpose for this Limiter.
- Advanced Options
- Additional options that vary when editing a pipe or a queue.
- Delay (Pipes)
- The **Delay** option is only found on limiter pipes. It introduces an artificial delay (latency), specified in milliseconds, into the transmission of any packets in the limiter pipe. This is typically left blank so that packets are transmitted as fast as possible by the firewall. This can be used to simulate high-latency connections such as satellite uplinks for lab testing.
- Weight (Queues)
- The **Weight** option is only found on child limiters (queues). This value can range from 1 to 100. Higher values give more precedence to packets in a given queue. Unlike PRIQ and CBQ priorities, a lowly-weighted queue is not in danger of being starved of bandwidth by the firewall.
- Packet loss rate
- Another method of artificially degrading traffic. The **Packet Loss Rate** can be configured to drop a certain fraction of packets that enter the limiter. The value is expressed as a decimal representation of a percentage, so `0.01` is 1%, or one packet out of a hundred dropped. This field is typically left empty so every packet is delivered by the firewall.
- Queue Size
- Sets the size of the queue, specified in queue slots, used for handling queuing delay. Left blank, it defaults to `50` slots, which is the recommended value. Slow speed links may need a lower queue size to operate efficiently. High speed links may need more slots.
Tip
In cases where there are several limiters or limiters with large **Queue Size** values, a **System Tunable** may need set to increase the value of `net.inet.ip.dummynet.pipe_slot_limit` above the total number of configured queue lots among all pipes and queues.
- Bucket Size
- The **Bucket Size**, also specified in slots, sets the size of the hash table used for queue storage. The default value is `64`. It must be a numeric value between `16` and `65536`, inclusive. This value is typically left blank.