# Linux
# 5 Linux commands to check free disk space
## [Linux df command](https://opensource.com/article/21/7/check-disk-space-linux-df)
The `df` command stands for "disk-free," and shows available and used disk space on the Linux system.
`df -h` shows disk space in human-readable format
`df -a` shows the file system's complete disk usage even if the Available field is 0
You can get this information in a graphical view using the **Disks** (gnome-disk-utility) in the GNOME desktop. Launch it to see all disks detected by your computer, and click a partition to see details about it, including space used and space remaining.
opensource.com
## [Linux du command](https://opensource.com/article/21/7/check-disk-space-linux-du)
`du` shows the disk usage of files, folders, etc. in the default kilobyte size
`du -h` shows disk usage in human-readable format for all directories and subdirectories
`du -a` shows disk usage for all files
`du -s` provides total disk space used by a particular file or directory
The following commands will check your total space and your utilized space.
This information can be represented visually in GNOME with the **Disk Usage** application, or with **Filelight** in the KDE Plasma desktop. In both applications, disk usage is mapped to concentric circles, with the middle being the base folder (usually your **/home** directory, but it's up to you) with each outer ring representing one directory level deeper. Roll your mouse over any segment for detailed information about what's taking up space.
## Linux fdisk -l command
`fdisk -l` shows disk size along with disk partitioning information

# 6 tcpdump network traffic filter options
[https://www.redhat.com/sysadmin/tcpdump-part-one](https://www.redhat.com/sysadmin/tcpdump-part-one)
## 1. Option -D
`tcpdump` with `-D` provides a list of devices from which you can capture traffic. This option identifies what devices `tcpdump` knows about. Once you see this list, you can decide which interface you want to capture the traffic on. It also tells you if the interface is Up, Running, and whether it is a Loopback interface, as you can see below:
```shell
# tcpdump -D
1.tun0 [Up, Running]
2.wlp0s20f3 [Up, Running]
3.lo [Up, Running, Loopback]
4.any (Pseudo-device that captures on all interfaces) [Up, Running]
5.virbr0 [Up]
6.docker0 [Up]
7.enp0s31f6 [Up]
```
## 2. Option -c X
The `-c` option captures **X** number of packets and then stops. Otherwise, `tcpdump` will keep running indefinitely. So when you want to capture only a small sample set of packets, you can use this option. However, if there is no activity on the interface, `tcpdump` keeps waiting.
```shell
# tcpdump -c 5 -i any
dropped privs to tcpdump
tcpdump: verbose output suppressed, use -v or -vv for full protocol decode
listening on any, link-type LINUX_SLL (Linux cooked v1), capture size 262144 bytes
16:19:22.128996 ARP, Request who-has _gateway tell 192.168.86.81, length 28
16:19:22.130560 IP 172.217.222.189.https > kkulkarni.58810: Flags [P.], seq 3506342975:3506343029, ack 2537104576, win 377, options [nop,nop,TS val 4137065873 ecr 75405758], length 54
16:19:22.130642 IP kkulkarni.58810 > 172.217.222.189.https: Flags [.], ack 54, win 501, options [nop,nop,TS val 75422756 ecr 4137065873], length 0 16:19:22.131198 IP ovpn-3-80.rdu2.redhat.com.36380 > infoblox-trust01.intranet.prod.int.rdu2.redhat.com.domain: 53320+ PTR? 1.86.168.192.in-addr.arpa. (43)
16:19:22.131395 IP kkulkarni.53013 > ovpn-rdu2-alt.redhat.com.https: UDP, length 95
5 packets captured
49 packets received by filter
37 packets dropped by kernel
```
## 3. Option -n
It is usually easier to work if you use IP addresses instead of names, such as **kkulkarni.53013** as shown in the above output. You can use `-n` for this.
```shell
# tcpdump -c 5 -i any -n
dropped privs to tcpdump
tcpdump: verbose output suppressed, use -v or -vv for full protocol decode
listening on any, link-type LINUX_SLL (Linux cooked v1), capture size 262144 bytes
16:20:21.523375 IP 172.217.9.206.https > 192.168.86.31.34288: Flags [P.], seq 723352132:723352349, ack 2124268216, win 1059, options [nop,nop,TS val 2934032467 ecr 824781066], length 217
16:20:21.563992 IP 192.168.86.31.34288 > 172.217.9.206.https: Flags [.], ack 217, win 12654, options [nop,nop,TS val 824783221 ecr 2934032467], length 0
16:20:22.956717 IP 192.168.86.83.mdns > 224.0.0.251.mdns: 0 [2q] [1au] PTR (QU)? _companion-link._tcp.local. PTR (QU)? _homekit._tcp.local. (88) 16:20:22.956839 IP 192.168.86.83.mdns > 224.0.0.251.mdns: 0*- [0q] 2/0/3 (Cache flush)
16:20:22.956932 IP6 fe80::2:8c40:fdea:5a16.mdns > ff02::fb.mdns: 0*- [0q] 2/0/3 (Cache flush) PTR local., (Cache flush) PTR local. (214)
5 packets captured
5 packets received by filter
0 packets dropped by kernel
```
## 4. Option -s
`tcpdump` with `-sXXX` helps you control the capture size. On the second line in the previous output you can see it says capture size 262144 bytes, which is much larger than the packet. You can use `-s` to change the capture size. If you just want to inspect the packet headers, then you can use a smaller size for the capture. See the example below:
```shell
# tcpdump -c 5 -i any -n -s64
dropped privs to tcpdump
tcpdump: verbose output suppressed, use -v or -vv for full protocol decode
listening on any, link-type LINUX_SLL (Linux cooked v1), capture size 64 bytes
16:24:39.909994 IP 10.22.3.80.46368 > 10.11.200.20.ldap: Flags [.], ack 2583785634, win 502, options [nop,nop,TS[|tcp]>
16:24:39.910118 IP 192.168.86.31.53013 > 66.187.232.72.https: UDP, length 76
16:24:39.981646 IP 192.168.86.111.mdns > 224.0.0.251.mdns: 0 [5a] [28q] [1n] [1au][|domain]
16:24:39.983954 IP 192.168.86.111.mdns > 224.0.0.251.mdns: 0*- [0q] 2/0/1[|domain]
16:24:40.186150 IP 192.168.86.111.mdns > 224.0.0.251.mdns: 0 [1n] [1au][|domain]
5 packets captured
6 packets received by filter
0 packets dropped by kernel
```
## 5. Port captures
`tcpdump` allows you to specify network packets that are either using some port **X** as source or destination. For example, to capture DNS traffic, you can use `port 53`. You could prefix the **port** keyword with **src**/**dst** as `src port 53` or `dst port 53` and filter it even further.
```shell
# tcpdump -i any port 53 -n
16:49:58.979410 IP 10.22.3.80.46391 > 10.11.5.19.domain: 31741+ A? youtube.com. (29)
16:49:58.979450 IP 10.22.3.80.46391 > 10.11.5.19.domain: 4579+ AAAA? youtube.com. (29)
16:49:58.985835 IP 10.11.5.19.domain > 10.22.3.80.44202: 8898 NXDomain 0/1/0 (154)
16:49:58.986761 IP 10.22.3.80.38074 > 10.11.5.19.domain: 43241+ PTR? 31.86.168.192.in-addr.arpa. (44)
16:49:59.015164 IP 10.11.5.19.domain > 10.22.3.80.38074: 43241 NXDomain 0/1/0 (122)
16:49:59.015209 IP 10.11.5.19.domain > 10.22.3.80.46391: 4579 1/0/0 AAAA 2607:f8b0:4004:810::200e (57)
16:49:59.015231 IP 10.11.5.19.domain > 10.22.3.80.46391: 31741 1/0/0 A 172.217.15.78 (45)
16:49:59.015831 IP 10.22.3.80.51955 > 10.11.5.19.domain: 2503+ PTR? 1.122.168.192.in-addr.arpa. (44)
16:49:59.041490 IP 10.11.5.19.domain > 10.22.3.80.51955: 2503 NXDomain 0/1/0 (122)
```
## 6. Option -w
If you want to write the output of `tcpdump` to a file, use the option `-w .pcap` to write to a file. If you want to see how many packages were written, you can add `-v`.
```shell
# tcpdump -c 4 -i any port 53 -w dns.pcap -v
tcpdump: data link type LINUX_SLL2
dropped privs to tcpdump
tcpdump: listening on any, link-type LINUX_SLL2 (Linux cooked v2), snapshot length 262144 bytes
4 packets captured
24 packets received by filter
0 packets dropped by kernel
```
# DHCP on Linux
renew ip address - *sudo dhclient -r*
# dmidecode -t memory
```
dmidecode -t memory
```
Shows status of installed memory
# How to Change Passwords in Linux
[https://www.tomshardware.com/how-to/change-passwords-in-linux](https://www.tomshardware.com/how-to/change-passwords-in-linux)
## How to Change your Password in Linux
Any user can change their password at any time. It is good practice to frequently change your password, and to not reuse or rotate passwords.
1\. **Open a terminal.**
2\. **Type in the** ***passwd*** **command** to start the password change process. Passwd may look like a spelling mistake, but it is the command to work with passwords on the terminal.
```c
$ passwd
```
3\. **Type in your current password and press Enter.**
4\. **Type in your new password, press Enter. Then type it in again** to confirm that it is correct. Note that Linux will not echo (print) the password to the screen, nor will it show any asterisk indicating password length.

(Image credit: Tom's Hardware)## Change Another User's Password
If you are an administrator of many users, there will come a time where a user forgets their password and it will fall to you, or someone with sudo privileges to reset their password.
To change another user's password we use the same command, but specify the user’s name.
1\. **Open a terminal.**
2\. **Type in the** ***passwd*** **command along with the user name.** To use this command you will either need to be root, or be part of the “sudo” group. In the code example we assume that you are in the sudo group.
3\. **Change the user’s password, and confirm the change.**

(Image credit: Tom's Hardware)## Force a Password Reset
You’ve heard that one of your users has been reusing their passwords; this is bad. So let’s give them a chance to change their password. Using the -e argument we can enforce a password reset by expiring their password.
1\. **Open a terminal.**
2\. **Type in the command and pass the -e argument to expire Tom’s password.**
```c
$ sudo passwd -e tom
```
When Tom next logs in, the system will force Tom to change their password. Here we have simulated Tom logging in by using the “su” command to switch our user to Tom.

(Image credit: Tom's Hardware)There may come a time when a user account will need to be temporarily locked, preventing them from logging in. For this we can use the -l argument to lock the account. Here we are locking Tom out of their account.
1\. **Open a terminal.**
2\. **Use the command with the -l argument to lock Tom’s account.**
```c
$ sudo passwd -l tom
```

(Image credit: Tom's Hardware)When Tom next tries to login, their password is rejected and they receive an authentication error. Here we again simulate it using *su* to switch users.

(Image credit: Tom's Hardware)3\. **To unlock Tom’s account we use the -u switch.**
```c
$ sudo passwd -u tom
```

(Image credit: Tom's Hardware)## Exploring the passwd Command
The passwd command has a number of useful arguments (parameters) that we can pass when using the command. Here are some examples.
Checking the status of a user’s password is a useful tool for system administrators when it comes to audits and housekeeping. Here our test account, Tom, is audited.
Open a terminal and run the command with the -S switch. This will show the status of the account.
```c
$ sudo passwd -S tom
```

(Image credit: Tom's Hardware)The output is formatted to show
**The username**
**Password status Locked (L), No Password (NP), Password (P)**
**Date of last password change**
**Minimum password age**
**Maximum password age**
**Warning period (the number of days given to the user to change their password before it expires)**
**Inactivity period (number of days after a password expires before it is locked)**
If we wanted to set the number of days for Tom’s warning period to 14 days, we would use this command.
```c
sudo passwd -w 14 tom
```

(Image credit: Tom's Hardware)If you want to list the password status for all users, then the -a switch is just the thing. This switch is used with -S to list the status of every user, even the users that you never knew existed. These extra users are used for specific tasks, such as printers and networking.

(Image credit: Tom's Hardware)Here we can see all the users on our test machine, but the two “real” users are Les and Tom.
# How To Configure Firewall with UFW on Ubuntu 20.04 LTS
[https://www.cyberciti.biz/faq/how-to-configure-firewall-with-ufw-on-ubuntu-20-04-lts/](https://www.cyberciti.biz/faq/how-to-configure-firewall-with-ufw-on-ubuntu-20-04-lts/)
How do I set up and configure firewall with UFW on Ubuntu 20.04 LTS server?
UFW is an acronym for an uncomplicated firewall. Securing a network with an uncomplicated firewall is super easy and highly recommended. This page explains how to set up and secure your Ubuntu 20.04 LTS server with ufw.
Tutorial requirements
Requirements
Ubuntu Linux 20.04 LTS
Root privileges
[Yes](https://www.cyberciti.biz/faq/how-can-i-log-in-as-root/ "See how to login as root user")
Difficulty level
[Easy](https://www.cyberciti.biz/faq/tag/easy/ "See all Easy Linux / Unix System Administrator Tutorials")
Category
Firewall
Prerequisites
ufw command
Est. reading time
7 minutes
Table of contents ↓
- [1 Set up ufw policy](https://www.cyberciti.biz/faq/how-to-configure-firewall-with-ufw-on-ubuntu-20-04-lts/#Set_up_ufw_policy "Set up ufw policy")
- [2 Open SSH port](https://www.cyberciti.biz/faq/how-to-configure-firewall-with-ufw-on-ubuntu-20-04-lts/#Open_SSH_port "Open SSH port")
- [3 Turn on ufw firewall](https://www.cyberciti.biz/faq/how-to-configure-firewall-with-ufw-on-ubuntu-20-04-lts/#Turn_on_ufw_firewall "Turn on ufw firewall")
- [4 Open ports with ufw](https://www.cyberciti.biz/faq/how-to-configure-firewall-with-ufw-on-ubuntu-20-04-lts/#Open_ports_with_ufw "Open ports with ufw")
- [5 Block ports with ufw](https://www.cyberciti.biz/faq/how-to-configure-firewall-with-ufw-on-ubuntu-20-04-lts/#Block_ports_with_ufw "Block ports with ufw")
- [6 Get ufw firewall status](https://www.cyberciti.biz/faq/how-to-configure-firewall-with-ufw-on-ubuntu-20-04-lts/#Get_ufw_firewall_status "Get ufw firewall status")
- [7 Delete ufw firewall rules](https://www.cyberciti.biz/faq/how-to-configure-firewall-with-ufw-on-ubuntu-20-04-lts/#Delete_ufw_firewall_rules "Delete ufw firewall rules")
- [8 Firewall management commands](https://www.cyberciti.biz/faq/how-to-configure-firewall-with-ufw-on-ubuntu-20-04-lts/#Firewall_management_commands "Firewall management commands")
- [9 IP Masquerading](https://www.cyberciti.biz/faq/how-to-configure-firewall-with-ufw-on-ubuntu-20-04-lts/#IP_Masquerading "IP Masquerading")
- [10 Egress filtering](https://www.cyberciti.biz/faq/how-to-configure-firewall-with-ufw-on-ubuntu-20-04-lts/#Egress_filtering "Egress filtering")
- [11 Conclusion](https://www.cyberciti.biz/faq/how-to-configure-firewall-with-ufw-on-ubuntu-20-04-lts/#Conclusion "Conclusion")
nixCraft: Privacy First, Reader Supported
- **nixCraft is a one-person operation**. I create all the content myself, with no help from AI or ML. I keep the content accurate and up-to-date.
- **Your privacy is my top priority**. I don’t track you, show you ads, or spam you with emails. Just pure content in the true spirit of Linux and FLOSS.
- **Fast and clean browsing experience**. nixCraft is designed to be fast and easy to use. You won’t have to deal with pop-ups, ads, cookie banners, or other distractions.
- **Support independent content creators**. nixCraft is a labor of love, and it’s only possible thanks to the support of our readers. If you enjoy the content, please support us on Patreon or share this page on social media or your blog. Every bit helps.
## Step 1 – Set Up default UFW policies
To view status of ufw, type:
`$ sudo ufw status`
Sample outputs:
```
Status: inactive
```
The default policy firewall works out great for both the servers and desktop. It is always a good policy to closes all ports on the server and open only required ports one by one. Let us block all incoming connection and only allow outgoing connections from the Ubuntu 20.04 LTS box:
`$ sudo ufw default allow outgoing$ sudo ufw default deny incoming`
### Enabling IPv6 support
Make sure the directive IPV6=yes do exists in **/etc/default/ufw** file. For instance:
`$ cat /etc/default/ufw`
## Step 2 – Open SSH TCP port 22 connections
The next logical step is to allow incoming SSH ports. We can easily open SSH TCP port 22 using UFW as follows:
`$ sudo ufw allow ssh`
If you are running ssh on TCP port 2222 or TCP port 2323, enter:
`$ sudo ufw allow 2222/tcp$ sudo ufw allow 2323/tcp`
Some sysadmins have a static IP address (such as 202.54.2.5) at home or office location. In that case, only allow ssh access from the static IP address such as 202.54.2.5 to Ubuntu server IP address 172.24.13.45:
`$ sudo ufw allow proto tcp from 202.54.2.5 to 172.24.13.45 port 22`
But how do I find out my static IP 202.54.2.5 on Ubuntu server itself? Try the [w command](https://www.cyberciti.biz/faq/unix-linux-w-command-examples-syntax-usage-2/ "Linux / Unix: w Command Examples") or lastlog command:
`$ w$ lastlog -u {YOUR_ADMIN_LOGIN_NAME_HERE}$ lastlog -u vivek`
And here is what I see:
```
Username Port From Latest
vivek pts/0 202.54.2.5 Thu Sep 29 15:19:21 +0000 2022
```
Next, let us limit ssh port, run:
`$ sudo ufw limit ssh`
See “[How to limit SSH (TCP port 22) connections with ufw on Ubuntu Linux](https://www.cyberciti.biz/faq/howto-limiting-ssh-connections-with-ufw-on-ubuntu-debian/)” for more information.
## Step 3 – Turn on firewall
Now we got basic configuration enabled. In other words, the firewall will drop all incoming traffic except for ssh TCP port 22. Let us true it on the UFW, enter:
`$ sudo ufw enable`
![Ubuntu Configure Firewall with UFW]()
Remember, once UFW enabled, it runs across system reboots too. We can verify that easily as follows using the systemctl command:
`$ sudo systemctl status ufw.service`
![How to Configure Firewall with UFW on Ubuntu 20.04]()
### Want to disable the UFW based firewall? Try
If you need to stop the firewall and disable on system startup, eenter:
`$ sudo ufw disable`
Sample outputs:
```
Firewall stopped and disabled on system startup
```
## Step 4 – Open specific incoming connections/ports
Let us add more rules. Say you want to open ports and allow IP address with ufw. The syntax is as follows to open TCP port 80 and 443:
`$ sudo ufw allow 80/tcp comment 'accept Apache'$ sudo ufw allow 443/tcp comment 'accept HTTPS connections'`
Open UDP/1194 (OpenVPN) server:
`$ sudo ufw allow 1194/udp comment 'OpenVPN server'`
### Allow port ranges via ufw
We can allow port ranges too say, tcp and udp 3000 to 4000:
`$ sudo ufw allow 3000:4000/tcp$ sudo ufw allow 3000:4000/udp`
In this example, you want to allow ALL connections from an IP address called 104.22.10.214, enter:
`$ sudo ufw allow from 104.22.10.214`
Let us allow connections from an IP address called 104.22.11.213 to our port 25, enter:
`$ sudo ufw allow from 104.22.11.213 to any port 25 proto tcp`
We can set dest IP 222.222.222.222 for port 25 too:
`$ sudo ufw allow from 104.22.11.213 to 222.222.222.222 port 25 proto tcp`
### Allow connection on specific interface
Open port 22 for wg0 interface only:
`$ sudo ufw allow in on wg0 to any port 22`
Say you want to allow connection for TCP port 3306 on lxdbr0 interface from 10.105.28.22, then add:
`$ sudo ufw allow in on lxdbr0 from 10.105.28.22 to any port 3306 proto tcp`
Let us add sub/net instead of single IP address:
`$ sudo ufw allow in on lxdbr0 from 10.105.28.0/24 to any port 3306 proto tcp`
## Step 5 – Block and deny incoming connections/ports
Do you want to close ports and block certain IP addresses? The syntax is as follows to deny access. In other words, simply ignoring access to port 25:
`$ sudo ufw deny 25/tcp`
Make sure we deny all connections from an IP address called 203.5.1.43, enter:
`$ sudo ufw deny from 203.5.1.43`
Deny all connections from an IP/subnet called 103.13.42.13/29, enter:
`$ sudo ufw deny from 103.13.42.13/29`
Want to deny access to 1.1.1.2 (say bad guys IP) on port 22? Try:
`$ sudo ufw deny from 1.1.1.2 to any port 22 proto tcp`
## Step 6 – Verify status of UFW
Use the status command as follows:
`$ sudo ufw status`
```
Status: active
To Action From
-- ------ ----
22/tcp ALLOW Anywhere
80/tcp ALLOW Anywhere # accept Apache
443/tcp ALLOW Anywhere # accept HTTPS connections
1194/udp ALLOW Anywhere # OpenVPN server
3000:4000/tcp ALLOW Anywhere
3000:4000/udp ALLOW Anywhere
Anywhere ALLOW 104.22.10.214
25/tcp ALLOW 104.22.11.213
222.222.222.222 25/tcp ALLOW 104.22.11.213
Anywhere DENY 203.5.1.43
Anywhere DENY 103.13.42.8/29
22/tcp DENY 1.1.1.2
22/tcp (v6) ALLOW Anywhere (v6)
80/tcp (v6) ALLOW Anywhere (v6) # accept Apache
443/tcp (v6) ALLOW Anywhere (v6) # accept HTTPS connections
1194/udp (v6) ALLOW Anywhere (v6) # OpenVPN server
3000:4000/tcp (v6) ALLOW Anywhere (v6)
3000:4000/udp (v6) ALLOW Anywhere (v6)
```
Want verbose outputs? Try:
`$ sudo ufw status verbose`
## Ubuntu 20.04 LTS UFW delete rules
So far we learned how to add, deny, and list the firewall rules. It is time to delete unwanted rules. The syntax is as follows to list all of the current rules in a numbered list format:
`$ sudo ufw status numbered`
```
Status: active
To Action From
-- ------ ----
[ 1] 22/tcp ALLOW IN Anywhere
[ 2] 80/tcp ALLOW IN Anywhere # accept Apache
[ 3] 443/tcp ALLOW IN Anywhere # accept HTTPS connections
[ 4] 1194/udp ALLOW IN Anywhere # OpenVPN server
[ 5] 3000:4000/tcp ALLOW IN Anywhere
[ 6] 3000:4000/udp ALLOW IN Anywhere
```
To delete 6th rule type the command:
`$ sudo ufw delete 6$ sudo ufw status numbered`
# How to Install NTP Server and Client(s) on Ubuntu 22.04 LTS
[https://vitux.com/how-to-install-ntp-server-and-client-on-ubuntu/](https://vitux.com/how-to-install-ntp-server-and-client-on-ubuntu/)
NTP or Network Time Protocol is a protocol that is used to synchronize all system clocks in a network to use the same time. When we use the term NTP, we are referring to the protocol itself and also the client and server programs running on the networked computers. NTP belongs to the traditional TCP/IP protocol suite and can easily be classified as one of its oldest parts.
When you are initially setting up the clock to sync with NTP, it takes six exchanges within 5 to 10 minutes before the clock is set up. Once the clocks in a network are synchronized, the client(s) update their clocks with the server once every 10 minutes. This is usually done through a single exchange of messages (transaction). These transactions use port number 123 of your system.
In this article, we will describe a step-by-step procedure on how to:
- Install and configure the NTP server on a Ubuntu machine.
- Configure the NTP Client to be time synced with the server.
We have run the commands and procedures mentioned in this article on a Ubuntu 22.04 LTS system.
## Install and configure NTP Server on the host computer
Follow these steps to install the NTP server on your Ubuntu server machine:
Note: We are using the Ubuntu command line, the Terminal, to install and configure NTP. You can open the Terminal application either through the application launcher search or the Ctrl+Alt+T shortcut.
### Step 1: Update the package repository index
To install the latest software versions from the Internet repositories, your local repository index must align with them. Run the following command as sudo in order to update your local repository index:
```
$ sudo apt update
```

### Step 2: Install NTP Server with apt-get
Please run the following command as sudo in order to install the NTP server daemon from the APT repositories:
```
$ sudo apt install ntp
```
Please note that only an authorized user can add, remove and configure software on Ubuntu.

The system might ask you for the sudo password and provide you with a Y/n option to continue the installation. Enter Y and then hit enter; the NTP server will then be installed on your system. The process may, however, take some time, depending on your Internet speed.
### Step 3: Verify installation (optional)
You can verify your NTP installation and also check the version number by running the following command in your Terminal:
```
$ sntp --version
```

### Step 4: Switch to an NTP server pool closest to your location
When you install the NTP server, it is mostly configured to fetch the proper time. However, you can switch the server pool to the ones closest to your location. This includes making some changes in the */etc/*ntp*.conf* file.
Open the file in the nano editor as sudo by running the following command:
```
$ sudo nano /etc/ntp.conf
```

In this file, you will be able to see a pool list. We have highlighted this list in the above image. The task here is to replace this pool list by a pool of time servers closest to your location. The pol.ntp.org project provides reliable NTP service from a big cluster of time servers. To choose a pool list according to your location, visit the following page:
[https://support.ntp.org/bin/view/Servers/NTPPoolServers](https://support.ntp.org/bin/view/Servers/NTPPoolServers)
We have searched for a pool list for the US:

The page tells us to add the following lines to the ntp.conf file:
```
server 0.us.pool.ntp.org
server 1.us.pool.ntp.org
server 2.us.pool.ntp.org
server 3.us.pool.ntp.org
```
This is how my file looks after adding the above lines to it:

Quit the file by hitting Ctrl+X and entering y to save changes.
### Step 5: Restart the NTP server
For the above changes to take effect, you need to restart the NTP server. Run the following command as sudo to do so:
```
$ sudo service ntp restart
```
### Step 6: Verify that the NTP Server is running
Now, check the status of the NTP service through the following command:
```
$ sudo service ntp status
```

The Active status verifies that your NTP server is up and running.
### Step 7: Configure Firewall so that client(s) can access the NTP server
Finally, it is time to configure your system’s UFW firewall so incoming connections can access the NTP server at UDP Port number 123.
Run the following command as sudo to open port 123 for incoming traffic:
```
$ sudo ufw allow from any to any port 123 proto udp
```

Your Ubuntu host machine is now configured as an NTP server.
## Configure NTP Client to be Time Synced with the NTP Server
Let us now configure our Ubuntu client machine to be time-synchronized with the NTP server.
### Step 1: Install ntpdate
The ntpdate command will let you manually check your connection configuration with the NTP-server. Open the Terminal application on the client machine and enter the following command as sudo:
```
$ sudo apt-get install ntpdate
```

### Step 2: Specify IP and hostname of the NTP server in the hosts file
For your NTP server to be resolved by a hostname in your client machine, you need to configure your /etc/hosts file.
Open the hosts file as sudo in the nano editor by entering the following command:
```
$ sudo nano /etc/hosts
```
Now add your NTP server’s IP and specify a hostname as follows in this file:

Quit the file by hitting Ctrl+X and then save it by entering y.
### Step 3: Check if the client machine’s time is synchronized with an NTP server
The following ntpdate command will let you manually check if time is synchronized between the client and server systems:
```
$ sudo ntpdate NTP-server-host
```
The output should ideally show a time offset between the two systems.
### Step 4: Disable the systemd timesyncd service on the client
Because we want our client to sync time with the NTP server, let us disable the timesyncd service on the client machine.
Enter the following command to do so:

### Step 5: Install NTP on your client
Run the following command as sudo in order to install NTP on your client machine:
```
$ sudo apt-get install ntp
```
### Step 6: Configure the /etc/ntp.conf file to add your NTP server as the new time server
Now we want our client machine to use our own NTP host server to be used as the default time server. For this, we need to edit the /etc/ntp.conf file on the client machine.
Run the following command as sudo in order to open the file in the Nano editor:
```
$ sudo nano /etc/ntp.conf
```
Then, add the following line in the file, where NTP-server-host is the hostname you specified for your NTP server:
```
server NTP-server-host prefer iburst
```
This is how my file looks like after I have specified the time server:

Hit Ctrl+x to close the file and enter y to save the changes.
### Step 7: Restart the NTP server
In order for the above changes to take effect, you need to restart the NTP service. Run the following command as sudo to do so:
```
$ sudo service ntp restart
```
### Step 8: View the Time Synchronization Queue
Now your client and server machines are configured to be time-synced. You can view the time synchronization queue by running the following command:
```
$ ntpq -ps
```
You should be able to see NTP-server-host as the time synchronization host/source in the queue.
So this was all you needed to know about installing and configuring NTP to synchronize time on your networked Ubuntu machines. The process may seem a little cumbersome, but if you follow all of the above steps carefully, your machines will be synced in no time.
# How to Set Time, Timezone and Synchronize System Clock in Linux
The ‘**timedatectl**‘ command is a new utility for [RHEL-based](https://www.tecmint.com/redhat-based-linux-distributions/ "RedHat-based Linux Distributions") and [Debian-based](https://www.tecmint.com/debian-based-linux-distributions/ "Debian-based Linux Distributions") distributions. It is a part of the ‘**systemd**‘ system and service manager, serving as a replacement for the old traditional [date command](https://www.tecmint.com/change-linux-system-date-and-time/ "date Command in Linux") used in ‘**sysvinit**‘ daemon-based Linux distributions.
The **timedatectl** command allows you to query and change the configuration of the system clock and its settings, you can use this command to set or change the current date, time, and timezone or enable automatic system clock [synchronization with a remote NTP server](https://www.tecmint.com/install-ntp-server-in-centos/).
In this tutorial, am going to take you through the ways you can manage time on your Linux system by setting the **date**, **time**, **timezone,** and **synchronize time with NTP** from the terminal using the new **timedatectl** command.
It is always a good practice to maintain the correct time on your Linux server or system and it can have the following advantages:
- maintain a timely operation of system tasks since most tasks in Linux are controlled by time.
- the correct time for logging events and other information on the system and many more.
## How to Find and Set Local Timezone in Linux
**1.** To display the current time and date on your system, use the **timedatectl** command from the command line as follows:
```
# timedatectl status
```
Check Time and Date
In the screencast above, **RTC** time is the hardware clock time.
**2.** The **time** on your Linux system is always managed through the **timezone set** on the system, to view your current timezone, do it as follows:
```
# timedatectl
OR
# timedatectl | grep Time
```
Check Linux Time Zone**3.** To view all available timezones, run the command below:
```
# timedatectl list-timezones
```
List All Timezones in Linux**4.** To find the local timezone according to your location, run the following command:
```
# timedatectl list-timezones | egrep -o "Asia/B.*"
# timedatectl list-timezones | egrep -o "Europe/L.*"
# timedatectl list-timezones | egrep -o "America/N.*"
```
Find Local Timezone in Linux**5.** To set your local timezone in Linux, we will use the **set-timezone** switch as shown below.
```
# timedatectl set-timezone "Asia/Kolkata"
```
Set Local Timezone in LinuxIt is always recommended to use and set the coordinated universal time, **UTC**.
```
# timedatectl set-timezone UTC
```
Set UTC Time in LinuxYou need to type the correct name timezone otherwise you may get errors when changing the timezone, in the following example, the timezone “Asia/Kolkata” is not correct therefore causing the error.
Set Correct Timezone in Linux## How to Set Time and Date in Linux
**6.** You can set the date and time on your system, using the timedatectl command as follows:
### Set Time in Linux
To set time only, we can use a **set-time** switch along with the format of time in **HH:MM:SS** (Hour, Minute, and Seconds).
```
# timedatectl set-time 15:58:30
```
Set Local Time in LinuxYou may get the below error when setting the date as shown above:
```
Failed to set time: NTP unit is active
```
**7.** The error says that the NTP service is active. You need to disable it using the below command.
```
# systemctl disable --now chronyd
```
### Set Date and Time in Linux
**8.** To set date and time, we can use a **set-time** switch along with the format of date in **YY:MM:DD** (Year, Month, Day) and time in **HH:MM:SS** (Hour, Minute, and Seconds).
```
# timedatectl set-time '2015-11-20 16:14:50'
```
Set Date in LinuxSet Date and Time in Linux### How to Find and Set Hardware Clock in Linux
**9.** To set your hardware clock to coordinated universal time, **UTC**, use the **set-local-rtc boolean-value** option as follows:
First Find out if your hardware clock is set to the local timezone:
```
# timedatectl | grep local
```
Set your hardware clock to the local timezone:
```
# timedatectl set-local-rtc 1
```
Set Hardware Clock TimezoneSet your hardware clock to coordinated universal time (UTC):
```
# timedatectl set-local-rtc 0
```
Set the Hardware Clock to UTC### Synchronizing Linux System Clock with a Remote NTP Server
**NTP** stands for **Network Time Protocol** is an internet protocol, which is used to synchronize the system clock between computers. The **timedatectl** utility enables you to automatically sync your Linux system clock with a remote group of servers using NTP.
Please note that you must have **NTP** installed on the system to enable automatic time synchronization with NTP servers.
To start automatic time synchronization with a remote NTP server, type the following command at the terminal.
```
# timedatectl set-ntp true
```
To disable NTP time synchronization, type the following command at the terminal.
```
# timedatectl set-ntp false
```
# How to Symlink a Directory in Linux
Symlink, also known as a symbolic link in Linux, creates a link to a file or a directory for easier access. To put it in another way, symlinks are links that points to another file or folder in your system, quite similar to the shortcuts in Windows. Some users refer to symlinks as soft-links. Before moving forward, let’s elaborate soft-links and hard-links.
Hard-links: Hard-links are the links that mirror or copy the original file. Hard-links have the same inode numbers.
Soft-links: Soft-links are simple links that points to the original file. You can access the original file through soft links. Soft-links can point to a file or folder in any partition and have different inode numbers.
Learning about creating symlink in Linux is a great way to improve your grip on the Linux terminal. So, let’s learn the steps involved in making the soft-links in Linux.
## How to Create Symlink (soft-link) in Linux
To make symlink or soft link, we use the “**ln**” command. The syntax to follow to create symlink is mentioned below:
$ ln-s\[path of the target file/directory\]\[symbolic name\]
In the first argument after the “-s” option, you will be giving the path of the file of a folder you want to create the symlink of. While in the second argument, pass the name you want to give that symlink. To check the created links, use the following command:
$ ls-l
To check inode numbers, use the command mentioned below:
$ ls-i
## How to Create a Symlink (soft link) to a File
Creating a soft link to a file is simple; use the syntax mentioned below:
$ ln-s\[path of the target file\]\[symbolic name\]
Important to note that if you do not specify the “\[symbolic name\]”, then the command will create a symlink by the original file’s name. Let’s understand it through an example.
I have created a directory “my\_folder” that contains a text file “my\_doc.txt”. Now, to create symlink to “my\_doc.txt” file, I will use:
$ ln-s my_folder/my_doc.txt my_document

To verify it, use:
$ ls-l
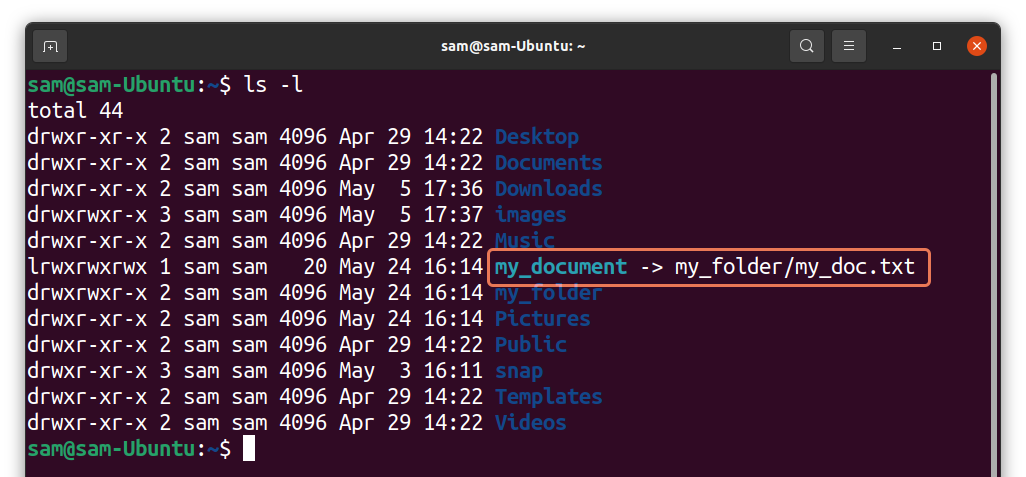
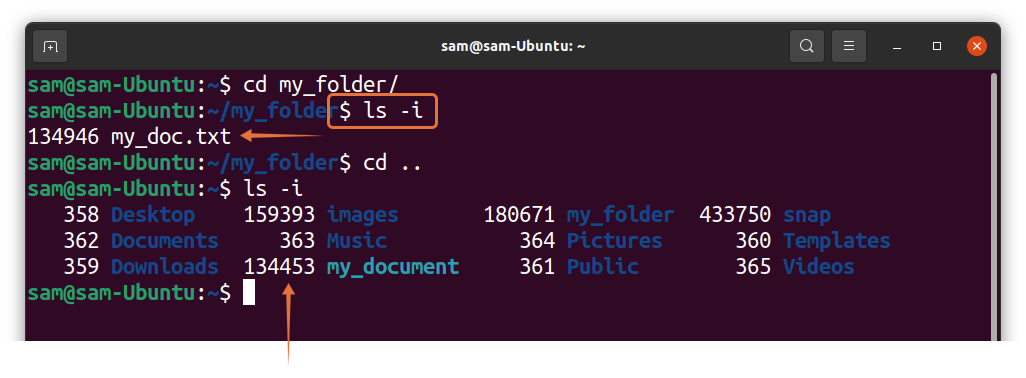
As it can be seen in the above output, “**my\_document**” is pointing to “**my\_folder/my\_doc.txt**” file. Both the symlink and the original file would have different inode number. To check inode numbers used:
$ ls-i
Hard links will always have same inode numbers. To verify, I created a hard link of “**my\_doc.txt**” file and name it “**my\_document\_2**”:
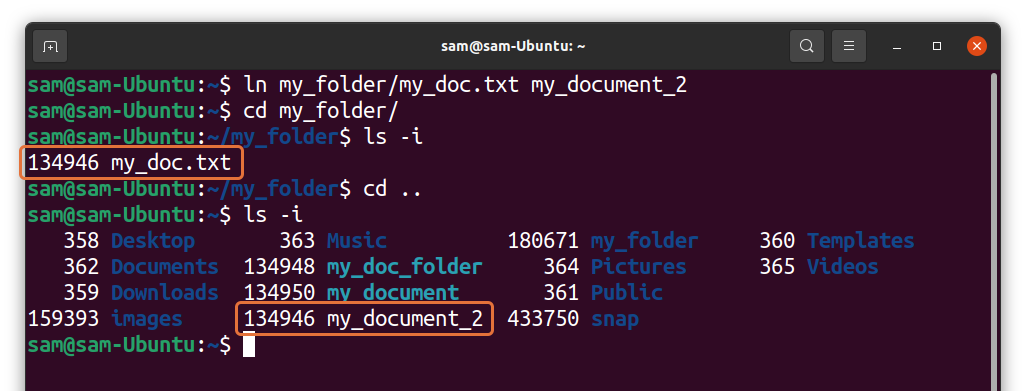
It can be seen in the output that the original file and the hard link have same inode numbers.
## How to Create a Symlink (Soft Link) of the Folder/Directory
To create a soft-link or symlink to a directory is quite similar to creating a symlink to a file. For instance, I am creating the symlink of the “**my\_folder**” directory using:
$ ln-s my_folder my_doc_folder

The above command will create a symlinked folder in the current directory. To verify it, use:
## How to Overwrite the Symlink (Soft Link) in Linux:
If you try to update a symlink with the same name that already exist, then you will get an error:
$ ln-s my_folder_2/my_doc_2.txt my_document

We will have to use the force flag “**-f**” to overwrite the new path to the existing symlink.
$ ln-sf my_folder_2/my_doc_2.txt my_document
## 
## How to Remove Symlink (Soft Link) in Linux:
In many situation, you need to remove the unnecessary symlinks from your system. To delete symlink, we use the “**unlink**” command, and the syntax is given below:
$ unlink\[symlink name\]
Let’s remove the symlinks we created in the above examples. To unlink a symlink of a file, use:
$ unlink my_document

And to unlink the symlink of a directory:
$ unlink my_doc_folder

We can also use the “**rm**” command to remove symlinks.
$ rm my_document my_doc_folder

The advantage of “**rm**” over “**unlink**” is that you can remove multiple symlinks with the “**rm**” command, which is not possible with the “**unlink**” command as shown in the following image:

Note that whether you use the “**unlink**” or “**rm**” command, do not use trailing slash “**/**” even if it is a directory.
# LN Command - Create Links
[https://linuxize.com/post/how-to-create-symbolic-links-in-linux-using-the-ln-command/](https://linuxize.com/post/how-to-create-symbolic-links-in-linux-using-the-ln-command/)
## Links Types
There are two types of links in Linux/UNIX systems:
- **Hard links**. You can think a hard link as an additional name for an existing file. Hard links are associating two or more file names with the same [inode](https://en.wikipedia.org/wiki/Inode) . You can create one or more hard links for a single file. Hard links cannot be created for directories and files on a different filesystem or partition.
- **Soft links**. A soft link is something like a shortcut in Windows. It is an indirect pointer to a file or directory. Unlike a hard link, a symbolic link can point to a file or a directory on a different filesystem or partition.
## How to Use the `ln` Command
`ln` is a command-line utility for creating links between files. By default, the `ln` command creates hard links. To create a symbolic link, use the `-s` (`--symbolic`) option.
The `ln` command syntax for creating symbolic links is as follows:
```sh
ln -s [OPTIONS] FILE LINK
```
- If both the `FILE` and `LINK` are given, `ln` will create a link from the file specified as the first argument (`FILE`) to the file specified as the second argument (`LINK`).
- If only one file is given as an argument or the second argument is a dot (`.`), `ln` will create a link to that file in the [current working directory](https://linuxize.com/post/current-working-directory/) . The name of the symlink will be the same as the name of the file it points to.
By default, on success, `ln` doesn’t produce any output and returns zero.
## Creating Symlink To a File
To create a symbolic link to a given file, open your terminal and type:
```sh
ln -s source_file symbolic_link
```
Replace `source_file` with the name of the existing file for which you want to create the symbolic link and `symbolic_link` with the name of the symbolic link.
The `symbolic_link` parameter is optional. If you do not specify the symbolic link, the `ln` command will create a new link in your current directory:
In the following example, we are creating a symbolic link named `my_link.txt` to a file named `my_file.txt`:
```
```
ln -s my_file.txt my_link.txt
```
```
To verify that the symlink was successfully created, use the [`ls`](https://linuxize.com/post/how-to-list-files-in-linux-using-the-ls-command/) command:
```
```
ls -l my_link.txt
```
```
The output will look something like this:
```
```output
lrwxrwxrwx 1 linuxize users 4 Nov 2 23:03 my_link.txt -> my_file.txt
```
```
The `l` character is a file type flag that represents a symbolic link. The `->` symbol shows the file the symlink points to.
## Creating Symlinks To a Directory
The command for creating a symbolic link to a directory is the same as when creating a symbolic link to a file. Specify the directory name as the first parameter and the symlink as the second parameter.
For example, if you want to create a symbolic link from the `/mnt/my_drive/movies` directory to the `~/my_movies` directory you would run:
```
```con
ln -s /mnt/my_drive/movies ~/my_movies
```
```
## Overwriting Symlinks
If you try to create a [symbolic link that already exists](https://linuxize.com/post/bash-check-if-file-exists/) , the `ln` command will print an error message.
```
```
ln -s my_file.txt my_link.txt
```
```
```
```output
ln: failed to create symbolic link 'my_link.txt': File exists
```
```
To overwrite the destination path of the symlink, use the `-f` (`--force`) option.
```
```
ln -sf my_file.txt my_link.txt
```
```
## Removing Symlinks
To [delete/remove symbolic links](https://linuxize.com/post/how-to-remove-symbolic-links-in-linux/) use either the `unlink` or `rm` command.
The syntax of the [`unlink`](https://linuxize.com/post/unlink-command-in-linux/) is very simple:
```sh
unlink symlink_to_remove
```
Removing a symbolic link using the [`rm`](https://linuxize.com/post/rm-command-in-linux/) command is the same as when removing a file:
```sh
rm symlink_to_remove
```
No matter which command you use, when removing a symbolic link not append the `/` trailing slash at the end of its name.
If you delete or move the source file to a different location, the symbolic file will be left dangling (broken) and should be removed.
# Sysadmins Networking Cheat Sheet
[](http://bookstack.coltscomputer.services/uploads/images/gallery/2023-12/kZUimage.png)
[](http://bookstack.coltscomputer.services/uploads/images/gallery/2023-12/wAXimage.png)
# Using Cert Bot to get a Valid SSL certificate
This guide will detail how to get a valid SSL cert using certbot on Linux operating systems
[Certbot user guide](https://eff-certbot.readthedocs.io/en/stable/using.html)
[Commands for defining Key Type](https://eff-certbot.readthedocs.io/en/stable/using.html#rsa-and-ecdsa-keys)
[https://www.onepagezen.com/letsencrypt-auto-renew-certbot-apache/](https://www.onepagezen.com/letsencrypt-auto-renew-certbot-apache/)
[Configuration file](https://eff-certbot.readthedocs.io/en/stable/using.html#id36)
[https://eff-certbot.readthedocs.io/en/stable/using.html#config-file](https://eff-certbot.readthedocs.io/en/stable/using.html#config-file)
Follow this guide to force Cerbot to use Elliptical Curve Diffe-Hellman Curves for all certificates. Any existing certs will be updated upon the next reboot.
Certbot accepts a global configuration file that applies its options to all invocations of Certbot. Certificate specific configuration choices should be set in the `.conf` files that can be found in `/etc/letsencrypt/renewal`.
By default no cli.ini file is created (though it may exist already if you installed Certbot via a package manager, for instance). After creating one it is possible to specify the location of this configuration file with `certbot--configcli.ini` (or shorter `-ccli.ini`). An example configuration file is shown below:
```
# This is an example of the kind of things you can do in a configuration file.
# All flags used by the client can be configured here. Run Certbot with
# "--help" to learn more about the available options.
#
# Note that these options apply automatically to all use of Certbot for
# obtaining or renewing certificates, so options specific to a single
# certificate on a system with several certificates should not be placed
# here.
# Use ECC for the private key
key-type = ecdsa
elliptic-curve = secp384r1
# Use a 4096 bit RSA key instead of 2048
rsa-key-size = 4096
# Uncomment and update to register with the specified e-mail address
# email = foo@example.com
# Uncomment to use the standalone authenticator on port 443
# authenticator = standalone
# Uncomment to use the webroot authenticator. Replace webroot-path with the
# path to the public_html / webroot folder being served by your web server.
# authenticator = webroot
# webroot-path = /usr/share/nginx/html
# Uncomment to automatically agree to the terms of service of the ACME server
# agree-tos = true
# An example of using an alternate ACME server that uses EAB credentials
# server = https://acme.sectigo.com/v2/InCommonRSAOV
# eab-kid = somestringofstuffwithoutquotes
# eab-hmac-key = yaddayaddahexhexnotquoted
```
If on the internal network set the DNS on the machine to use CloudFlared or Google. DNS will not resolve properly if using the internal DNS servers
1. install the package certbot *sudo apt install certbot -y*
2. navigate to the /etc/letsencrypt directory
3. Two types on install Manual and Auto
1. sudo certbot certonly --manual --preferred-challenges dns -d "\*.coltscomputer.services"
1. this will pull a SSL cert from Let's Encrypt
2. Go to the DNS hosted domain on [Route 53](https://us-east-1.console.aws.amazon.com/route53/v2/hostedzones?region=us-east-2#ListRecordSets/Z09329661DRDZZMUXFO3E) and add the \_acme-challenge text to the existing \_acme-challenge TXT record
4. For the auto install
1. [This guide shows how to configure a virtual host](https://community.letsencrypt.org/t/unable-to-find-a-virtual-host-listening-on-port-80/158912/3)
1. cd /etc/apache2/sites-enabled
2. edit the .conf files there for the necessary domain name
1. sudo nano \*.conf
2. edit the YOUR-DOMAIN-NAME line
2. sudo certbot certonly --apache --key-type ecdsa --preferred-challenges dns -d "\*.coltscomputer.services"
1. This should auto renew
2. use *sudo certbot renew --dry-run* to test if the renewal will work automatically
# Using Netplan to set a static IP address
[https://www.linux.com/topic/distributions/how-use-netplan-network-configuration-tool-linux/](https://www.linux.com/topic/distributions/how-use-netplan-network-configuration-tool-linux/)
- Match the netplan configuration to the below
- [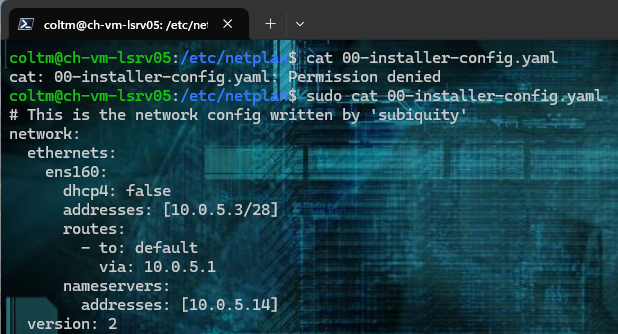](https://docs.coltscomputer.services/uploads/images/gallery/2024-07/Ctv1Jl9knFWImisw-image.png)
- run `sudo chmod 600 /etc/netplan/your_config_file.yaml`
- run `sudo netplan try`
- if there are no errors accept the changes
# Using S.M.A.R.T to check disk health
[https://linuxconfig.org/how-to-check-an-hard-drive-health-from-the-command-line-using-smartctl](https://linuxconfig.org/how-to-check-an-hard-drive-health-from-the-command-line-using-smartctl)
smartctl has to be run as sudo or root user
*smartctl -a /dev/sda* shows all smart data from a drive
Run the following tests in the scenarios
- short test
- The **short** test is meant to quickly check the most common problems that could be found on a storage device. The test should take no more than 10 minutes: mechanical, electrical and read performances of a disk are checked.
- long test
- The **long** test is basically a more accurate version of the “short” test. In can take a lot of time to complete: as stated in the the smartctl manual, it can last from tens of minutes to several hours.
- conveyance test
- The **conveyance** test is meant to check for possible damages occurred during the transportation of the device. It usually takes minutes to complete a conveyance test. It is available only on ATA devices.
- select test
- The **select** test, like the “conveyance” one, is available only on ATA devices, and is meant to check only the specified range of LBAs (Logical Block Addresses). The range of addresses is specified when launching the test. For example, to check addresses from 10 to 20 (inclusive), we would run:
- smartctl -t select,10-20
-t option is for running a test immediately and specifies the test type
short for --test
# Show used disk space on Linux
```
sudo du -h -x -d1 /
```
# Clean Archive Cache
Run this after doing an apt upgrade
```
sudo apt-get clean
```
# Expand LVM Volume
### Expanding the Logical Volume
1. **Check Available Space: Before expanding, check how much free space is available in the volume group.**
1. **`vgdisplay`**
2. **Resize the Logical Volume: To extend the logical volume, use the following command. Replace `` with the amount you want to add (e.g., `10G` for 10 GB):**
1. **`sudo lvextend -L + /dev/mapper/ubuntu--vg-ubuntu--lv`**
3. **Resize the Filesystem: After resizing the logical volume, you need to resize the filesystem to use the new space:**
1. **For ext4 filesystem:**
1. **`sudo resize2fs /dev/mapper/ubuntu--vg-ubuntu--lv`**
2. **For XFS filesystem:**
1. `sudo xfs_growfs /dev/mapper/ubuntu--vg-ubuntu--lv`
**Shrinking the Logical Volume**
1. **Check Filesystem Size: Before shrinking, ensure the filesystem is smaller than the logical volume you want to resize it to. You might need to reduce the filesystem size first.**
1. **For ext4 filesystem:**
1. `sudo resize2fs /dev/mapper/ubuntu--vg-ubuntu--lv `
2. For example, to shrink to 20G:
1. `sudo resize2fs /dev/mapper/ubuntu--vg-ubuntu--lv 20G`
2. **Reduce the Logical Volume: Now you can safely reduce the logical volume:**
1. **`sudo lvreduce -L /dev/mapper/ubuntu--vg-ubuntu--lv`**
3. **Resize the Filesystem Again (if necessary): If you haven’t already resized the filesystem in the first step, you can do it now.**
# Ubuntu 20.04: How to Extend Partition (For Noobs)
[https://forum.cloudron.io/topic/6086/ubuntu-20-04-how-to-extend-partition-for-noobs/2](https://forum.cloudron.io/topic/6086/ubuntu-20-04-how-to-extend-partition-for-noobs/2)
Our Ubuntu 20 is installed on Hyper-V. First, let’s check the size of the file system by running df -h (all commands are executed as root):
```bash
# df -h
Filesystem Size Used Avail Use% Mounted on
tmpfs 394M 1,4M 392M 1% /run
/dev/sda3 24G 7,4G 16G 33% /
tmpfs 2,0G 0 2,0G 0% /dev/shm
tmpfs 5,0M 0 5,0M 0% /run/lock
tmpfs 4,0M 0 4,0M 0% /sys/fs/cgroup
/dev/sda2 512M 7,8M 505M 2% /boot/efi
tmpfs 394M 144K 394M 1% /run/user/1000
```
Our system partition, mounted in /, is 24 GB in size.
Let’s see the output fdisk -l:
```yaml
# fdisk -l
Disk /dev/sda: 25 GiB, 26843545600 bytes, 52428800 sectors
Disk model: Virtual Disk
Units: sectors of 1 * 512 = 512 bytes
Sector size (logical/physical): 512 bytes / 4096 bytes
I/O size (minimum/optimal): 4096 bytes / 4096 bytes
Disklabel type: gpt
Disk identifier: F5F02D9D-060D-422F-BA27-1981A6CA23F4
Device Start End Sectors Size Type
/dev/sda1 2048 4095 2048 1M BIOS boot
/dev/sda2 4096 1054719 1050624 513M EFI System
/dev/sda3 1054720 52426751 51372032 24.5G Linux filesystem
```
In this example, we have 1 disk /dev/sda with a size of 25 gigabytes, which is divided into 3 logical ones: /dev/sda1, /dev/sda2 and /dev/sda3 with the Linux filesystem type – we are interested in it.
**Increasing disk size**
In a virtualization environment, we increase the size of the hard disk of our virtual machine. Most likely, your virtualization system will ask you to turn off the VM first. I increased the disk to 30 gigabytes, start the machine:
```yaml
#fdisk -l
Disk /dev/sda: 30 GiB, 32212254720 bytes, 62914560 sectors
Disk model: Virtual Disk
Units: sectors of 1 * 512 = 512 bytes
Sector size (logical/physical): 512 bytes / 4096 bytes
I/O size (minimum/optimal): 4096 bytes / 4096 bytes
Disklabel type: gpt
Disk identifier: F5F02D9D-060D-422F-BA27-1981A6CA23F4
Device Start End Sectors Size Type
/dev/sda1 2048 4095 2048 1M BIOS boot
/dev/sda2 4096 1054719 1050624 513M EFI System
/dev/sda3 1054720 52426751 51372032 24.5G Linux filesystem
```
**Ubuntu 20 extend partition**
*Attention! Before starting work on expanding the system partition, be sure to make a backup copy of your data!*
After increasing the size of the disk, you need to increase the system partition itself. Let’s execute fdisk /dev/sda, where /dev/sda is the label of our disk (Disk /dev/sda):
```perl
# fdisk /dev/sda
Welcome to fdisk (util-linux 2.32.1).
Changes will remain in memory only, until you decide to write them.
Be careful before using the write command.
Command (m for help):
```
We enter p to look at the list of partitions:
```yaml
Command (m for help): p
Disk /dev/sda: 30 GiB, 32212254720 bytes, 62914560 sectors
Disk model: Virtual Disk
Units: sectors of 1 * 512 = 512 bytes
Sector size (logical/physical): 512 bytes / 4096 bytes
I/O size (minimum/optimal): 4096 bytes / 4096 bytes
Disklabel type: gpt
Disk identifier: F5F02D9D-060D-422F-BA27-1981A6CA23F4
Device Start End Sectors Size Type
/dev/sda1 2048 4095 2048 1M BIOS boot
/dev/sda2 4096 1054719 1050624 513M EFI System
/dev/sda3 1054720 52426751 51372032 24.5G Linux filesystem
```
To expand a partition, you must first delete information about it. To do this, enter d and specify the partition (3 for /dev/sda3):
```sql
Command (m for help): d
Partition number (1-3, default 3): 3
Partition 3 has been deleted.
```
*In this case, only the record about the partition is deleted, the data itself remains on the disk!*
Enter n – creating a new partition
```bash
Command (m for help): n
```
Next, we indicate the number of the partition:
```java
Partition number (3-128, default 3):3
```
Next, the starting and ending sectors are indicated. Be sure to check that they match the hyphenated values. This way we use all the unallocated space:
```typescript
First sector (1054720-62914526, default 1054720): 1054720
Last sector, +/-sectors or +/-size{K,M,G,T,P} (1054720-62914526, default 62914526): 62914526
Created a new partition 3 of type 'Linux filesystem' and of size 29.5 GiB.
```
As you can see, a 29.5 gigabyte partition was created with the Linux filesystem type.
It will also ask if we want to delete the current filesystem type. We refuse:
```css
Partition #3 contains a ext4 signature.
Do you want to remove the signature? [Y]es/[N]o: N
```
It remains only to save the partition table:
```bash
Command (m for help): w
```
Reboot the virtual machine:
```bash
# reboot
```
Now we will use the resize2fs utility (for ext4) to increase the size of the filesystem:
```csharp
# resize2fs /dev/sda3
resize2fs 1.45.6 (20-Mar-2020)
open: Permission denied while opening /dev/sda3
n0mit@n0mit-vm:~$ sudo resize2fs /dev/sda3
resize2fs 1.45.6 (20-Mar-2020)
Filesystem at /dev/sda3 is mounted on /; on-line resizing required
old_desc_blocks = 4, new_desc_blocks = 4
The filesystem on /dev/sda3 is now 7732475 (4k) blocks long.
```
Checking the result:
```bash
# df -h
Filesystem Size Used Avail Use% Mounted on
tmpfs 394M 1.4M 392M 1% /run
/dev/sda3 29G 7.4G 21G 27% /
tmpfs 2.0G 0 2.0G 0% /dev/shm
tmpfs 5.0M 0 5.0M 0% /run/lock
tmpfs 4.0M 0 4.0M 0% /sys/fs/cgroup
/dev/sda2 512M 7.8M 505M 2% /boot/efi
tmpfs 394M 84K 394M 1% /run/user/126
tmpfs 394M 72K 394M 1% /run/user/1000
```
As you can see in Ubuntu 20 extend artition is not such a difficult task.
# Live resize root partition on Linux Server (VM)
[https://www.clouvider.com/knowledge\_base/live-resize-root-partition-on-linux-server/](https://www.clouvider.com/knowledge_base/live-resize-root-partition-on-linux-server/)
Most virtual hypervisors (like Proxmox or VMWare) allow resizing VM storage on the fly.
However, if you don’t want to reboot your server while resizing, you can resize your root partition “live”.
Assuming your drive has been already resized on the hypervisor side (e.g. from 20GB to 40GB), you need to follow the following steps to ensure the OS knows about the increased storage capacity.
### **Step 1**
Check your current partition size and drive by using **df -h** and **fdisk -l /dev/sda** command (assuming your drive is sda):
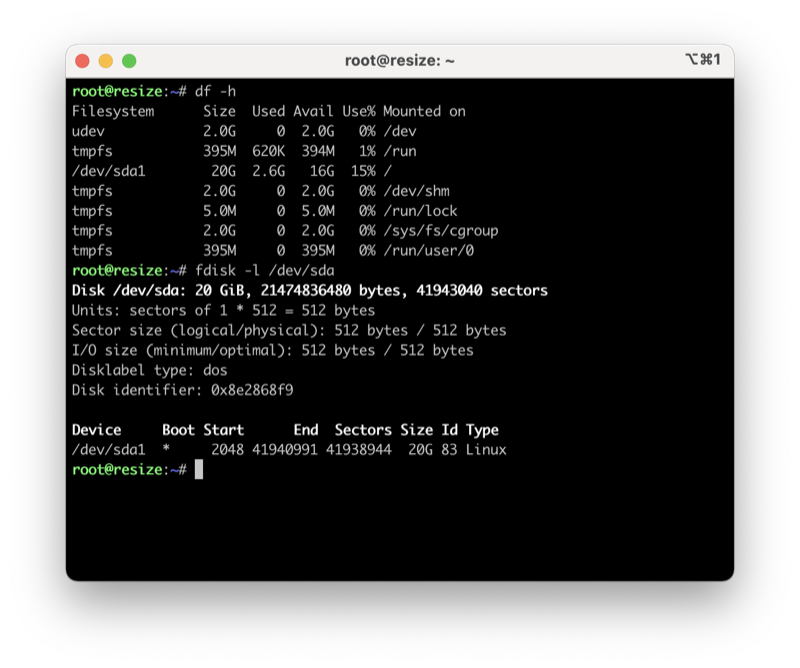
As you can see, the root partition / and the drive total capacity are around **20GB.**
### **Step 2**
Now you need to rescan your block device sda with the following command:
$ echo 1 > /sys/block/sda/device/rescan
And check again drive capacity by using **fdisk -l /dev/sda** command:
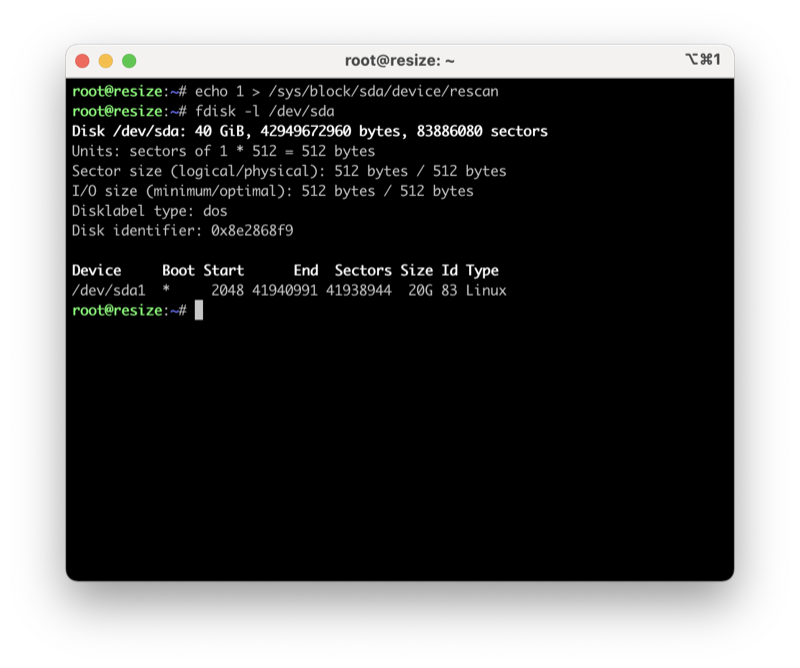
Now your drive has 40GB capacity, but your root partition still uses only 20GB. To resize the root partition, you need to run **fdisk /dev/sda**:
$ fdisk /dev/sda
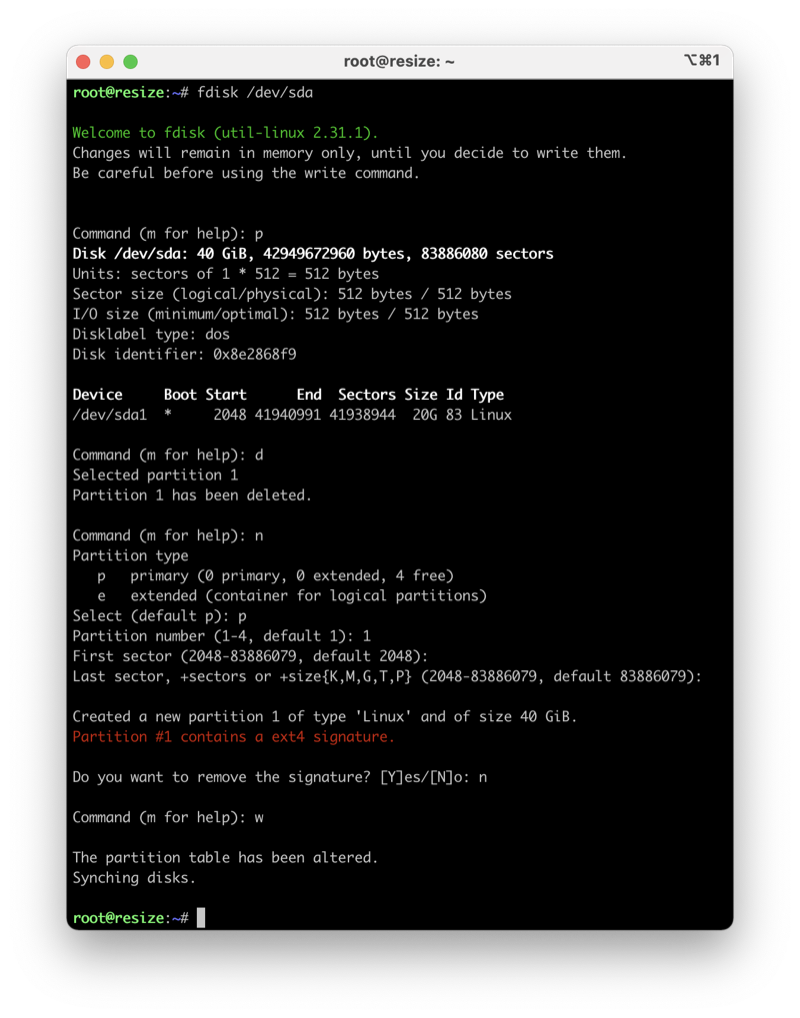
Now press **“p”** to print the current partition layout.
**This operation can be dangerous, so please follow the following steps with caution!**
### **Step 3**
Now delete your primary partition /dev/sda1 by pressing the **d** key.
### **Step 4**
Create a new partition by pressing the **n** key and pressing **1** for the partition number.
### **Step 5**
Use the default value of **Fist sector and Last sector**
### **Step 6**
**Do not remove the existing signature!** Press **n** to avoid removal.
### **Step 7**
**:** Now press the **w** key to save the partition table.
### **Step 8**
Type **resize2fs /** command and check your current root patition capacity by using **df -h**:
$ resize2fs /
$ df -h
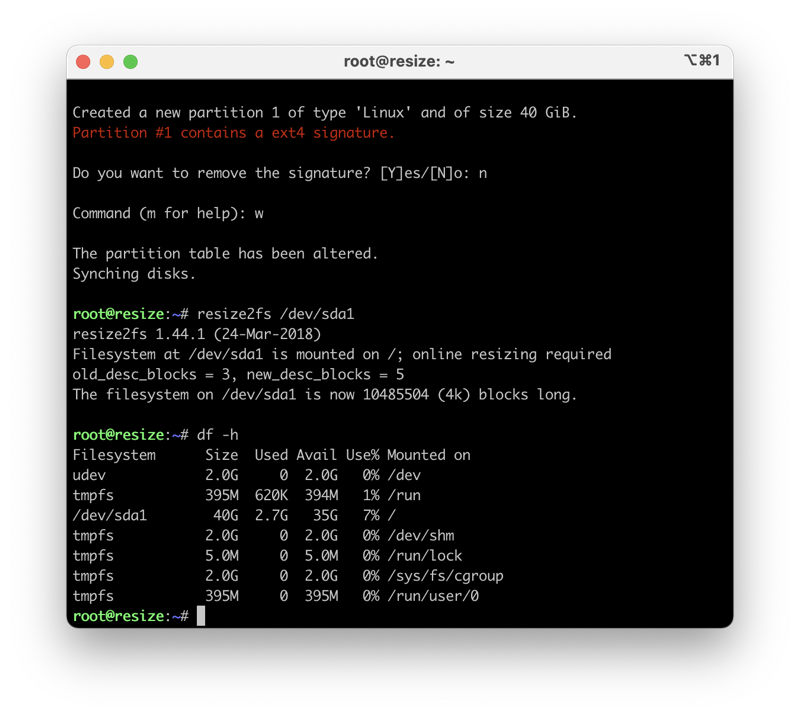
Your root partition / has been now resized.
# Mount SMB Share on boot
\# SMB share
//<SMBSharePath> <local path> cifs username=,password=,uid=,gid=,iocharset=utf8,file\_mode=0777,dir\_mode=0777 0 0
# How to enable Swap on Linux
[https://azdigi.com/blog/en/linux-server-en/linux-fundementals/how-to-enable-swap-on-linux/](https://azdigi.com/blog/en/linux-server-en/linux-fundementals/how-to-enable-swap-on-linux/)
### Step 1: SSH into your Linux system
To create and enable **SWAP** on **Linux**, we first need **to SSH** or access your **VPS** or server with **root** privileges. If you don’t know how to **SSH** into your [**VPS/Server**](https://azdigi.com/pro-vps/), you can refer to the following tutorial:
- [How to login to Linux VPS with SSH protocol](https://azdigi.com/blog/en/azdigi-guide/vps-en/instructions-for-logging-into-linux-vps-with-ssh-protocol/).
After successfully **SSH,** we continue with step 2 to check **Swap** .
### Step 2: Check Swap
Before proceeding to create the **Swap** file, we need to check if the current system has **Swap** enabled or not by running the following command:
AZDIGI Tutorial
```
swapon -s
```
If after running the command no information is displayed, it means that our server has not enabled **Swap**.
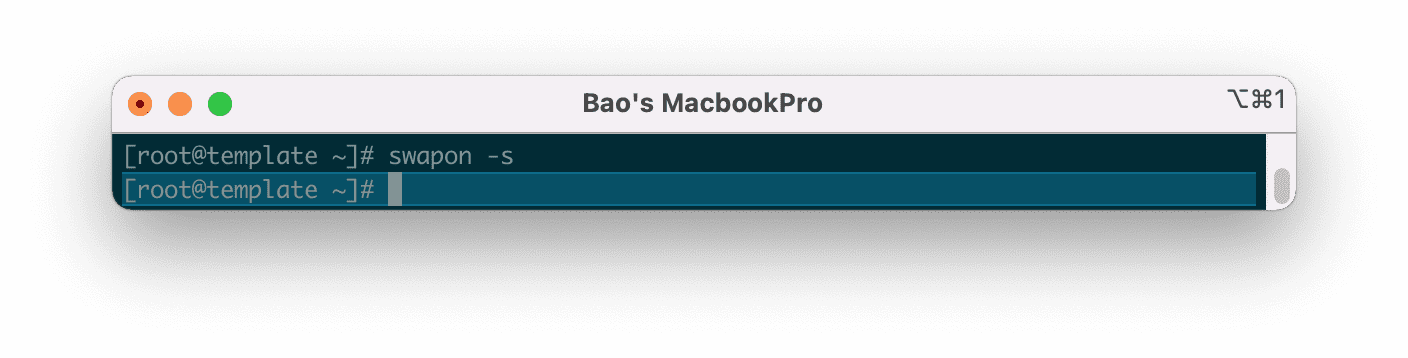*The system has not enabled **Swap**.*
### Step 3: Check the free disk space
Check the free disk space so we can consider creating Swap file space in the next step. To check the free disk space, we use the following command:
AZDIGI Tutorial
```
df -h
```
My free space is up to **31GB**, so it’s quite comfortable to create **Swap**. Because after creating Swap, your server capacity will be lost corresponding to the amount you have allocated for **Swap**.
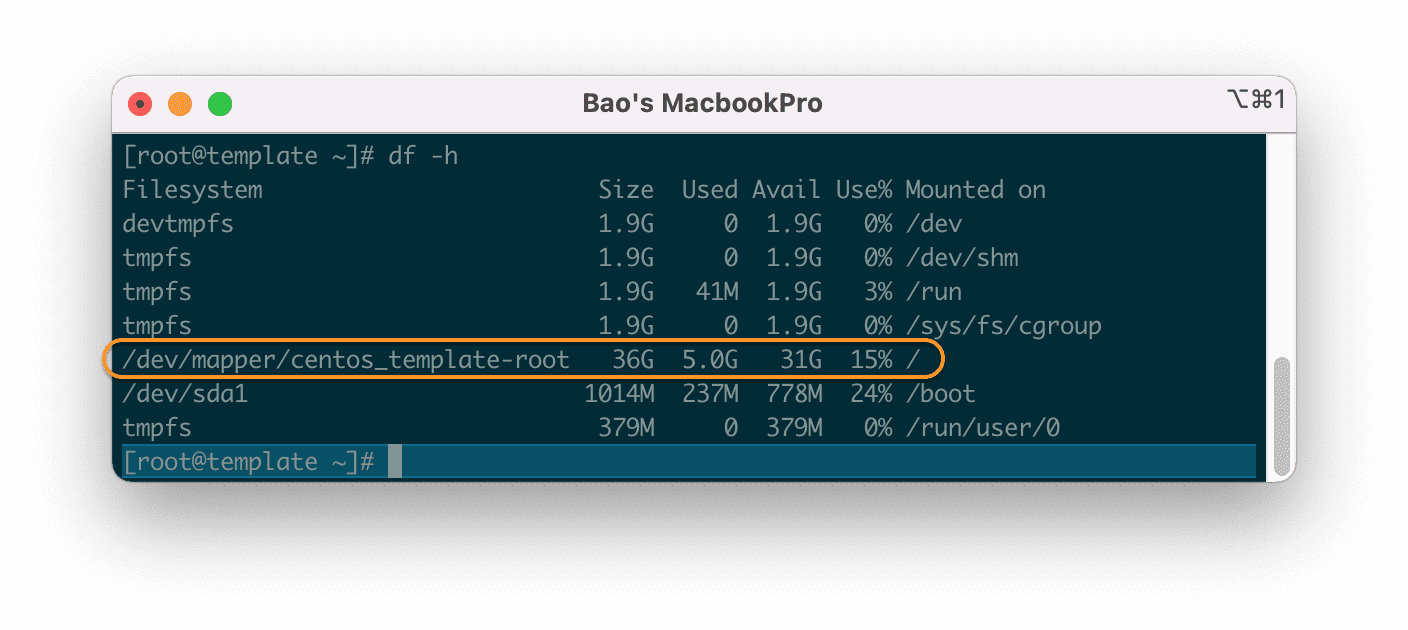*Check the Linux server capacity with the `df -h` command.*
### Step 4: Create the Swap file
For my server with only **4GB** **of RAM**, I will create a Swap partition from **1GB** to **2GB** is suitable.
Here I will use the `dd` command to create a **Swap** file with a capacity of **2GB**.
AZDIGI Tutorial
```
dd if=/dev/zero of=/mnt/swapfile bs=1024 count=2048k
```
The above command will create a **2GB** Swap file. You can change **`count=2048k`** to `count=1024k` … to create a **1GB** Swap. The maximum Swap capacity should only be twice the physical RAM.
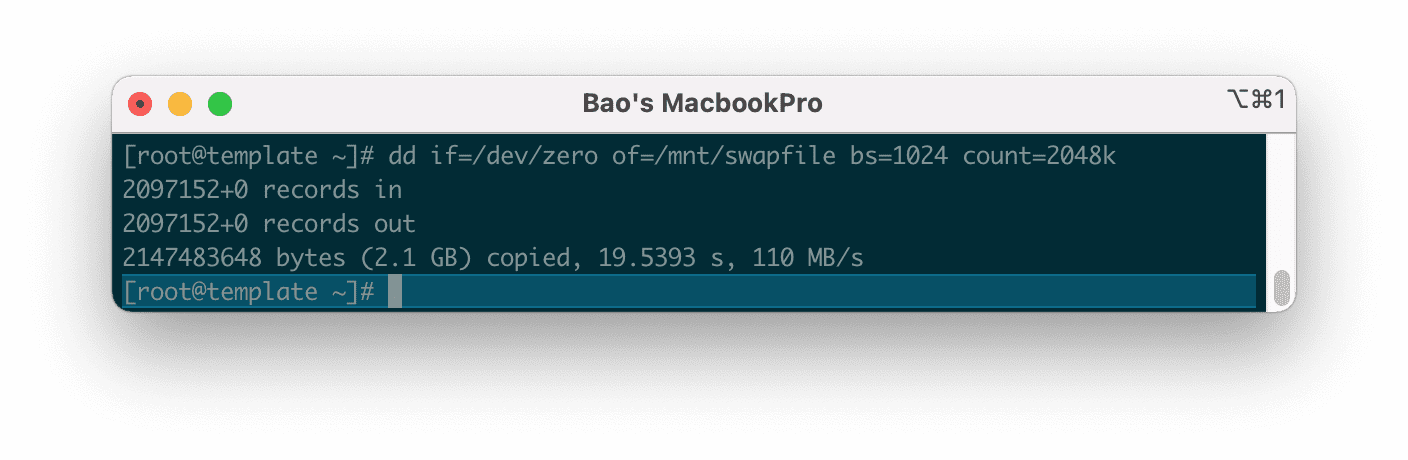*Create a **Swap** file with a capacity of **2GB**.*
After we have created the Swap file, we need to create a partition for it in step 5.
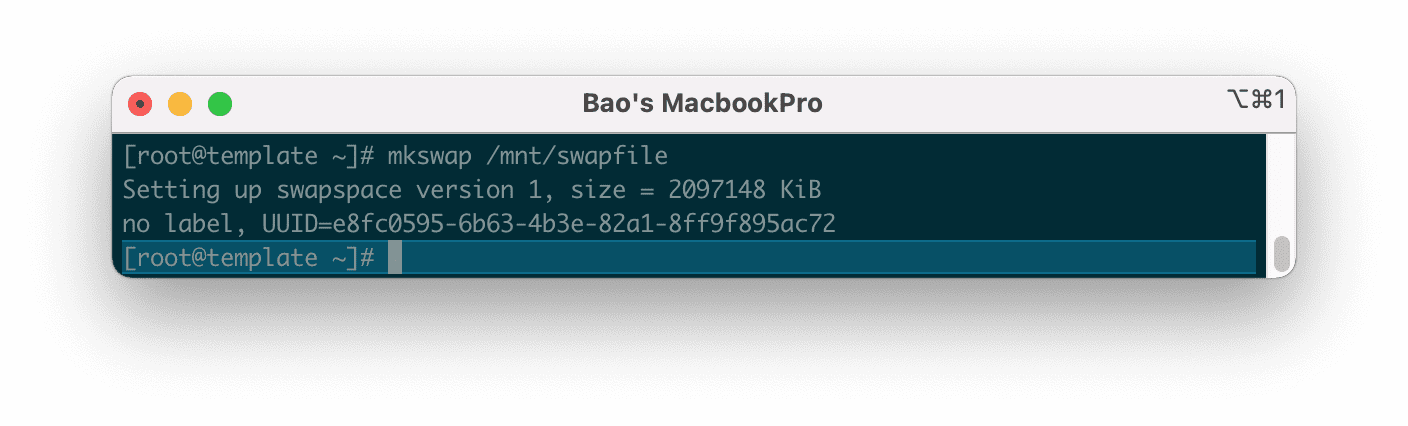
### Step 5: Create Swap Partition and enable Swap on Linux
To create a Swap partition, run the following command:
AZDIGI Tutorial
```
mkswap /mnt/swapfile
```
*Create a **Swap** partition on **Linux**.*
Then we continue to enable **Swap** on **Linux** with the command below:
AZDIGI Tutorial
```
swapon /mnt/swapfile
```
You will get a warning that the permission should be`0600` to make this partition more secure because by default when initializing the directory, it will have permission `0644` . Please ignore this because we will perform the decentralization in the next step.
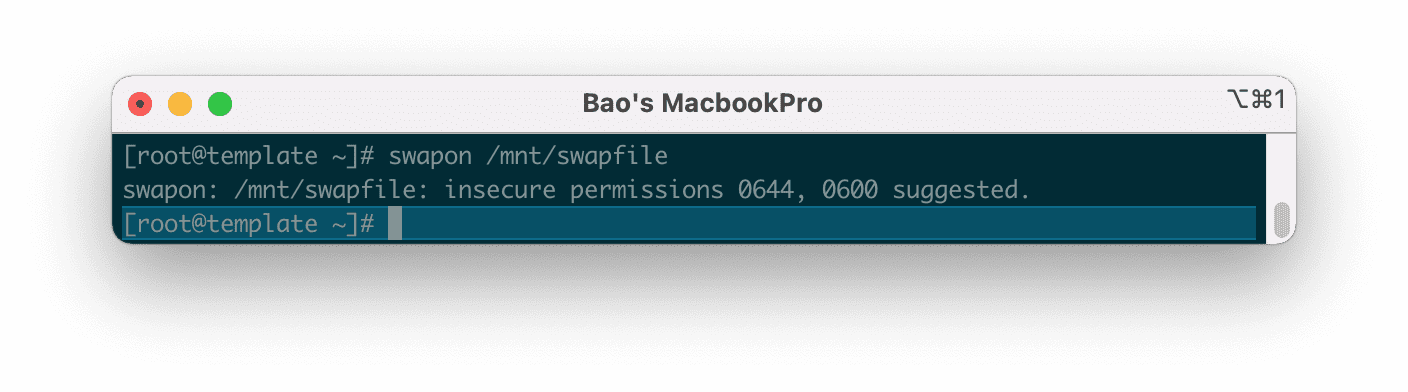*Security warning when activating **Swap** where the folder is in different permissions than `0600` .*
Check the **Swap** status again as in step 2, you will see that everything is different now.
AZDIGI Tutorial
```
swapon -s
```
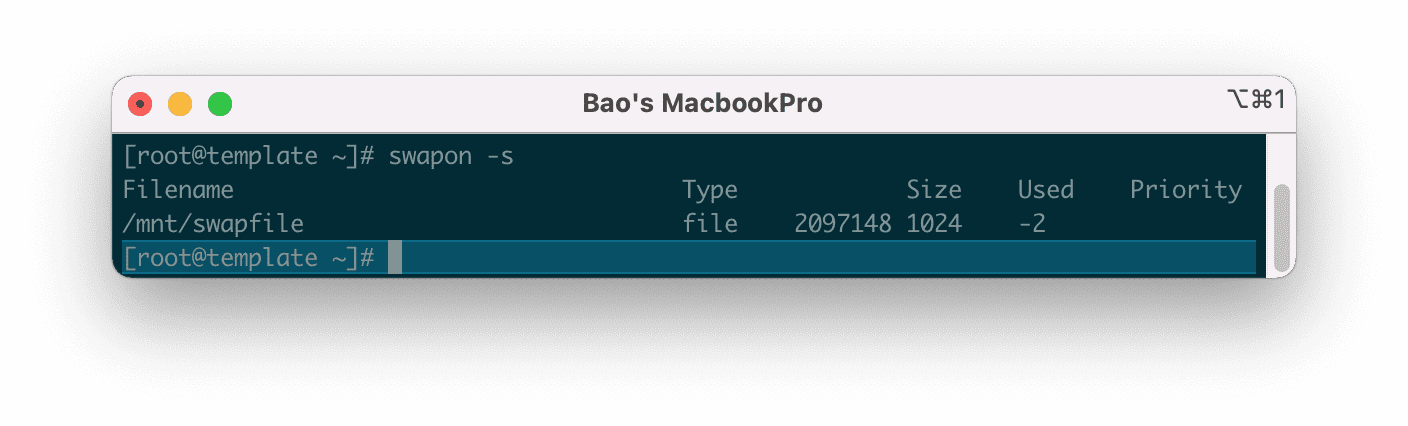*Enable **Swap** on **Linux** successfully.*
Next, we need to set up the **Swap** partition to automatically activate after rebooting the system.
AZDIGI Tutorial
```
echo /mnt/swapfile none swap defaults 0 0 >> /etc/fstab
```
Continue to perform security settings for the Swap partition with the following two commands:
AZDIGI Tutorial
```
chown root:root /mnt/swapfile
chmod 0600 /mnt/swapfile
```
**Explanation of the two commands above:**
- **Command 1:** Delegation of group owner permissions belong to **root**.
- **Command 2:** Authorize only the **root** to access and read and write data.
So we have successfully enabled Swap on Linux. However, if you need to prioritize using **Swap** when the ram level reaches the limit, then follow the rest of the article.
## **V. Configure Swappiness**
Swappness is the priority of using Swap of Linux system. When the amount of free RAM remaining equals the value of Swappiness (as a percentage), the Linux server will switch to use. For example, if your server has only 10% free RAM and Swappiness is set to 10, the server will switch to using Swap.
Because the speed of RAM is many times faster than the speed of the hard disk, when data is written/read from Swap, it will give a much slower speed when used on RAM. So you should consider tweaking the Swappiness range from **5** to **10** as appropriate.
**Note:** The higher the number, the more often the server uses Swap, which means that the hard disk will have to read and write more and degrade faster.
Swappiness will have a value between 0 – 100.
Here are some commonly used scenarios:
- swappiness = 0: swap is only used when RAM is used up.
- swappiness = 10: swap is used when 10% RAM is available.
- swappiness = 60: swap is used when the RAM is 60% free.
- swappiness = 100: swap takes precedence as RAM.
You can check the Swappiness parameter with the following command:
AZDIGI Tutorial
```
cat /proc/sys/vm/swappiness
```
Here are the results on my server.
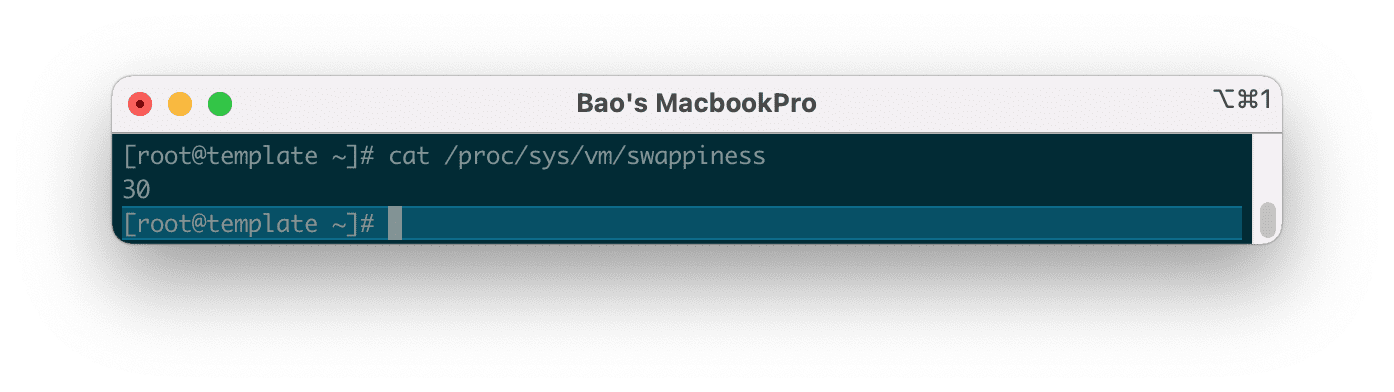*When the amount of physical **RAM** reaches **70%**, Linux switches to using **Swap**.*
And to change this value to **10**, we use the following command:
AZDIGI Tutorial
```
sysctl vm.swappiness=10
```
Then check again with the test command you can see that the number Swappiness has been changed.
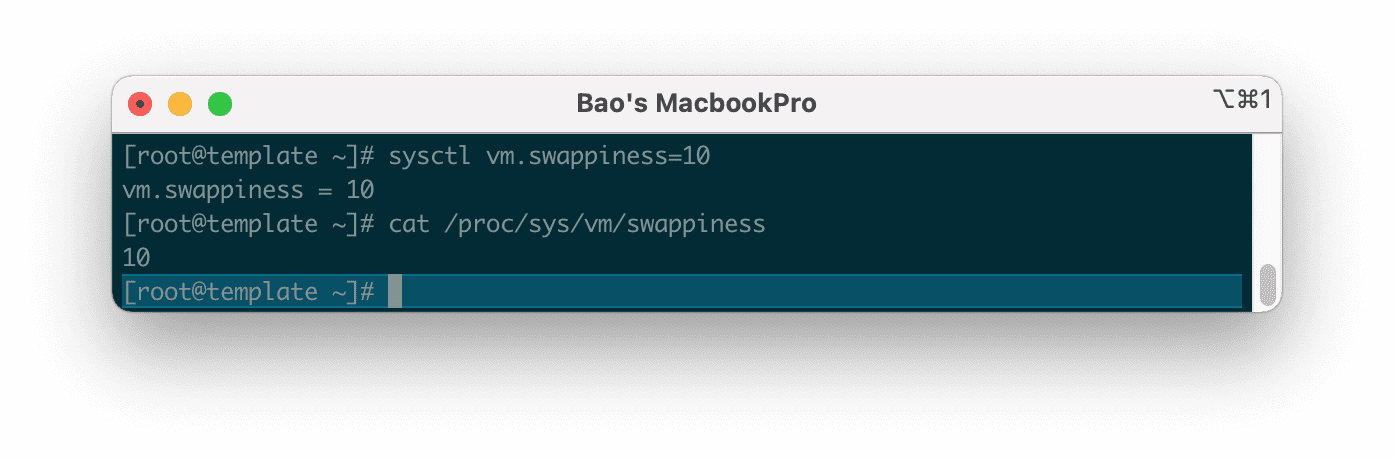*When the amount of physical **RAM** reaches **70%**, Linux will switch to using **Swap**.*
However, using this command is only a temporary configuration. And after restarting the server the parameters will be back to default.
To make sure this parameter stays the same every time you restart the server, you need to adjust the parameter`vm.swappiness` at the end of the `/etc/sysctl.conf` file, in case your server does not have this line, please add it manually.
Then save this file and restart your server to get the new parameters. Please wait a moment for the server to restart, you can check again with the following commands.
AZDIGI Tutorial
```
swapon -s
cat /proc/sys/vm/swappiness
```
Below is the result after I restart the server.
In some cases CentOS 7 server even if you change the parameters **`vm.swappiness`** at the end of the `/etc/sysctl.conf` file also doesn’t work after restarting the server, maybe that server has a **tune profile** that will automatically overwrite the parameters **`vm.swappiness`** every time it reboots.
To check which profile is overriding, use the following command:
AZDIGI Tutorial
```
grep vm.swappiness /usr/lib/tuned/*/tuned.conf
```
The results will be as follows:
According to the result, please edit the parameters`vm.swappiness` in the `/usr/lib/tuned/virtual-guest/tuned.conf` file to 10 at your disposal. And finally, restart the server.
# How To Check Swap Usage Size and Utilization in Linux
## [https://www.cyberciti.biz/faq/linux-check-swap-usage-command/](https://www.cyberciti.biz/faq/linux-check-swap-usage-command/)
## Check swap usage size and utilization in Linux
The procedure to check swap space usage and size in Linux is as follows:
1. Open a terminal application.
2. To see swap size in Linux, type the command: **swapon -s**.
3. You can also refer to the **/proc/swaps** file to see swap areas in use on Linux.
4. Type **free -m** to see both your ram and your swap space usage in Linux.
5. Finally, one can use the **top** or **htop** command to look for swap space Utilization on Linux too.
## How to Check Swap Space in Linux using /proc/swaps file
Type the following [cat command](https://www.cyberciti.biz/faq/linux-unix-appleosx-bsd-cat-command-examples/ "cat Command in Linux / Unix with examples") to see total and used swap size:
`cat /proc/swaps `
Sample outputs:
```
Filename Type Size Used Priority
/dev/sda3 partition 6291448 65680 0
```
Another option is to type the [grep command](https://www.cyberciti.biz/faq/howto-use-grep-command-in-linux-unix/ "How to use grep command In Linux / UNIX with examples") or [egrep command](https://www.cyberciti.biz/faq/grep-regular-expressions/ "Regular expressions in grep ( regex ) with examples") as follows:
`grep '^Swap' /proc/meminfo`
Here is what I see:
```
SwapCached: 0 kB
SwapTotal: 524284 kB
SwapFree: 524284 kB
```
## Look for swap space in Linux using swapon command
Type the following command to show swap usage summary by device
`swapon -s`
Sample outputs (you may see a filename such as /swap1 instead of a partition such as /dev/sda3):
```
Filename Type Size Used Priority
/dev/sda3 partition 6291448 65680 0
```
## Use free command to monitor swap space usage
Use the free command as follows:
`free -g``free -k`
`free -m`
Sample outputs (look for swap line):
```
total used free shared buffers cached
Mem: 11909 11645 264 0 324 8980
-/+ buffers/cache: 2341 9568
Swap: 6143 64 6079
```
See [Linux Check Memory Usage Using the CLI and GUI](https://www.cyberciti.biz/faq/linux-check-memory-usage/ "Linux Check Memory Usage Using the CLI and GUI") tutorial page for more info.
## See swap size in Linux using vmstat command
Type the following vmstat command:
`vmstat`
`vmstat 1 5`
Sample outputs:
```
procs -----------memory---------- ---swap-- -----io---- -system-- ----cpu----
r b swpd free buff cache si so bi bo in cs us sy id wa
1 9 1209512 101352 1504 127980 0 3 11 20 60 55 3 1 95 1
2 11 1209640 101292 1508 134132 844 424 5608 964 23280 15012 2 8 20 70
0 10 1210052 108132 1532 125764 648 660 10548 916 22237 18103 3 10 11 77
1 13 1209892 106484 1500 128052 796 240 10484 980 24024 12692 2 8 24 67
1 9 1209332 113412 1500 124028 1608 168 2472 620 28854 13761 2 8 20 70
```
Note down the following output from swap field:
1. si: Amount of memory swapped in from disk (/s).
2. so: Amount of memory swapped to disk (/s).
## top/atop/htop/glances Linux commands
**Prerequisite**
By default, htop, atop, and glances command may not be installed on your system. Hence, use the [apk command](https://www.cyberciti.biz/faq/10-alpine-linux-apk-command-examples/ "10 Alpine Linux apk Command Examples") on Alpine Linux, dnf command/[yum command](https://www.cyberciti.biz/faq/rhel-centos-fedora-linux-yum-command-howto/ "How to use the yum command on Linux (CentOS/RHEL)") on RHEL & co, [apt command](https://www.cyberciti.biz/faq/ubuntu-lts-debian-linux-apt-command-examples/ "apt Command Examples for Ubuntu/Debian Linux")/[apt-get command](https://www.cyberciti.biz/tips/linux-debian-package-management-cheat-sheet.html "Ubuntu/Debian Linux apt-get package management cheat sheet") on Debian, Ubuntu & co, zypper command on SUSE/OpenSUSE, pacman command on Arch Linux to install the htop, atop, and glances.
Type any one of the following command at the CLI:
`atop``htop``top``glances`
Sample outputs from top command:
```
top - 02:54:24 up 15:24, 4 users, load average: 0.45, 4.84, 6.75
Tasks: 266 total, 1 running, 264 sleeping, 0 stopped, 1 zombie
Cpu(s): 3.2%us, 1.4%sy, 0.0%ni, 94.4%id, 1.0%wa, 0.0%hi, 0.1%si, 0.0%st
Mem: 8120568k total, 7673584k used, 446984k free, 4516k buffers
Swap: 15859708k total, 1167408k used, 14692300k free, 1151972k cached
PID USER PR NI VIRT RES SHR S %CPU %MEM TIME+ COMMAND
13491 vivek 20 0 1137m 279m 6692 S 10 3.5 19:17.47 firefox
5663 vivek 10 -10 1564m 1.1g 59m S 8 14.5 5:10.94 vmware-vmx
2661 root 20 0 352m 185m 8604 S 6 2.3 65:40.17 Xorg
3752 vivek 20 0 3566m 2.6g 12m S 6 33.6 63:44.35 compiz
4798 vivek 20 0 900m 50m 4992 S 2 0.6 0:11.04 chrome
5539 vivek 20 0 1388m 838m 780m S 2 10.6 1:45.78 VirtualBox
6297 root 20 0 0 0 0 S 2 0.0 0:00.15 kworker/2:0
6646 root 20 0 19252 1404 936 R 2 0.0 0:00.01 top
1 root 20 0 8404 644 608 S 0 0.0 0:03.32 init
2 root 20 0 0 0 0 S 0 0.0 0:00.03 kthreadd
3 root 20 0 0 0 0 S 0 0.0 0:02.30 ksoftirqd/0
6 root RT 0 0 0 0 S 0 0.0 0:00.00 migration/0
7 root RT 0 0 0 0 S 0 0.0 0:00.24 watchdog/0
37 root 0 -20 0 0 0 S 0 0.0 0:00.00 cpuset
38 root 0 -20 0 0 0 S 0 0.0 0:00.00 khelper
39 root 20 0 0 0 0 S 0 0.0 0:00.00 kdevtmpfs
40 root 0 -20 0 0 0 S 0 0.0 0:00.00 netns
```
Sample outputs from htop command:
Fig.01: Linux: Swap Memory Usage Command
Sample outputs from glances command:

See [how to keep an eye on your Linux system with glances monitor](https://www.cyberciti.biz/faq/linux-install-glances-monitoring-tool/ "Linux: Keep An Eye On Your System With Glances Monitor") for more info.
## [Linux Find Out What Process Are Using Swap Space](https://www.cyberciti.biz/faq/linux-which-process-is-using-swap/)
Try the smem command:
`smem`
OR
`top`
## Linux GUI tool to monitor swap space size and usage
Try Gnome or KDE system monitor tool. For example, the **GNOME System Monitor** shows you what programs are running and how much processor time, memory (including paging/swap space size), and disk space are being used.

##
# Mount an SMB Share in Linux
[https://www.linode.com/docs/guides/linux-mount-smb-share/](https://www.linode.com/docs/guides/linux-mount-smb-share/)
Determining how to share files and directories between computers is a common problem — one that has many different solutions. Some of these solutions include file transfer protocols (like SFTP), cloud storage services, and distributed file system protocols (like NFS and SMB). Figuring out what solution is right for your use case can be confusing, especially if you do not know the correct terminology, techniques, or the tools that are available. Sharing files can be made even more complicated if you intend to do so over the internet or use multiple operating systems (like Linux, Windows, and macOS).
This guide covers the Server Message Block (SMB) protocol. Specifically, it discusses using the SMB protocol to mount a Windows SMB share (a shared directory) to a Linux system. By following this guide, you will be able to access all of your files within a Windows folder (such as `C:\My_Files`) on your Linux system at whichever directory you choose as a mount point (such as `/mnt/my_files`). This method of file sharing is appropriate when you need to access entire Windows directories remotely as if they were local resources. In most cases, SMB is a native (or easily installed) file sharing solution for users that need access to the same directory and is commonly shared through a corporate intranet or the same private network.
## Installation
The LinuxCIFS utils package provides the tools needed to connect to a share and manage mounts on a Linux system. You use it to help create and manage a connection to a Windows, macOS, or Linux share.
1. Update the list of available packages using the below command:
```bash
sudo apt update && sudo apt upgrade
```
2. Install the both the LinuxCIFS utils package (needed to mount SMB shares) and the psmisc package (needed to gain access to the `fuser` command, which shows you which users are using the various mounts on your server).
```bash
sudo apt install cifs-utils psmisc
```
Verify that LinuxCIFS is available using the following command:
```bash
mount -t cifs
```
- No error or output message is expected as there are no CIFS connections set up yet.
- Verify that you have access to the `fuser` command.
```bash
fuser
```
This command shows a list of the various command line switches that can be used with the `fuser` utility.
```
Usage: fuser [-fMuvw] [-a|-s] [-4|-6] [-c|-m|-n space] [-k [-i] [-s sig] | -SIGNAL] NAME...
```
## Mount an SMB Share
All files in Linux are accessible on a single giant hierarchical directory tree, which starts at the root (`/`). The mount command (used in this tutorial) enables you to access other storage devices or file systems from that same tree. These other storage resources do not have to be physical disks and they do not have to be using the same file system. To learn more about the mount command, review the following guides:
- [Quick Guide to the Linux Mount Command](https://www.linode.com/docs/guides/linux-mount-command/)
- [Mount a File System on Linux](https://www.linode.com/docs/guides/mount-file-system-on-linux/)
The following sections detail how to mount an SMB share on Ubuntu, but the essential process is the same for other Linux distributions.
1. Create an empty directory to be used as the mount point. This directory can be located wherever you wish, though it’s common to use the `/mnt` directory.
```bash
mkdir /mnt/smb_share
```
Enter the following command to mount the SMB share, replacing *\[server-ip\]* with the IP address of your SMB server, *\[share-path\]* with the file path to your SMB share on that server, and *\[mount-point\]* with the new directory you just created.
```bash
mount -t cifs //[server-ip]/[share-path] /[mount-point]
```
In the example below, the SMB server’s IP is 192.0.2.17, the share’s path is SharedFiles, and the mount point is `/mnt/smb_share`.
```bash
mount -t cifs //192.0.2.17/SharedFiles /mnt/smb_share
```
- When prompted, enter the password to connect to the remote share.
- If the connection is successful, you should see the remote share mounted on the mount point directory you created. To verify this, type the following command:
```bash
mount -t cifs
```
- The command above lists all mounted SMB shares. Among this list, you should see the share you just mounted.
- You should now be able to access the files as if they were on a local drive. In the command below, replace *\[mount-point\]* with the directory you have created (such as `/mnt/smb_share`).
```bash
cd [mount-point]
```
From here, you can run the `ls` command to view your files and you can interact with the files as you would any other files on your system.
## Create a Credentials File
You don’t want to have to type in your credentials every time you access a share. On the other hand, putting the credentials where everyone can see is not a good idea. The following steps help you create a credentials file to automate the process of logging in.
1. Use your preferred text editor such as vi or nano to create a file to store the credentials. You can name the file anything you want, but using a period before the filename will hide it from view. For example, you can create a file named `.credentials` using the following command:
```bash
nano ~/.credentials
```
Add the necessary credentials to the file in the following format:
If the `domain` is not required (except on Windows systems), you can omit that entry. Replace the `target_user_name` and `target_user_password` with the actual credentials you need to use to access the SMB share. Save and close the file.
- Set ownership of the credentials file to the current user by running the following command:
```bash
sudo chown
```
- Replace `` with your username and `` with the name of your credentials file.
- Set the file permissions to `600` to ensure that only the owner has read and write access:
```bash
sudo chmod 600
```
To mount the share using the credentials file, run the following command:
```bash
sudo mount -t cifs -o credentials= /// /
```
- Replace `` with the IP address of the server hosting the share, `` with the name of the share you want to mount, and `` with the local mount point where you want to access the share. You aren’t asked for credentials this time because mount uses the credentials file instead.
- Verify that the share has been successfully mounted using the following command:
```bash
mount -t cifs
```
1. This should show you the share information as output, confirming that the share has been successfully mounted using the credentials file.
## Mount a Share Automatically At Boot
Remounting the SMB share every time you restart the server can be tedious. You can instead set your server up to automatically remount the share every time you restart it using the following steps. Before starting these steps, make sure that the share is currently unmounted.
1. Open the `/etc/fstab` file in your preferred text editor. This file contains configurations that the server uses on reboot to reconnect to shares (among other things). There are columns for the file system, mount point, type, and options.
2. Enter the information below in each of the columns:
File: /etc/fstab
```
```
1.
```bash
: ///: : cifs
: credentials=
```
From the file above, replace `` with the IP address of the server hosting the share, `` with the name of the share you want to mount, `` with the local mount point where you want to access the share, `` with the name of your credentials file,
2. Save the file so the share is available next time you reboot the server.
3. Verify that the share is mounted correctly using the `` as an identifier because the mount is reading the `/etc/fstab` file.
## Unmount a Share
You may need to unmount a share at some point. To unmount an SMB share that has been mounted using the `mount` command, you can use the `umount` command followed by the mount point of the share. The correct command is `umount`, not `unmount`.
So to unmount an SMB share at the mount point ``, run the following command:
```bash
umount -t cifs /
```
The share should not appear in the output of this command.