# DNS
# Apple Private Relay on pihole
if your Apple device has a DNS issue, but the DNS queries are not showing in the pihole logs you should see something along the lines of `mask.icloud.com` and `mask-h2.icloud.com` being blocked as Blocked (Special Domain) nxdomain. This appears to be a problem with Apple Private Relay, which can happen even when this is disabled. Below are the steps to resolve the issue.
Open the pihole server and edit `/etc/pihole/pihole-FTL.conf` in a text editor of your choice
add the line `BLOCK_ICLOUD_PR=false`
Save the file and reboot the hardware
After reboot Apple device DNS queries should begin to show properly in the pihole, and the PR `mask.icloud.com` and `mask-h2.icloud.com` domains should no longer be visible.
# Blocking External Client DNS Queries
# Blocking External Client DNS Queries
This procedure configures the firewall to block DNS requests from local clients to servers outside the local network. With no other accessible DNS servers, clients are forced to send DNS requests to the DNS Resolver or DNS Forwarder on pfSense® software for resolution.
Note
Blocking is effective but does not gracefully handle the situation. Clients must manually adjust their configuration to use the firewall for DNS. Redirecting DNS requests to the firewall is a more seamless solution. See [Redirecting Client DNS Requests](https://docs.netgate.com/pfsense/en/latest/recipes/dns-redirect.html) for details.
- Navigate to **Firewall > Rules**, **LAN** tab
- Create the block rule as the first rule in the list:
- Click  **Add** to create a new rule at the top of the list
- Fill in the following fields on the rule:
- Action
- *Reject*
- Interface
- *LAN*
- Protocol
- *TCP/UDP*
- Destination
- *Any*
- Destination Port Range
- *DNS (53)*
- Description
- `Block DNS to Everything Else`
- Create the pass rule to allow DNS to the firewall, above the block rule:
- Click  **Add** to create a new rule at the top of the list
- Fill in the following fields on the rule:
- Action
- *Pass*
- Interface
- *LAN*
- Protocol
- *TCP/UDP*
- Destination
- *LAN Address*
- Destination Port Range
- *DNS (53)*
- Description
- `Pass DNS to the Firewall`
- Click  **Apply Changes** to reload the ruleset
When complete, there will be two rule entries that look like the following picture:

Certain local PCs could be allowed to use other DNS servers by placing a pass rule for them above the block rule.
## DNS over TLS
Another concern is that clients could use DNS over TLS to resolve hosts. DNS over TLS sends DNS requests over an encrypted channel on an alternate port, `853`.
This traffic can be blocked with a firewall rule for port `853` using the same procedure used for `53`. Though if the firewall will not be providing DNS over TLS service to clients, do not add the pass rule.
## DNS over HTTPS
Similar to DNS over TLS, clients may also use DNS over HTTPS (DoH). This is harder to block as it uses port `443`. Blocking port `443` on common public DNS servers may help (e.g. `1.1.1.1`, `8.8.8.8`).
Some browsers automatically attempt to use DNS over HTTPS because they believe it to be more secure and better for privacy, though that is not always the case. Each browser may have its own methods of disabling this feature. Firefox uses a “canary” domain `use-application-dns.net` by default. If Firefox cannot resolve this name, Firefox disables DNS over HTTPS.
To prevent Firefox from using DNS over HTTPS, add the following to the DNS Resolver custom options:
```
server:
local-zone: "use-application-dns.net" always_nxdomain
```
# Pi-Hole
Pi-Hole is a DNS server that has built in ability to block queries. It does this by returning 0.0.0.0 for queries on the block list.
[Pi-Hole Home Page](https://pi-hole.net/)
For [installation instructions](https://github.com/pi-hole/pi-hole/#one-step-automated-install)
| List of Commands |
| Change password: sudo pihole -a -p
Pi-Hole v6 updated command to
```
sudo pihole setpassword
```
Update: pihole -up
|
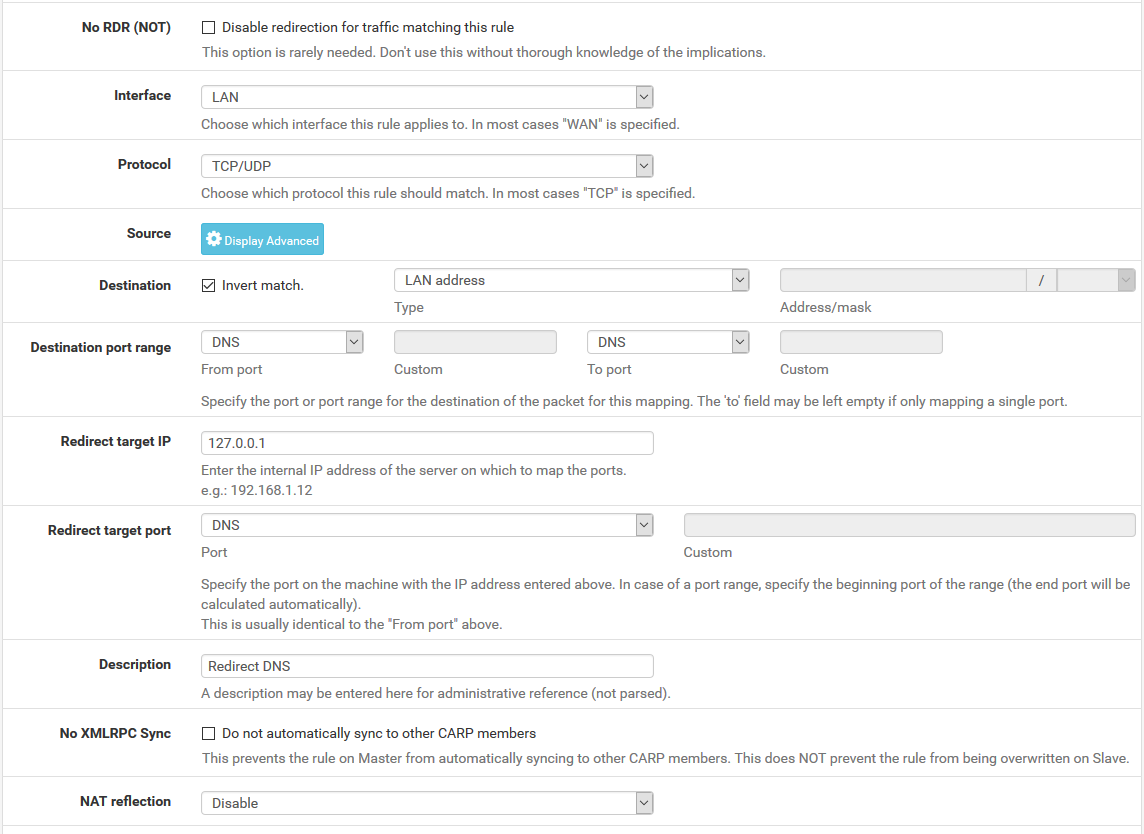
# Redirecting Client DNS Requests
# Redirecting Client DNS Requests
**Before you begin: Network level DNS must be set to use the pFsense firewall or DNS queries will fail. Attempting to redirect all DNS queries to your own DNS server, only to try and then send them off to Google or Cloudflared will fail.**
To restrict client DNS to only the DNS Resolver or Forwarder on pfSense® software, use a port forward to capture all client DNS requests.
Note
Either The DNS Resolver or DNS Forwarder must be active and it must bind to and answer queries on *Localhost*, or *All* interfaces.
See also
- [Blocking External Client DNS Queries](https://docs.coltscomputer.services/books/networking/page/blocking-external-client-dns-queries "Blocking External Client DNS Queries")
- [Blocking Web Sites Using DNS](https://docs.coltscomputer.services/books/networking/page/blocking-web-sites "Blocking Web Sites")
The following example uses the LAN interface but the same technique will work with any local interface.
- Navigate to **Firewall > NAT**, **Port Forward** tab
- Click  **Add** to create a new rule
- Fill in the following fields on the port forward rule:
- Interface
- *LAN*
- Protocol
- *TCP/UDP*
- Destination
- **Invert Match** *checked*, *LAN Address*
- Destination Port Range
- *DNS (53)*
- Redirect Target IP
- `127.0.0.1`
- Redirect Target Port
- *DNS (53)*
- Description
- `Redirect DNS`
- NAT Reflection
- *Disable*
When complete, the port forward must appear as follows:
Note
If DNS requests to other DNS servers are blocked, such as by following [Blocking External Client DNS Queries](https://docs.coltscomputer.services/books/networking/page/blocking-external-client-dns-queries "Blocking External Client DNS Queries"), ensure the rule to pass DNS to `127.0.0.1` is above any rule that blocks DNS.
With this port forward in place, DNS requests from local clients to **any** external IP address will result in the query being answered by the firewall itself. Access to other DNS servers on port 53 is impossible.
Tip
This can be adapted to allow access to only a specific set of DNS servers by changing the Destination network from “LAN Address” to an alias containing the allowed DNS servers. The **Invert match** box should remain checked.
Warning
Clients using DNS over TLS or DNS over HTTPS could circumvent this protection. Redirecting or blocking port `853` may help with DNS over TLS, depending on the clients.
See [Blocking External Client DNS Queries](https://docs.netgate.com/pfsense/en/latest/recipes/dns-block-external.html) for additional advice.
# Configure Conditional Forwarder on PiHole
[](https://docs.coltscomputer.services/uploads/images/gallery/2025-02/T4AjJeY1cC4KyhsW-image.png)
Enter one entry per line like the above
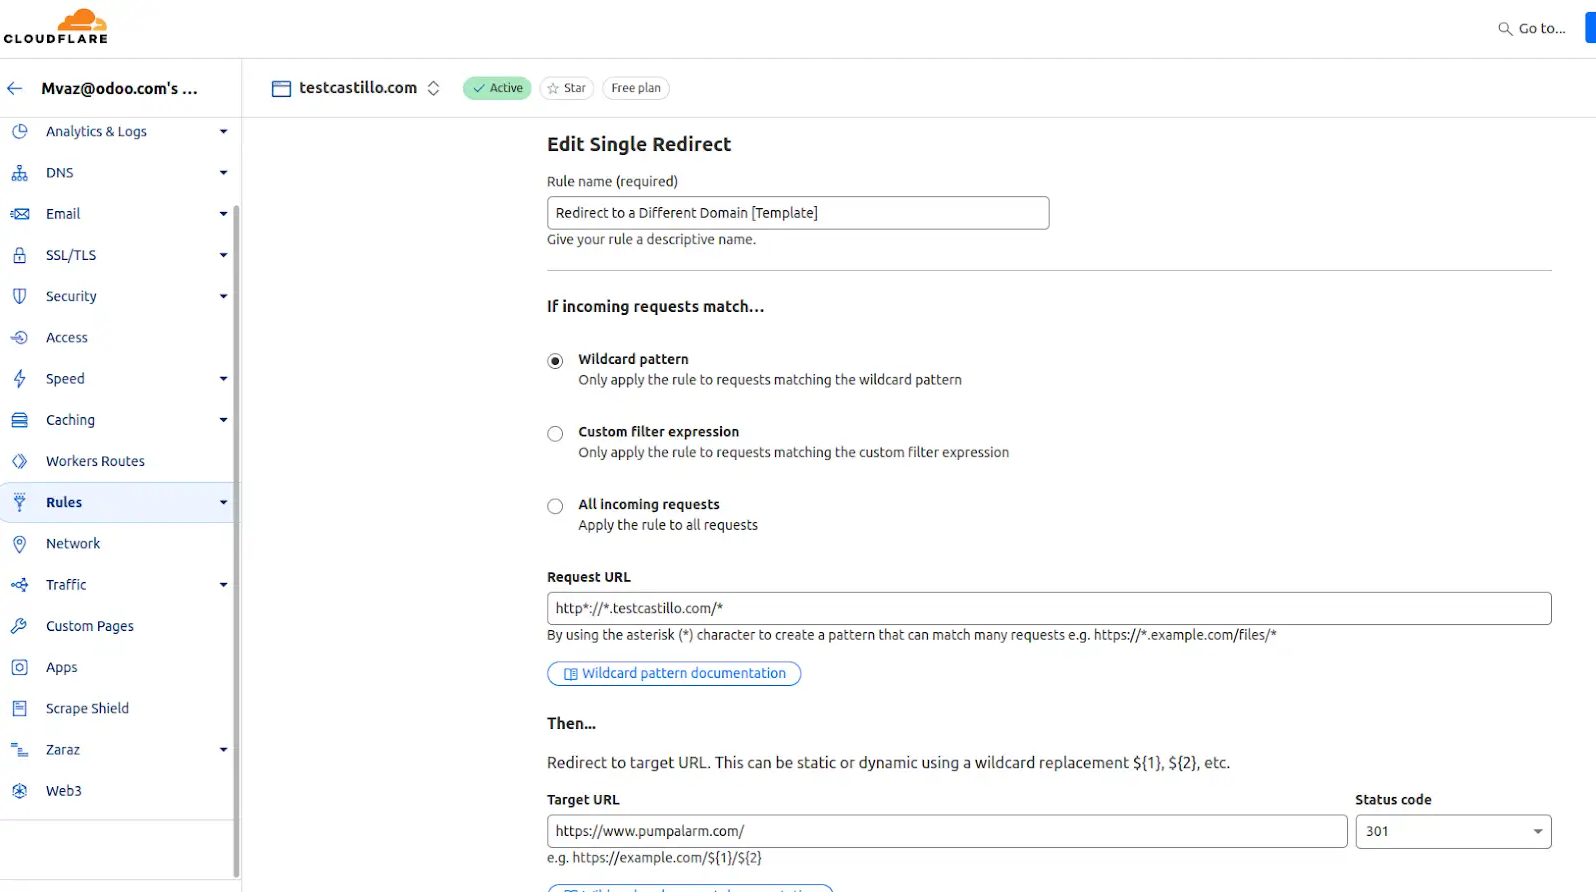
# Redirect to a different domain - Cloudflared
[https://drive.google.com/file/d/1-uxqWlPEd4vYTOfqIfMYyf\_fkyS-vM8D/view?usp=drive\_link](https://drive.google.com/file/d/1-uxqWlPEd4vYTOfqIfMYyf_fkyS-vM8D/view?usp=drive_link)
[](https://docs.coltscomputer.services/uploads/images/gallery/2025-02/SI3BCrehH0EGhobl-image.png)
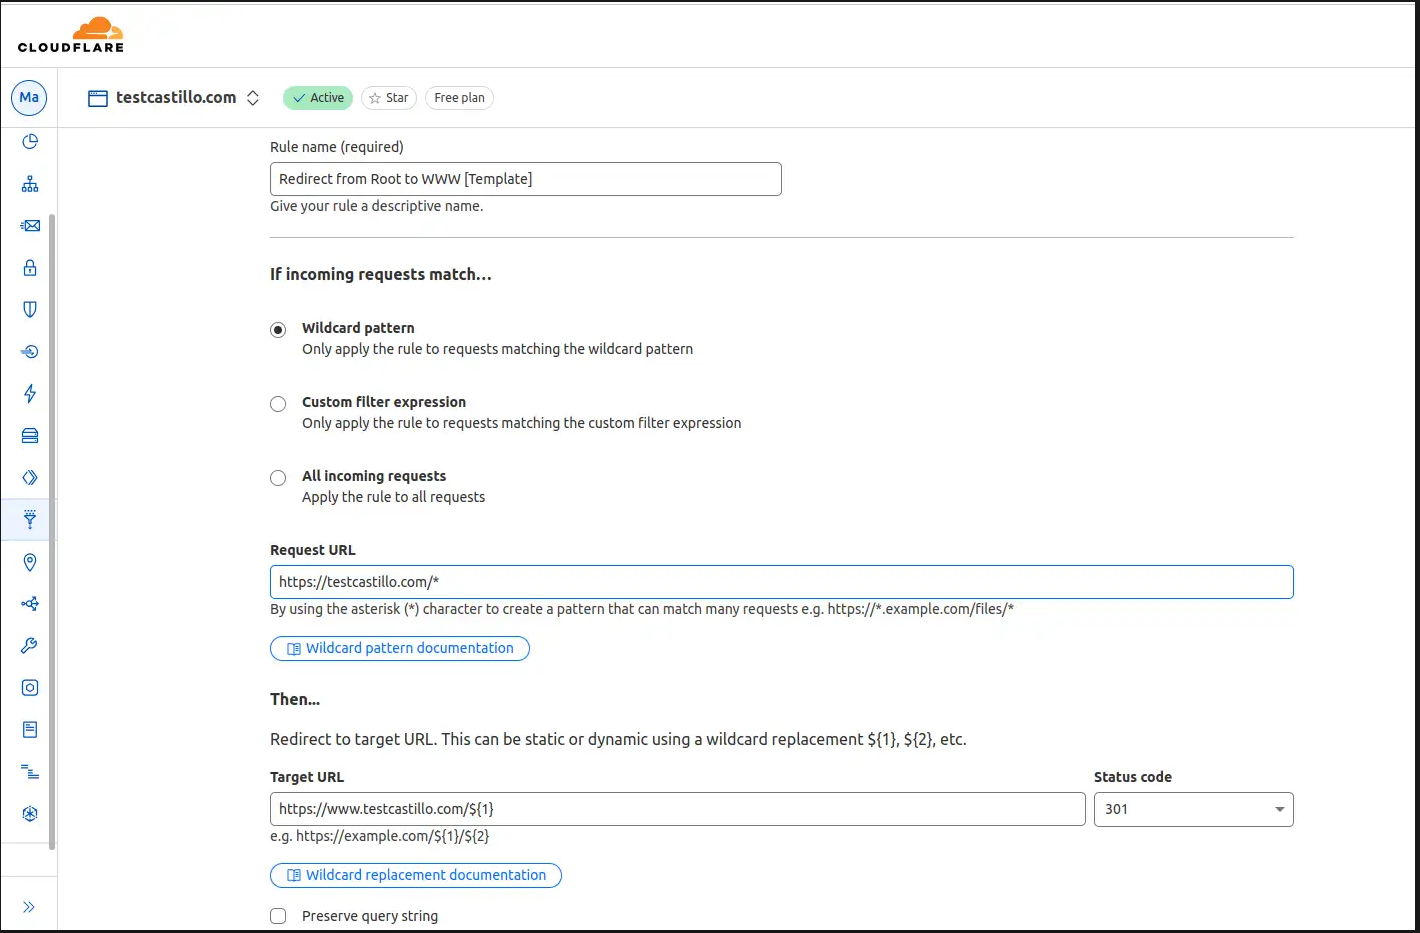
# Redirect from root to WWW - cloudflared
[https://drive.google.com/file/d/1igk01QjlggVZXxe2pbHMNy\_MtNCZoxkC/view?usp=drive\_link](https://drive.google.com/file/d/1igk01QjlggVZXxe2pbHMNy_MtNCZoxkC/view?usp=drive_link)
[](https://docs.coltscomputer.services/uploads/images/gallery/2025-02/4L6ruQ3q1fV9Wu6f-image.png)
# Redirect Domain to New Domain
This config should allow you to redirect source.example.com to destination.example.com using cloudflared and Odoo as examples
First setup HTTP 301 redirect rules from the source to the destination domain.
[](https://docs.coltscomputer.services/uploads/images/gallery/2025-02/COGjRjWk7DuN0S4O-image.png)
[](https://docs.coltscomputer.services/uploads/images/gallery/2025-02/tKxaWAiVIsSkezM0-image.png)
Next configure the DNS records
[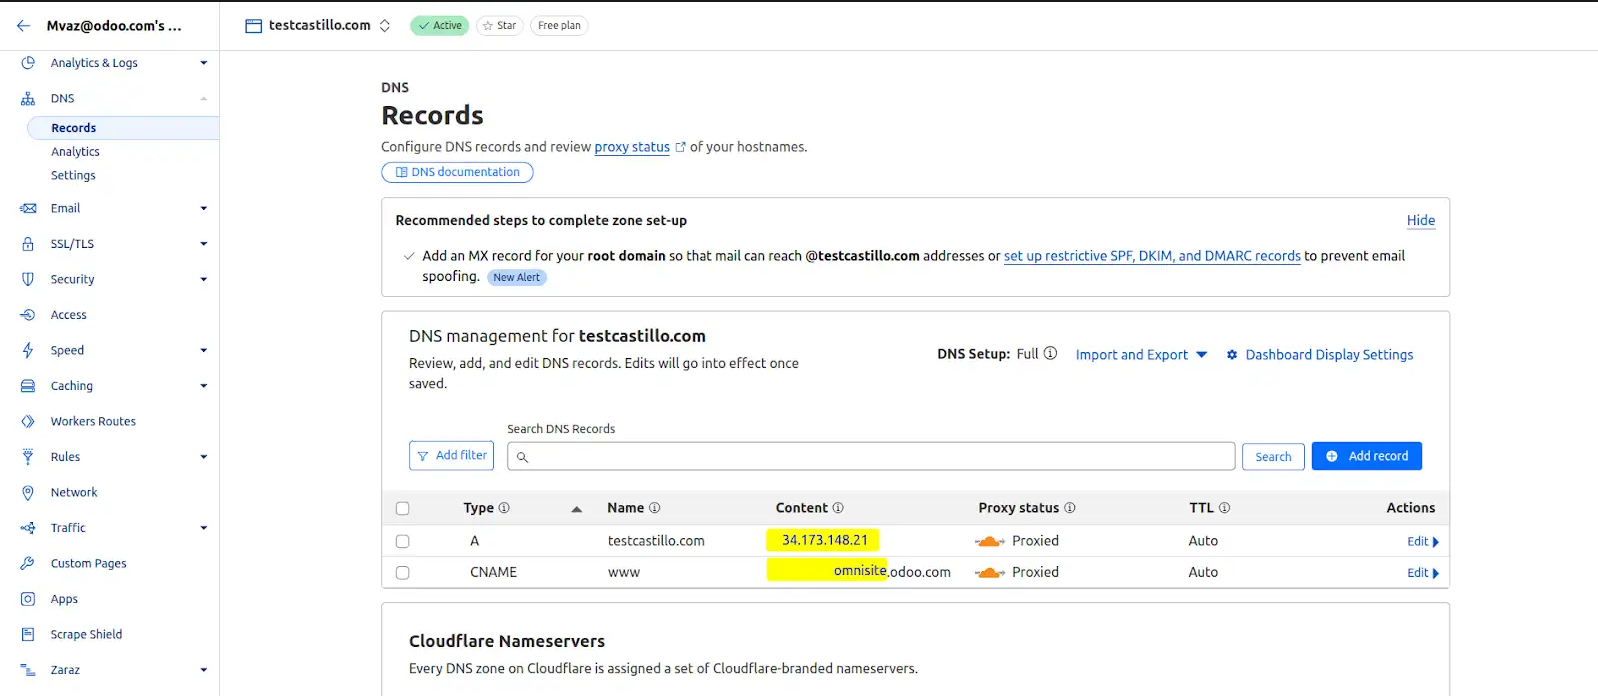](https://docs.coltscomputer.services/uploads/images/gallery/2025-02/K3wEZztiUd7pOOCl-image.png)
This should redirect [www.source.example.com](https://www.source.example.com) and source.example.com to [www.destination.example.com](https://www.destination.example.com).
\#Cloudflared #Odoo #DNS #Redirect