Fortigate
- IPsec VPN to Azure with virtual network gateway
- Change log level
- Troubleshooting FSSO Agent Install
- Use Active Directory objects directly in policies
- Clone Existing IPsec VPN
- Decrease Memory Usage
- Technical Tip: Configure FortiGate to restart (reboot) daily
- ackup and restore the VPN configuration for the free FortiClient using the Windows Registry
- SAML Authentication fails after firmware upgrade to v7.2.12, v7.4.9 or v7.6.4
- Approved Countries List
IPsec VPN to Azure with virtual network gateway
Prerequisites
- A FortiGate with an Internet-facing IP address
- A valid Microsoft Azure account
Sample topology

Sample configuration
This sample configuration shows how to:
- Configure an Azure virtual network.
- Specify the Azure DNS server.
- Configure the Azure virtual network gateway.
- Configure the Azure local network gateway.
- Configure the FortiGate tunnel.
- Create the Azure firewall object.
- Create the FortiGate firewall policies.
- Create the FortiGate static route.
- Create the Azure site-to-site VPN connection.
- Check the results.
To configure an Azure virtual network:
- Log in to Azure and click New.
- In Search the Marketplace, type Virtual network.
- Click Virtual network to open the Virtual network pane.

- At the bottom of the Virtual network pane, click the Select a deployment model dropdown list and select Resource Manager.
- Click Create.

- On the Create virtual network pane, enter you virtual network settings, and click Create.

To specify the Azure DNS server:
- Open the virtual network you just created.
- Click DNS servers to open the DNS servers pane.
- Enter the IP address of the DNS server and click Save.

To configure the Azure virtual network gateway:
- In the portal dashboard, go to New.
- Search for Virtual Network Gateway and click it to open the Virtual network gateway pane.

- Click Create Virtual network gateways and enter the settings for your virtual network gateway.

- If needed, create a Public IP address.

- Click Create.
Creating the virtual network gateway might take some time. When the provisioning is done, you'll receive a notification.

To configure the Azure local network gateway:
- In the portal dashboard, click All resources.
- Click Add and then click See all.

- In the Everything pane, search for Local network gateway and then click Create local network gateway.

- For the IP address, enter the local network gateway IP address, that is, the FortiGate's external IP address.

- Set the remaining values for your local network gateway and click Create.
To configure the FortiGate tunnel:
- In the FortiGate, go to VPN > IP Wizard.
- Enter a Name for the tunnel, click Custom, and then click Next.

- Configure the Network settings.
- For Remote Gateway, select Static IP Address and enter the IP address provided by Azure.
- For Interface, select wan1.
- For NAT Traversal, select Disable,
- For Dead Peer Detection, select On Idle.
- In the Authentication section, select
- Configure the Authentication settings.
- For Method, select Pre-shared Key and enter the Pre-shared Key.
- For IKE, select 2.

- Configure the Phase 1 Proposal settings.
- Set the Encryption and Authentication combination to the three supported encryption algorithm combinations accepted by Azure.
- AES256 and SHA1
- 3DES and SHA1
- AES256 and SHA256
- For Diffie-Hellman Groups, select 2.
- Set Key Lifetime (seconds) to 28800.

- Set the Encryption and Authentication combination to the three supported encryption algorithm combinations accepted by Azure.
- In Phase 2 Selectors, expand the Advanced section to configure the Phase 2 Proposal settings.
- Set the Encryption and Authentication combinations.
- AES256 and SHA1
- 3DES and SHA1
- AES256 and SHA256
- Uncheck Enable Perfect Forward Secrecy (PFS).
- Set Key Lifetime (seconds) to 27000.

- Set the Encryption and Authentication combinations.
- Click OK.
To create the Azure firewall object:
- In the FortiGate, go to Policy & Objects > Addresses.
- Create a firewall object for the Azure VPN tunnel.
To create the FortiGate firewall policies:
- In the FortiGate, go to Policy & Objects > IPv4 Policy.
- Create a policy for the site-to-site connection that allows outgoing traffic.
- Set the Source address and Destination address using the firewall objects you just created.
- Disable NAT.

- Create another policy that allows incoming traffic.
- For this policy, reverse the Source address and Destination address.

- For this policy, reverse the Source address and Destination address.
- We recommend limiting the TCP maximum segment size (MSS) being sent and received so as to avoid packet drops and fragmentation.
To do this, use the following CLI commands on both policies.
config firewall policy
   edit <policy-id>
      set tcp-mss-sender 1350
      set tcp-mss-receiver 1350
   next
end
To create the FortiGate static route:
- In the FortiGate, go to Network > Static Routes.
- Create an IPv4 Static Route that forces outgoing traffic going to Azure to go through the route-based tunnel.
- Set the Administrative Distance to a value lower than the existing default route value.

To create the Azure site-to-site VPN connection:
- In the Azure portal, locate and select your virtual network gateway.
- In the Settings pane, click Connections and then click Add.

- Enter the settings for your connection. Ensure the Shared Key (PSK) matches the Pre-shared Key for the FortiGate tunnel.
To check the results:
- In the FortiGate, go to Monitor > IPsec Monitor.
- Check that the tunnel is up.

- If the tunnel is down, right-click the tunnel and select Bring Up.

- Check that the tunnel is up.
- In the FortiGate, go to Log & Report > Events.
- Select an event to view more information and verify the connection.
- In the Azure portal dashboard, click All resources and locate your virtual network gateway.
- In your virtual network gateway pane, click Connections to see the status of each connection.
- Click a connection to open the Essentials pane to view more information about that connection.
- If the connection is successful, the Status shows Connected.
- See the ingress and egress bytes to confirm traffic flowing through the tunnel.
- In your virtual network gateway pane, click Connections to see the status of each connection.
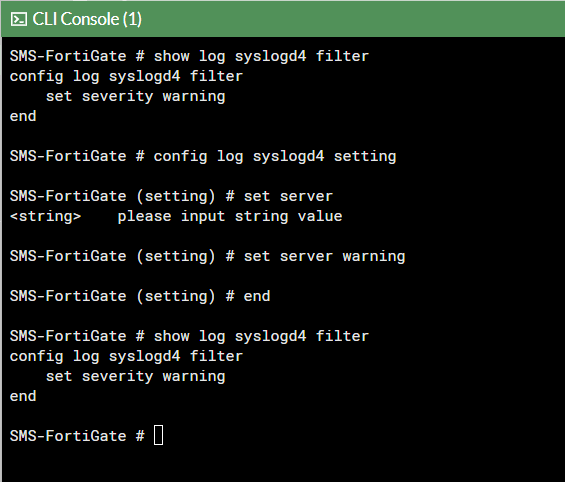
Change log level
This will allow you to change the filter for which logs are recorded in the Fortigate firewall.
- Open the cli
- type the command
config log syslogd | syslogd1 | syslogd4 setting - use command
set severity <log level> - finally follow with
endto set the config - next use
show log syslogd filterto confirm the log level
Troubleshooting FSSO Agent Install
| Description |
This article describes why Fortinet Single Sign-On (FSSO) stops working after upgrading to FSSO Collector Agent 5.0.0290. |
| Scope | FortiGate, FSSO, Collector Agent |
| Solution |
It has been noticed Fortinet Single Sign-On Agent service appears to be stopped, however, when trying to restart the service, it stops again shortly after.
If it is verified the FSSO CA debug logs, an error 'cannot bind to UDP socket' can be found.
Starting FSSO Collector Agent build 5.0.0290, the FSSO Collector Agent includes a Syslog service that runs on UDP port 514.
If UDP port 514 is already in use by another application/service/server on the Windows machine running the FSSO Collector Agent, this error while running FSSO - 'cannot bind to UDP socket' can be seen.
To verify the same, open command prompt, run as administrator. Enter command ‘netstat –abo’, this will show Active Connections along with the listening port number.
On FSSO Agent build 5.0.0290 and later, under Advanced Settings -> Syslog source list -> Uncheck 'Enable this feature', since it is also using port 514.
After disabling the FSSO Collector Agent’s Syslog functionality, the FSSO Collector Agent should start successfully.
|


Description
This article describes why FortiGate cannot connect to FSSO Agent on Windows server 2019 and how to resolve the issue.
Scope
FortiGate v7.2.1, FSSO Collector Agent.
Solution
As an example in this article, an External Connector on FortiGate 7.2.1 has been configured using an FSSO Agent on a Windows AD connector.

The configuration was working, but suddenly FSSO communication between FortiGate and FSSO Collector Agent 5.0.0306 has stopped.
FortiGate connects to the Collector Agent by default via port TCP/8000. Verify the Collector Agent is listening on port TCP/8000 in the Windows Firewall.


From FortiGate, double-check to see if the FSSO CA is listening and to additionally verify that it is connected using telnet connection:

Using debug command for verifying FSSO server status, 'waiting for retry' can still be seen as the Connection Status.

- commands in picture
- diagnose debug enable
- diagnose debug authd fsso server-status
For further troubleshooting FSSO CA on Windows server, run the following debug application authd command.
diagnose debug application authd -1
Debug messages will be on for 30 minutes.
photon-kvm12 (root) # diagnose debug enable
photon-kvm12 (root) # authd_timer_run: 2 expired
authd_epoll_work: timeout 5000
authd_timer_run: 1 expired
authd_epoll_work: timeout 990
authd_timer_run: 1 expired
authd_epoll_work: timeout 10000
authd_epoll_work: timeout 10000
Server challenge:
f9 57 20 05 7a 00 6d 50 42 7b a5 48 02 5d cf 37
MD5 response:
d5 08 03 a2 66 f1 ad 2b 0c 9a 6f 9b a5 d1 e9 1c
authd_epoll_work: timeout 9990
_process_auth[FSSO-Collector Agent]: server authentication failed, aborting
disconnect_server_only[FSSO-Collector Agent]: disconnecting
authd_epoll_work: timeout 9990
diag deb disaauthd_timer_run: 1 expired
authd_epoll_work: timeout 9980
authd_epoll_work: timeout 9980
Server challenge:
19 58 fc 28 4b 3a 66 7c 2c 0e 09 62 96 56 76 45
MD5 response:
73 b5 03 1b b8 64 21 c8 82 7e 8d 10 e6 2b c3 99
authd_epoll_work: timeout 9970
_process_auth[FSSO-Collector Agent]: server authentication failed, aborting
disconnect_server_only[FSSO-Collector Agent]: disconnecting
authd_epoll_work: timeout 9960
After trying to re-enter or change the FSSO Agent password that is in use for communication between FortiGate and FSSO Collector Agent, finally communication is established.
Make sure the password is less than 15 characters. The FSSO collector agent can only accept passwords up to 15 characters in length.
The status will then show as 'Connected' and will be possible to verify once again using a debug command.


Identify the user account used to run the Fortinet Single Sign On process service and validate the permissions of the user account, it must belong to Administrators and/or Domain Admins groups:


If it still does not work after confirming that the password is the same on both FortiGate and the Collector agent, try to uninstall and reinstall the Collector agent.
To uninstall the collector agent in Windows, go to Add or Remove programs under System Settings. Find the FSSO Collector agent and uninstall it.
To reinstall the collector agent, refer to Technical Tip: How to install the FSSO Collector Agent.
After it is installed again, configure the FSSO collector agent and try to connect it again to the FortiGate.
The status should then show as 'Connected'.
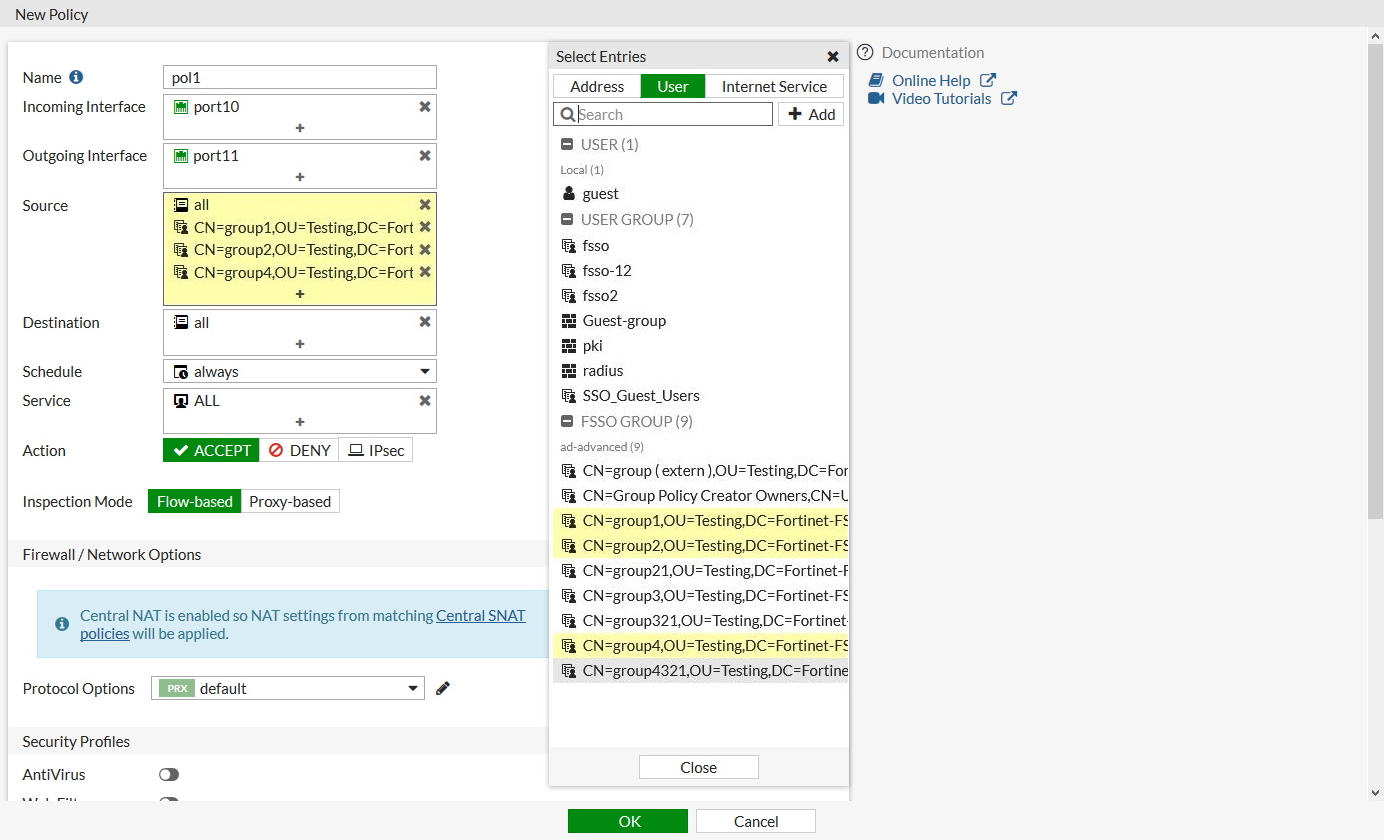
Use Active Directory objects directly in policies
Use Active Directory objects directly in policies
Active Directory (AD) groups can be used directly in identity-based firewall policies. You do not need to add remote AD groups to local FSSO groups before using them in policies.
FortiGate administrators can define how often group information is updated from AD LDAP servers.
To retrieve and use AD user groups in policies:
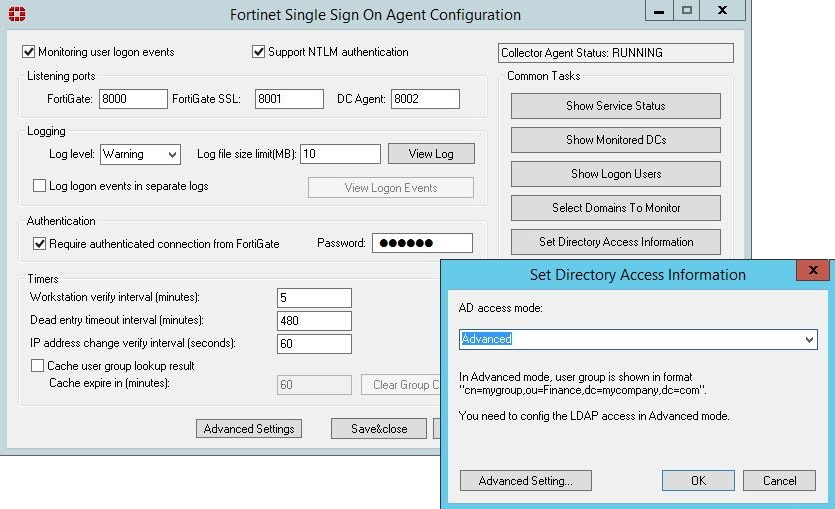
Set the FSSO Collector Agent AD access mode
To use this feature, you must set FSSO Collector Agent to Advanced AD access mode. If the FSSO Collector Agent is running in the default mode, FortiGate cannot correctly match user group memberships.
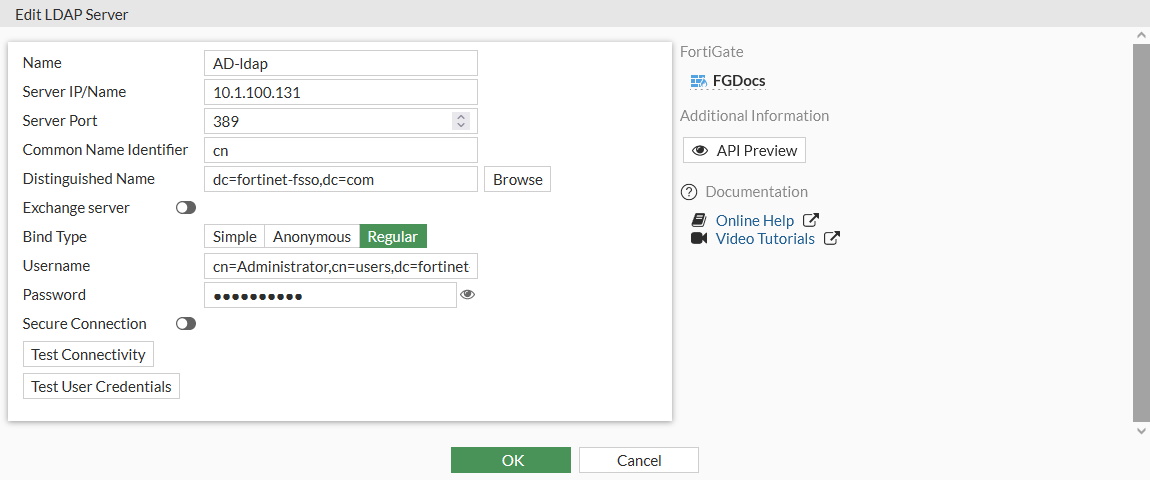
Add an LDAP server
|
When configuring an LDAP connection to an Active Directory server, an administrator must provide Active Directory user credentials.
|
To add an LDAP server in the GUI:
-
Go to User & Authentication > LDAP Servers.
-
Click Create New.
-
Configure the settings as needed.
-
If secure communication over TLS is supported by the remote AD LDAP server:
-
Enable Secure Connection .
-
Select the protocol.
-
Select the certificate from the CA that issued the AD LDAP server certificate.
If the protocol is LDAPS, the port will automatically change to 636.
-
-
Click OK.
To add an LDAP server in the CLI:
config user ldap
    edit "AD-ldap"
        set server "10.1.100.131"
        set cnid "cn"
        set dn "dc=fortinet-fsso,dc=com"
        set type regular
        set username "cn=Administrator,cn=users,dc=fortinet-fsso,dc=com"
        set password XXXXXXXXXXXXXXXXXXXXXXXX
    next
end
Create the FSSO collector that updates the AD user groups list
To create an FSSO agent connector in the GUI:
-
Go to Security Fabric > External Connectors.
-
Click Create New.
-
In the Endpoint/Identity section, click FSSO Agent on Windows AD.
-
Fill in the Name
-
Set the Primary FSSO Agent to the IP address of the FSSO Collector Agent, and enter its password.
-
Set the User Group Source to Local.
-
Set the LDAP Server to the just created AD-ldap server.
-
Enable Proactively Retrieve from LDAP Server.
-
Set the Search Filter to (&(objectClass=group)(cn=group*)).
The default search filter retrieves all groups, including Microsoft system groups. In this example, the filter is configured to retrieve group1, group2, etc, and not groups like grp199.
The filter syntax is not automatically checked; if it is incorrect, the FortiGate might not retrieve any groups.
-
Set the Interval (minutes) to configure how often the FortiGate contacts the remote AD LDAP server to update the group information.
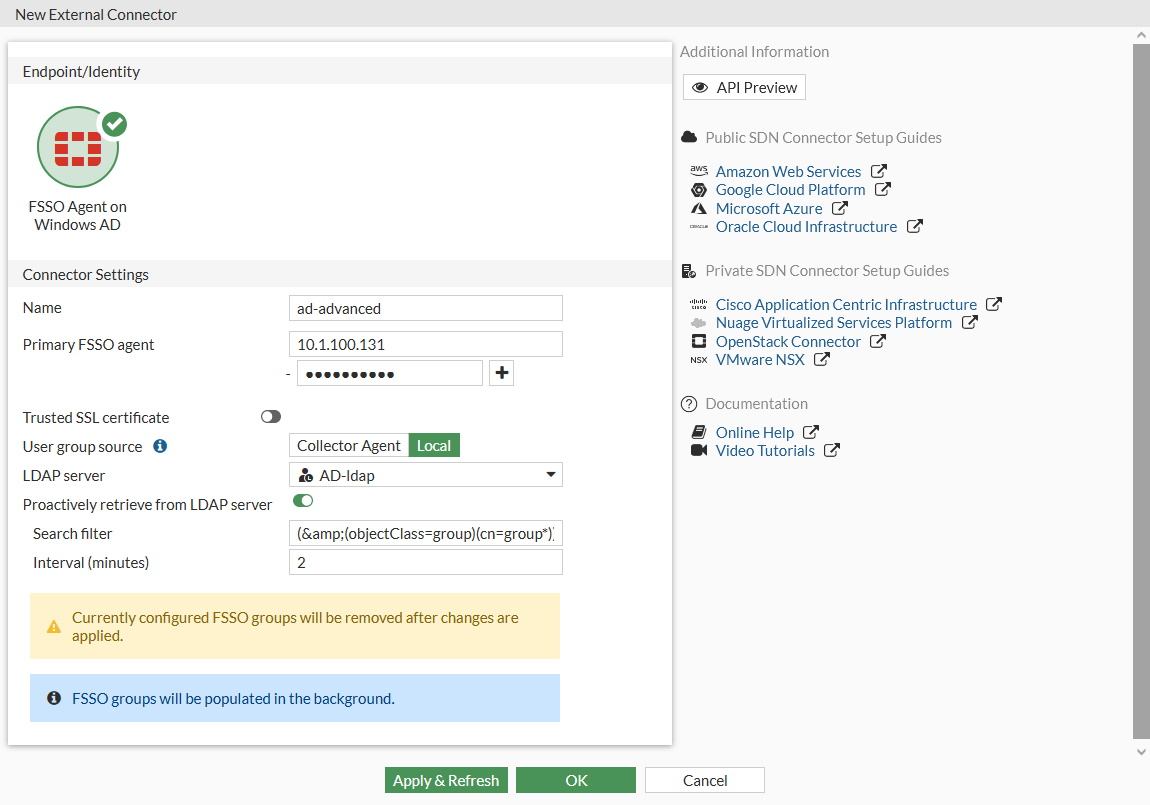
-
Click OK.
-
To view the AD user groups that are retrieved by the FSSO agent, hover the cursor over the group icon on the fabric connector listing.

To create an FSSO agent connector in the CLI:
config user fsso
    edit "ad-advanced"
        set server "10.1.100.131"
        set password XXXXXXXXXXXXXX
        set ldap-server "AD-ldap"
        set ldap-poll enable
        set ldap-poll-interval 2
        set ldap-poll-filter "(&(objectClass=group)(cn=group*))"
    next
end
You can view the retrieved AD user groups with the show user adgrp command.
Use the AD user groups in a policy
The AD user groups retrieved by the FortiGate can be used directly in firewall policies.
Clone Existing IPsec VPN


Decrease Memory Usage
di de crashlog read
This command will show you the crashlog of the fortigate
"Kernel exits extreme low memory mode" looking for that error
diag autoupdate versions will show the versions of the autoupdates
diag autoupdate versions | grep Attempt -f this will show the times of autoupdate attempts
First thing we can do is disable the automatic security rating report.
config sys global
set security-rating-run-on-schedule disable
end
Next we will set the Internet Service Database to only download the in use databases
config sys fortiguard
set internet-service-database on-demand
end
follow that with
execute update-ffdb-on-demand
Technical Tip: Configure FortiGate to restart (reboot) daily
Description
This article describes how to set up FortiGate to reboot daily, at a pre-defined time.
Scope
FortiGate.
Solution
FortiOS firmware allows the user to automate a daily restart (reboot) of the FortiGate, at a pre-defined hour. This is a repeated reboot and it can be used for a one-time reboot at a predefined hour (with the mention that it needs to be removed afterward). An alternate option is available in the form of an auto-script that can further fine-tune the reboot, cycle, or add additional commands (from v5.6).
From v6.2, a more advanced way can be used - Automation Stitch (FortiOS v6.0 has Automation Stitch, but can only be triggered by an event, and not Scheduled).
Daily restart. This option is configurable from the CLI as shown in the example below:


ackup and restore the VPN configuration for the free FortiClient using the Windows Registry
| Description | This article describes how to backup and restore the VPN configuration (tunnels, settings, etc.) for the free FortiClient using the Windows Registry. |
| Scope | FortiClient. |
| Solution |
The VPN tunnel configuration for the FortiClient is stored within the Windows Registry.
These keys are located under HKEY_LOCAL_MACHINE\SOFTWARE\Fortinet\FortiClient.
It is possible to export the FortiClient Registry keys by right clicking on the FortiClient folder, and pressing 'Export'.
This will create a .reg file which can be run on other PCs to apply the same configuration.
Here is a new PC that has a fresh installation of the FortiClient.
Once that file has been ran and applied to the new PC's registry, those tunnels are visible.
|


SAML Authentication fails after firmware upgrade to v7.2.12, v7.4.9 or v7.6.4
Troubleshooting Tip: SAML Authentication fails after firmware upgrade to v7.2.12, v7.4.9 or v7.6.4
Description This article describes how to resolve the SAML authentication issue that occurs after upgrading to v7.2.12, v7.4.9 or v7.6.4.
Scope FortiGate v7.2.12, v7.4.9, v7.6.4.
Solution
Beginning from v7.2.12, v7.4.9 and v7.6.4, FortiGate verifies the signature of SAML Response messages. See SAML certificate verification in Release Notes. Note that this also includes the FIPS-CC CVE-Patched builds for FortiOS 7.2, such as FIPS-CC-72-5 and onward.
After the upgrade, SAML authentication when using FortiGate as the Service Provider (e.g., for IPsec/SSL VPN, FortiGate administrator logins, SAML captive portal) may fail. The below debugs can be run on the FortiGate while reproducing the issue from the test user's PC:
diagnose debug console timestamp enable
diagnose debug application samld -1
diagnose debug enable
To stop the debugs:
diagnose debug disable
diagnose debug reset
The following error, 'Signature element not found', will be seen in the debugs on the FortiGate:
IDP sig verify is required for response and assertions
__samld_sp_login_resp [833]: Failed to process response message. ret=101(Signature element not found.)
samld_send_common_reply [92]: Code: 1, id: 563501, pid: 2470, len: 65, data_len 49
samld_send_common_reply [101]: Attr: 22, 12, e
samld_send_common_reply [101]: Attr: 23, 37, Signature element not found.
samld_send_common_reply [120]: Sent resp: 65, pid=2470, job_id=563501.
The user can see the error below ('Firewall Authentication Failed') in the browser:
saml1.png
f6bbd0f9-f125-481b-96d8-b706fcfcf9c6.png
Picture1.png
A behavior at SSL VPN, over the FortiClient, after connecting, the percentage of the process will get stuck on 'Status: 40%':
Captura de pantalla 2025-09-24 175608.png
After the upgrade, both the SAML assertion and the response must be signed, not just the SAML assertion. 'Signature element not found' indicates no signature was provided. To resolve the authentication issue, change the setting in IDP to enable 'SAML response and Assertion' signing.
If Microsoft Entra ID is used as IdP, select 'Sign SAML response and Assertion' for the signing option under Single sign-on -> SAML Certificates -> Select Edit -> SAML Signing Certificate, as shown in the screenshot below:
saml3.png
This will fix the SAML authentication issue, and users will be able to authenticate successfully.
Note for Google IdP users: The Google implementation only signs either the assertion or reply based on the 'Signed reply' checkbox, but cannot sign both. If 'Signed reply' is unchecked, only the SAML Assertions are signed. If 'Signed reply' is checked, only the SAML Reply is signed. Both will fail since the FortiGate expects both Assertion AND Reply to be signed.
When Cisco Duo is used as the Identity Provider (IdP), ensure that both the ‘Sign response’ and ‘Sign assertion’ options are selected as shown in the screenshot below.
To configure this:
Under Signing options, select both:
Sign response.
Sign assertion.
image - 2025-10-07T115553.003.png
One potential mitigation strategy involves reverting to a previous firmware version, which may offer more stable performance under current conditions. While it is not a definitive fix, this approach could serve as a temporary workaround until a more permanent resolution is identified.
For more information, see this document: Set up your own custom SAML app.
Technical Tip: Login issues with SAML IdP. 'Failed to verify signature' error in SAML Debug
Troubleshooting Tip: How to troubleshoot IPsec SAML Dial UP tunnel
Admin FortiGate FortiGate v7.2 FortiGate v7.6 IPsec SAML SSL-VPN SSO
45314
Contributors
Approved Countries List
- Canada
- Ireland
- Germany
- Japan
- South Korea Listed as: Korea, Republic of
- Switzerland
- UK
- USA
edit "Germany"
set type geography
set country "DE"
next
edit "Canada"
set type geography
set country "CA"
next
edit "Japan"
set type geography
set country "JP"
next
edit "South Korea"
set type geography
set country "KR"
next
edit "Switzerland"
set type geography
set country "CH"
next
edit "UK"
set type geography
set country "GB"
next
edit "USA"
set type geography
set country "US"
next
edit "Ireland"
set type geography
set country "IE"
next
edit "Australia"
set type geography
set country "AU"
next
config firewall addrgrp
edit "Trusted Countries"
config firewall addrgrp
edit "Trusted Countries"
set member "Canada" "Germany" "Japan" "South Korea" "Switzerland" "UK" "USA" "Ireland" "Australia"
next
end
CA Canada
CH Switzerland
DE Germany
GB United Kingdom
IE Ireland
JP Japan
KR Korea, Republic of
US United States