aristosnet dhcp <interface> Changes interface from static to DHCP
aristosnet static <interface> <ip> <netMask> <gateway> <dnsServer> Sets static IP address - All Fields Required
# Incremental vault recovery - x360Recover
[https://help.axcient.com/x30recover-faqs-appliance-errors-and-troubleshooting/2091183-incremental-vault-recovery-x360recover](https://help.axcient.com/x30recover-faqs-appliance-errors-and-troubleshooting/2091183-incremental-vault-recovery-x360recover)
What is incremental vault recovery?
**Vault recovery** has always been a feature of x360Recover. (It's the process of recovering snapshot data for a protected system on a vault and moving that data back to an appliance.) Vault recovery can be useful when an appliance has been lost or damaged, or when you are switching a protected system from Direct-to-Cloud mode to appliance mode.
**Incremental vault recovery is a new feature (available in v. 12.3.0 and newer) which allows you to perform the recovery of protected system data on a vault and move that data back to an appliance ***in multiple passes**.*
With incremental vault recovery, you can now maintain an uninterrupted set of backups, even while you are actively repairing the appliance and recovering the cloud data.
When will you need incremental vault recovery? How does it work?
Consider the scenario where you have lost an appliance at a client location.
Traditionally, there would be a window of time in which the client's protected systems would be without a backup. This would continue until you could replace the failed appliance.
Even worse, if you did not want to abandon the existing backup history on the vault, you would incur additional time without new backups while you perform a vault recovery to the repaired or replaced appliance. (This is necessary to maintain the replication link with the existing vault data.)
Also see: [Displacing third party BDR with x360Recover](https://help.axcient.com/migrate-protected-systems/displace-a-third-party-bdr-with-x360recover)
**With incremental vault recovery (in v.12.3.0), you can now maintain an uninterrupted set of backups while repairing the appliance and recovering the cloud data:**
- In this scenario, you would immediately reconfigure the protected system to perform Direct-to-Cloud backups. This maintains the stream of backups for your client systems by sending backups to the vault while you deal with the failed appliance.
- Then, once the appliance is repaired, you perform incremental recovery steps, to copy the protected system data back to the appliance.
- The first pass will copy the base image and all recovery points currently existing on the vault to the appliance. Backups will continue to run and new recovery points will continue to be created on the vault during this process.
Note: You can select the ‘Starting Point’ for your appliance data when performing the first pass. Select the recovery point you wish to be the ‘Base’ image (oldest snapshot) available on the appliance. You do not need to replicate ALL historical data on the vault back to the appliance (if space is limited, for example.)
- Once the initial recovery pass is completed, you can perform additional ‘incremental’ passes to collect newly-created snapshots on the vault and copy them to the appliance.
- When the appliance is synced with the vault, perform the ‘Final’ pass. The ‘final’ recovery pass ends the ‘incremental’ recovery process and automatically strips the ‘Direct-to-Cloud’ mode flag from the protected system on the vault. (This will block further Direct-to-Cloud backups.)
To complete the process, you (a) manually reconfigure the agent to point to the appliance and (b) configure replication on the appliance to the vault.
Detailed instructions on how to perform an incremental vault recovery appear later in this article. (See below)
Steps to perform incremental vault recovery
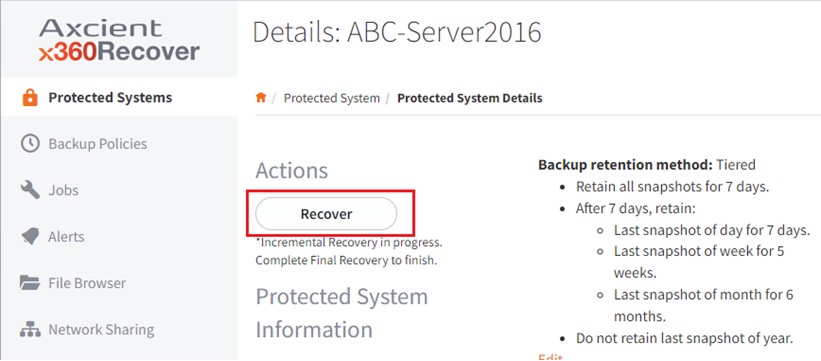
**STEP 1.** To begin the recovery process, click **Recover** from the *Protected Systems* page of the appliance.
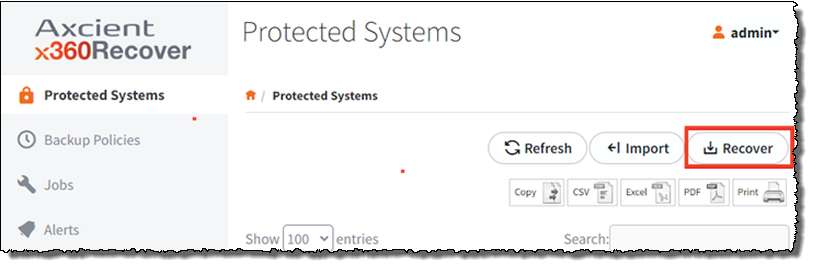
This will open the ‘Recover Protected System’ configuration dialog.
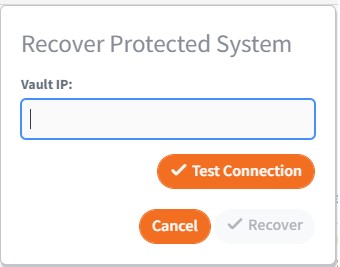
**STEP 2**. Enter the IP address or FQDN of your vault and click **Test Connection**.
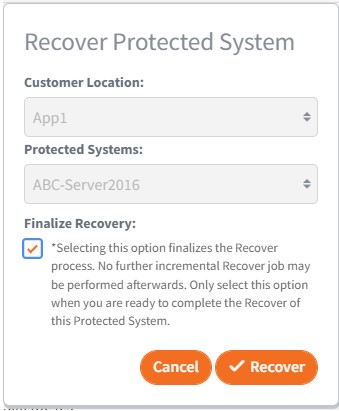
**STEP 3**. When the connection test is successful, select the **Customer Location** and **Protected Systems** you wish to recover.
**Note:** Only customer locations and protected systems that belong to the same client as THIS appliance will be visible. If no protected systems belonging to this client exist on the vault (that are not already present on the appliance) then the selection list will be empty.
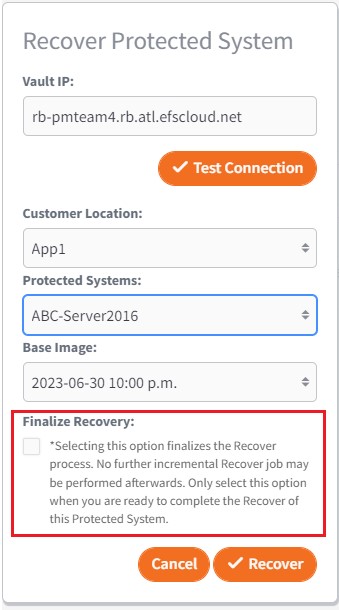
**IMPORTANT:** By default, the **Finalize Recovery** check box will be unselected.
- Leaving this check box unchecked means that we will perform an incremental recovery and additional recovery passes will remain possible.
- If you check this box and select Finalize Recovery, this will be the LAST recovery pass (even if it is the FIRST pass) and no further recovery operations will be possible later.
**STEP 4.** Now that you have selected the customer location and the protected systems, select the desired **Base Image.**
**Note:** The base image will be the OLDEST snapshot recovered to the appliance from the vault.
After you have selected the desired base image, click **Recover** to begin.
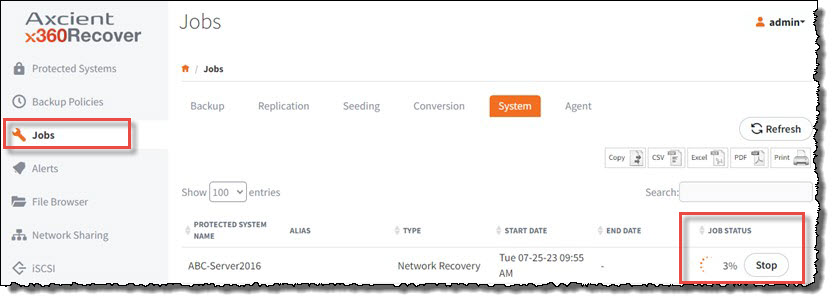
You may monitor progress on the **Jobs** -> *System* page for details:
What happens next?
Once the initial recover pass is completed, the protected system will be listed on the *Protected Systems* page.
Icons in the **STATUS** column will indicate that backups are currently disabled, and an incremental recovery process is in progress.

**STEP 5.** To perform additional incremental recovery passes for this protected system, navigate to the **Protected Systems** page and click on the system name. This will open the *Protected System Details* page. Now, click **Recover.**
- Note that **Recover** is the only option available under the *Actions* section until the final recover pass is completed.
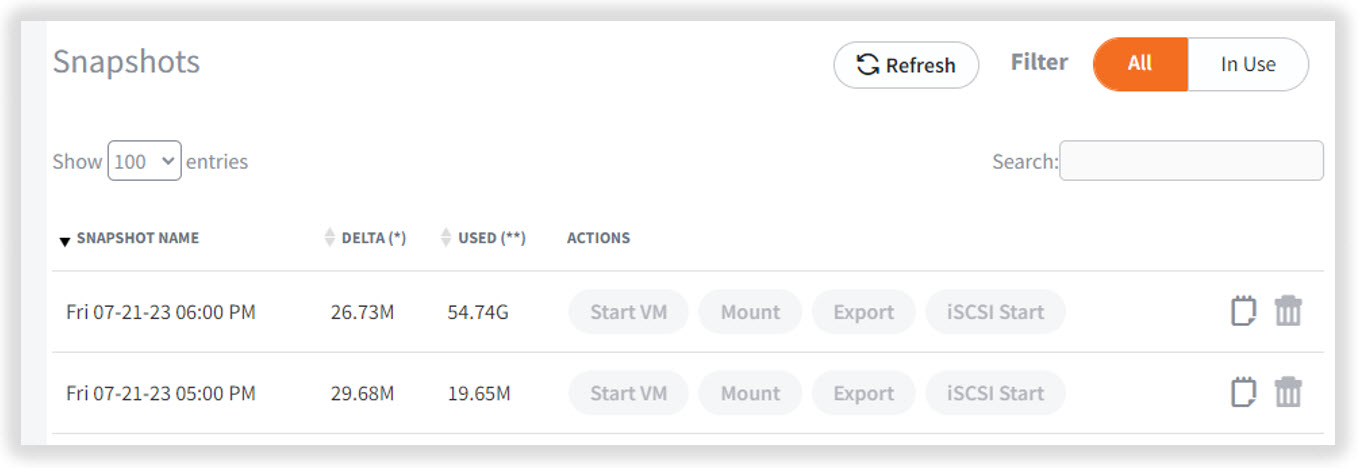
As shown below, all snapshot actions are also grayed out and unavailable until the final recover pass is completed:
- While you are continuing incremental recovery actions, the customer location and protected system selections are locked.
Continue with another Incremental pass, or, if you have completed all desired passes, check the box for **Finalize** **Recovery** (to perform the final pass) and click **Recover**.
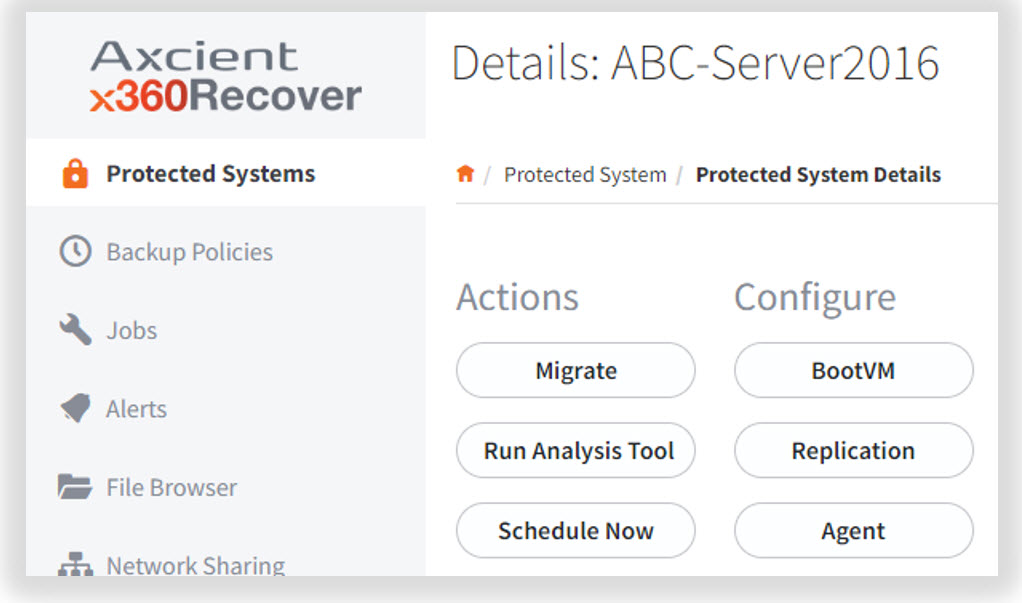
Once the final recovery pass is completed, all actions once more become available for the protected system on the appliance:
**STEP 6.** Enable replication to the vault by clicking **Replication** and configuring the desired settings:
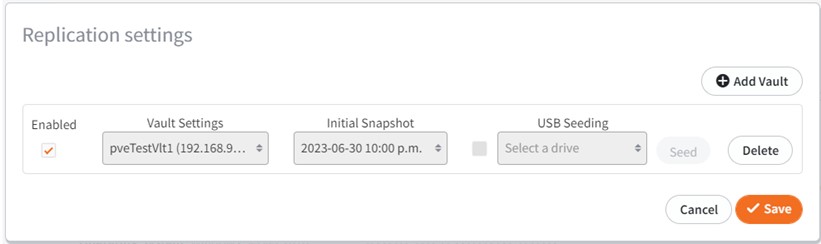
**Note:** If this is a newly-deployed appliance, you must first configure the vault settings before you enable replication.
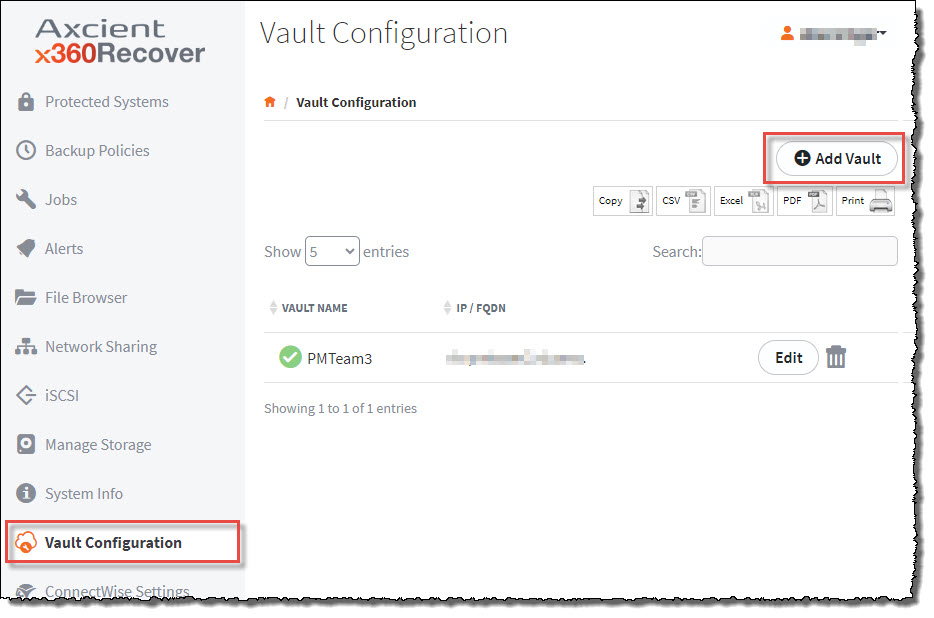
Do this by selecting **Vault Configuration** from the left menu of the appliance and configuring the settings for the vault (*before* you configure the replication for the protected system.) For detailed instructions, see [How to add vaults and manage settings.](https://help.axcient.com/06-monitor/115006587507--x360Recover-How-to-add-vaults-and-manage-settings)
**STEP 7.** You must now reconfigure the agent for appliance mode.
7.1. On the protected system, locate the aristos.cfg file in the agent installation directory. Typically, this file is found at
**c:\\program files (x86)\\replibit**
7.2. Stop the following services:
- Replibit agent service
- Replibit agent update service
- Replibit management service
7.3. Edit the aristos.cfg file in the agent installation directory by changing the ‘SERVER=<**value**>’ to SERVER=<**IP address of appliance**>
7.4. When you have completed that change, save the file.
7.5. If the system was configured in Direct-to-Cloud mode, delete the file **Permid.cfg**
Deleting this file will convert the agent back to appliance mode.
---
Additional help:
For help converting an appliance protected system to Direct-to-Cloud mode, review [Convert an existing appliance agent to Direct-to-Cloud](https://docs.coltscomputer.services/books/axcient/page/convert-an-existing-appliance-agent-to-direct-to-cloud-d2c "Convert an existing appliance agent to Direct-to-Cloud (D2C)")
For help converting a Direct-to-Cloud protected system to appliance mode, review [Convert a Direct-to-Cloud endpoint to appliance mode](https://docs.coltscomputer.services/books/axcient/page/convert-a-direct-to-cloud-endpoint-to-appliance-mode "Convert a Direct-to-Cloud endpoint to appliance mode")
# Convert an existing appliance agent to Direct-to-Cloud (D2C)
[https://help.axcient.com/003-manage-d2c/1500000655082-x360Recover-Direct-to-Cloud-D2C-Convert-from-appliance-mode-to-D2C-mode](https://help.axcient.com/003-manage-d2c/1500000655082-x360Recover-Direct-to-Cloud-D2C-Convert-from-appliance-mode-to-D2C-mode)
Overview
- Watch a 4 minute video: [**Convert an existing appliance agent to Direct-to-Cloud (D2C)**](https://vimeo.com/961630658)
- [What happens during the switch from appliance to Direct-to-Cloud?](https://help.axcient.com/003-manage-d2c/1500000655082-x360Recover-Direct-to-Cloud-D2C-Convert-from-appliance-mode-to-D2C-mode#Item2)
- [A note about full backups in x360Recover](https://help.axcient.com/003-manage-d2c/1500000655082-x360Recover-Direct-to-Cloud-D2C-Convert-from-appliance-mode-to-D2C-mode#Item3)
- [Steps to convert an existing appliance agent to Direct-to-Cloud](https://help.axcient.com/003-manage-d2c/1500000655082-x360Recover-Direct-to-Cloud-D2C-Convert-from-appliance-mode-to-D2C-mode#Item4)
- [Billing considerations](https://help.axcient.com/003-manage-d2c/1500000655082-x360Recover-Direct-to-Cloud-D2C-Convert-from-appliance-mode-to-D2C-mode#Item5)
- [Wondering how to convert a Direct-to-Cloud endpoint back to appliance mode?](https://help.axcient.com/003-manage-d2c/how-to-convert-a-direct-to-cloud-endpoint-to-appliance-mode)
---
Why switch an agent from appliance mode to Direct-to-Cloud mode?
It is sometimes necessary or desirable to switch an existing protected system agent operating in the appliance mode to one operating in the Direct-to-Cloud mode. For example:
- You may have an aging, on-premise BDR appliance you would like to retire in order to convert a customer from appliance-based backups to Direct-to-Cloud backups. However, the existing backup history already replicated by the appliance to the Cloud vault must not be lost.
- You may have a customer who has experienced a sitewide disaster, with their server infrastructure virtualized in the Axcient cloud. To seamlessly continue backups while virtualized in the cloud, you might prefer to convert the agents on the protected systems to Direct-to-Cloud mode, and then attach them to the existing vault backup sets.
---
What happens during the switch from appliance to Direct-to-Cloud?
During the conversion from appliance mode to Direct-to-Cloud mode, data for the protected system may already exist from a previous appliance replication. The agent now assumes the vault instance and preserves the existing recovery point history.
**Important:** A full backup is required when converting an agent from appliance to Direct-to-Cloud (or vice versa.) In most cases, this full backup will be triggered automatically. If the full backup is not triggered automatically, then a full backup should be triggered manually. This is to ensure that critical recovery metadata is generated and fully synced between the server and the protected system.
**Note:** Although the agent will scan the full contents of the protected system disks during this backup, the data sent to the cloud will be deduplicated and only net-new and changed data will be sent to the vault over the internet. This backup is expected to take somewhat longer than a normal Incremental backup, but typically only by a few minutes.
---
A note about full backups in x360Recover
Unlike other backup products, x360Recover does not generate new recovery chains when performing subsequent full backups.
Instead, because of the chain-free nature of x360Recover, the additional full backup simply serves to fully synchronize the protected system with the backup server. Any data on the backup server which is not different from data on the protected system is discarded and does not cause duplication of storage consumption.
The agent sends hash data to both appliances and vaults. The hash data used by the agent to determine which blocks that have changed is stored. When a full backup is performed, the hash data from the backup server is downloaded to allow full deduplication of the data already present on the server.
When a new full backup is requested, the agent copy of the hash file is deleted and the server-side hash files are downloaded. This serves as the basis for deciding ‘what has changed’ between the last backup on the server and the current protected system.
Agent hash files are replicated to the vault along with the protected system snapshot data. When converting an endpoint from appliance-based backups to Direct-to-Cloud, the current hash data is already present on the vault.
---
Steps to convert an existing appliance agent to Direct-to-Cloud
**Important: Do NOT remove any endpoints or customer locations in the license portal** (as described in step 10) until you have completed steps 1 through 9 *first*. If the BDR appliance is no longer functional, skip steps 3 and 4.
**Important: Appliance-Based protected systems using 'Storage-Based' licensing have long-term retention policies (3-year or 10-year) that are NOT inherited when the protected system is converted to Direct-to-Cloud (D2C). Please review your retention policy after the conversion to ensure it meets your client's needs.**
To convert an existing appliance agent to Direct-to-Cloud, perform the following steps:
1\. Verify that no backup is currently running on the appliance.
2\. Uninstall the agent from the protected system.
**Important: Do NOT delete the agent installation directory or aristos.cfg file**.
3\. Verify that the appliance has completed replication of all snapshots. The date/time on the most recent snapshot on the appliance should match the most recent snapshot on the vault.
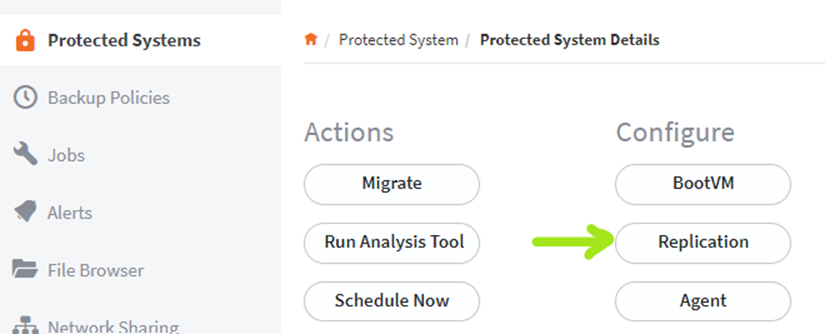
4.1. In the *Protected System Details* page for the system being converted, click the **Replication** button as shown below:
4.2. When the *Replication settings* window opens, click the **Delete** button as shown below: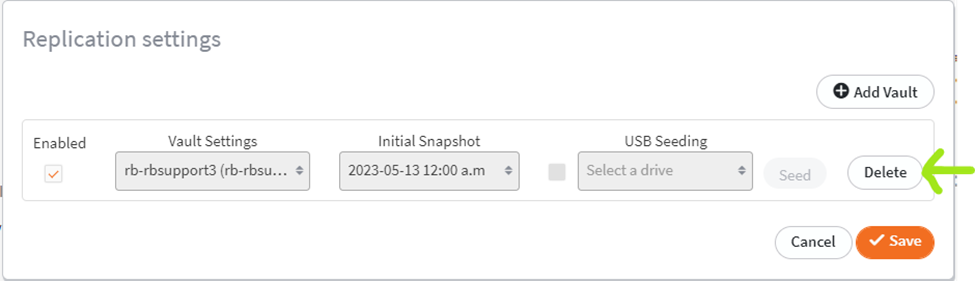
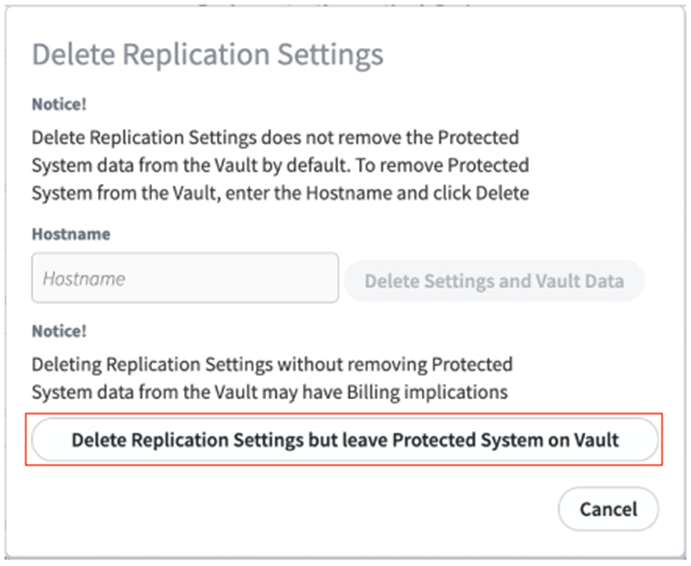
4.3 When the *Delete Replication Settings* window opens, click the button marked **Delete Replication Settings but leave Protected System on Vault**, as shown in the red box below:
**Important:** Do **NOT** enter the hostname in the *Hostname* field and Do **NOT** click on the *Delete Settings and Vault Data* button.
****
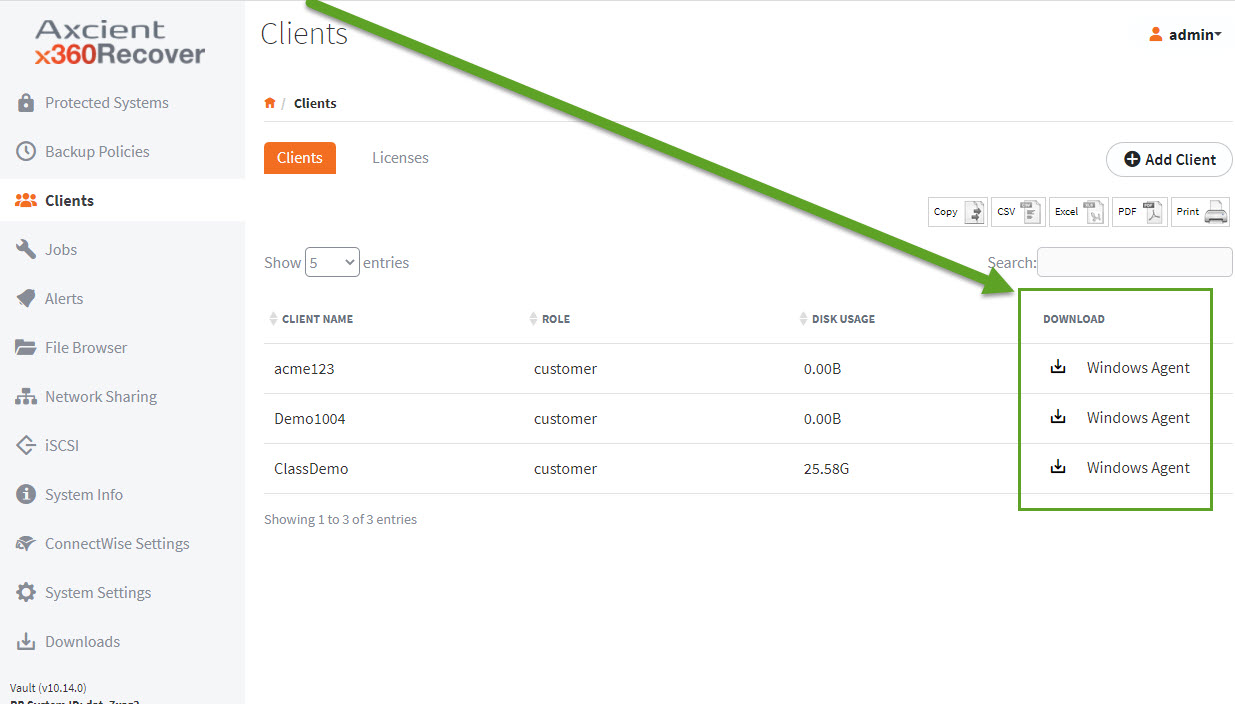
5\. Download the Direct-to-Cloud Windows agent via the vault user interface.
For Direct-to-Cloud, you can find the **Windows Agent** download link under the **Clients** tab in the vault:
6\. Install the Direct-to-Cloud agent on the protected system. Since the Replibit Folder and Aristos.cfg file still exist, the agent installer will not present the parameter configuration screen during installation with the server field grayed out and not available to be selected. For full details on installation, see the[ Direct-to-Cloud Quick Start Guide](https://help.axcient.com/002-install-direct-to-cloud/d2c-quick-start-guide?from_search=82236726).
**Important:** The Direct-to-Cloud agent installation file contains a specially formatted name, including an installation token that identifies which client the agent is being installed for. **Do not rename the agent installation file when downloading it from the vault.**
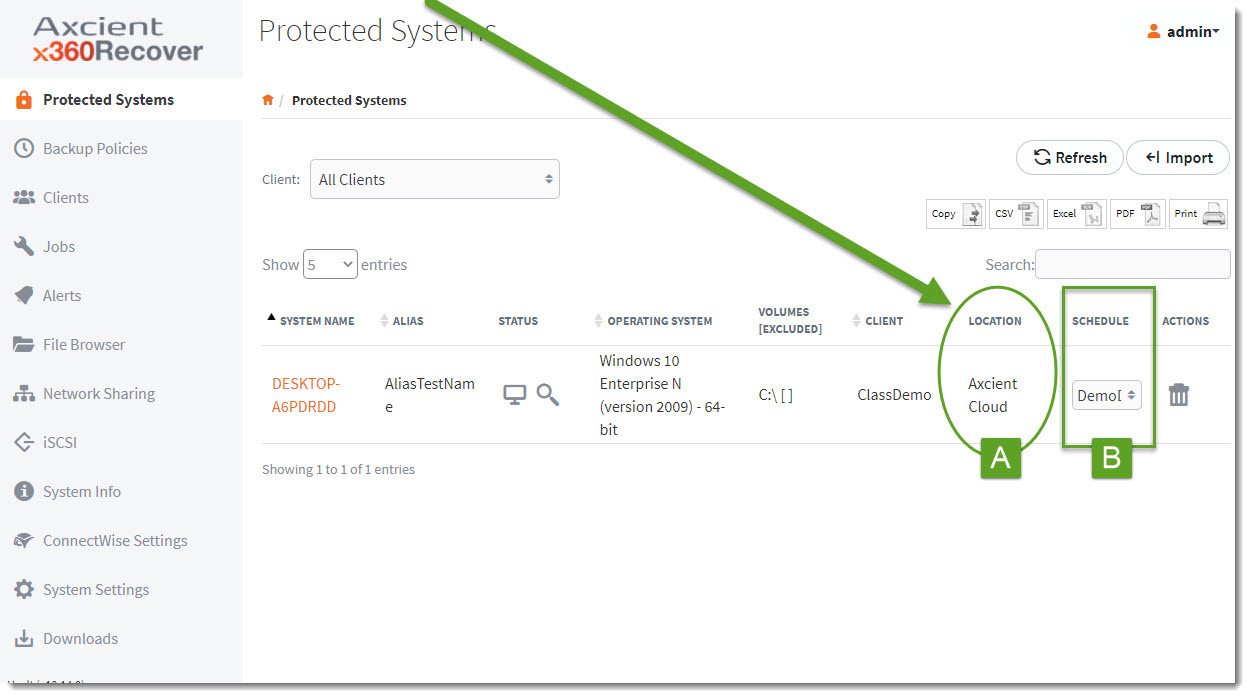
7\. Verify that the protected system is registered in the Axcient Cloud:
- Open the *Protected Systems* page on the vault and review the **Location** column.
1. If the protected system is on Direct-to-Cloud, it will indicate **Axcient Cloud** under *Location*
2. Additionally, after an end point has been converted to D2C, it will display a **Schedule** section:
8\. Verify that the next backup executed is a full backup. (If this is not the case, click **Schedule Now** and select *Full Backup from the Protected Systems Details* page.)
9\. Delete the protected system from the appliance.
10\. Reduce the endpoint licensing count for the customer location in the License Portal.
- **If you are decommissioning the appliance for this client:** Once the protected systems are longer showing in the Recover Manager for the appliance, you must then remove the license location in the license portal.
- **If the appliance is no longer accessible:** You must still (a) remove the endpoints on the license portal and then (b) put in a ticket with Support to have the license location removed for the appliance. (If the appliance has been assigned a storage license, you do not need to adjust the License Portal configuration.)
---
Billing considerations
**Important:** To avoid double-billing for this protected system, you must remove the protected system as described in steps 1 through 10 (above.)
If the appliance has been assigned a storage license, you do not need to adjust the License Portal configuration (as described in step 10 above). Your billing will reflect a new Direct-to-Cloud endpoint charge in the next billing cycle.
**Converting a protected system to Direct-to-Cloud mode automatically triggers billing for a new Direct-to-Cloud endpoint.**
For a full review of Direct-to-Cloud billing, please see [Direct-to-Cloud (D2C) Billing.](https://help.axcient.com/003-manage-d2c/360050734614-x360Recover-Direct-to-Cloud-D2C-Billing?from_search=80047751)
# Convert a Direct-to-Cloud endpoint to appliance mode
[https://help.axcient.com/003-manage-d2c/how-to-convert-a-direct-to-cloud-endpoint-to-appliance-mode](https://help.axcient.com/003-manage-d2c/how-to-convert-a-direct-to-cloud-endpoint-to-appliance-mode)
Steps to convert a Direct-to-Cloud endpoint to appliance mode
[**\[Watch a step by step video here:\]**](https://vimeo.com/957877340) (Seven minutes)
**STEP 1.** Deploy an appliance provisioned for the customer
**Need detailed instructions for installing and configuring an appliance?** Refer to [Appliance setup and first-time login](https://help.axcient.com/001-install-agents/appliance-setup-and-first-time-login-x360recover) for step-by-step help. Note: As you are using the instructions provided at [Appliance setup and first-time login](https://help.axcient.com/001-install-agents/appliance-setup-and-first-time-login-x360recover), you can disregard the final step called “Ready to deploy x360Recover Agents”, since your agent already exists on the protected system (and will be edited in step 3 below).
When deploying (or reinstalling) a new or existing appliance to a customer, you must add licenses for the endpoints that you want to convert from Direct-to-Cloud:
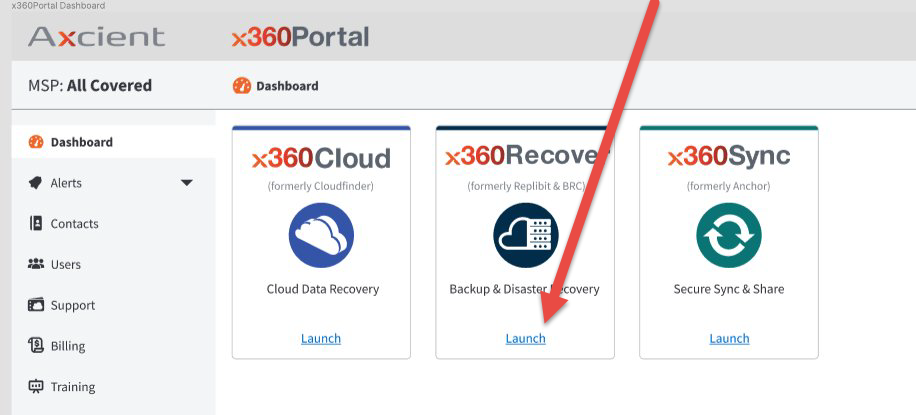
1.1. Sign-into [partner.axcient.com](https://help.axcient.com/003-manage-d2c/partner.axcient.com)
1.2. Click **Launch** on the x360Recover tile
1.3. When the Dashboard opens, click **Licenses** near the bottom of the left menu
1.4. Locate the new appliance
1.5. Hover over the new appliance and select the down arrow on the right side of the screen
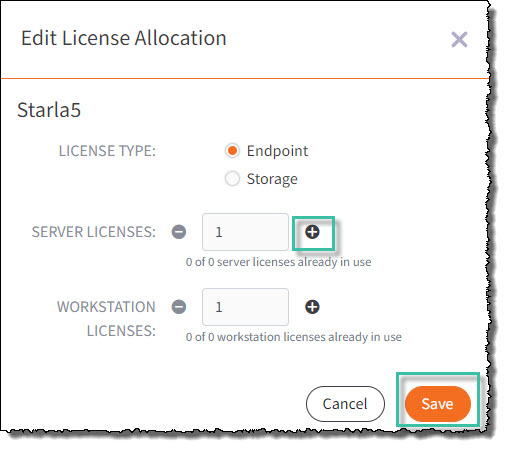
1.6. Select **Edit Licenses**
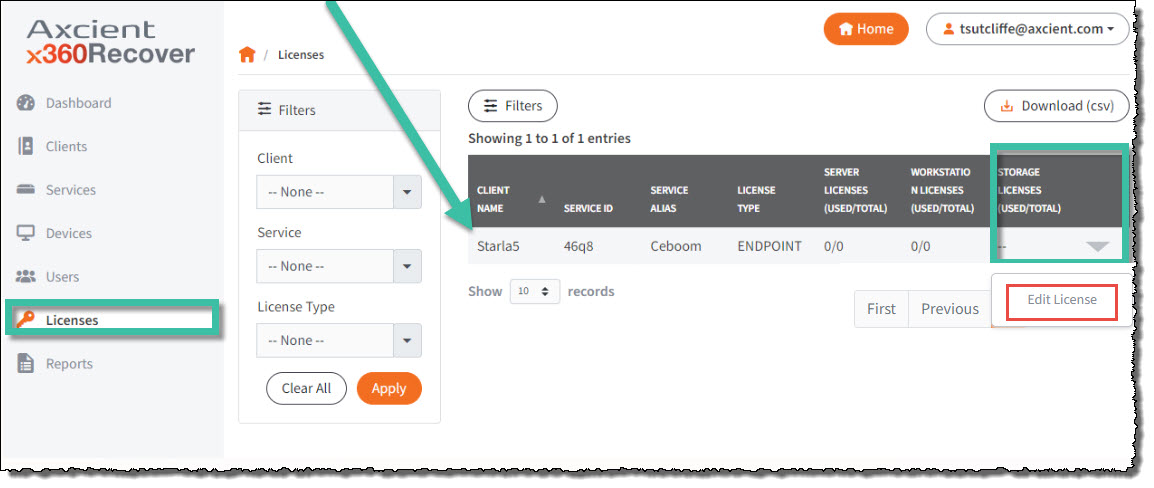
1.7. Click the plus sign to add additional server or workstation licenses
1.8. Click **Save**
---
STEP 2. Perform an incremental vault-to-appliance recovery
See [Incremental Vault Recovery](https://help.axcient.com/x30recover-faqs-appliance-errors-and-troubleshooting/2091183-incremental-vault-recovery-x360recover) for detailed instructions
---
STEP 3. Stop the agent service
3.1. After completing the vault recovery, open the vault.
Under the **Jobs** tab, verify that no Direct-to-Cloud backups are currently running for the desired endpoint.
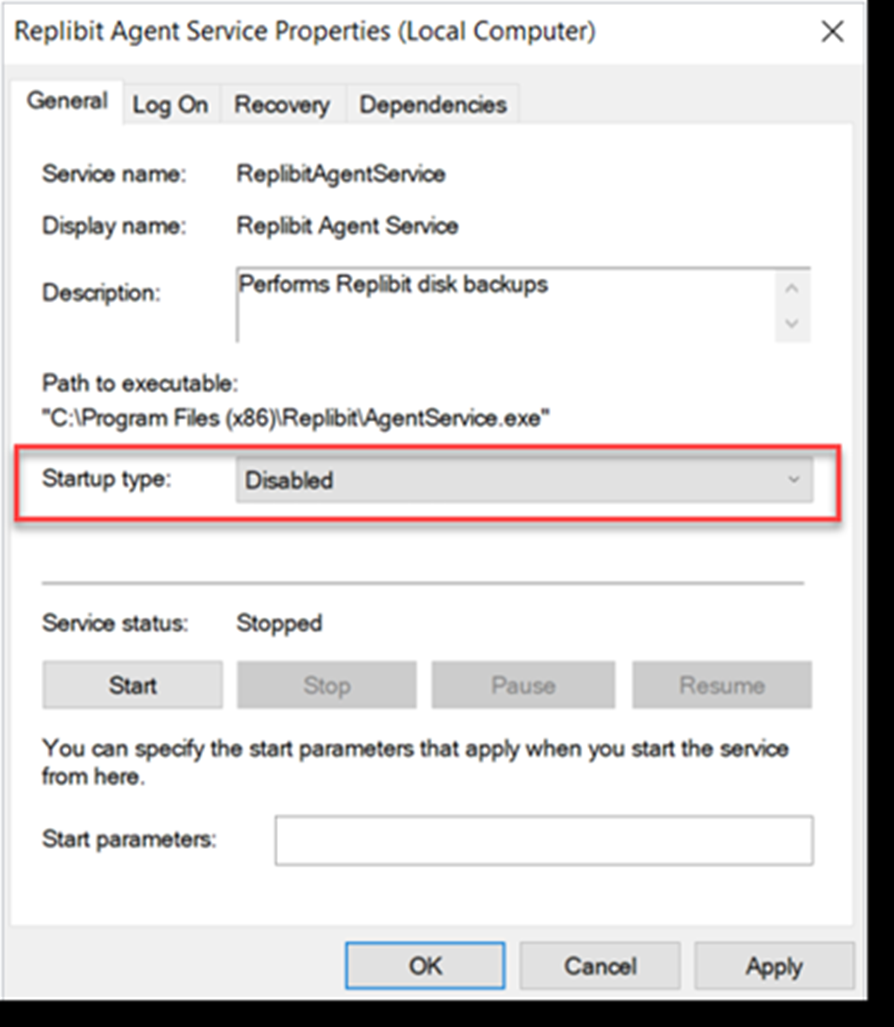
3.2. On the protected system, stop the **Replibit Agent Service** in Windows Task Manager and disable it:
3.3. Open notepad as administrator.
Open the **aristos.cfg** file in the Replibit directory **C:\\Program Files (x86)\\Replibit**
3.4. Save a copy of the file as **aristoscfgOld**
3.5. In the original aristos.cfg file, edit the field **SERVER=** by removing the vault URL and entering the IP address of the appliance.
3.6. Delete any settings related to local cache in aristos.cfg. (Local cache does not work with appliance-based backups.) Then, delete the **Permid.cfg** file.
3.7. Save and close notepad.
3.8 Enable/Start the agent services in Windows Task Manager.
---
STEP 4. Confirm that backup and replication are running
4.1. After converting a Direct-to-Cloud endpoint to appliance mode, the appliance will automatically select to run a **Full Backup** as the next backup job.
**Note:** This "Full Backup" is actually an incremental backup plus fresh metadata. (It is not the same size as a full base snapshot.)
Subsequent backups will be incremental, as usual.
4.2. Verify that backups are completed successfully.
4.3. Verify that new backups are replicated to the vault.
---
**Related article:**
If your appliance has failed entirely, or if the appliance storage pool has failed, you can recover protected systems from the vault to a **new** appliance. Full details are available at [How to recover a protected system from the vault to a **new** appliance.](https://help.axcient.com/5-recover-with-x360recover/115006584387-x360Recover-How-to-recover-a-protected-system-from-the-vault-to-a-new-appliance)
# Not Mounting Drives on Startup
When an Axcient server boots it first reaches out to the Axcient servers before it mounts the drive pool. If it cannot reach out, it will not mount the drives. The first thing to check is the DNS.
If this IP address section shows unavailable rather than the IP, then it is failing
[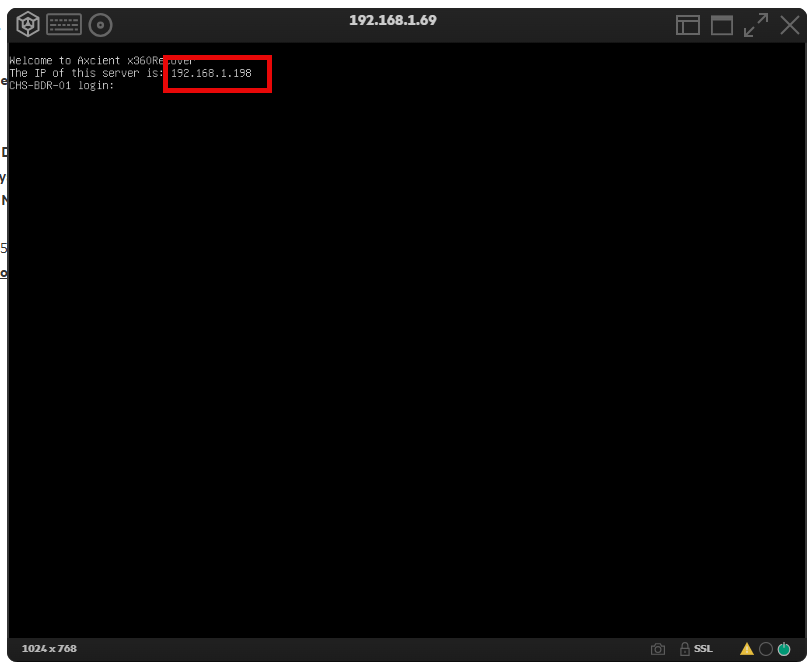](https://docs.coltscomputer.services/uploads/images/gallery/2025-03/pHbybH6s1DbNu3Vg-image.png)
Go into the console and change the DNS settings to Google public DNS using this article [Change network settings from console](https://docs.coltscomputer.services/books/axcient/page/change-network-settings-from-console "Change network settings from console")
# Reset the root password - x360Recover
[https://help.axcient.com/x360recover-faqs-passwords-and-networks/115013610527-x360Recover-How-to-reset-the-root-password](https://help.axcient.com/x360recover-faqs-passwords-and-networks/115013610527-x360Recover-How-to-reset-the-root-password)
1\. Reboot the system and wait for the Grub boot menu to appear. Press the **<Down>** and then **<Up>** cursor keys to interrupt the automatic boot countdown.
2\. Enter **E** on the top line.
3\. Scroll down to the line that starts with "linux /boot", go to the end of that line, and then add "init=/bin/bash" without the quotes
4\. Enter **F10** to boot.
5\. When you arrive at the command prompt, type
**mount -o remount,rw /**
**passwd root**
6\. Enter your new root password twice:
**mount -o remount,ro /**
7\. At this point, you can try 'reboot' or 'shutdown -r now' but if those fail, the power button is the only option.
After the system comes back, log in as root and:
**rm /var/lib/mongodb/mongod.lock
systemctl start asyncreboot**
8\. The system will reboot again and after that reboot, everything should start properly.