Addigy
- Allow System Extensions with Addigy MDM
- Connecting to a LiveDesktop Session from a Windows Device
- Creating Users on macOS Devices via GoLive
- How To Create User Accounts For All Devices In A Policy (OS Users)
- How To Get The Team ID, Bundle ID, and Code Requirement
- RocketCyber via MDM
- Renewing Apple Push Certificates
Allow System Extensions with Addigy MDM
https://support.addigy.com/hc/en-us/articles/4403549605267-Allow-System-Extensions-with-Addigy-MDM
What are System Extensions?
Addigy Mobile Device Management (MDM) capabilities offer functionality to allow System Extensions. As Kexts, also known as legacy system extensions, are being deprecated for newer macOS systems (Catalina and above) System Extensions allow software (network extensions and endpoint security) to extend functionality without requesting kernel-level access.
Prerequisites
In order to use this functionality, the device must be managed by Addigy MDM and have checked into the Addigy MDM Server properly. For help setting up Addigy MDM, see our article Addigy Mobile Device Management (MDM) Integration. Also, System Extensions payloads will fail to deploy unless the Addigy MDM Profile has been Approved on the device.
Configuring the System Extensions Policy
For building a System Extensions payload, first, let's navigate to Catalog > MDM Profiles > New. Then, in the selection window, search for System Extensions.
Load the appropriate Team ID or Identifiers for the corresponding software. To note, we recommend having each unique software separated into its own System Extension profile.
Obtaining System Extensions Identifiers
If you already have the Team ID or Identifiers, skip the next step and go to Deploying the Payload
If you still need to obtain this information, please follow our separate guide on How To Get The Team ID, Bundle ID, and Code Requirement.
Through the steps above you will be able to obtain the Identifiers as well as Code Requirement for the specified application.
Deploying the Payload
You can allow Allowed System Extensions, Allowed System Extensions Types, or Allowed Team Identifiers (Only fill out one of them).
Note: Whitelisting an app based on the Team ID alone will approve any Bundle Identifiers tied to that Team ID. For example, if an app has 6 Bundle IDs all tied to the Team ID "AADH234", I can whitelist just that and all 6 Bundle IDs will be allowed.
Once the identifiers are set, select Create Configuration to complete the process.
Additionally, if your software has multiple Bundle Identifiers, you can add multiple by using a comma (,) to separate them, see the example below:
com.bitdefender.FileProtect, com.bitdefender.SelfProtect, com.bitdefender.TMProtection, com.bitdefender.atc, com.bitdefender.mdredr, com.bitdefender.mdrnet, com.bitdefender.mdrfp, com.bitdefender.devmac, com.bitdefender.EndpointSecurityforMac, BDLDaemon
Connecting to a LiveDesktop Session from a Windows Device
To connect to a LiveDesktop session from a Windows device, you will need to download and use a third-party client which supports VNC.
For this example, and as a general recommendation, we will be using Remote Desktop Manager, a remote control client that supports Apple's Remote Management service beyond normal VNC specifications. You can download Remote Desktop Manager here: https://remotedesktopmanager.com/home/download. Devolutions, the company which produces Remote Desktop Manager, offers unlimited free usage of the app by creating a free account.
Of course, there are many other VNC clients that may work with LiveDesktop. Please feel free to use any client that you find works well for you.
Once you have installed Remote Desktop Manager, follow these steps to connect via LiveDesktop.
- Enable LiveDesktop on the Integrations page. More information can be found in our article Addigy LiveDesktop Overview.
- Click the LiveDesktop icon on the Devices page or within a GoLive session to start a new session.
- From the LiveDesktop session modal window, select the Start Session button.
- A VNC URL and VNC password will appear.
Note: Depending on the VNC client, the VNC password may not be needed. It is not needed for Remote Desktop Manager. - In Remote Desktop Manager, click the + in the top-left of the window, then select Add Session.
- Select Apple Remote Desktop (ARD) as the session type, then select OK.
- Copy the VNC URL from the Addigy console, paste it into the Host field in Remote Desktop Manager and select OK.
- Select Open Session.
- Enter a valid local username and password for the target macOS device and select Connect.
That's it! You're remotely connected to your macOS device via LiveDesktop.
Requesting Permission to Share the Desktop
Remote Desktop Manager also supports the ability to request access to the Desktop if a user is currently logged in.
Please note: Due to Apple's Screen Sharing functionality, when requesting permission using LiveDesktop, there is a mandatory timeout of 10 minutes. Apple's security measure will require this in intervals of 10 minutes with no activity in the session.
- Edit the Properties of the session.
- Under Settings, change the Authentication type to ARD ask control and the When viewing this computer... option to Ask other login to share display.
- Leave the username and password blank when using this method to connect. The user will instead be prompted to allow access.
Connecting with Other VNC Clients
If using a VNC client other than VNC Viewer, you may be presented with only a password field. This means that the VNC client only supports legacy VNC authentication. Please use the VNC password instead of a username and password to complete authentication to the device.
Deploying a Local Admin User for Authentication
It is possible to deploy an admin account for IT purposes across devices to which you will be connecting from a Windows device. For information on deploying admin user accounts to your macOS devices, check out the following articles:
How To Create User Accounts For All Devices In A Policy
How To Create A User Account On A macOS Device
Creating Users on macOS Devices via GoLive
User accounts can be created on individual macOS Devices using GoLive.
Note: These user accounts will not have a SecureToken initially; however, if a Bootstrap Token has been escrowed on the device, a SecureToken will be granted after the first login of the created user.
Creating a User Account
- Navigate to GoLive on the device where the account will be created.
- Select the Users tab.
- Select New User:
- In the window that opens, fill in the account credentials for the user:
Note: The username field should not contain spaces. - Select Save. A prompt will appear confirming that the command was sent:
The Users list will refresh and reflect the newly created account.
How To Create User Accounts For All Devices In A Policy (OS Users)
Addigy provides a simple way to create and manage a user account on a group of Macs in your organization. This can solve the problem of needing a consistent "IT Manager" account on each device for support purposes.
Note: These users will not have a Secure Token; however, if a device's Bootstrap Token is escrowed, the accounts will be granted a Secure Token upon first login. The Bootstrap Token should automatically escrow upon MDM enrollment.
Warning: It is highly recommended that you use a strong password when creating a user account, especially for administrator-level access.
1. To create the OS User, first Navigate to the Catalog Page, and click OS Users, and then click New:
2. From here the Create New User window will open and will have the following Components:
- Full Name - This will be the Display Name and can contain spaces
- Account Name - This name should not contain spaces as it will be the name of the /Users/$AccountName home directory
- Type - This will either be Standard or Admin
- Password - This will be the password that will be set for the user. This will need to follow any password requirements set on the device
How To Get The Team ID, Bundle ID, and Code Requirement
How To Get The Team ID, Bundle ID, and Code Requirement
Why do I need it?
The Team ID, Bundle ID, and/or Code Requirement are important pieces of information for creating PPPC, System Extention, or KEXT payloads. This allows you to whitelist certain applications (Bundle ID) or application developers (Team ID). Using this information you will find how to acquire this information to implement as you wish.
Finding the Team ID or Bundle ID
- Open the Terminal app on the Mac (Applications/Utilities/Terminal.app)
- In a new Terminal window, type codesign -dv [PATH OF APPLICATION] (In the example below we're using the Skitch app). Press Enter.
- For the Team ID, find the text starting with "TeamIdentifier=" (see image below)
- For the Bundle ID, find the text starting with "Identifier=" (see image below)
Be sure to only copy the text after the = sign. In this case, it would be com.google.Chrome and EQHXZ8M8AV
Finding the Code Requirement
- Open the Terminal app on the Mac (Applications/Utilities/Terminal.app)
- In a new window, type codesign -dr - [PATH OF APPLICATION] (the example below uses the Skitch app). Press Enter.
- Find the text starting with "designated =>" (this is the Code Requirement, highlighted in the image below)
Alternative Method (Requires macOS Ventura)
Use the following command:
sudo sfltool dumpbtm
It will output many items, so it would be best to implement a grep or perform a CMD + F search for the item you are looking for.
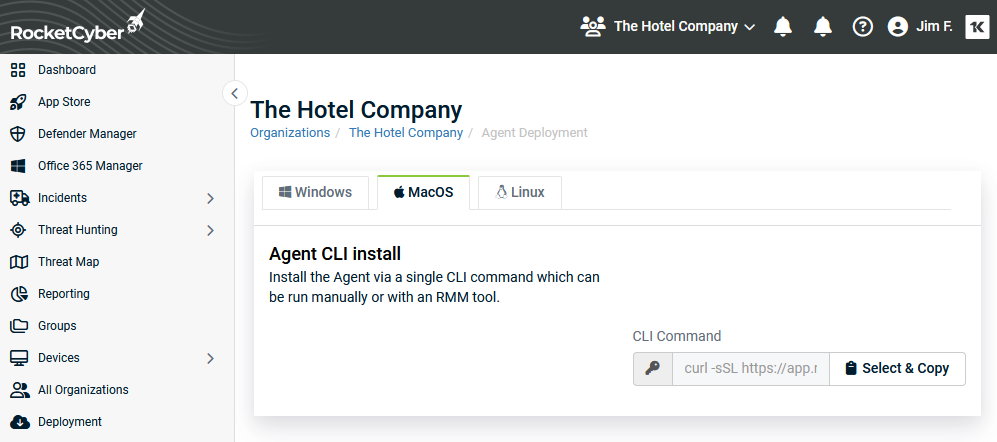
RocketCyber via MDM
To Install
Installing RocketCyber Agent for macOS
Requirements
Device must be running a supported version of macOS.Supported Operating Systems for RocketCyber Agent
Agent must be installed with sudo privileges, which the default install script provides.
Installation
- Navigate to the deployment view from within one of the organization accounts.

- Click on the macOS tab
- Click the Select & Copy button to copy the deployment script to the clipboard.
- From a terminal window on macOS paste the copied deployment script and press enter
The deployment script will download and install the required components to desired macOS device. It will prompt for administrator credentials as required for certain commands.
Once the agent deployment script has completed, return to the RocketCyber dashboard to view the device in the device list.
To uninstall
sudo /usr/local/rocketcyber/mac-agent-updater UNINSTALL "" "" ""
Renewing Apple Push Certificates
Renewing Apple Push Certificates
Apple Push Certificates expire after one year and need to be manually renewed. This article explains how to renew your certificate with Addigy.
If the Push Certificate has already expired, please see FAQ: My Push Certificate Expired.
Similar to when creating a new certificate, the renewal process requires you to log into Apple's Push Certificate portal. You must have access to the Apple ID that was used to create the cert initially.
How to renew your Apple Push Certificate with Addigy:
- First, navigate to Account > MDM Settings, find the certificate you'd like to renew, and make a note of the APN Topic.
- Open the actions dropdown for the certificate and select Renew to open the Renew Certificate window.
- The pop-up provides the CSR you'll need to renew the certificate (the same CSR that was used to create it). Download the AddigyCSR.plist and go to the Apple Push Certificate website (you'll have to log in with the same Apple ID that was used to create the cert originally)
- After logging in with the Apple ID, find which certificate you are renewing. To ensure the push certificates match, you can click on the blue
 button and reference the Subject DN (specifically, the string after "CN=APSP:"). This Subject DN should match the APN Topic shown in the Account > MDM Settings page. Follow this check for each certificate until you find a match. If there is no match, the Apple Push Certificate in Addigy was created under another Apple ID.
If you cannot access the Apple ID that managed the push certificate OR you do not know which Apple ID managed the cert, you can reach out to Apple for further assistance. For steps on what is needed for this process, please reference this great article from Rich Trouton @ DerFlounder.
- After finding a match, click the Renew button. From here, click Choose File and select the plist file downloaded from Step 3.
-
You will now be able to download the renewed certificate .pem file and upload it into Addigy via the Renew Certificate Window in Step 2.
If you see the error: "Error: There is a problem with the certificate’s topic (400)" returned when uploading, please review this article to see why.
- Finally, Save and then verify that the Updated date column of the certificate has changed.
Renaming Apple Push Certificate
In Account > MDM Settings > Click the three dots under Actions > Info.
The Info tab will show you all of the attributes of the Apple Push Certificate including the serial numbers, the topic, and the expiration date. It also allows for the certificate to be renamed by providing a Rename button next to the Push Certificate name.